Showing posts with label Chiffon pops. Show all posts

Friday, 3 July 2026

Sugar-Free Vanilla Chiffon Bees

 I made some chiffon cake bees and used one of them as a cake topper for a sugar-free gender reveal cake!


The bee means something special to the couple that's why it's included as part of the decoration. I made it sugar-free as requested by my friend but you can make it with white sugar.

BEE MAIN BODY
Egg yolk batter:
16g milk
12g oil
Pinch of salt
1/8 tsp vanilla
20g cake flour, sifted
1 egg yolk
1-2 drops yellow gel colouring (optional)

Meringue:
1 egg white (36-40g)
1/8 tsp cream of tartar 
15-20g sugar of choice*

WHITE WINGS & EYE HIGHLIGHTS
See my previous post for the pandan vanilla chiffon cake recipe that I used.

BLACK EYES
5g butter/oil
5g cake flour
5g icing sugar
5g egg whites
1/16 tsp charcoal powder/black cocoa powder

FEELERS
Angel hair pasta
Black batter for making the eyes

OTHERS
- Pink lustre dust for rosy cheeks
- Black edible marker for mouth & stripe outlines
- Bloomed & melted gelatin used as glue for the wings & eyes. I used a ratio of 1:6 for gelatin:water
- Charcoal powder + water as black paint. I didn't measure as I just added drinking safe water to charcoal powder until it was a good painting consistency. Allow the paint to dry on the chiffon sponge before direct handling to prevent accidental smudges

* I used a blend of sugar replacements & prebiotic soluble fibers instead of white sugar. Unable to disclose type & ratio at the moment.

See the reel for the process of making the bees and the method in the pinned comments of the reel:


with love,
Phay Shing
Read More »

Saturday, 20 January 2024

Year of the Dragon Lunar New Year Greeting

It's my annual tradition to create a new year greeting showcasing all the major genres of bakes I work with. Here's what I made welcoming The Year of the Dragon!


What's in this picture?
1. Chiffon cake mandarin oranges. This year marks 10 years since I made my first mandarin orange chiffon cake oranges back in January 2014!
2. Macaron teacups on saucers. One of my signature 3D macaron creations.
3. Choux pastry dragon suit head, horns, frills and paws. I couldn't think of how to incorporate choux and marshmallow in a coherent creation until I thought of the rabbit in dragon suit idea. Glad it worked out!
4. Marshmallow bunny face and ears, as well as dragon wings. I made a fully marshmallow version of the rabbit in dragon suit too!

Watch the video in this post to see the squish in the marshmallow parts!

https://www.instagram.com/p/C2WADcgSJVH/?igsh=MTEyczdsMzFsYXY3NQ==


with love,

Phay Shing

Read More »

Wednesday, 1 November 2023

Chiffon Cake Longevity Peaches (no artificial colouring added) on Pandan Kaya Cake

 I have been making longevity peach chiffon cakes for the past 9 years and this is the first time I decided to make it as naturally coloured as possible for my grandmother's 88th birthday. You may click on this link to see my past bakes that are longevity peach themed and made in various flavours like lychee rose and yuzu. Grandma likes to celebrate her birthday according to the lunar calender so the actual date we celebrate is not fixed each year. Because of this, I had to make the cake for her at a rather busy period so I kept things simple but yummy.

Here's this year's longevity peach cake for grandma!

The peaches sit on top of my signature pandan kaya cake!

Here's a better look at the peaches!


The peaches are almost naturally coloured, not 100% naturally coloured, because the bottled pandan paste I used for the leaves already has artificial green colouring added. In the past I had to use white colouring to make the peaches appear whiter instead of yellow, and used pink gel colouring to add on the pink. This time round I used a chiffon cake recipe adapted from Mimi that doesn't use any egg yolks to omit the use of artificial white colouring, and I used diluted fresh dragonfruit puree to colour the peaches pink naturally. The peaches were made a week in advance and frozen due to my busy schedule, but they still appeared and tasted as good as new!

You may refer to this post for my reduced sugar pandan kaya cake that is still tasty and refreshing at the same time. I increased the amount of sugar/gula melaka by about 20% for both the chiffon sponge and pudding to suit the tastebuds of my grandma and the whole clan of the extended family since this request was not a "siew-siew-siew-siew dai" (less-less-less-less sweet in colloquial Singapore) order 😆, but is still less sweet than commercially sold cakes in general. My cousin commented that it tastes better than Bengawan Solo's signature pandan kaya cake!

Chiffon cake longevity peaches (makes about 12-15 mini peaches):

Egg yolk batter
35g cake flour
Pinches of salt
10g caster sugar
15g vegetable oil (I used canola)
40g milk
1/4 tsp vanilla extract
1/8 tsp cocoa powder
1/4 tsp pandan paste

Meringue*
2 large egg whites (about 38-40g each egg white)
30g caster sugar
1/4 tsp cream of tartar

Decoration
Pink dragonfruit puree, sieved & diluted with water 
Water or simple syrup** 
Cake glue or melted marshmallow

* I split ingredients in half as the leaves & peach body have different baking time & temperature profiles

** Make simple syrup by dissolving sugar in hot water in 1:2 ratio. Using syrup instead of water helps to keep the sponge moist longer during storage

Steps:
1. Line a baking tray (or 2) with teflon sheet or parchment paper. Size of tray doesn't matter as we just need to spread the batter as thin a layer as possible for the leaves. Lightly grease heart shaped silicone molds with a little oil. You may use egg shells if you don't have the heart molds, and carve out the shape after baking. Wash and air dry eggshells thoroughly if using them. Preheat oven to 125C with fan on.

2. Make egg yolk batter. I know the name seems somewhat inappropriate because there is no egg yolk used but this is the same portion that is in all chiffon cake recipes where the yolk normally goes. In a mixing bowl, use an electric mixer to mix oil, milk, vanilla, salt and sugar together. Sift in flour and whisk until well combined. Divide into 2 equal portions. Add sifted cocoa powder and pandan paste to one portion, cover with cling wrap and set it aside. Cocoa powder is added to deepen the green colour and make it appear less neon bright.

3. Make one portion of meringue with one egg white portion of ingredients. In a clean metal bowl, beat egg white with cream of tartar until firm peaks, gradually adding sugar once the egg whites are foamy. Take your time to build up a stable, tight and glossy meringue at medium speed. Going high speed all the way creates large air bubbles and the meringue is not as stable.

4. Quickly but gently fold the meringue into the white egg yolk batter in 3 additions. Transfer into piping bag. Fill the mold until full.

5. Bake for 25-35 min. Increase temperature to 150-160C and bake for another 5 min. Cool completely before unmolding. Note that the baking profile is just a guideline and is dependent on mold size and oven so adjust accordingly.

6. Preheat oven to 170C with the fan on. 

7. Prepare another batch of meringue. Fold meringue into green egg yolk batter. Pour into lined baking tray and spread as thin a layer as possible.

8. Bake for 30 seconds. Turn off the oven fan and continue baking for 8-9 min or until done. Keep an eye on it as it can go from done to brown within a minute or less. Immediately flip onto fresh parchment paper and cool completely before cutting out the leaves with cookie cutter. You may use scissors/knife and a homemade template if you don't have an appropriate cutter.

9. Use scissors to trim off browned parts of the peach body. You may also use scissors or a small fruit knife to carve the shape if you used egg shells to bake.  Use the back of the knife to make an imprint in the middle of the peach.

10. Brush the tip of the peach with diluted dragonfruit puree. I didn't measure the dilution ratio as the exact measurement is not important. I go by the colour I get visually. You can always apply another coat if the colour is too faint, or add a little more puree to your paint. Don't use undiluted puree as the colour is too dark. Use some water to blend the pink colour towards the white parts of the peach. In the past I used a toothbrush spray to create the ombre pink effect but this method is much cleaner!

11. Glue the leaves onto the peach body using cake glue or melted marshmallow. Store in airtight condition in the fridge or freezer until ready to consume.

Here's the reel of the process of making the peaches!

https://www.instagram.com/reel/CzJF8h9y0VV/?igshid=MzRlODBiNWFlZA==

I had leftover pandan sponge and pudding so I assembled a few pandan kaya cupcakes. 

Looking cute!


I think I am going to stick with this method of making chiffon cake longevity peaches from now on with the exception of substituting the milk with some other liquids for flavour variation. I hope this post is helpful for those of you who want to create healthier versions of longevity peaches for your loved ones that minimizes artificial food colouring. You may use matcha powder for the leaves to make it fully naturally coloured but I wanted the peaches to match the flavour profile of the cake below. Maybe I shall try that next time! 


Update: I did an Instagram poll and majority are in favour of a longer, more detailed video tutorial so I made a youtube video version of it and you may see it here:

https://youtu.be/-qU4WdBn6DQ?si=6iTMFX7E4kkrj-wv


with lots of love,

Phay Shing

Read More »

Tuesday, 21 March 2023

Eeyore Sugar-Free Ube Coconut Chiffon Dome Cakes

 I am almost done with draft 1 of Deco Marshmallows! But before I complete writing the last two recipes and create the respective templates for them, I decided to take a short break to satisfy my curiosity as well as test out the ube paste that I am going to use in one of the marshmallow entries. Having had success with the sugar-free chocolate Rilakkuma swiss roll, I am curious to know if it works for decorative chiffon cake characters as well. Here's the result of my experiment!


This is actually my second attempt. The first attempt was considered a fail for me although taste and texture wise was great. Why so?

I use Allulose and Alchemy fibre as my sugar replacements for sugar-free chiffon cakes. I explained my choice of sugar-replacements in my previous post and you can read about it. 

While this combination of sugar replacements produce chiffon cakes that have texture like the real deal, Allulose browns at a much lower temperature than sugar. If you are baking strong colours, earthy, brown or black colours, the browning of Allulose would not be as obvious. But browning will show up more obviously for pastels and tricky colours like blue and purple. This makes baking "naked chiffons" or character chiffons trickier if you don't want the cakes to appear brown at all.

Using coconut milk like I did for this bake doesn't help either as the cake tends to brown more easily than if water is used but I prefer not to compromise the taste for looks. I used steam baking and lower temperature to help to mitigate the browning.

Video of the process is on my Instagram:

https://www.instagram.com/reel/CqEyn-EgGdl/?igshid=YmMyMTA2M2Y=

Sugar free ube coconut Eeyore dome cakes (makes one 7x7" sheet cake + 4 domes baked in glass bowls*)

Egg yolk batter
2 egg yolks
5g Allulose
30g oil of choice 
30g coconut milk
1.5 tsp ube paste/extract**
45g cake flour
Pinches of salt
white gel coloring (as needed or optional)**
1 drop of purple gel coloring (optional)**
2-3 drops strawberry paste**
1 small toothpick dip of peach gel colouring**

Meringue
3 egg whites
22g Alchemy fibre
53g Allulose
1/4 tsp Cream of tartar/lemon juice

* I used glass bowls that are about 9cm in diameter at the top and 6.5cm in height. You may use any metal or silicone molds about the same size as well but do note that any markings using edible marker should match the colour of the batter or pipe by freehand.

** Use 2 tsp ube paste and omit all extra colouring and flavouring if you are making plain ube coconut cake without Eeyore design. Bake in 6" chiffon tin or in 10x12" tray for Swiss roll.

Steps:
1. Preheat oven to 150C with tray of water at base of oven. Line 7x7" tray with Teflon sheet or parchment paper. Trace out the snout on outer side of glass bowls with edible marker.

2. Make the egg yolk batter. Whisk egg yolks, salt and Allulose until pale and thick. Add oil and whisk until combined. Add coconut milk and whisk until combined. Gradually sift in cake flour and whisk until no trace of flour is seen. Add a little white gel colouring if you wish to make the batter base less yellow. 

3. Portion out 2 tsp of batter and add strawberry paste to colour it pink. Portion 2 tsp of batter and colour it peach coloured. Add ube paste to the remaining batter. Add purple gel colouring if desired.

4. Make the meringue. Whisk together Allulose and Alchemy fibre in a small bowl. In a clean metal bowl, beat egg whites with cream of tartar until firm (almost stiff) peaks, adding sugar-replacement mix gradually once egg whites are foamy.

5. Fold in 4 tbs of meringue into the each of the pink and peach batters. Fold in the rest of the meringue into purple ube batter. Fold in the meringue in two or three additions. Transfer purple and peach batter into piping bags with hole cut.

6. Pipe purple batter into glass bowls until it reaches the line marked by edible marker for the snout. Pipe the snout with peach batter. Fill up the whole glass bowl with more purple batter, leaving about 1cm unfilled. 

7. Pour the pink batter into the 7x7" tray and spread it to fill half (one side) of it. Fill the other half with purple batter.

8. Place all cakes into the oven. Reduce temperature to 140C. Bake for 10 minutes or until the sheet cake is baked through. Remove from oven and immediately flip it out onto a fresh sheet of parchment paper. Continue baking the dome cakes at 130C for another 15 minutes. Reduce temperature to 110C and bake for another 10 minutes or until skewer comes out clean. Please adjust baking temperature and time according to your oven. All temperatures mentioned in this post is as read by the oven thermometer.

9. Let the dome cakes cool completely before carefully unmolding by hand. Be gentle as chiffons are delicate! 

Extra details like the hair and eyes
10g butter
10g egg whites
10g cake flour
10g powdered erythritol (replace with icing sugar if you don't have. Although it won't be 100% sugar-free, this is negligible)
1g charcoal powder
1g cocoa powder (may replace with charcoal)

Steps:
1. Preheat oven to 150C and line a small tray with teflon sheet or parchment paper.

2. Whisk everything together until smooth. Transfer into a small piping bag with a small hole cut.

3. Pipe a blob with spikes for Eeyore's hair. I did this by freehand. Pipe a patch of batter about 6x6cm in area for the eyes. Batter doesn't have to be too thick. About 2mm thick will do.

4. Bake for 7-8 min or until it appears dry. 

5. Cool completely before carefully removing the hair and use a Wilton #12 tip to cut out the eyes.

Assembly
1. Use a knife to press a line down the front of Eeyore's face.

2. Use a tear drop shape cookie cutter to cut out the ears from the sheet cake. I made one out of metal can. Press the pink and purple cutouts together for each ear.

3. Melt some sugar-free chocolate (I used 100% cocoa with no sugar added from Pascha) and colour it black with charcoal powder or oil based black colouring, or use black chocolate chips. Paint on the nostrils, stitches and eyebrows with melted chocolate.

4. Glue on the hair and eyes with melted chocolate. 


I had to stop work here as it was night time and had other household things to deal with but took the chance to take a photo of the works-in-progress look.

5. Glue on the ears with melted marshmallows or cake glue. Use short pieces of wooden skewer to help to secure it in place if necessary but warn your recipients! 

As with all sugar-free bakes made with sugar replacements, eat in moderation as some people have digestive systems that are sensitive to them.


with love,

Phay Shing


Read More »

Friday, 6 January 2023

Rabbit Family Chiffon Cakes


My Little Rabbit Family hopping into the New Year and the Year of the Rabbit! Sincerely wish my dear friends here the best in 2023!❤️❤️ 

Some assembly scenes here.

With lots of love,

Susanne 


Read More »

Tuesday, 22 November 2022

Egg Chiffon Cakes Tutorial


Eggshell Chiffon Cake Baking Tutorial!🥰 

Watch the tutorial here

I often get questions on these cute chiffon cake egg characters, so I thought to share some tips: 

- Drain the egg contents by making a small hole on the tip of the egg. 
- Fill to 2/3 of the height is enough. 

Egg chiffon cakes are super bouncy because of their high surface to volume ratio☺️ Hope you liked it! =)❤️ 

With love, 

Susanne


Read More »

Tuesday, 25 October 2022

Candy Corn and Pumpkins Chiffon Cake Pops


*Recipe* The happiest Candy Corn and Pumpkin Chiffon Cake Pops!🥰 

Flavored with LorAnn Oils Pumpkin Spice Bakery Emulsion, these treats are bursting with bold pumpkin flavor and the sweet spices of fall!💕✨️ 

Recipe (Recipe video reel here
3 egg yolks 
15g castor sugar (4 tsp) 
30g oil (2 tbsp) 
50g milk (3 ¼ tbsp) 
1.5 tsp LorAnn Oils Pumpkin Spice Bakery Emulsion, product of the USA 
57g cake flour, sifted (1/2 cup) 
LorAnn Oils Liquid Gel Food Coloring 

3 egg whites 
60g castor sugar (0.3 cup) 
1/4 tsp cream of tartar 

Steps  on Lorann Oils website =) 

Hope these bring a smile to your faces!❤️🥰 

With love,
Susanne

Read More »

Tuesday, 31 May 2022

'Basket of strawberries' Lychee Rose Strawberry Chiffon Cake

 This was what I made for my mum's birthday this year! Chiffon cake strawberries in biscuit basket, on top of a lychee rose strawberry chiffon cake!


There's more to it than meets the eye. Each strawberry in the biscuit basket has cream and strawberry jelly inside. The cake below is made from lychee rose chiffon sponge and filled with lychee rose diplomat cream, lychee jelly, strawberry compote and chopped canned lychees. The sweet pink buffalo check mat is made from chiffon too!

This will be a super long blog post as this bake has so many components. I will break it down into two main parts: 1. Chiffon strawberries in biscuit basket and 2. Lychee rose strawberry chiffon cake.

1. CHIFFON STRAWBERRIES IN BISCUIT BASKET
Recipe and steps for this part includes biscuit basket, strawberry jelly and chiffon strawberries.


Biscuit Basket


Ingredients:
140g plain flour or cake flour
1/2 tsp baking powder
30g icing sugar (I used sugar-free option but can use regular ones)
1/8 tsp salt
1 tbs milk powder (optional, added to boost milky flavour)
3/8 tsp cocoa powder (optional, for colour)
48g vegetable shortening or unsalted butter
50g milk ( May not use all)
1/2 tsp vanilla extract

Steps:
1. Sift together all dry ingredients. 

2. Rub in butter/ shortening until breadcrumb-like.

3. Mix vanilla into milk. Add milk a little at a time until cohesive dough forms.

4. Cling wrap and rest the dough overnight or at least 2hours at room temperature. This is to make the dough smoother and more pliable.

5. Roll dough, cut into thin strips and weave the basket.

6. Bake at 165C until lightly golden brown and cool completely. Remember to bake till really dry. If it is still a little soft, the basket may not hold its shape unless you do a tight weave. I prefer a looser weave revealing a little of the goodies that are inside. 

7. Assemble by gluing parts together with stiff royal icing. Dry completely before storing in airtight container. 

Please click on this link for the Youtube video tutorial of making the basket.

Strawberry Jelly


Ingredients:
70g strawberry compote*
70g water
2g agar powder
1/4 tsp strawberry emulco

*Strawberry compote
220g strawberries
15-30g sugar of choice (may use regular caster sugar or diabetic friendly options like erythritol, adjust amount according to taste and tartness of fruit.)
Pinches of salt

Note: Excess strawberry compote is reserved for assembling the lychee rose strawberry cake.

Steps:
1. Prepare strawberry compote by boiling all the ingredients with low heat in a saucepan until the fruit content is reduced to 60-70% of original weight. Mash the strawberries as it cooks with a potato masher or spatula. Sieve the compote if you prefer smoother compote. Cool completely before storing or using.

2. Make the jelly. Place all ingredients except agar in a small saucepan. Scatter agar powder on the surface of the mixture and let it bloom for a few minutes. 

3. Prepare moulds for setting the jelly. I used paper cones as my moulds but you may use other moulds if you wish. Bring mixture to a roiling boil while whisking continuously. Continue boiling for one minute more while whisking continuously. Add about 1/2-1 tsp of jelly mixture into each mould and let it cool slightly before refrigerating for at least 30 minutes. Unmould and store in fridge in airtight container until ready to assemble the strawberries.

Chiffon cake strawberries


Ingredients:
Egg yolk batter
2 egg yolks
25g vegetable oil
25g water
(1 tsp strawberry emulco + 1/4 tsp vanilla extract for strawberries)
OR
(1/2 tsp pandan paste + 1/2 tsp vanilla extract for leaves)
(40g cake flour +1/8 tsp cocoa powder for strawberries)
OR
(38g cake flour for leaves)
Pinch of salt
Any other gel colouring to get desired shade of red/green

Meringue
2 egg whites
32g caster sugar 
1/8-1/4 tsp cream of tartar

Steps:
1. line 10x12" tray with parchment or teflon sheet. Prep about 25-28 paper cones in suitable holders (you may use aluminium foil covered loaf pans with holes in the foil to make a stand for the cones). Preheat oven to 150C for red cones and 175C for green sheet cake.

2. Prep egg yolk batter. Whisk egg yolks until thick and pale. Add oil and whisk until combined. Add water and respective flavourings and whisk together. Gradually sift in respective flour and whisk until well combined. adjust colour if necessary.

3. Prep meringue. In a clean metal bowl, beat egg whites with cream of tartar until firm peaks or just reach stiff peaks, gradually adding in sugar once the egg whites are foamy.

4. Gently fold the meringue into egg yolk batter in 3 additions.

5. Pour/pipe batter into respective tray/cones. Spread the batter really thin for the leaves. You may not use up all the batter for that. Fill cones till about half full.

Paper cones filled with red batter

6. Bake green sheet cake for 9-10min. Bake red cones for 25-30 min. I reduced the temperature for the cones to 140C after first two minutes of baking. Note that temperature and time is oven dependent so adjust accordingly.

Assemble the strawberries as shown in this Youtube video (you may also watch the shortened version in my Instagram reel). You will need light corn syrup/cake glue/ melted marshmallows as glue. The cream I used is just store bought non-dairy whipping cream with a little more vanilla extract added. You may use dairy whipping cream that is stabilized but this entire bake is already so involved I felt like simplifying this part 😂. I whipped up about 40g of whipping cream for assembling the strawberries. Store assembled strawberries in the fridge in airtight container for at most a week. This is non-dairy if you use non-dairy cream so a week storage isn't an issue but it may dry out with longer storage.

Here's another view of the basket of "strawberries"! I love the cut view as well! The mat under the basket is actually homemade marzipan. I just used the marzipan for photography so not sharing the recipe.


2. LYCHEE ROSE STRAWBERRY CHIFFON CAKE

This part consists of a chiffon cake placemat with pink buffalo check pattern, lychee rose chiffon cake sponge, lychee rose diplomat cream, lychee jelly made from canned lychee syrup, fresh Korean strawberries, canned lychees and strawberry compote.

Lychee rose chiffon cake

Ingredients (makes one 17cm chiffon cake and one 7x7" chiffon sheet cake):
Egg yolk batter
6 egg yolks
75g canned lychee puree, sieved
75g vegetable oil
6g rose syrup (you may use rose water but I find rose syrup that is used to make Bandung has less tendency to taste chemical)
1/8 tsp salt
1 tsp vanilla extract
130g cake flour

Meringue
6 egg whites
1/4 tsp cream of tartar
90g caster sugar (I replaced half with erythritol)

Steps:
1. Preheat oven to 150C. Place a tray of water at base of oven if you wish to create steam. Line 7x7" tray with teflon sheet or parchment paper. Set oven rack to second lower position.

2. Make egg yolk batter. Whisk egg yolks until thick and pale. Add oil and whisk until combined. Add lychee puree, rose syrup, salt and vanilla and whisk together. Gradually sift in flour and whisk until well combined. 

3. Prep meringue. In a clean metal bowl, beat egg whites with cream of tartar until firm peaks or just reach stiff peaks, gradually adding in sugar once the egg whites are foamy.

4. Gently fold the meringue into egg yolk batter in 3 additions.

5. Fill 7x7" pan till about one inch thick with batter. Pour the rest into 17cm chiffon tin. Run a chopstick in the batter to pop any trapped air bubbles. Place both into the oven

6. Bake for 20 minutes. Remove the 7" tray and immediately flip the cake onto a fresh sheet of parchment paper. Continue baking the 17cm cake for another 40min at 130C (as read by oven thermometer) or until skewer comes out clean. Invert the chiffon cake immediately and cool completely before unmoulding by hand. Note that baking temperature and time will vary between different ovens so adjust accordingly. Store the cakes in airtight condition until ready to assemble.

Lychee jelly
Ingredients:
50g chilled lychee syrup from the can
12g gelatin powder or 6 gelatin sheets
100g lychee syrup from the can at room temperature

Steps:
1. Place chilled lychee syrup in a microwaveable bowl. Scatter gelatin powder or place gelatin sheets in it to bloom for 10 minutes. 

2. Microwave on low power for 20 seconds and stir. Repeat if necessary until melted fully. You may use double boiling method to melt the gelatin if you wish.

3. Add the rest of the lychee syrup. Whisk until well combined. Chill in fridge until set, at least one hour.

4. Cut the jelly into small cubes and store in the fridge until ready to assemble.

Lychee rose diplomat cream
Ingredients:
150g lychee puree from canned lychees, sieved
50g milk
20g cornflour
2 egg yolks
6g rose syrup
Pinches of salt
15g unsalted butter, softened (you can take it out from the fridge once you start work and it will soften)
80-120g whipping cream of choice (I used non-dairy for convenience which is already stabilized and sweetened. You may use dairy cream or a combination of both. If using dairy cream only, please stabilize it with gelatin or other means and add sugar to taste. Use less whipping cream for a richer cream and stronger lychee flavour.)

Note if you are opting to use less whipping cream, especially if you are using dairy cream, you may have to upsize the recipe to 3 egg yolks worth to ensure there is sufficient cream for cake assembly.

Steps:
1. Whisk together egg yolks, salt and cornflour in a heavy mixing bowl or heavy glass jug.

2. In a saucepan, heat milk, lychee puree and rose syrup until steaming hot, not boiling. Remove from heat and slowly pour in a thin stream into the egg yolk mixture while whisking the yolk mixture continuously. Pour everything back into saucepan and cook over medium low heat while whisking continuously. 

3. Keep whisking and cooking until custard starts to thicken. Remove from heat and whisk until smooth. Return back to heat and cook and whisk until custard is firm enough to hold a soft peak.

4. Remove from heat and add butter. Whisk until well combined. Transfer to a mixing bowl and press cling wrap on the surface immediately. Cool to room temperature before refrigerating for at least an hour. You may prepare this pastry cream a day in advance if you wish.

5. Remove pastry cream from fridge and loosen it with spatula. Whip up whipping cream and fold into pastry cream to make diplomat cream. Transfer into a large piping bag with a hole cut for cake assembly.

Cake assembly
-17cm chiffon cake cut horizontally into three pieces
-7x7" chiffon cake to cut out three circles to cover hole in middle of chiffon cake
-Strawberry compote (from previous section)
-Canned lychee syrup
-Lychee rose diplomat cream in large piping bag
-Korean strawberries cut to size and dried on paper towels
-Canned lychees cut to small pieces, remove woody parts
- 9" cakeboard
- guitar sheet or acetate sheet

Steps:
1. Pipe a little diplomat cream on cakeboard and place chiffon cake on it. Cover the hole with circle piece of cake cutout. 

2. Wrap acetate sheet around cake and secure with tape. Brush cake surface with lychee syrup. Carefully spoon some strawberry compote in the middle of the cake, leaving about 1inch border uncovered. Pipe a ring of diplomat cream around the strawberry compote and carefully thin it out all the way to the edge using a metal teaspoon. (see first picture in collage below)

3. Add strawberries around the circumference, taking care to press the fruit against the acetate sheet. (second picture in collage)

4. Pipe some diplomat cream in the middle. Add lychee jelly and chopped lychees in the middle. (third picture in collage)

5. Carefully pipe diplomat cream around the strawberries to fill the gaps, and over the jelly and lychees. Use the back of a spoon to smooth out the cream (fourth picture in collage).

6. Place another slice of sponge over the cream and cover the hole with a cut piece of sponge. Repeat above steps until the last piece of sponge is placed on top. Brush the tops of the top sponge with some lychee syrup. Cover with cling wrap and refrigerate overnight or at least two hours until ready to assemble. I inserted jumbo straws into the middle of the cake as dowels to support the heavy basket of strawberries but you may omit if not needed.

Buffalo check patterned chiffon cake mat
Ingredients:
Egg yolk batter
2 egg yolks
20g oil
30g milk
45g cake flour
white gel colouring
strawberry emulco

Meringue
2 egg whites
1/4-1/2 tsp cream of tartar
40g caster sugar (I replaced half with erythritol)

Note that there will be excess batter. I just piped it out to make another sheet cake for mini swiss roll.

Steps:
1. Prepare 10 x 12" tray with buffalo check pattern template (I made my own according to size of squares I wanted) and teflon sheet (preferable)/ parchment paper (ok in a pinch but may result in wrinkled looking pattern). Preheat oven to 180C, set oven rack to middle position.

2. Prepare egg yolk batter as mentioned above (not gonna repeat myself 😂) but add some white gel colouring in. Divide yolk batter into 1:1:2 ratio for white:dark pink: light pink. But if you want things simpler for yourself since there is excess batter anyway, just divide into three equal portions, about 40g each. Add strawberry emulco until desired shade of pink is reached for light pink and dark pink.

3. Prepare meringue and divide into three equal portions or 1:1:2 ratio for white: dark pink : light pink. Fold into respective egg yolk batter. Transfer into piping bags with a small hole cut, about 2-3mm. I must stress the importance of a properly made meringue. If it is unstable, it will break down fast. I use a little more cream of tartar and sugar in the meringue than for my regular chiffons for the reason of stabilizing it a bit more.

4. Pipe the pattern following the template. Pipe as thick as possible while retaining the shape, at least 4-5mm thick

5. Place tray in oven, lower temperature to 170C and bake for 9 min or until you think it is done 😂. Unfortunately this one takes a bit of guess work and you have to know your oven well and have some experience working with chiffons, because the batter is so thin. I cannot prescribe exact baking time and temperature. Bake too long and it gets browned and dry. Bake too short and it will be very fragile. Temperature too high, it will brown. Temperature too low and it will also be fragile and the meringue may start deflating before it sets (pattern will not he pretty). A chiffon this thin can go from baking too short to too long within a minute. To give yourself a larger margin of error, start with the higher temperature for first few minutes to quickly set the meringue structure before it breaks down, and then lower the temperature to a level where it is unlikely to brown so quickly but sufficient to dry out your cake batter. It is ok to open the oven door to have a closer look at your cake to check after the first few minutes. If it still appears wet, continue baking another half to one minute.

6. Once baked, immediately flip it out onto a fresh sheet of parchment paper.

Ta-dah! Looks like an actual towel.

7. Use a knife or pizza cutter to cut the cake according to the size you want. 

8. Carefully place it on top of the lychee rose strawberry cake after removing the acetate sheet. Brush the surface with lychee syrup.


You may add some fresh strawberries or chiffon strawberries on top, or the whole basket of strawberries. Please remember to use dowels of putting something heavy on top because this is a delicate cake.


Actually, I didn't get to taste the big cake because mum and dad caught Covid a few days before the planned extended family get-together celebration. My aunt picked up the big cake and shared it with the rest of my extended family including grandma. My mum and dad had the basket of chiffon strawberries instead. According to aunt, the cake was so yummy and she kindly helped me take picture of a cut slice.

Pardon the messy interior because I inserted jumbo straw dowels into the cake for photography of what the entire bake should look like.

In my slightly distracted state of mind while making this bake, I forgot all about the chiffon cake daisies I made as little pops of colour to add on the bake when I took the photos. I think they deserve a mention and feature in the blog post because they are so dainty and cute!


My parents are better now so it is a relief! Thank God for vaccines and good medical care in Singapore!

This project was really a labour of love that took many many hours. Glad it turned out yummy and pretty! Please acknowledge me if you use any of my material that I shared in this post (and other posts) because it has taken me a lot of time to develop it. For more timely view of my work, please follow me on Instagram at phay_shing as I may not share everything in the blog.


with lots of love,

Phay Shing


Read More »

Wednesday, 6 April 2022

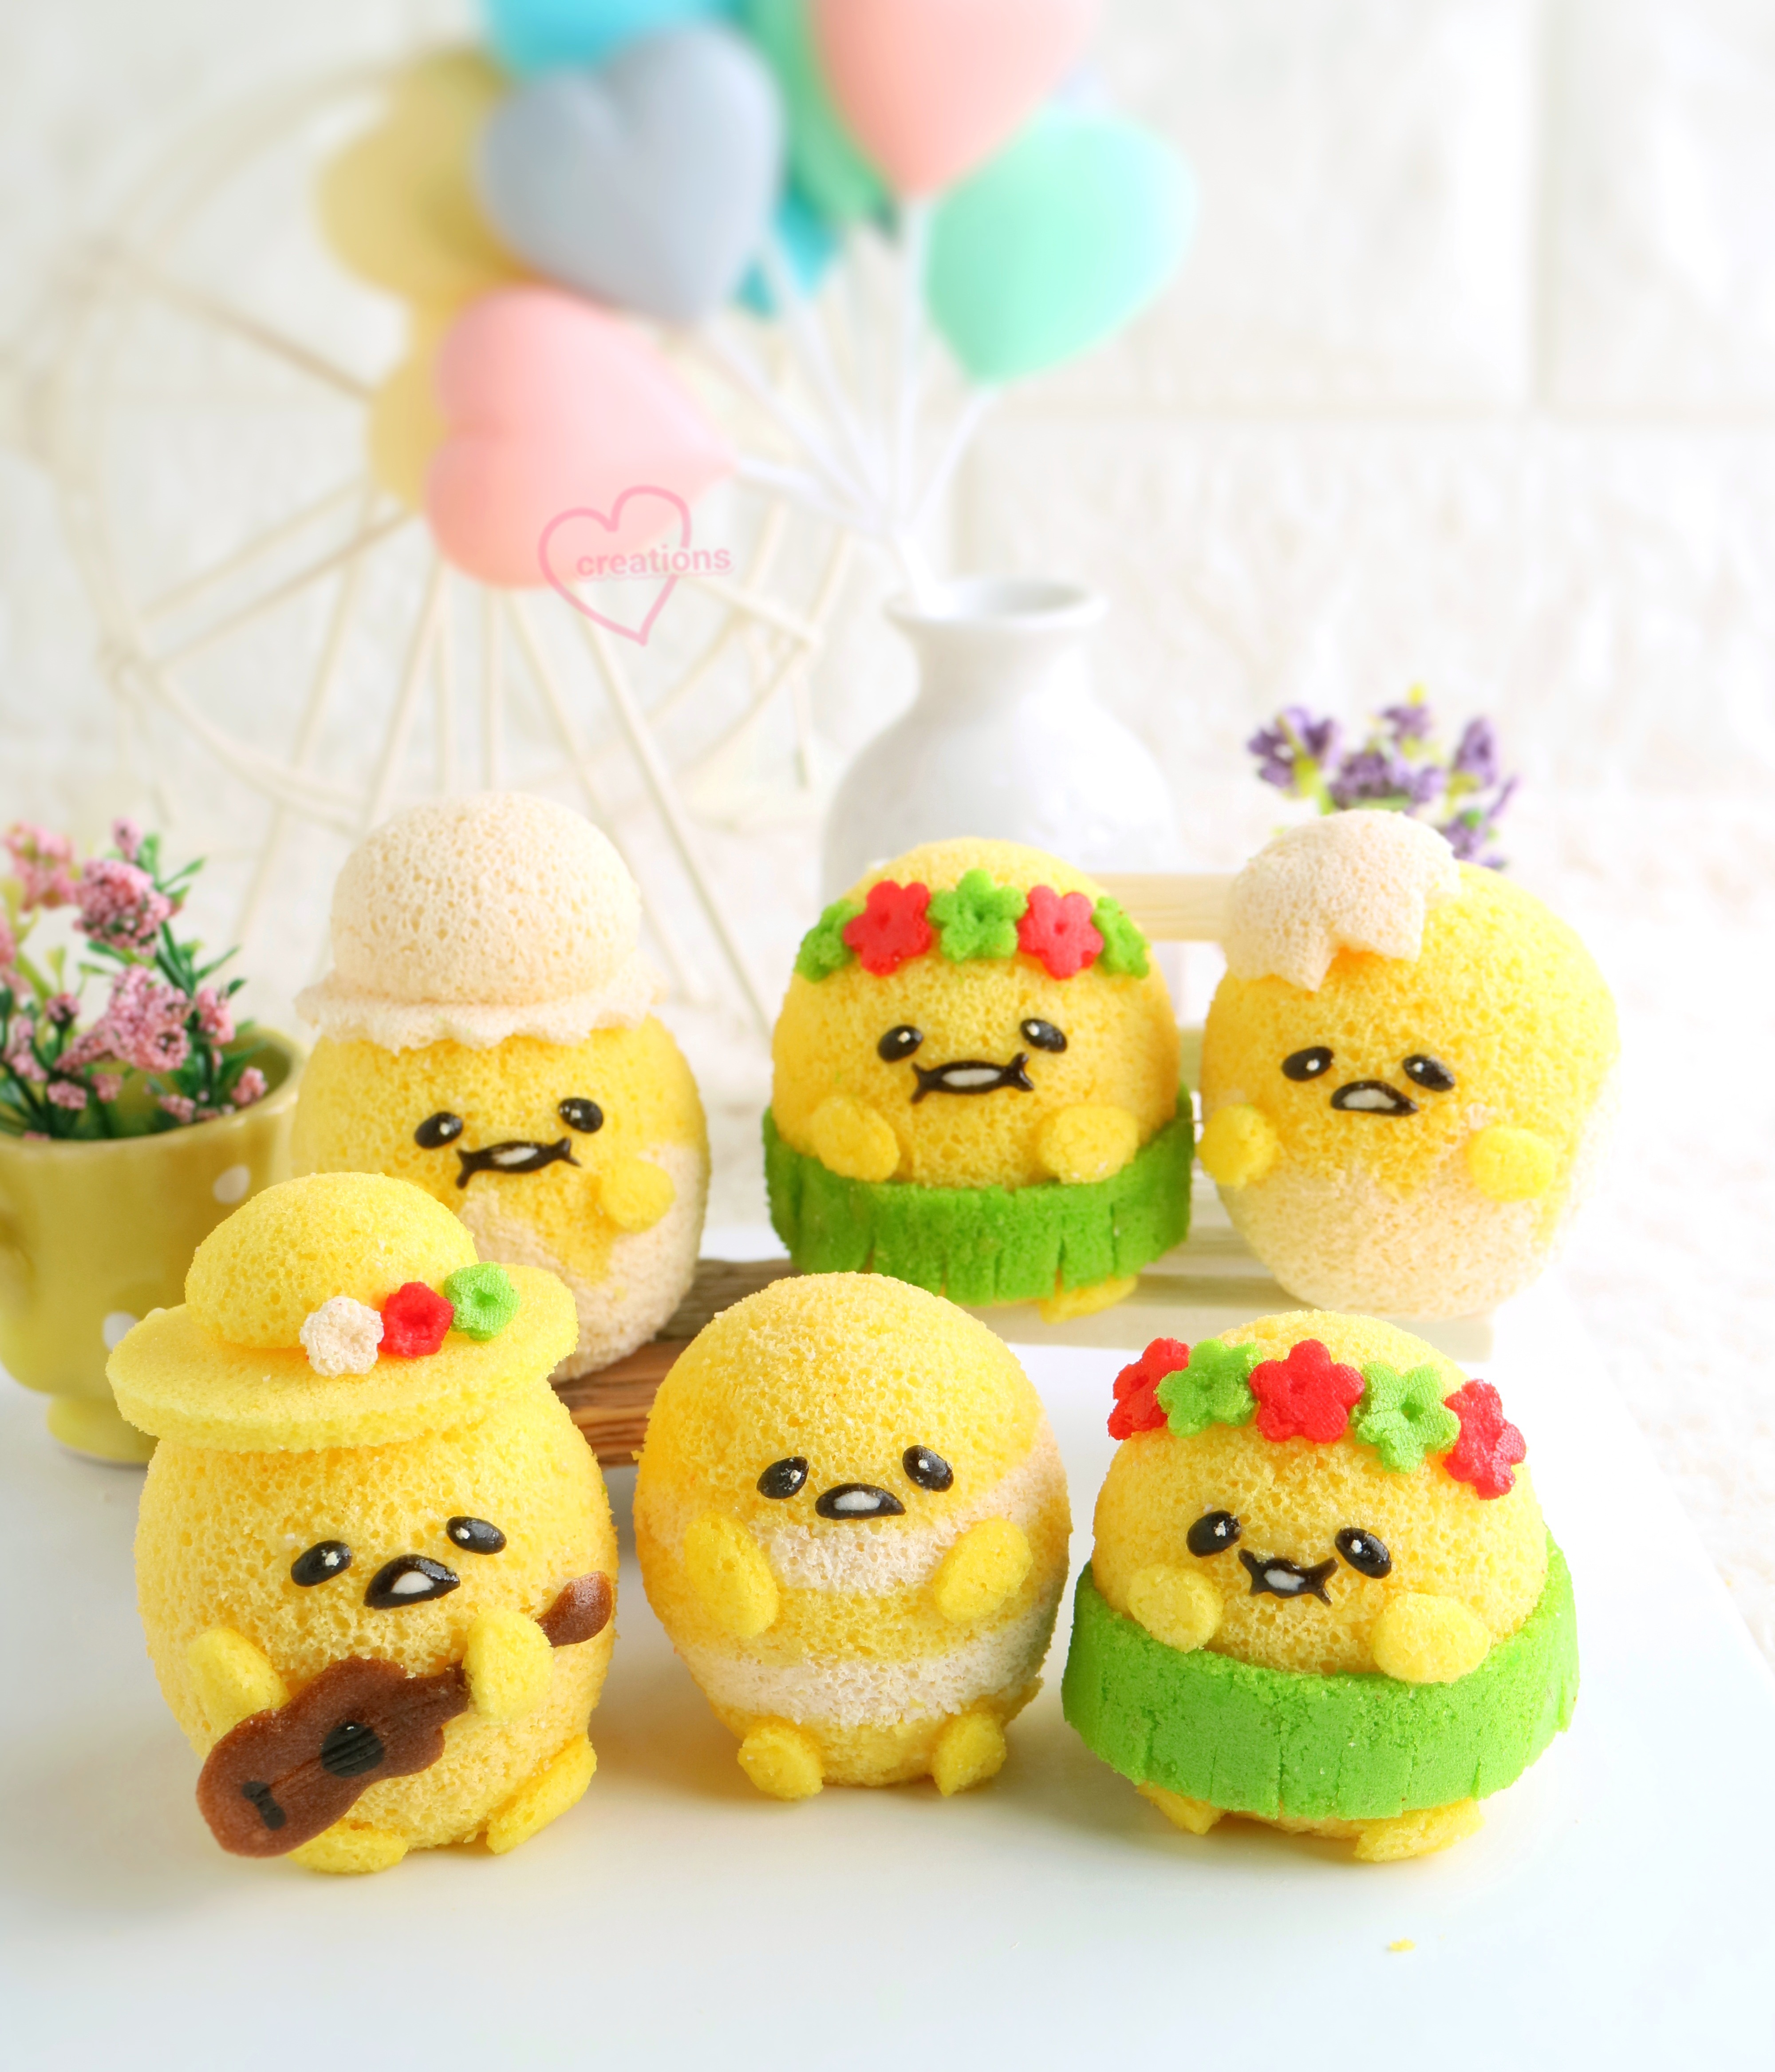
Gudetama Chiffon Egg Cakes


Cute Lemon Egg Cakes singing & dancing 🥰💃

Which is your favorite?❤️😛

Lemon Chiffon Egg Cakes🍋
1 egg yolk
10g vegetable oil
5g lemon juice
5g milk
1/4 tsp vanilla extract
15g all-purpose flour
¼ tsp lemon zest
¼ tsp lemon emulco (optional)

1 egg white
25g castor sugar
Few drops lemon juice

@suncorefoods yellow safflower for the color

Whisk egg yolks with oil, lemon juice, milk, vanilla, lemon zest. Add in sifted flour and whisk till well combined. Add in yellow safflower powder and mix till desired shade.

Whisk egg whites with sugar and lemon juice in a new bowl till firm peaks. Fold in the meringue till well incorporated.

Pour the batter into 6 drained egg shells till 2/3 full. Bake at 140C for 30 mins. Unmold when the cakes are fully cool. Decorate with melted chocolate, sheet cake and sprinkles.

Hope they made you smile!!❤️❤️🥰
 

Read More »

Sunday, 26 December 2021

Tiger Choux Pastry in Macaron Teacup Class

Welcoming the Year of the Tiger with three genres of bakes--- choux pastry tiger in macaron teacups with chiffon cake mandarin oranges on the side! 


We decided to replace the fortune tiger choux pastry class with this instead as it will be a class involving two genres of bakes. For the first time, I will be teaching deco choux as well as creative macarons in a single class. It will be pretty intensive but value for money based on the content and hands-on experience you will be getting. Some parts will be prebaked for you due to the limited time we have in class (we can't accomodate too many rounds of baking) but you will have the hands-on experience of piping all the pieces of choux and macarons, and assembling/decorating all the teacups and tigers. The filling taught for this creation is a savoury one--- bakkwa diplomat cream, which complements the sweet macaron and choux au craquelin very well. 

The chiffon cake mandarin oranges won't be taught in class as I have detailed recipe and  video tutorial in the blog on how to shape and decorate the oranges. 

Please refer to this link for more details and to register soon as the class is in mid-January 2022 . 


With love, 

Phay Shing 

Read More »

Saturday, 11 September 2021

Apple Black Tea 'Basket of Apples' Cake

After making the chiffon apples in biscuit basket, I made another version of the "apples in basket" theme with the same flavour (apple black tea) but with the basket made out of cake this time! This was for my dad's and uncle's combined birthday celebration.

The apples are the same as what I made for my dad's small birthday bake where each large apple has an apple black tea diplomat cream and apple dragonfruit black tea jelly filling. Here's how the cross-section looks like! 


The mini apples don't have filling because it would have been challenging to insert it in. 

The recipe for the cake (chiffon sponge, diplomat cream and jelly) can be found over here where I did my trial bake for cake flavour. I made chiffon apples back in 2014 when I first discovered that cake marbling technique can be used to create the patterns on the apple. I have done basket weave type of cake using chiffon sponge a number of times since I made the first one for my mum's birthday in 2015. But this is the first time I am making it this complicated as there is a heart-shaped hole at the side of the basket revealing the layers of goodies that the cake is made up of. While I usually make a half basket weave covered cake as the cake base to showcase the basket weave as well as the beautiful yummy cake layers, I thought this would look a little odd for the apple theme. But I am not willing to cover up the sides totally in basket weave as it is a pity to hide the goodies inside. I ended up with a compromise of a hole at the side to showcase the cake layers and basket weave. This is the first time I sliced the chiffon sponge cake into 5 layers too. Usually I slice into 3 layers only. Quite a challenge to slice it so thinly because chiffons are so soft! 

Here's a peek at the layer of filling between sponge layers. 

Apple black tea diplomat cream and apple dragonfruit black tea jelly

Here's a view of the basket cake without the apples! 


I baked very thin layer of chiffon sponges to make the basket weave. I added a little more kocha powder (black tea powder) and a little cocoa powder to make a slightly darker brown for the basket weave but I think it isn't too obvious 😂. 

I chose a heart shaped opening at the basket because this bake is made with lots of love for the people who love me. My uncle treats me like his own daughter although he never had children, and has continued to support my family over the years. So this cake is a little gift I make in return for all the love and care. 


With lots of love,

Phay Shing

Read More »

Sunday, 5 September 2021

Apple Black Tea Chiffon Cake 'Apples' in Biscuit Basket

My dad's and uncle's birthdays are pretty close to each other and because we have 2 separate celebrations, I decided to make 2 separate but related bakes for them. Both are apple themed. For my dad's small home birthday celebration, I revisited an old bake back in 2014 but with filling this time and placed in an edible basket! 

Apple black tea chiffon cake "apples" in biscuit basket! 

A close up view of the cross-section of the insides! Apple black tea diplomat cream and apple dragonfruit black tea agar jelly! 

It actually took me 2 tries to get the basket right. The first try was my default construction cookie recipe that tastes awesome and it's easy to work with as rolled cookies. But it was difficult to handle for weaving as the dough kept breaking, and the basket fell apart when I placed it upright to dry it out a little more in the oven. Way too fragile due to the microcracks induced by the compression forces as the weaved dough expanded slightly during baking in the oven. 

I had a think and remembered that I had a biscuit dough recipe which has a texture and elasticity similar to bread dough, making it easier to handle for weaving and hopefully, remains sturdy enough after baking to keep its shape and hold the apples! This biscuit happens to be my iced gems biscuit base. I tweaked it slightly to include a little cinnamon and cocoa powder for colouring, and reduced the baking powder to minimize expansion of the dough which may cause cracks due to the weave pattern. Thank God it worked this time! 

You may refer to any basket weave tutorial for circular baskets on how to weave. Pinch seal the ends of each rope of dough when you run out of length. Use a metal bowl that is wrapped in aluminium foil as your work surface. Remember to grease it first before slapping on the dough. 


I didn't take photos of the weaved rim and handles because it was late and I was a little miffed at having to rebake😂. I used small hemisphere slicone moulds as the work surface for the handles. The various parts were glued together using royal icing

Ta-dah! My edible wicker biscuit basket! 

Recipe for biscuit basket
Ingredients:
140g plain flour 
1/2 tsp baking powder
20g icing sugar 
1/8 tsp salt
1/8 tsp cinnamon powder
1/4 tsp cocoa powder

48g unsalted butter
50g milk (use less or add more as necessary) 
1/4 tsp vanilla extract 

Steps:
1. Sift together all powdered ingredients into mixing bowl. Add vanilla extract to milk. 

2. Rub in unsalted butter into powdered ingredients until it resembles fine breadcrumbs. 

3. Add milk a little at a time until a ball of dough forms. Cling wrap and let it rest for 30 minutes. This will help the dough to relax and make it more pliable.

4. Prepare the baking tray/ moulds, lining with parchment or foil and greasing as necessary. Preheat oven to 165C.

5. Portion and roll out the ropes of dough as needed for weaving. Weave the basket, pinch sealing portions where you need to join the ropes. 

6. Bake until slightly golden brown. This bake time can vary depending on size of the weaved portion. Can range from 15 to 25 min. Cool completely before assembling with royal icing as the glue. 


The basket was stored at cool room temperature in airtight condition. 

I prepared some apple dragonfruit black tea jelly and measured 1 tsp of it for each apple, set in cling wrap. You may refer to this post for the jelly recipe. 

Refrigerated until ready to fill the chiffon apples. It would be perfect if I have moulds of the right size but I didn't so this less ideal cling wrap trick will have to do.  You only need to prepare a small quantity of jelly since each apple only needs 1 tsp worth. 

Prepare the apple black tea diplomat cream and store it in a piping bag in the fridge until ready to fill the apples. Please refer to this post for the recipe. You will only need a little cream and 1 egg yolk portion recipe is more than enough. 

Apple black tea chiffon cake recipe for "apples" 
Note that I increased the sugar content in the meringue to improve its stability compared to my old recipe in 2014. This makes it easier for patterning the apple design. 

Ingredients (makes about 9-12 cupcakes) :
Egg yolk batter
3 egg yolks
42g vegetable or canola oil
3/4 tsp vanilla extract 
1/4 tsp cinnamon powder
1/8 tsp salt
60g cake flour 
1/4 tsp baking soda (to neutralize acidity of tea) 
1/2 tsp kocha powder (black tea powder) 

Colouring for yellow and red batters
Yellow gel colouring 
1/8 tsp red powder colouring 

Meringue
4 egg whites
1/4 tsp cream of tartar
80g caster sugar 

Steps :
Kindly refer to this post for the detailed steps because it is too long to type😂. The difference is I simplified the use of many sources of colouring because some of them impart a flavour which I didn't want as it will detract from the apple black tea base that I intended it to be. 

Inverting the glass bowls to cool the chiffon apples. 

Carefully unmould the cakes by hand when cooled totally. Use a piping tip to mark out the hole and then use a toothpick to dig out a portion of cake. Don't throw the cake cutout, instead pipe in a little cream. Insert a ball of jelly and coat with more cream.  It should look like this:


Cover the hole with some of the cake cut out earlier. Shape the base of the cake to make it taper slightly inward. To do so, you may shape by hand, or use a mould/bowl with smaller diameter. Insert the base of the cake into the mould/bowl to round it out. I used a silicone mould with smaller diameter than the glass bowls they were baked in. 

To shape the apple top, make an indent on the top of the apple with a clean finger or wider end of the chopstick. 

Ta-dah! Shaped apple. The shaped portions may tend to bounce back to its original shape. Just keep pressing or inserted into the mould for a longer time and the shape should hold better. 

Insert a sliver of cinnamon as the apple stem and you are done! 

With lots of love,

Phay Shing


Read More »

Monday, 28 December 2020

'黑皮牛耶!' Year of the Ox Choux Pastry In Macaron Teacups

It has become a personal annual tradition of sorts for me to put up content to welcome the new year featuring three genres of bakes that are dear to me. It started out with the personal tradition of making the mandarin orange chiffon cake "oranges" but it has since expanded to include macaron teacups with a new year greeting and the Chinese zodiac animal for the year. Since 2021 welcomes the Year of the Ox, I have to wish everyone "黑皮牛耶! Happy New Year!" 


To those of you who aren't familar with Chinese, "黑皮牛耶", the four characters on the macaron teacups literally translates to "black skinned ox yeah" but when read aloud, it sounds like "happy new year" in English. You can see why I can't resist making this pun in 2021🤣

"黑皮牛耶!" indeed! 🤣. Look at their happy and cheeky faces! Black may seem like an inauspicious colour but without this choice of colour, I won't be able to pull off the pun. 

You may refer to this post for details of the mandarin orange chiffon cake oranges. I took a nice photo of just the oranges this year but won't be doing a separate blog post for it because the one in 2016 is comprehensive enough. 


You may refer to this blog post for details on making the teacup macarons. I have been conducting macaron teacup classes and will continue to do so as they are rather popular. 

What is new that I would like to share here is the choux pastry Ox. Some of you asked for the template so I will share it here too. Please refer to this post for the detailed recipe for making the choux pastry batter and craquelin. Add charcoal powder to the craquelin and choux batter to colour it black, preferably sifted with the flour. About 1 tsp will do for a 2 egg portion of choux batter. Baking the pieces for the ox is relatively easy as you don't have to be concerned about browning. The main head piece is made using a 2.3-2.5cm diameter template for the piped circles of batter and 3cm cookie cutter for craquelin cutout. 

Here is a picture of the baked choux pastry cases. I baked some plain uncoloured large choux au craquelin at the same time. 


Prepare some plain coloured choux batter for the horns. If you don't want to prep the batter twice (once for each colour) , you can use halved sliced almonds for the horns. Although you may split the choux batter and colour a portion black while leaving a small portion plain, do note that adding charcoal powder after the egg has been added to the choux batter limits the expansion capacity of the choux bun a little but it will still work.

This is the template for making the ears, horns and arms of the Oxen. 

Stretch this picture to fit an entire A4 paper for the right sizing. I didn't want to switch on my laptop for the original so I took a photo of the template using my phone camera so pardon the shadow😅. 

Piped batter for the small parts. Bake at 175C for 15 min or until horns appear golden brown. You may need to return the long arms to the oven to bake at 130C for another 5 to 10 min to ensure it is totally crispy. 

When cooled completely, carefully use a toothpick to make a 2cm diameter hole at the base for piping in the filling when ready to eat. I always recommend filling just before eating. Use the toothpick to make holes for inserting the horns and ears. Use black royal icing to secure them if necessary. Use more royal icing to add on the facial details. You may dry the assembled choux cases in 70C oven for 20 min to thoroughly dry it out. 

Tadah! Cute little ox! 

I am not providing any recipe for filling because you can fill it with any filling you like and I have shared a number of flavours in our blog that you can choose from. 

Happy New Year to all who have followed us all these years! 2020 has been an eventful year for all. May 2021 be one that is better! God bless! 


With love, 

Phay Shing


Read More »