Showing posts with label Salted caramel. Show all posts

Tuesday, 12 April 2022

Totoro and Mei Earl Grey Salted Caramel Macaron Scene


I had a request for a macaron scene with birthday girl's favourite characters in there so I created this!

Totoro and Mei with elephant, giraffe and koala!

I used my default swiss meringue method recipe to make the macaron shells for the characters and the large round base. 

The trees are made of black tea brown sugar meringues. I got the basic recipe from a baker friend but tweaked it for the added flavours so I am not able to share it. 


Yes the entire tree is made of meringue! No royal icing or wires used to glue or support the structure. I had to build it up in stages like a 3D cardboard tree except all parts and glue are made of meringue. These were made in advance, thoroughly dried and stored in airtight container.

Here's a better view of all the characters. I usually make duplicates of each character in case of accidents while handling.


I filled the macarons with Earl grey Italian meringue buttercream (IMBC), homemade salted caramel and some crushed biscoff.

I folded in some salted caramel, crushed biscoff and some earl grey tea leaves into half of the Earl grey IMBC, and drizzled more salted caramel and sprinkled more crushed biscoff for the large macaron base.

 I have always used Swiss meringue buttercream as my default buttercream base but thought why not try Italian meringue based buttercream instead so that I can incorporate more brewed tea in the buttercream.

Earl grey Italian meringue buttercream (IMBC)
Ingredients:
76g egg whites (about 2 eggs)
100g caster or granulated sugar (portion about 1 tsp out for egg whites)
30g concentrated Earl Grey tea*
114g unsalted butter (cut into small pieces, cool but softened)
A pinch of salt
1/2 tsp vanilla extract

* Steep 4 Earl grey teabags in 60g boiling water for 10 minutes. Squeeze out the liquid from the bags as much as possible. Measure out 30g for making IMBC

Steps:

1. Place sugar (100g minus 1 tsp) , concentrated tea and a pinch of salt in a small saucepan and heat at medium-low heat. Stir intially to help the sugar dissolve but once the water starts boiling, stop stirring. 

2. In the meantime, beat egg whites with 1tsp sugar until foamy. Reduce mixer speed if necessary to prevent overwhipping.

3. Once syrup temperature reaches 110C, turn up mixer speed and whip until soft peaks as you wait until syrup reaches 115C. Again, reduce mixer speed as necessary once soft peak is reached. Once temperature is reached, remove from heat. Turn mixer speed up to medium-high and pour the syrup down the side of mixing bowl in a slow and steady stream. Keep beating on medium-high speed for 10-15 minutes or until Italian meringue is cooled to room temperature.. It is important to make sure butter is not warm when you add the softened butter.

4. Add butter a little at a time while beating on medium-low speed. You may switch to paddle attachment if you wish but I prefer having less things to wash. Don't panic if it appears to split a little. just keep going and adding butter a little at a time.

5. After all the butter is added, add vanilla. Continue whipping but increase mixer speed to medium high and beat for another 2 minutes.

You may use the Earl Grey IMBC as it is. But I portioned out about half of the IMBC and added homemade salted caramel with the ratio of 
1:2 for salted caramel : Earl grey IMBC,
folded in some Earl grey tea leaves (about one teabag's worth) and crushed biscoff (about 30g). Do note that the ratios can be adjusted according to taste.


Sharing a picture of the assembled large base with a meringue tree before the tree gets hidden by the characters.

I hope this creation brought a smile to your face as it did for me and the recipient! 

Do check out my Instagram account at phay_shing for a more up-to-date view of my baking journey!

with love,
Phay Shing
Read More »

Sunday, 30 January 2022

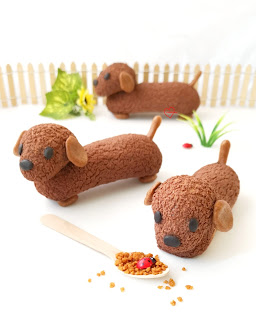
Chocolate Salted Caramel Biscoff Sausage Dog Eclairs

Did you know that just a few tweaks to your classic eclair can become something like this? 


Chocolate daschund craquelin eclairs! Filled with delectable salted caramel biscoff diplomat cream with extra oozy salted caramel!. 


The basic techniques on how to create puffy, hollow eclairs will be covered, as well as the decorative techniques and yummy filling. 

Puffy chocolate craquelin eclairs! 

Please click on this link for more information or to register. 


With love, 

Phay Shing 

Read More »

Friday, 29 October 2021

Green Hatchling Salted Caramel Choux Pastry

My younger kid has taken a liking to one of the plushies at home. It's the green hatchling from Angry Birds. He has it around when he reads in bed, and brings it to the study table when he studied for exams. The hatchling is named Grip by my kids so let's call him that. Grip has become a family member and friend of sorts so that's why I decided to make Grip salted caramel choux pastries for my kid's birthday! 

Grip with various expressions! I made it so as part of my first attempt at stop motion video. 

A view of the cross section! 

Have a look at the stop motion video over here

I used my default recipe for choux au craquelin but didn't bake from frozen batter. I will share the ingredient list here since some of you may be interested in the colouring I used. But please refer to the method in the reference post. 

Craquelin ingredients:
21g unsalted butter
18g sugar
21g cake or plain flour
2 drops lime green/mint green gel colouring 
2 drops electric yellow gel colouring 
1/2 tsp white powder colouring 

Extra notes for craquelin: 
You may scale up the recipe. I was making a small batch

Choux batter ingredients:
110g water
40g bread flour
20g plain flour
20g olive oil
20g unsalted butter
1/2 tsp salt
1/2 tsp sugar 
2 eggs
1 tsp white powder colouring 
A pinch of yellow powder colouring 
2 drops lime or mint green gel colouring 
4 drops yellow gel colouring (extra if necessary for the beak and feet batter) 

Extra notes for choux batter:
I divided the cooked dough in ratio of 1:4 for yellow: green, added the extra gel colours before adding the egg to the respective coloured batters. 


For Grip's hair, I used celery fibers that are blanched for 1 min and dehydrated in oven for an hour at 90-100C. 

Blanched and dehydrated celery fibers. 

So glad the "hair" and choux bun are so close in shade😍😍😍

I didn't take photos of the small parts like beaks, feet, tail and wings. They were all made of choux as well. The eyes were made from royal icing transfers. 

I drew the eyes on paper and used it as template for piping the eyes. 

The filling is salted caramel and salted caramel diplomat cream with mini crunchy chocolate balls. 

You may refer to this post for the salted caramel recipe. I thinned it with a little milk so it is more oozy. You may add crushed biscoff biscuits instead of crunchy chocolate balls. I just didn't want to buy an extra packet of biscuit for this😂. 


Salted caramel diplomat cream

Ingredients:

2 egg yolks

20g brown sugar

20g cornflour 

200g milk 

1 tsp vanilla extract 

1/4 tsp caramel flavouring (optional) 

15g unsalted butter 

20-30g salted caramel

65g whipping cream of choice (dairy, non-dairy or a combination) 

30g crunchy chocolate balls/crushed biscoff biscuits (adjust amount according to taste, omit if you prefer) 

Steps:

1. Heat milk, vanilla and caramel flavouring (if using) in a small saucepan until steaming hot (not boiling). In the mean time, whisk together egg yolks, brown sugar, cornflour and salt in a heavy bowl or glass measuring jug. 

2. Pour hot milk into egg yolk mixture in a thin stream while whisking the egg yolks continuously. Pour everything back into saucepan and heat over medium-low heat while whisking continuously. 

3. Once mixture thickens, remove from heat and continue whisking until mixture smoothens out. Place back on stove and whisk continuously while cooking to preferred consistency. 

4. Remove from heat and add butter and salted caramel and whisk until well combined. Press a cling film on surface of pastry cream and refrigerate until firm, at least 1h.


5. Whip up whipping cream of choice till firm or stiff peaks. Remove pastry cream from fridge and beat it briefly with spatula to loosen texture. Fold in whipped cream to make diplomat cream. 

6. Fold in crunchy chocolate balls or crushed biscoff biscuit crumbs. 


7. Transfer into piping bag. Fill pastries shortly before eating. Note that biscuit or crunchy cookie items do not stay crisp in the filling for long so if you want to enjoy the crunch within the filling, add in the crunchy bits only shortly before filling and serving. 

Grip is so cute I couldn't resist taking more pictures! 


Twinning! 

Pastry Grip with the real life Grip! 

As it is my kid's last year in primary school, I decided to make a graduation version as well! 

The hats are made of macarons and sour candy strips. You may refer to my Macaron Basics book for the regular sized macaron version. 

I hope this post puts a smile on your face as much as Grip (both real and pastry versions) did for my little one and all of us at home! 


With lots of love, 

Phay Shing


Read More »

Monday, 29 March 2021

Salted Caramel Biscoff Cat Macaron Class (for teens!)

I have decided to conduct a macaron class for teenagers during the June school holidays. This cat face design is the same as the one I intend to teach for adults but a full body version


The filling is salted caramel and biscoff swiss meringue buttercream, a flavour that most young people love, including my younger kid! 


In this class, I will teach the basics of French method, how to pipe the simple cat head, how to decorate the face using edible markers and royal icing, as well as demo how to make the fillings. Due to time constraint, the fillings will be demo only but the macaron making and decoration will be fully hands-on. 

If you are interested in this class, please click on this link to register and for more details. 


With love,

Phay Shing

Read More »

Wednesday, 9 December 2020

Slime and Magma Cube Nama Chocolate Mochi

As my elder kid gets older, what he is interested in changes as well. The yearly birthday bakes is like a diary of sorts, documenting what he likes. But as he gets older, his taste gets more exotic and the bar set for me is higher. 

"Ma, why don't we try something different this year." 

By different, he means different genre of bake. I made him chiffon cake, cookies, macarons, choux pastry and even a chocolate bomb with macaron hidden inside before for previous birthdays. This year, he requested for mochi. Not just any mochi but mochi in his favourite flavours and in the form of some characters in his favourite game --- Minecraft. Presenting my version of Matcha mochi with Matcha Nama chocolate and azuki bean in the center, and Mocha mochi with Nama dark chocolate and coffee salted caramel in the center. 

Slime and Magma cubes! 

The only challenging part of this is figuring out how to get it to be cuboid without special moulds. I tried my technique of using cookie cutters to make snowskin mooncakes for this but somehow it didn't work. Not sure if it is the fact that the filling is cold and can go soft after a while. I gave up trying with the square metal cookie cutter after a couple of atempts and just stuffed it in a silicone ice cube tray. It worked!... Sort of 😂. You need to make sure the mochi is sufficiently dusted with flour so that it doesn't stick to the mould or it will end up tearing again.

You begin by making the Nama chocolates. I used Just One Cookbook's recipes as a reference for both dark chocolate and matcha chocolate versions. Nama chocolate is actually just chocolate ganache dusted with cocoa or matcha powder. I skipped the dusting and prepared the chocolates using my lazy one-bowl method of preparation. 

Nama dark chocolate 
Ingredients :
100g 54.5% Callebaut dark chocolate 
50g whipping cream 
1/2 tsp Kahlua coffee liqueur 

Steps :
1. Place everything in a microwave-safe bowl or heatproof bowl. Melt the chocolate using medium power at 10 second bursts of using microwave. Alternatively you may use double boiler to melt the chocolate. Stir well until chocolate is melted and mixture is smooth. 

2. Transfer into 3cm silicone hemisphere moulds and press a cling wrap on the surface. Refrigerate for 1h.

3. Reserve a little melted chocolate in piping bag. 

Matcha Nama chocolate 
Ingredients :
100g Callebaut white chocolate 
30g whipping cream 
7g unsalted butter 
4g (1/2 tbs) matcha powder 

Steps:
1. Place everything except matcha powder in microwave-safe bowl or heatproof bowl. Melt the chocolate in a similar way as pt 1 above.

2. Add matcha powder and mix well. 

3. Transfer into 3cm silicone hemisphere moulds and press a cling wrap on the surface. Refrigerate for 1h.


4. Reserve a little melted chocolate in piping bag. 

You may omit the coffee salted caramel or leave out the coffee and use plain salted caramel if you wish. I usually a stash of homemade salted caramel in the freezer as it freezes well. 

Coffee salted caramel
Ingredients:
1 tsp instant coffee granules
1 tsp boiling hot water 

Note: you may prepare your salted caramel by dissolving the coffee granules in the hot cream for making salted caramel. But because I already have salted caramel in store, I add the coffee after the caramel has been made. 

Steps:
1. Dissolve instant coffee in hot water. Doesn't matter if not all the granules are dissolved. 

2. Add coffee into salted caramel in a microwave-safe bowl. Mix well. Microwave for 10 sec at medium power. Mix well. Repeat heating and stirring until mixture is hot enough and starts to bubble. 

3. Let coffee caramel cool for 10 min at room temperature. Sieve coffee caramel into piping bag. 

Assembling of the mochi filling involves first making a well in the middle of the set chocolates. You can use anything you have on hand to create the well. Spoons, fondant tools, mini melon baller etc. 


Fill the cavities with coffee salted caramel or partially mashed azuki beans. 


Glue the halves of the hemispheres together using some melted chocolate left in the piping bags. Use gloves to handle the chocolates as heat from your fingers will melt it. 

Each ball of chocolate is about 16g. 

Put the assembled chocolates into the fridge or freezer while you work on the mochi. 

Mochi 
Ingredients:
45g icing sugar
45g cooked glutinous rice flour + extra for dusting 
75g water 
Powder flavouring * 
12g olive oil (or shortening /other oil) 
Gel colouring (if using) 

* 1/2 tsp Matcha powder OR 
1/2 tsp instant coffee granules and 1/2 tsp cocoa powder. Omit this for plain mochi

Note: traditional mochi doesn't contain any oil and raw glutinous rice flour is used in the preparation. I used cooked glutinous rice flour as I still have leftover from snowskin mooncake making. I add oil so it can keep moist and soft longer. So after a few days, the mochi texture will resemble snowskin mooncake texture. And if you guessed that I actually used a snowskin mooncake recipe for my mochi, you are absolutely right! 

Steps:

1. Sift together icing sugar and cooked glutinous rice flour. If powdered flavouring is used, sift that in together as well. 

2. Place water, oil and gel food colouring in small saucepan. I added a drop of green for the matcha mochi and a drop of red for the mocha mochi to get the final product to look more like the characters. Heat the mixture until it just starts to boil. 

3. Pour the liquid into the sifted flour. Mix well with a spatula until a dough forms. For the matcha mochi, I added a few drops of white gel colouring and mixed it until the colouring is absorbed but colour is not homogeneous. This is to give it a slightly molted look but is optional. Cling wrap mixing bowl and set aside to cool for about 10 min or until dough is cool enough to handle. 

4. Briefly knead the dough with spatula and portion into 20g balls. Dust with some flour if it is too sticky. I like to use parchment paper as my work surface. 

5. Flatten a ball of dough and place a ball of chocolate in the middle. 


6. Carefully wrap the filling with dough, placing it seam side down. 


7. Dust each ball of mochi with cooked glutinous rice flour. Place into silicone ice cube trays. These are slightly bigger than 3cm. Carefully press it in to fill the corners as far as possible. 


8. Freeze for 1h covered. In the mean time, prepare some plain dough for making the Magma eyes. Prepare some greenish black dough for making the Slime eyes and mouth. I used a mix of matcha powder and charcoal powder to colour the dough. 

9. Roll out the dough until about 1mm thick for both plain and green-black. I used fondant square cutters to cut out the small squares and laid them on a tray lined with parchment. 

10. Air-dry the cutouts for 15 min. Use edible marker or edible paint to add on the red, orange and yellow details of the Magma eyes. 


11. Pop the frozen mochi out of the ice cube tray and place them on a baking tray lined with parchment paper. 

12. Brush a little water on the spots where the eyes are supposed to go. Carefully place the eye cutouts in place. 


13. Store the assembled mochi in airtight container in fridge for up to 5 days. The texture of mochi is soft for first 2 days but will firm up more after that. 

Here is a view of the cross-section! 


With lots of love, 

Phay Shing
Read More »

Tuesday, 10 November 2020

Masha and the Bear Salted caramel Dark Chocolate Macarons

My friend requested for a couple of macaron cake toppers for her daughter's birthday with the little girl's favourite characters --- Masha and the Bear! 


I had fun with the new backdrops I bought because it really brings the characters to life! 

I baked the macaron shells using the swiss meringue method along with the shells for Kirby and Mario on the beach scene. So it was one crazy bake. 

Piped batter

I decorated the macaron shells with edible marker and edible paint made by dissolving gel food colouring in some vodka. 


The macarons were filled with dark chocolate ganache amd homemade salted caramel


I always make an extra set of characters in case of damage. 


With love, 

Phay Shing

Read More »

Wednesday, 21 October 2020

Among Us Salted Caramel Macarons (Imposter flavour included!)

How time flies! When I first started on my baking journey, my kids were both preschoolers. They are now in their tweens/teens! Over the years, what they request for birthday bake evolves as they grow. My younger kid is turning 11 soon and for his birthday bake, Among Us macarons was requested. This game is the latest craze among teens today. He loves salted caramel anything so I filled the macarons with salted caramel swiss meringue buttercream and a dollop of salted caramel in the middle....


.... Well... Not all of them are filled with yummy salted caramel. Of course I had to include an imposter, or two 😉. You can't tell which one is the imposter just by looking at them. 

I made sure that even the filling looks like the real deal. 

One of them is the real deal and the other is the imposter. Can you guess which is which? 

I must admit that the idea of filling the imposter with a weird filling came from a meme I saw where the imposter was filled with wasabi amongst the others which were filled with Matcha. 

I filled the imposter with oyster sauce soy sauce swiss meringue buttercream and oyster sauce salted caramel in the middle 🤣. My kid gave a funny face when he ate it😂. 

I used the Swiss meringue method to make the macarons as it is not a huge batch but it has many colours. You may refer to this post for the recipe for the macaron shells. I used Wilton #6 tip for piping. 


Piped batter


Freshly baked shells

I used black royal icing to outline the shells. 

I love this shot! Puts a smile on my face😊

I had to take more photos of these because they look so cheerful! 

And more photos 😂

You may refer to this post for the salted caramel recipe. You may double the portion if you would like to make more salted caramel. Extras can be frozen for several months. 

Salted caramel Swiss meringue buttercream
Ingredients:
75g egg whites (about 2 large eggs worth) 
50g caster sugar 
1/8 tsp salt
135g unsalted butter, cut into tbs sized cubes, firm but not cold and hard
1 tsp vanilla extract
100g salted caramel

Steps:
1. Bring a saucepan filled with about 1 inch of water to simmer. Place egg whites, salt and sugar in a heatproof bowl set on the saucepan without the base of the bowl touching the water. Whisk the egg whites continuously until 70C, using candy thermometer to monitor temperature. 

2. Remove from heat and beat using electric mixer until stiff peaks form and meringue is cooled to room temperature. 

3. Add butter one cube at a time while beating with electric mixer. Don't worry if it appears to curdle. It will all come together eventually. Once all the butter is added, beat on high speed for 2 minutes more. 

4. Add vanilla extract and beat until combined. 

5. Weigh out 200g of swiss meringue buttercream. Leave a little vanilla smbc for the imposter(s). Add 100g of salted caramel to the 200g of smbc. Beat with electric mixer until smooth. Transfer to piping bag to fill the macarons. 

I filled the macarons with a ring of salted caramel swiss meringue buttercream and a dollop of salted caramel in the middle. 

For the imposters, I didnt really measure precisely. I just added oyster sauce and soy sauce to the vanilla smbc until it looks like the real deal. I added some oyster sauce to the salted caramel. 

Ta-dah! The imposters! They look like the real thing, don't they

Store filled macarons in the fridge in airtight container. Best to wait for a couple of days for the filling to mature the macaron shells before eating. Remember to let the container rest at room temperature for 15 min before opening to avoid condensation from forming on the shells. This is ideal but the way I presented for my kid to "play" meant that the same container had to be taken in and out of the fridge several times (he is only allowed one macaron to eat each time). To avoid the condensation from turning the remaining macarons soggy, I placed a paper towel in the container to absorb moisture, and open and closed the container as quickly as I can. 

I usually bake enough for my younger kid's whole class but due to the Covid situation, he can't do that for his birthday this year. Nonetheless, it is one of the more fun birthday bakes for him 😊. 


With lots of love, 

Phay Shing

Read More »

Tuesday, 6 October 2020

No-Churn Salted Caramel Biscoff Ice-cream

I seem to have many macaron classes these days so I am generating too many egg yolks, more than I can comfortably incorporate in cooking for the family. So I decided to make some ice-cream 😊. Salted caramel biscoff flavoured! 


My younger kid's favourite flavour! 

I found out by accident some time back that the frozen diplomat cream I make for choux pastry fillings make excellent ice-creams when frozen. I did some research recently and found that one of the versions of no-churn old fashioned ice-cream is precisely frozen diplomat cream! 

Why use egg yolks in ice-cream making? Because egg yolks are natural emulsifiers! Many cheap commercial ice-creams sold in tubs contain artificial emulsifiers to keep the ice-cream creamy and scoopable. Many no-churn ice-cream recipes are condensed milk based. While the condensed milk version is simple as it contains few ingredients, you can't control the amount of sugar in your ice-cream and it does tend to be rather sweet. You can have total control over how much sugar goes into cooked custard based ice-creams, like this one that I am sharing. 

I make my own salted caramel and usually keep some in the freezer, so making this ice-cream wasn't too troublesome. If you don't have salted caramel on hand, you may refer to this recipe to make some before you make the ice-cream. I make and store my salted caramel in quite a firm state. For incorporating it into ice-cream, you have to thin it a little with milk or the salted caramel bits will be really hard when frozen. Prepare some salted caramel with consistency thin enough to flow off a spoon easily. You may choose to fold the caramel into the ice-cream or drizzle over each scoop. The great thing about homemade ice-cream is there's so many things you can adjust according to taste 😊 so feel free to adjust the ingredient quantity based on your preference. 

Salted caramel that is thinned with milk and some biscoff biscuits in the process of being crushed. I do the old fashioned way of using a pestle to grind the biscuits. 

Ingredients :

4 or 5 egg yolks
20g cornflour 
50g brown sugar (use white sugar for other flavours that don't go well with brown sugar. This level of sugar is already quite low but you may increase or reduce according to taste. ) 
2 tsp vanilla extract /beanpaste
1/8 tsp salt
240g fresh milk
240g heavy cream
2 gelatin sheets, bloomed in ice water
1/4 cup homemade salted caramel, thinned with milk
100g biscoff biscuits, coarsely crushed

Steps:

1. Heat heavy cream in saucepan until steaming (not boiling or bubbling), about 70°C. Remove from heat. Combine bloomed gelatin sheets (squeeze out excess water) and hot cream in a bowl. Whisk until gelatin is melted. Press a cling wrap on the surface and refrigerate for a few hours or overnight. 

2. Heat milk and vanilla in saucepan until steaming (not boiling). In the meantime, whisk egg yolks, brown sugar, cornflour and salt together in a glass measuring jug or heavy mixing bowl. 

3. When milk is hot enough, remove from heat and pour in a thin stream into the egg yolk mixture, whisking the egg yolk mixture continuously. Pour everything back into saucepan. 

4. Cook the custard over medium low heat while whisking continuously. Once the mixture starts to thicken, remove from heat and continue to whisk until mixture is smooth again. Return the saucepan back to heat and keep whisking and cooking until thickened, about 2 minutes more. Be careful not to use too high heat or you get scrambled eggs. 

5. Sieve custard into a bowl and press cling wrap on the surface. Refrigerate until firm, at least 1h or overnight. 

6. Take out set heavy cream from fridge. Consistency is like panna cotta. 

Use an electric mixer to beat until stiff peaks. 


7. Take out set custard/pastry cream from fridge and whip briefly with a spatula to loosen it up 


8. Fold whipped cream into custard in a few additions.

9. Fold in crushed biscoff biscuits. 

10. Fold in salted caramel (optional if you are serving ice-cream with salted caramel drizzled over) . 


11. Spread the mixture in a thin layer in a container or lined baking tray. As thin a layer as possible as it helps the diplomat cream to freeze quickly. Ice-cream that is quickly frozen is easier to scoop too because any ice crystals that form will not have chance to grow too big. Freeze for 1.5-2h for a softer-serve, overnight for a firmer ice-cream. 


You may serve the ice-cream with more crushed biscoff biscuits and/or salted caramel! 


Enjoy! 

With love, 

Phay Shing 

Read More »