Showing posts with label Hello kitty. Show all posts

Monday, 27 March 2023

Sanrio Hanami Dango Vegan Macarons

I am finally done with the first draft of Deco Marshmallows! While waiting for the editor to get back to me with it, I have decided to work one something I have been procrastinating for years---vegan macarons! 

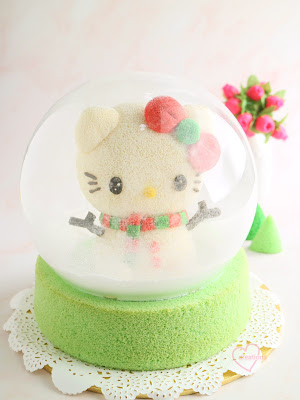
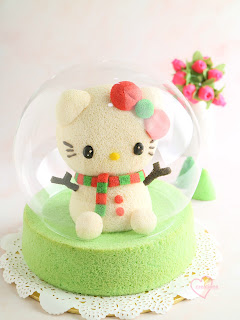
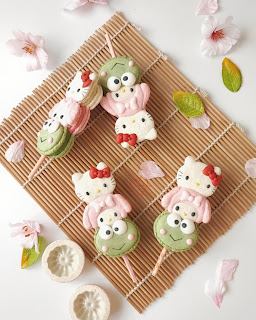
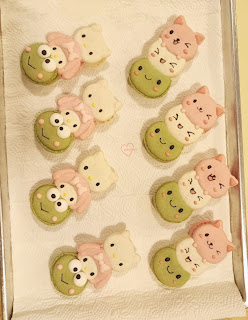
As Sakura season is here, I am inspired by the Hanami dango, which is a traditional Japanese confectionery that announces the arrival of spring. Of course I couldn't resist the chance to make it kawaii with Hello Kitty, My Melody and Keroppi! 

Matcha, strawberry and vanilla white chocolate ganache as filling to match the traditional colours 

Besides vegan macarons with vegan fillings, I took the chance to try out vegan royal icing for some of the fine details.

All credit goes to Meiyee (Instagram account: nm_meiyee) for sharing her vegan recipes. Her work is beautiful, naturally coloured and flavoured! I adapted from her recipes that are shared so I didn't follow exactly what she did but do check out her account for the recipes and to marvel at her work! 

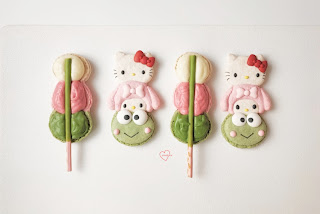
I used bakeable matcha powder with no additional artificial green colouring for the matcha shells and ganache. I added freeze-dried strawberry powder and a tiny bit of bottled strawberry emulsion for strawberry. I used matcha Pocky sticks for the "skewer" (I know it's not vegan but I prefer having everything edible but I didn't want to make the biscuit sticks from scratch too 🙈)

Here are some photos of the process:

Freshly baked shells. I was working on a separate set for future vegan macaron class material at the same time.

I actually rushed through the decoration and didn't manage to finish as I had to go out of the house. This is the works-in-progress decoration with vegan royal icing. Could have been better if I didn't rush

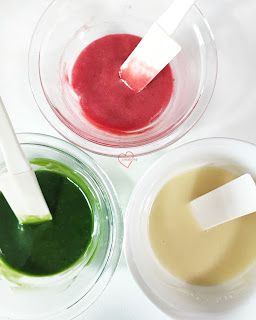
Strawberry, matcha and vanilla vegan white chocolate ganache before whipping it up to lighten the texture.

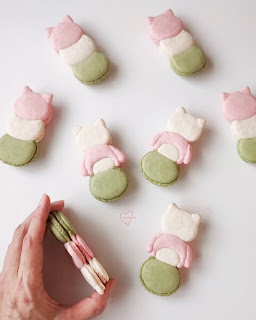
Filling up the macarons and inserting a matcha Pocky stick


Experienced macaron bakers will be able to tell that I had issues with one of the colours of batter and they would be right! I knew what went wrong and but am confident I can rectify it for the class. After all, this is my first attempt and it was rather ambitious of me to try three colours/flavours of macaron shells in a single batch. The flavour that I left to the last to work on had issues because the meringue needed to be whipped stiffer again and I should have trusted my instincts to do so. Can you tell which one it is? 

I am excited to be able to include vegan macarons as part of my class content after this experiment. Stay tuned for class announcements July onwards for vegan macarons! But note that I won't be teaching the Sanrio characters. 


Check out my Instagram reel for some video snippets of the aquafaba meringue and macaron batter!


with love,
Phay Shing


Read More »

Sunday, 2 October 2022

Hello Kitty Chiffon Cake


Too cute to eat?❤️ Throwback to Charity baking and Birthday celebration for @yvonnelim928 last week! 

We made cute animal chiffon cake "ice cream" cones, and it was so much fun and a meaningful event!  All proceeds were donated to club rainbow. 

I made this cake, inspired by Hello Kitty for her birthday surprise as well. Thank God it was well received! 

You can watch some highlights and video of the event here

With lots of love,
Susanne


Read More »

Thursday, 16 June 2022

Solar System Macaron Ferris Wheel II

My friend requested for a solar system ferris wheel back in 2017 for her boss's birthday. You can see it in this post. More than four years later, her boss has since gotten married, has two young kids, and is about to leave the company. He is still an astronomy enthusiast. That's the backstory to this second solar system ferris wheel 😊. And yes his wife is a ballerina.

I made this second ferris wheel smaller than the first for more stability (lower center of gravity), and I mounted it on a giant macaron base. I chose a firmer filling too to help with structural stability in tropical Singapore: dark chocolate buttercream with freeze dried raspberry powder and crushed oreo cookies, and lemon white chocolate buttercream. Macaron structures like this one needs careful planning, execution and suitable choice of filling to prevent misalignment and/or collapse. I will be sharing the recipe for the fillings I used and the assembly process in this post.

I used my default swiss meringue method recipe for making the macaron shells.

Decoration is done using a little royal icing but the bulk of it is done using edible marker and vodka wash, or white paint made with white gel colouring, white powder colouring and vodka.

I make duplicates in case of butter fingers or accidental uglification.

The filling recipes here are more suited for macaron structures. For regular macarons, feel free to replace butter with whipping cream to make a ganache, and reduce the proportion of chocolate for a softer filling that will mature the macarons faster.

Dark chocolate raspberry oreo filling
Ingredients:
150g Dark chocolate couverture (you may choose your percentage of cocoa according to preference)
30g Unsalted butter
1/8 tsp salt
30g crushed oreo cookie crumbs, sieved
10g freeze-dried raspberry powder

Steps:
1. Melt dark chocolate with butter and salt either by double-boiling or microwaving at low power.

2. Add freeze-dried raspberry powder and sifted crushed oreo cookie crumbs and mix well.

3. Let it sit for half an hour at room temperature to firm up a little to toothpaste consistency before using. Refrigerate briefly if room temperature is too warm to firm up the filling.

Lemon white chocolate filling
Ingredients:
70g white chocolate, finely chopped or use chips
15g unsalted butter
A pinch of salt
Zest of one lemon
10g lemon juice
1/2 tsp lemon extract (optional)

Steps:
1. Melt white chocolate, butter and salt by double-boiling or microwaving at low power. Be careful not to overheat. stir between 10 second bursts of heating if using microwave.

2. Add lemon zest and extract (if using) and mix well. Gradually add lemon juice and mix well.

3. Set aside to firm up to toothpaste consistency at room temperature.

Filling the macarons with two types of filling.

Here's a short video of how I assemble the ferris wheel, originally posted in my Instagram reels.

Do have a look at the reel along with the caption as I provide more tips there.


with love,

Phay Shing

Read More »

Monday, 20 December 2021

Snowglobe Chiffon Cake


Presenting my latest experiment - a Snowglobe Cake that truly Snows!☃️❄ 

Finally succeeded after several attempts and trials (yay!!)😛😍 This is the final prototype with a Hello Kitty Snowman! I have another prototype which I will post soon =) 

Can you guess how I made it snow?❄ All the different steps are important to make the "snow" fly. 

Here's the picture before the snow. You can see the globe is empty. 


See the snowing video here! 


And here's how I did it! 

Make a small hole in the cake and fill with snow powder or icing sugar behind the snowman (swipe to the last pic here). ➡️  Remember to sift it first. This is a really important step!

Cover back the globe. Insert a needle pump into the side of the cake into the hole full of snow powder. Remember to sanitise the needle first! 

Switch on the pump or blower and let it snow!🥰❄

Hope you liked it! 
Happy holidays and stay warm!!❤❤

With lots of love,
Susanne


Read More »

Friday, 5 November 2021

Hello Kitty's Birthday Cake


Happy birthday Hello Kitty! Thank you for bringing so much smiles to everyone around the world!

So honored to bake @hellokitty 's birthday cake this year! 💖 It's a dream come true for me! 🥰

Step-by-step recipe on Sanrio's blog here!

With lots of love,
Susanne


Read More »

Thursday, 28 October 2021

Hello Kitty Bento Chiffon Cakes


Which is your favorite among the 3? 💖💖 

Cute bento cakes for the kids!😀 

Have been wanting to make bento cakes for the longest time! 

Have a blessed weekend!🥰 

With love,

Susanne

Read More »

Monday, 27 September 2021

Hello Kitty x Pusheen Chiffon Cake


Have you heard of the cutest collab EVER between Hello Kitty and Pusheen #HelloKittyxPusheen ?😍

Love this sooo much and thank you @Pusheen and @Hellokitty for sharing this creation too!! 💖💖

My chiffon cake creation inspired this dream with double dose of cuteness! ❤❤🥰

With lots of love,

Susanne

Read More »

Wednesday, 23 December 2020

Twinkling Chiffon Cake Gingerbread House


Celebrating Christmas with our lovely Sanrio characters! 

I always dreamed of making a chiffon cake gingerbread house with twinkling lights!

See the twinkling lights video here.

The photos can't capture the lights inside the house well, so do check out the video. The entire gingerbread house and Sanrio characters are all made from chiffon cake! 

I had wanted to make a chiffon cake house with twinkling lights for long time, so I am really excited about it! Very thankful for the opportunity to try this out in collaboration with Sanrio.

We are also having a Sanrio bake-along for Sanrio characters x Susanne deco chiffon currently. For more details check out my post here
 
Have a blessed Christmas with your loved ones!

With lots of love,
Susanne


Read More »

Wednesday, 28 October 2020

Hello Kitty Lychee Raspberry Rose Macarons (jumbo sized!)

My friend requested for a giant Hello Kitty cake topper for her daughter's birthday. I couldn't resist playing around with my new backdrops for photography! 

She looks happy on a day out! 

I was actually preparing some prebaked macaron shells for a bunny teacup class and had lots of leftover white batter. I thought why not make the Hello Kitty macaron. Although it is my preferred way to make the clothes out of macaron batter as well, I didn't want to waste the excess white batter and didn't have the bandwidth to make extra colours. This was what I piped with the batter. 

I usually make one extra just in case of damage. 

You may refer to this post for the recipe for swiss meringue method macarons. 

I used royal icing to add on the clothes, nose and bow, and used black edible marker to draw the eyes. 

Photo taken with a ruler to show how big these macarons are

I filled the macarons with lychee raspberry rose Swiss meringue buttercream. You may refer to this post for the recipe. 

Filling colour fits Kitty very well! 


With love,

Phay Shing 

Read More »

Friday, 25 September 2020

Hello Kitty Donut Tower Chiffon


Knock knock!! It’s HERE! One of our all-time favorite Sanrio characters is here!

Introducing the Hello Kitty Donut Tower Chiffon Online Baking Class and Kit! 💖💖

Very thankful for the opportunity to collaborate with Sanrio on official licensed Sanrio baking classes.

In the online class, you will learn how to make a special two-tier pinata wavy pattern chiffon cake with a 3D Hello Kitty chiffon and a super delightful surprise! In addition, a new flavour refreshing lemon chiffon is shared!🍋 Official Sanrio Hello Kitty templates and downloadable recipe are provided.
 
Sign up in link is here
 
The online class is available to everyone, and launching at special promo price now.

Baking kits with pans are also available for delivery to your doorstep (within Singapore region only). 


Hope the cute cake makes you smile!

With lots of love,
Susanne

Media features and more details of baking class:
Read More »

Monday, 21 September 2020

Around the world with Sanrio Chiffon Cake


This special creation "Around the world with Sanrio" chiffon cake is a special collaboration with Sanrio Singapore to celebrate International Peace day amidst these difficult times 💖.

Our lovable Sanrio characters, Hello Kitty, Little Twin Stars, Keroppi, My Melody, Pom pom purin, Bad batz maru, Cinamaroll, and Gudetama join forces to spread love, peace and unity during these hard times. 

The "Sanrio characters x Susanne Deco Chiffon" online classes were also borne during the difficult COVID times to spread love and family bonding during the stay-home period 💖.  We hope to encourage everyone.

Which Sanrio characters will you hope to see next in my online class? 

With lots of love,

Susanne


Read More »

Saturday, 12 September 2020

Hello Kitty and Donutella in Hot-Air Balloon Macarons

Sometimes you don't know something can be done until you try it. This is one of those experimental bakes that turned out really well and I thank God for it 😊. Presenting my version of Hello Kitty with Donutella on a hot-air balloon trip over the rainbow, all made using macarons! 

Ok the marshmellow clouds and the balloon ropes aren't made of macarons 😂. 

Two things I experimented with using macaron batter 1) as a glue for macaron structures, and 2) creating a pastel striped pattern on hemispherical macaron shells. As I needed fairly good meringue stability over many hours, I used the swiss meringue method

Just to share some pictures and tips about the process... 


Piping the panels of the hot-air balloon basket and characters. You can see I had trouble with piping Donutella's ears 🤣

I decorated the characters with black edible marker and royal icing

The panels of the basket were glued together using the same dark pink macaron batter (left in piping bag for many hours). I dried the assembled baskets at 65°C in the oven for 20 min until dry to touch, and then ramped up the temperature to 110 °C to bake for another 15-20min. This drying/baking temperature and time profile is to create a membrane on the piped batter surface as soon as possible, as well as to set the structure by baking without it developing feet. 

Ta-dah! I was so happy it worked! Are the macaron shells super hard due to extended baking? Not at all! I did a taste test. 


I bit into the trial basket and was pleasantly surprised the texture wasn't compromised at all. This is probably due to the low temperature used to bake the joints. The macaron shells are nicely full too! 

I wasn't confident the striped hemispheres would turn out pretty because of the pastel colours involved. Hemispheres generally need to be baked at a higher temperature for a longer time, especially since I used the largest silicone mould I have at home (diameter about 6cm). I added white powder food colouring and eyeballed the oven thermometer throughout baking to prevent browning from happening. Piping the stripes on a curved surface was challenging too. I had to scrape off some of the excess batter that flowed off too much and pooled at the base of the hemisphere. 

Piped batter on hemispherical silicone mould. 


Freshly baked shells! 

I filled the macaron shells with whipped raspberry strawberry white chocolate ganache. I piped a thin wall of melted white chocolate with a little vegetable shortening to provide some stability and firmness to the structure. 

Recipe for mixed berry ganache
Ingredients:
90g white chocolate couverture (I used Callebaut) 
25g unsalted butter
1/8 tsp salt
40g homemade mixed berry compote*
1 tsp freeze-dried raspberry powder
1 tsp freeze-dried strawberry powder

* I pureed equal amounts by weight of raspberry (pips sieved out) and strawberry, and added 10% by weight of sugar, a pinch of salt and a tsp of lemon juice. Cooked and reduced over low heat until about 60% of original total weight of ingredients. If you find this too troublesome, you may replace with whipping cream and double the amount of freeze-dried fruit powder or to taste. The compote can be kept in the fridge for up to a month in a sterilised glass jar. 

Steps: 
1. Place white chocolate, butter and dalt in a heatproof bowl and melt over a freshly boiled pot of water without the bowl touching the hot water. Alternatively, you may use microwave oven to melt chocolate and butter but be careful not to overheat. Chill in fridge for 5-10 min or until scoopable consistency. If the chocolate mix becomes hard, just let it sit at room temperature for a while. 

2. In the mean time, mix the compote and freeze-dried fruit powders together in a small bowl. Set aside. 

3. When the white chocolate mixture is firmed up (but not hard), whip it with a spatula until light and fluffy, like buttercream.

4. Add berry mix unto the whipped white chocolate, 1 tbs at a time, mixing until well combined before adding more. 

5. Transfer into piping bag and fill the macarons. 

Filling the rainbow

I didn't fill the hemispheres with the ganache as it would be too heavy to "float". I packed the extra filling instead for the recipient to fill when she wants to consume. I filled the balloons with marshmellows instead. 

A closer look at the hot-air balloons! 

I always make extra macarons, especially for characters, due to the high chance of breakage when handling it. The recipient plated the extras so nicely I just have to share it 😊. 

The macaron creation at the party! 


Did this creation put a smile on your face as it did to the recipient? 


With love, 

Phay Shing 

Read More »

Wednesday, 29 July 2020

Hello Kitty Popsicle Celebration (Online Class)


Here is the second class which I am launching with Sanrio!

Titled Hello Kitty Popsicle Celebration, Hello Kitty dressed in red and white and getting ready to celebrate SG National day with us! =)

These yummy chiffon cake popsicles are vanilla-strawberry flavoured. This item is easier to bake and fun to make for the whole family. We hope that these online classes will promote bonding as we celebrate National day at home. Sign-up link for the class is here.

There are also options to add on baking kits with popsicle mold, ice cream sticks, and ingredients pre-weighed!

Hope these cheerful Hello Kitty popsicles made you smile!

With lots of love,
Susanne


Read More »

Thursday, 27 February 2020

Hello Kitty in Strawberry Suit Chiffon Cake


Hello kitty dressed up as a giant Strawberry! 🍓🍓

Do you love strawberries?🍓🥰

I made this cake again for a friend who loves Hello kitty and strawberries! Hello Kitty was one of my earliest creative chiffon cakes and recipe has been shared here. Here, I used a larger pan and decorated the clothes into a strawberry using sheet cakes.


Here, I combined Hello kitty with a "Wood stump" chiffon cake. A version of the "Wooden stump" cake has been shared here

Here I used dark pearl chocolate chiffon cake, and instead used the knife to get the circular wood grains on the top. I love dark pearl chocolate chiffon as it is richer. Recipe has been shared below:

Dark pearl chocolate chiffon cake (6-inch)
2 egg yolks
26g vegetable/corn oil
43g milk
52g dark chocolate
23 g cake flour, sifted
10 g cocoa powder, sifted
Pinch of baking powder
Pinch of baking soda

Meringue:
3 egg whites
1/4 tsp cream of tartar
35g castor sugar

1. Preheat oven to 140°C. Prepare a 15-cm tube cake pan.

2. Melt dark chocolate in a double boiler and stir till smooth. Set aside to cool a little.

3. Prepare egg yolk batter: whisk egg yolks with castor sugar till light. Add in oil and mix well. Add in milk and mix well. Add in sifted cake flour, cocoa powder, baking powder and soda, and whisk till no lumps.

4. Prepare meringue: Using an electric mixer, whisk egg whites with cream of tartar and castor sugar till firm peaks are formed.

5. Fold in meringue gently into egg yolk batter 1/3 at a time.

6. Pour into cake pan, leaving 2-cm from the brim.

7. Bake at 140°C for 55 min, or until skewer inserted into centre of cakes come out clean.

8. Allow cake in pan to cool completely inverted on wire rack.

9. Hand unmould the cake after it is fully cooled.

Hope you will like this yummy chocolate cake and sweet creation!

Please take care of yourselves during this period!

With lots of love,
Susanne


More cookbook ideas:

Read More »

Monday, 11 February 2019

Hello Kitty & Pooh Valentine's Day Macaron Teacups

I get all excited about coming up with original and cute overloaded creations. This is one of them! It's for a boyfriend who wanted to surprise his girlfriend for Valentine's Day. I am sure you can tell she's a Hello Kitty and Winnie the Pooh fan!

The whole teacup setup is made of macarons, with the exception of the stick for the heart balloon

I made this concurrently with my "Heart in a Teacup" macarons so you may refer to that post for more details on making the macaron teacup. I used reduced-sugar Swiss method for the teacups.

I made Hello Kitty, Pooh and the teeny hearts on a separate day along with a few other unicorn heads and some random characters. And because the quantity is so small, I chose to use the French method for these. You may refer to this post for a cornflour-stabilized French method recipe that I used for this bake.

Piping the tiny shells! I mainly used Wilton #3 and #5 piping tips for these

Decorating the shells with fine black edible marker was a challenge too! Thank God I made extra shells!

I filled the tiny macarons with dark chocolate ganache


Special gifts for your loved ones need not happen on special days like Valentine's Day. Do something special for your loved ones on random days. That's more special 😉.

With love,
Phay Shing

Read More »

Wednesday, 6 December 2017

Cupid Hello Kitty Strawberry & Dark Chocolate Macaron Carousels

I made not just one but two girly pink Hello Kitty macaron carousels! One regular sized and one downsized. Kitty is dressed up as a cupid this time :)


I used the non-reduced sugar macaron shell recipe but used icing sugar that already has cornflour added in. Both regular and reduced sugar recipes can be found here. You may refer to my Creative Baking: Macarons book for a systematic presentation of the basics and complex shaped macarons. You may refer to my video tutorials for macaron basics and piping of complex shapes on the blog too. You may refer to this post for the dimensions of the shells required to make the carousel and the respective baking times. I piped a scalloped roof like the one similar to the sheep macaron carousel as I think it's really pretty and it is very helpful for positioning the paper straws during the assembly. Checkout the sheep carousel post for detailed steps of assembly.

Just to share some photos of the process...

I piped carousel base and roof of different sizes as the carousels are of different sizes.

I piped the letters using macaron batter instead of my usual royal icing. I painted some gold and glitter lustre dust dissolved in vodka post-baking.

Piping the Kitty shells!

Freshly baked kitties! Check out the awesome feet!

The intricate bow and arrow and ribbon are made of royal icing.

Freshly baked circular shells for the carousel frame. Looking pretty in a stack :)

Dark chocolate flavour was requested but for aesthetics, I decided to add a layer of strawberry white chocolate so that it looks visually more pleasing when assembled. I used dark chocolate ganache for the circular shells in the middle, followed by dark chocolate and strawberry white chocolate. The latter outer layers do not contain heavy cream whereas the ganache does. You may refer to this recipe for dark chocolate ganache. I used about 80g worth of dark chocolate ganache.

Recipe for filling
Ingredients:
Dark chocolate
85g dark chocolate, chopped
20g vegetable shortening
1/2 tsp vanilla bean paste
1/4 tsp fine sea salt

Strawberry white chocolate
120g white chocolate, chopped
30g vegetable shortening
2 tsp strawberry emulco
3/8 tsp fine sea salt

Steps:
1. Place chocolate and shortening in a microwave safe bowl. Melt at medium power for 10-20 seconds and stir. Repeat until melted and smooth.

2. Add salt and mix well with spatula.

3. Gradually add flavouring and mix well. Note that adding strawberry paste/emulco all at one shot may cause the white chocolate to seize.

4. Transfer to piping bag and fill the shells.

Filling up Hello Kitty with dark chocolate and strawberry white chocolate 

Both recipients think it's too pretty to be eaten :p. The dilemma that comes with requesting for something as pretty as this from me!

With love,
Phay Shing

Read More »