Showing posts with label Earl Grey. Show all posts

Monday, 12 January 2026

Caramel Earl Grey Cat Box Cakes

 These cat box cakes are not only cute, they are delicious too!


Here's the cake composition:
🔸Earl Grey honey chiffon sponge (as the base)
🔸Light coloured Earl Grey vanilla chiffon sponge (as painting canvas)
🔸Caramel Earl Grey custard cream
🔸Crunchy Biscoff spread
🔸Earl Grey cinnamon honey tea agar jelly
🔸Freshly ground salt


I used the printing technique for the painted chiffon so there is no need to mess around with a patterning batter. This "cheat" method yields great results while saving the environment by eliminating the use of piping bags and cutting out a ton of washing. 

Painted chiffon using the printing method

A peek at halfway through assembling

A peek at the cross-section!

You may see the process of making these in this reel:
https://www.instagram.com/reel/DTKkS9viQAv/?igsh=eWYyNTZxcGJiNWls

If you are interested in learning how to make these cakes, I offer both studio and online classes for it. The grey and white cat designs will be shared in the class.  Please refer to the respective links for more information or to register:
Read More »

Saturday, 5 July 2025

Easy Red Panda Macarons

 This bake came about because I wanted something simple to use up my leftover salted Dulce De Leche and Earl Grey ganache from my cat macaron bake. The design is simple enough for bakers who can't manage piping characters because you only need to pipe circles for these cute red pandas!


I used my default French method recipe that's in my Creative Baking: Macaron Basics book (but added earl grey tea powder) and one portion is enough to make all the macarons in the picture below.


I used white chocolate, Earl grey tea powder and chocolate Crispearls for decorating the red panda face. No edible markers or royal icing were used! 

Check out the tutorial for making these over here:

https://www.instagram.com/reel/DKwaINgJp1Y/?igsh=MW1kZm5zNWIxMDRpdQ==

Just to share a photo of the real life cutie we saw at the zoo recently!


with love,

Phay Shing

Read More »

Sunday, 22 June 2025

Cat Macarons with Earl Grey Ganache & Salted Dulce De Leche

 I had a request for cat macarons (again!) so I wondered what design should I make this time since I have made various cat designs over the years and prefer not to make exact repeats. I turned to caroline_laura318 (Instagram account) for inspiration because in my opinion, her cat creations represent the cat-titude and playfulness of real cats the best.

Here's my set and I hope I did her work and the real felines justice!


I filled the macarons with Earl Grey white chocolate ganache and salted Dulce De Leche.

A closer look at the filling...


A closer look at the side profile...


You may wonder why my Earl Grey ganache looks so dark when I used white chocolate as the base. It's because I used both Earl Grey powder and loose leaves to impart a strong Earl Grey flavour.

I used my default Swiss meringue method recipe for the macaron shells. Please see the reel for the process as well as recipe for the fillings.

https://www.instagram.com/reel/DKbzvW2yHq9/?igsh=MXY4a3BzdGZiOGVpbw==


Thank God the macarons were very well received!


with love,

Phay Shing

Read More »

Thursday, 29 August 2024

Apple Earl Grey Apple Macarons

Happy Teacher's Day to all teachers! Thank you for your hard work! I didn't have time to make a teacher's day special bake so this unplanned bake came at the right time! This unplanned bake happened because I had leftover batter from an epic project that was sitting in the piping bag for 4 hours. Presenting my apple macarons filled with apple Earl Grey ganache and apple jam filling! The ganache is dairy-free and temperature stable in tropical Singapore's non-airconditioned room temperatures.


I used my default Swiss meringue method recipe where the egg whites are split into whipped and unwhipped portions to give a smoother finish on the surface. Really pleased that despite leaving out the batter for long, the macaron shells are still full, smooth and have even feet!

Even the stems and leaves were made from leftover batter too and of a different color. The stems were made from leftover grey batter with cocoa powder and cornstarch added. I added the cornstarch to thicken the batter some more to give the stems a little texture. The leaves were made from leftover beige batter coloured with green gel colouring.


The apple jam is actually what I use for making zephyrs (agar-based marshmallows). Since this bake was unplanned, I just used the same apple jam for filling the macarons as I am preparing for a marshmallow bake soon.


Proper technique and attention to detail during the process is so important and that's what I teach in my classes. It's not simply about following a recipe as we all work with different equipment and conditions.

See my reel for the filling recipe and video tutorial of the process:

https://www.instagram.com/reel/C_Nl4M-S_cA/?igsh=cWsxbWNrMXRvbmty


with love,

Phay Shing

Read More »

Monday, 11 September 2023

Earl Grey Pear Chiffon Cake

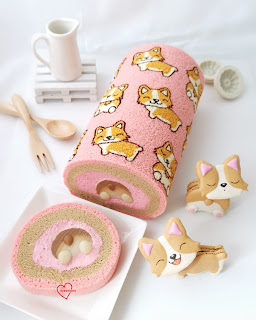
 If I had a choice, I would rename the title of this post as "Earl Grey Honey Milk Tea Vanilla Pear and Lime Chiffon Cake" but that would be too long and a big mouthful to read out aloud 😆. But that's the true representation of this really aromatic, refreshing and yummy cake!


I made not just one but two such cakes! One for my dad's birthday and another for my uncle's birthday.


The pears on top are actually made of chiffon cake. This is the Instagram reel on how to make it:


The large cakes are made up of:
- Earl grey honey milk tea chiffon sponges
- Earl grey pear tea with honey agar jelly 
- Pear and lime compote with brown sugar and honey
- Chantilly cream

I have to thank Lizzy (@homecookinglizzy Instagram account ) for the inspiration for this cake flavour and the recipe for the pear and lime compote. It's amazing 😍.

I was trying out baking without using steam baking but with a different baking temperature profile to see if it works too. Fan mode was used when I usually use top and bottom heat only. My conclusion is, there isn't really much difference in results from my usual temperature profile which starts at a higher temperature and then gradually lowering it, while using steam baking.

Earl Grey pear tea
This is used for making the chiffon "pears" and the agar jelly.

Ingredients:
1 large ripe Packham pear, peeled and grated
2 Earl Grey tea bags
1/2 tsp black tea powder (or 1 Earl Grey tea bag)
1 stick of cinnamon
1/2 tsp vanilla bean paste or extract
400ml water

Steps:
1. Place all ingredients in saucepan and bring to a boil. Simmer for 5 minutes.

2. Turn off heat and leave it to cool completely. Discard cinnamon stick. Squeeze out the tea bags. Sieve the Earl Grey pear tea through fine sieve. Store in airtight glass container refrigerated until needed. You may prepare this 1-2 days in advance.


Earl Grey pear tea chiffon cake "pears"
Ingredients (makes about 15-16 pears):
Egg yolk batter
2 egg yolks
28g vegetable oil
28g Earl Grey pear tea
40g cake flour
Pinches of salt
1/2 tsp vanilla extract
Green and yellow gel food colouring
1/2 tsp Earl Grey tea leaves from tea bag (optional)
Cinnamon stick cut to thin slivers (for pear stems)

Meringue
2 egg whites
1/8 tsp cream of tartar
38g caster sugar

Steps:
1. Wash egg shells and remove membrane inside. Air dry completely before using. Use silicone hemisphere tray, muffin cases or disposable cupcake cases to hold each eggshell upright.

2. Preheat oven to 120-130C fan mode.

3. Prepare egg yolk batter. Whisk egg yolks until pale and thick. Add oil and whisk until well combined. Add tea, salt and vanilla and whisk until well combined. Gradually sift in flour and whisk until no trace of flour is seen. You may add some tea leaves from a tea bag to the flour before sifting together to add black specks on the pear to mimic real pears. Set aside.

4. Make the meringue. Beat egg whites with cream of tartar until firm peaks or just reach stiff peaks, gradually adding sugar once egg whites are foamy. 

5. Quickly but gently fold meringue into egg yolk batter in three additions. Transfer into large piping bag. Cut a hole about 7-8mm. Fill the egg shells about 2/3-3/4 full.


6. Bake for 35-40 minutes. Increase temperature to 160C and bake for another 5 minutes. Leave to cool completely before cutting off the excess cake that rose out of the egg shell. Crack the egg shells with the back of metal spoon and gently releasing the cake. Adjust baking temperature and time according to your oven as each oven is different. 

7. Use a strip of cling wrap to tie a knot at where you want the "waist" of the pear to appear on each cake. Leave it for 10-15 minutes before untying it. I was impatient and didn't want to use so much plastic so I just did it one at a time, using the time to unmould each cake as the length of time to "strangle" the previous cake. The sponge would bounce back a little but I just shape it with my fingers again.


8. Insert a sliver of cinnamon stick for the pear stem. You may use chocolate if you wish but I prefer something that is less fragile and easier to handle in hot and humid Singapore. 


9. Brush the surface of the sponge with syrup (1:2 sugar: hot water) and store in airtight condition in the fridge. You may store at room temperature too if consuming within 3 days.


Don't they look cute?😍

Earl Grey pear tea with honey agar jelly
I portion the jelly ingredients such that the jelly layer I set in my silicone tray is about 7-8mm thick. My tray is about 8" in diameter.

Ingredients:
270g Earl Grey pear tea
40g honey
5g agar powder
Zest of 1 large lime (calamamsi), optional

Steps:
1. Put cold or room temperature tea in saucepan. Scatter agar powder over and whisk. Let it sit for 5-10 minutes. 

2. Add honey and lime zest. Bring to boil while whisking frequently.  Simmer for 3 minutes while whisking. 

3. Pour mixture through a very fine sieve into tray. Leave it to cool to room temperature. Refrigerate for at least 1 h.

4. Use a small teardrop shaped cutter (or any other shape you like) to cut out pieces for lining the sides of the cakes. Finely chop the remaining leftover jelly for adding to the filling in the middle with the pear and lime compote. Keep the cutouts and finely chopped pieces covered and refrigerated until needed.

Pear and lime compote 
Ingredients:
3 ripe but firm pears, peeled and finely chopped
2 large limes (calamamsi), zest and juice
45g light brown sugar
15g honey
15g water
1/8 tsp salt

Steps:
1. Place all ingredients in a saucepan and cook for about 15-20 minutes or until pear appears translucent.  Set aside to cool completely. You may prepare this a day in advance. Store in refrigerator if preparing in advance.


Earl Grey honey milk tea chiffon cakes
Ingredients (makes one 15cm and one 17cm chiffon cake in tube pans*):
Egg yolk batter
7 egg yolks
80g vegetable oil
110g Earl Grey honey milk tea**
1.5 tsp vanilla extract
1/8 tsp salt
5g black tea powder***
145g cake flour

Meringue
7 egg whites
1/4 tsp cream of tartar
105g caster sugar

*Please scale recipe according to your chiffon cake tin size. Use 2 or 3 egg portion for 15cm and 4 egg portion for 17cm tin.

** Dissolve 55g of honey in 100g of milk by heating and stirring in a saucepan. Remove from heat once honey is dissolved and milk is steaming hot. Soak 6 Earl Grey teabags for 10-15 minutes. Squeeze out as much tea as you can from the tea bags. Portion out 110g for use. Top up with more milk if amount is not enough.

***Extra notes: You may replace tea powder with more Earl Grey tea bags if you don't have it, adjust amount according to taste and brand. The tea powder I use is able to dissolve in water. You may add milk powder if you wish the taste to be milkier. I omitted it although Lizzy added it, because the sponges are eaten with dairy cream instead of eaten alone or without pairing with something milky.

Steps:
1. Preheat oven to 120-130C fan mode. Set oven rack to second lower position.

2. Dissolve black tea powder in Earl Grey honey milk tea if using. Set aside.

3. Prepare egg yolk batter. Whisk egg yolks until pale and thick. Add oil and whisk until well combined. Add tea, salt and vanilla and whisk until well combined. Gradually sift in flour and whisk until no trace of flour is seen. Set aside.

4. Make the meringue. Beat egg whites with cream of tartar until firm peaks or just reach stiff peaks, gradually adding sugar once egg whites are foamy. 

5. Quickly but gently fold meringue into egg yolk batter in three additions. Pour into chiffon cake tins until batter is about 1" below the rim. Run a chopstick along the base and sides of the tin to pop any large air bubbles.

6. Bake for 1h - 1h 10 minutes. The cakes don't brown at all in my oven at this temperature. Increase temperature to 160C and bake for another 7-10 minutes or until tops appear a little browned. Immediately invert the tins to cool completely before unmoulding by hand. Slice each cake horizontally into 3 slices. I sliced into 4 so that I can fill the hole in the middle with circular cutouts from the fourth slice.

Chantilly cream
You may use any type of cream or combination of cream you like according to taste preference and ambient conditions that you are serving the cake. Non-dairy holds up the best, is pre-sweetened and impossible to overwhip. Heavy cream tastes the best but may need stabilizers like gelatin and sugar, and tends to be over whipped more easily if not careful. You may also use double cream which has higher fat content than heavy cream, tastes great too but able to hold its shape better in warmer conditions. I use a combination of non-dairy and double cream to get the best of both worlds of taste, stability and ease of handling. I use a ratio of 2:3 for non-dairy : double cream.

Make sure sponge cakes are sliced and all filling ingredients are ready before whipping the cream. Use it immediately to assemble the cakes.

Ingredients:
250g Whip topping (non-dairy whipping cream)
375g double cream (45% fat)

Steps:
1. Whip non-dairy whipping cream until stiff. Set aside.

2. Whisk double cream until loosened and able to hold some soft to firm peaks. Be careful not to over whisk or it will split. That's why I recommend using the hand whisk instead of electric mixer for this.

Whisked double cream till soft-firm peak

3. Gradually fold in whipped non-dairy cream into double cream until well combined.

Assembly
1. Place a slice of sponge on 7 or 8" cakeboard. Wrap an acetate sheet around the cake and tape it in place. Fill the hole with a sponge cutout if you wish.

2. Brush the sponge with some syrup from the compote. 

3. Spread a thin layer of cream over the sponge.

4. Slide agar jelly cutouts down the sides of the acetate sheet so that there is no air gap. Line the whole circumference of the cake with the jelly.

5. Transfer some cream into piping bag with a small hole (4-5mm) cut. Pipe cream around the jelly cutouts, making sure there is no air gap. Use a skewer or chopstick to nudge the cream if you see air gaps from the outside. 

6. Fill the middle with pear and lime compote and chopped bits of Earl Grey pear tea jelly.


7. Cover with cream and smoothen it relatively flat.

8. Carefully insert second sponge layer. Fill hole with sponge cutout if you wish.

9. Repeat steps 2-8.

10. Cover the top with cling wrap. Refrigerate for at least 2 hours before removing the acetate sheet. You may leave the acetate sheet in place if you wish until ready to serve. Keep refrigerated and consume within 3-5 days. 

My family loved the cake because it is so light, refreshing and fragrant, with a good balance of flavours! I thought the addition of lime to Earl Grey and pear an unusual one but it turned out very well! Here's a peek at the messy yummy slices!


To be honest, I would have filled the "pears" with some cream and compote as well but these cakes came at a very busy period for me with multiple deadlines happening around the same time. I decided to keep things simpler. If you would like to know how to fill the pears, you may refer to my apple black tea chiffon cake apples or chiffon strawberries posts.


with lots of love,

Phay Shing

Read More »

Tuesday, 12 April 2022

Totoro and Mei Earl Grey Salted Caramel Macaron Scene


I had a request for a macaron scene with birthday girl's favourite characters in there so I created this!

Totoro and Mei with elephant, giraffe and koala!

I used my default swiss meringue method recipe to make the macaron shells for the characters and the large round base. 

The trees are made of black tea brown sugar meringues. I got the basic recipe from a baker friend but tweaked it for the added flavours so I am not able to share it. 


Yes the entire tree is made of meringue! No royal icing or wires used to glue or support the structure. I had to build it up in stages like a 3D cardboard tree except all parts and glue are made of meringue. These were made in advance, thoroughly dried and stored in airtight container.

Here's a better view of all the characters. I usually make duplicates of each character in case of accidents while handling.


I filled the macarons with Earl grey Italian meringue buttercream (IMBC), homemade salted caramel and some crushed biscoff.

I folded in some salted caramel, crushed biscoff and some earl grey tea leaves into half of the Earl grey IMBC, and drizzled more salted caramel and sprinkled more crushed biscoff for the large macaron base.

 I have always used Swiss meringue buttercream as my default buttercream base but thought why not try Italian meringue based buttercream instead so that I can incorporate more brewed tea in the buttercream.

Earl grey Italian meringue buttercream (IMBC)
Ingredients:
76g egg whites (about 2 eggs)
100g caster or granulated sugar (portion about 1 tsp out for egg whites)
30g concentrated Earl Grey tea*
114g unsalted butter (cut into small pieces, cool but softened)
A pinch of salt
1/2 tsp vanilla extract

* Steep 4 Earl grey teabags in 60g boiling water for 10 minutes. Squeeze out the liquid from the bags as much as possible. Measure out 30g for making IMBC

Steps:

1. Place sugar (100g minus 1 tsp) , concentrated tea and a pinch of salt in a small saucepan and heat at medium-low heat. Stir intially to help the sugar dissolve but once the water starts boiling, stop stirring. 

2. In the meantime, beat egg whites with 1tsp sugar until foamy. Reduce mixer speed if necessary to prevent overwhipping.

3. Once syrup temperature reaches 110C, turn up mixer speed and whip until soft peaks as you wait until syrup reaches 115C. Again, reduce mixer speed as necessary once soft peak is reached. Once temperature is reached, remove from heat. Turn mixer speed up to medium-high and pour the syrup down the side of mixing bowl in a slow and steady stream. Keep beating on medium-high speed for 10-15 minutes or until Italian meringue is cooled to room temperature.. It is important to make sure butter is not warm when you add the softened butter.

4. Add butter a little at a time while beating on medium-low speed. You may switch to paddle attachment if you wish but I prefer having less things to wash. Don't panic if it appears to split a little. just keep going and adding butter a little at a time.

5. After all the butter is added, add vanilla. Continue whipping but increase mixer speed to medium high and beat for another 2 minutes.

You may use the Earl Grey IMBC as it is. But I portioned out about half of the IMBC and added homemade salted caramel with the ratio of 
1:2 for salted caramel : Earl grey IMBC,
folded in some Earl grey tea leaves (about one teabag's worth) and crushed biscoff (about 30g). Do note that the ratios can be adjusted according to taste.


Sharing a picture of the assembled large base with a meringue tree before the tree gets hidden by the characters.

I hope this creation brought a smile to your face as it did for me and the recipient! 

Do check out my Instagram account at phay_shing for a more up-to-date view of my baking journey!

with love,
Phay Shing
Read More »

Saturday, 5 February 2022

Corgi Earl Grey Strawberry Swiss Roll

I am trying to make time for other bakes this year, not just macarons and choux pastries. For a start, I decided to create a corgi swiss roll inspired by my 3D corgi macaron design! 


Everyone in my family said it looks like a corgi ran into the roll cake and got stuck😂. Once you see it, it is difficult to unsee! Here's a top view of the cake. 


I made it almost dairy-free as my friend's family cannot tolerate dairy. Trace amounts is ok so I used a little butter in the strawberry diplomat cream. 

This cake is made of Earl Grey strawberry vanilla chiffon sponge, strawberry diplomat cream made from lots of fresh strawberries (see the specks of red in the cream) and an Earl Grey vanilla honey oat milk agar agar jelly in the middle of the roll. 

This bake begins with making the strawberry pastry cream, the Earl grey agar and vanilla honey oat milk agar. You may refer to this recipe for the strawberry diplomat cream. For a dairy free version, use non-dairy whipping cream and use a plant-based milk. I used soy milk. I also added the whipped cream into the pastry cream just before assembling the cake. 

To make the corgi butt shaped jelly, I made my own customized cookie cutter from a DIY kit. You may use some condensed milk or evaporated milk if you wish. Adjust any sugar added according to type of milk you use and according to taste. The agar is quite a firm one as I wanted to be sure the jelly cutouts can keep the shape. You may reduce the amount of agar powder used if you prefer softer filling, or use fresh strawberries as the filling. You may use gelatin instead of agar but it has a softer bite than agar and melts more easily in hot Singapore so it will be more challenging to cut out shapes. 

Earl grey and Vanilla honey oat milk jelly

Ingredients (makes two 7x7" trays) :
Earl grey agar
500g oat milk (or any milk of preference) 
6 Earl grey teabags (adjust according to strength preference ) 
6g agar agar powder
Sugar (according to taste. I didn't add as oat milk is slightly sweet) 

Vanilla honey agar
440g oat milk
40g honey (or according to taste)
1 tsp vanilla extract
6g agar powder

Steps:
1. Boil 500g oat milk in saucepan and steep 6 teabags for 10 minutes. Squeeze all the tea out from the bags. Let it cool to room temperature before adding agar powder and sugar (if using). 

2. Bring all the contents in saucepan to roiling boil while stirring constantly. Keep it boiling for about 1min (continue stirring!) before removing from heat and pour into mould/tray lined with teflon sheet. I used 7x7" trays for setting the agar. You may reserve about one tablespoon for piping the corgi tails on a separate teflon sheet or parchment paper and let it set. 

3. Prepare the vanilla honey agar in a similar way. Transfer about 1.5 tbs into piping bag to pipe out the corgi feet. I used my macaron template for piping the agar corgi tail and feet. Store set tails and feet in airtight container in a single layer until ready to assemble. 

4. Set the two square trays of agar in fridge until firm, at least an hour. You can prepare this a day in advance. 

5. Make customized cookie cutter and cut out the corgi butt shape. I glued the different coloured jelly together using freshy made transparent (plain) agar as glue but with a lower powder to liquid ratio (1/4 tsp agar powder to 100g water). Keep all assembled pieces in a single layer in airtight condition in fridge while preparing the chiffon sponge. 

Cutting out the agar pieces with customized cutter

This is the second time I am using Keem Ooi's technique and recipe for patterned swiss roll. You may see my first attempt over here. Please check out her Instagram page (Keempossible_2) and drop her a DM if you are interested in purchasing her recipe. I just tweaked it to flavour the sponge layers with strawberry paste and earl grey to flavour and colour the cake without additional food colouring. I used a 10x12" pan instead of 9x11" as suggested by Keem.  I added about 1/2 tsp strawberry paste and used 2 earl grey teabags for the pink and brown sponge layers respectively. 

Freshly baked patterned chiffon sponge

Cooling the sponge in rolled up position helps to prevent it from cracking. 

Are there any additional tips I would like to highlight? Yes! Make sure the meringue for your patterning batter is whipped till really stiff but not broken. Take your time to build up your meringue slowly. These two tips will ensure you have a nice thick and smooth patterning batter that stays stable for a longer time as you pipe the design. 

Instead of painting, I used edible markers to outline the corgi and add on the details as they are really small and fine. You may use paint made by dissolving gel colouring in water like what Keem does. You may wish to brush the surface of the sponge with simple syrup if the sponge dries out while you work in the open to paint in the details.

Do follow me on Instagram @phay_shing as I am most active there if you would like to see more of my work. I don't most some of my work on Facebook and the blog. 

With love, 
Phay Shing


Read More »

Thursday, 14 January 2021

Jawa and Tusken Raider Dark Chocolate and Earl Grey Macarons

I was asked to make some macarons for a Star Wars fan club event that was supposed to happen back in May last year but it got postponed until end November due to the pandemic. The drawings for a rather chibi version of Jawa and Tusken raiders were given to me so it was very helpful when I had to make a total of 66 character macarons like these! 


I used the Swiss meringue method to make these macarons. The shells alone I chose to split over 2 days to bake as I still have my hands full with family. 

Here are some photos of the piped batter... 

Piped Jawas! 

Piped Tusken raiders! 

I decorated the shells with edible marker and royal icing.  It took me 2 days to complete decorating the shells. 

See the awesome feet! 

See the awesome feet on these too! 

I filled the macarons with dark chocolate ganache and Earl Grey ganache


Here is another peek at the assembled macarons! 


With love, 

Phay Shing

Read More »

Saturday, 5 September 2020

Princess Crown and Shoes Raspberry and Earl Grey Macarons

I had a request for princess themed macarons. Since the stereotypical princess wears fancy shoes and tiaras, I made these macarons 😊

Looks a little like a shop selling princessy paraphernalia 🤣

I had to decide whether to go for easier time before baking or post-baking. I chose the latter to avoid using royal icing (which is added sugar) on the baked shells. So this is what the piped batter looks like...

Intricate details were done using macaron batter too

The glass slipper 

I used the Swiss meringue method for making the macaron shells and you may refer to the detailed recipe in this post.

I used edible marker to decorate the baked shells to make the features on the tiaras and shoes more well defined. I painted on some white stars to give the glass slipper a "bling bling" look by using paint made with white gel colouring dissolved in vodka.

Raspberry and earl grey flavours were requested. You may refer to this post for raspbery white chocolate ganache and this post for the Earl Grey ganache.

Filling with raspberry ganache

Filling with Earl Grey ganache. 

Did these princessy accessories charm you 😊? 


With love,
Phay Shing
Read More »