Showing posts with label Chinese Pastry. Show all posts

Friday, 6 February 2026

Horse 马蹄酥 (Ma-Ti-Su)

 It's the Year of the Horse (马年) so of course I have to make some 马蹄酥 horses!


A closer look at the flaky pastry and gooey filling!


Recipe For 马蹄酥🐴 (horse shoe pastry horses)
(makes about 7 horse pastries)

A.k.a. Beh Teh Soh or Heong Piah in Hokkien dialect or Heong Paeng in Cantonese dialect.

Recipe is adapted from Yeo Min's Chinese Pastry School cookbook. 

For those of you not familiar with the pastry, it has a crisp, flaky crust and a gooey, fragrant, savoury and sweet filling with maltose, shallot oil and toasted white sesame seeds as the stars of the flavour profile.

Filling:
35g sugar (caster or light brown)
55g maltose
1/2 tbs toasted white sesame seeds
10g shallot oil
1g salt
15g cooked glutinous rice flour

Oil dough:
54g plain flour
27g vegetable shortening 
1/16 tsp cocoa powder

Water dough:
70g plain flour
10g caster sugar
8g neutral oil
4g shallot oil
35g warm water
5g maltose
1/16 tsp salt

Egg wash:
1 egg yolk
1 tsp hot water
1/8 tsp cocoa powder

Others:
Black edible marker
A little maltose or honey

Watch my reel to see the process:


METHOD:
1. Prepare filling. Warm maltose and sugar in microwave oven/double boiler. Mix in the rest of ingredients. Rest for 10min. Divide into 15g portions. Freeze for 10min before reshaping to horse face shape. Keep frozen till assembly.

2. Prepare water dough. Whisk all ingredients except flour together to emulsify oil & water. Pour at once into flour. Mix until dough forms. Cover and rest for 15min. Knead until elastic and passes windowpane test. Keep covered

3. Prepare oil dough while resting water dough. Rub shortening into flour and form a ball of dough.

4. Laminate 18g water dough and 9g oil dough as shown in reel. Keep laminated balls of dough covered to prevent drying out.

5. Add 1/16 tsp cocoa powder to 6g of oil dough. Roll to 3mm thick between parchment paper and cut out horse mane. You may use a template and knife. I made a homemade cookie cutter out of an empty can to make it easier. Bake at 150C for 10 min or till done. You may do this after the pastries are baked to have a better gauge of the size of the mane needed.

My homemade cookie cutter for the horse's mane


6. Use leftover oil dough for forming the ears.

7. Roll laminated dough flat, about 8-10cm. Place filling in the middle & enclose. Pinch seams together & place it seam side down. Make sure the seams are properly sealed or the filling will burst out during baking.

8. Prepare egg wash. Dissolve cocoa powder in hot water. Add to egg yolk & mix well. Sieve before using.

9. Brush the tops of the pastry for horse face pattern. Attach ears and egg wash as shown in reel. Make holes for nostrils using toothpick. Imprint the mouth using a straw cut as shown in reel. You may need to deepen the mouth by using the toothpick to indent the smile deeper or it may disappear after baking

10. Bake in preheated oven at 170C fan/180C for 30 min (or until lightly browned). Rotate the baking tray halfway through baking. 
Very helpful tip from Yeo Min: 
Bake pastries on preheated baking tray or hot stone to quickly set the pastries for reducing risk of leaks. That's why I placed each horse on parchment paper squares so that I can yeet them into the oven directly onto a hot surface, baking 3 horses at a time. This tip really works wonders! 

11. Cool slightly before drawing eyes with black edible marker. Attach the mane using a little warmed and softened maltose or honey. Best enjoyed freshly baked or retoasted until warm if stored in airtight container to enjoy the pastries with the filling in a gooey state.

with love,
Phay Shing
Read More »

Sunday, 12 October 2025

马蹄酥(Ma-Ti-Su) Seal

 My younger boy wanted his favourite Chinese Pastry, beh teh soh/heong piah (马蹄酥) as his early birthday treat from me this year so I made them into the likeness of the newest addition of plushie in our family --- seal with a disapproving look! 


Here's a closer look at the bite-cross-section!


I adapted the recipe from Yeo Min's Chinese Pastry School cookbook.

You may find a video of the process and the full recipe over here:

https://www.instagram.com/reel/DPdx9tOiU_x/?igsh=czhwZnQzdmY5bWV4

I will just share the ingredient list over here for your convenience but so check out the reel for the method.
I accidentally used 4-5g more oil for the water dough so it was much softer than the oil dough. It still turned out well but don't make the same mistake as me!

马蹄酥 (Ma Ti Su) Seal
(Makes about 12 seals)

Filling:
70g sugar (caster or light brown)
110g maltose
1 tbs toasted white sesame seeds
20g shallot oil
2g salt
30g cooked glutinous rice flour

Oil dough:
100g plain flour
50g vegetable shortening 

Water dough:
140g plain flour
20g sugar
16g neutral oil
8g shallot oil
70g warm water
10g maltose
1/8 tsp salt

Maltose wash (may replace with egg wash):
1/2 tsp maltose
1/2 tsp instant coffee (optional, to add slight brown naturally)
10g hot water
1 drop brown gel colouring 

Glue:
1 tsp plain flour
2 tsp water

Other:
Dark brown non pareils/ chocolate Crispearls 
Black edible marker


Here's how the assembled pastries look before baking...


... and after baking with the eyes drawn in


Thank God the boy gave his seal of approval 🤭! These are yummy when eaten warm after re-toasting to get the filling oozy and crust crisp again.


with lots of love,

Phay Shing

Read More »

Thursday, 23 January 2025

Yuzu Matcha Wintermelon Mochi Tarts

 Inspired by the filling of wife biscuits (老婆饼) & the pastry of pineapple tarts during the Lunar New Year season, I came up with these!


A closer look at the insides!


It was a challenge to get nice pictures of a bite cross-section because the pastry is light and crumbly. I have shared the recipe and video of the process on Instagram 

https://www.instagram.com/reel/DFJTQ1ghkpm/?igsh=MTh6aGJkeDJwZnRh

But I will just copy and paste the recipe and baker's notes on this blog post for those of you who find it hard to read off the captions of the reel. Feel free to upsize as this is a small batch.

Yuzu Matcha Wintermelon Mochi Tarts 
(makes about 25 tarts)

Filling:
100g candied wintermelon (糖冬瓜)* blended or minced
1/8 tsp salt
6g oil
4g honey
20g yuzu/Jeju citron* marmalade without rind
25g water* (more if necessary, 1/2 tsp at a time)
40g cooked glutinous rice flour* (a.k.a. 糕粉)
2g matcha powder*
12g yuzu/citron rind from marmalade, finely chopped

Pastry:
110g plain flour 
10g cornstarch 
6g matcha powder
20g milk powder
25g icing sugar
1/8 tsp salt
100g cold unsalted butter, cubed
1 egg yolk

Egg wash:
1 egg yolk
7g milk/water

1. Blend or mince candied wintermelon. Add salt, oil, honey, marmalade & water. Mix well

2. Whisk together cooked glutinous rice flour & matcha powder. Add to 1. & mix until dough forms

3. Add rind & mix well. Add more water if dough is dry*

4. Divide filling into 8g balls. Keep airtight & refrigerate until ready to assemble

5. Sift together all dry ingredients for pastry

6. Rub in butter until it resembles fine breadcrumbs

7. Add yolk. Mix until dough forms. Wrap & refrigerate for 30min

8. Divide dough into 10g portions. Wrap the filling. Make a hole to vent* during baking

9. Freeze & preheat oven to 135C fan/150C

10. Once oven is preheated, place chilled tarts on lined baking tray. Apply egg wash. Add black sesame seeds if you wish

11. Bake for 30 min or until lightly browned, rotating the tray halfway. You may reapply the egg wash halfway through baking if you wish. Remember to adjust baking temperature and time according to your oven as each oven is different. 


*Baker's notes:

🔸Candied wintermelon, cooked glutinous rice flour and yuzu/Jeju citron marmalade are most likely things you can find in an Asian grocer if you don't live in Asia. These are common items in Singapore. If you can't get cooked glutinous rice flour, simply dry fry glutinous rice flour over low heat for 10 min until aromatic. There's a distinctive cooked glutinous rice flour smell you can't miss

🔸I was given some high grade matcha powder from @alovelikesobo but you may use whatever you have on hand. Do note that lower quality matcha may oxidize with exposure/heat and the green colour may be less vibrant after baking. Needless to say, higher quality powder would taste better

🔸The amount of water needed for the filling will vary depending on how dry your candied wintermelon is. Err on the side of adding less water first because it can get difficult to handle if too much water is added and it becomes a sticky mess. Add enough water such that it's still soft and tacky to touch but doesn't stick to your finger when lightly pressed as shown in the reel

🔸I went for a slightly firmer pastry than regular pineapple tart pastry but still crumbly as the filling is slightly chewy due to the glutinous rice flour. Personally I feel if the pastry is too delicate, it wouldn't fit this filling but feel free to adjust the ratios of the dry ingredients in the pastry. The higher the percentage of cornstarch, the more delicate the pastry

🔸Traditional wife biscuits are made with flaky pastry that doesn't use butter. I decided to have a light buttery pastry to accompany the aromatic and slightly chewy filling. Slits or holes are usually made in the flaky pastry before baking. They act as vents to release steam from the filling, which in turn prevents the pastry from cracking uncontrollably. Don't be alarmed if you see your tart pastry cracking in the oven as this is due to the expansion of filling/ release of steam. The appearance of the cracks will reduce upon cooling. Using lower heat with longer baking time helps to keep cracking minimal


with love,

Phay Shing

Read More »

Monday, 20 November 2023

Guinea Pig Wife Biscuit (low carb version)

 Hubby loves having 老婆饼 (wife biscuit) at the start of the day sometimes but Chinese pastries are usually not keto/diabetic-friendly. That's why I decided to make a more sugar-free/ low carb version of his favourite Chinese pastry as his birthday bake.


These cute pastries are modelled after a guinea pig plush we have at home whom we have named 圆滚滚 (pronounced as "yuan goon goon" and it means roly-poly in English). Here is 滚滚 looking at the pastry version of himself 😆!


We have a soft spot for guinea pigs since we have one geriatric pig at home (the other one passed almost a year ago).

I must admit that I couldn't do a full sugar replacement as candied wintermelon, the key ingredient in the filling, has to be made using actual sugar because it relies on the chemical properties of sugar for it to work. I rinsed the excess sugar crystals off the candied wintermelon thoroughly and pat the pieces dry before mincing to reduce the amount of actual sugar. But in all other areas, I replaced regular sugar with Erythritol. I didn't use Allulose as it tends to brown/burn at much lower temperatures and has a stronger aftertaste that hubby doesn't like. Although Erythritol isn't easily soluble in water, it isn't an issue for this bake. It also browns nicely when baked. I don't recommend replacing plain flour with keto alternatives as you need the gluten formation for the flaky pastry to work.

The plush toy is from a very talented artist, Birdie Tam (@birdietam.art Instagram account). I adapted the wife biscuit recipe from Yeo Min's (@pastoriessg Instagram account) newly launched Chinese Pastry School book. Do grab a copy of her book if you are interested in Chinese Pastries. She is very detailed and has done much research into the history and science of Chinese pastry making.

This bake consists of shortbread cookies for the leaves and ears, candied wintermelon filling, and Chinese flaky pastry made from laminating water and oil dough. I used only matcha, cocoa and charcoal powders for natural colouring. You may have a look at my reel for the process of making this:

https://www.instagram.com/reel/Cz3ehDhvAwR/?igshid=MzRlODBiNWFlZA==

GUINEA PIG WIFE BISCUITS

Makes about 15 wife biscuits. Whenever sugar is mentioned, you may use regular sugar or sugar-replacement of choice. I used powdered Erythritol (zero GI) for all.

Shortbread cookie leaves and ears
10g icing sugar
Pinch of salt
20g vegetable shortening or butter (I used shortening as wife biscuits aren't buttery)
30g plain flour, sifted
Cocoa powder
Matcha powder

Wintermelon filling
65g cooked glutinous rice flour* (a.k.a gaofen 糕粉)
40g sugar
Pinches of salt
110-115g water
15g peanut oil
125g candied wintermelon**, finely minced
12g white sesame seeds, toasted

* If you are unable to get cooked glutinous rice flour, you may buy the raw one which should be available at Asian markets if you do not live in Asia. Stir-fry the raw flour without oil in a frying pan over low heat until you are able to smell the distinctive aroma of cooked glutinous rice flour.
** Also available from Asian markets. You could also make your own from scratch but the whole process requires about a week due to the long wait time for the sugar to draw moisture out from the wintermelon pieces, and the subsequent drying process. Yeo Min has a recipe for making candied wintermelon in her book too.

Water dough 
100g plain flour
20g icing sugar
Pinch of salt
28g peanut oil
55g hot water

Oil dough
80g plain flour
40g vegetable shortening (you may use lard or ghee)

Finishing
1 egg yolk
1 tsp water
Charcoal powder

Steps:
1. Make the shortbread ears and leaves. Mix sugar, salt and shortening until well combined. Do not whip to avoid introducing too much air into the dough. Fold in flour. Form a ball of dough. Divide into two equal portions. Add matcha powder to one portion and cocoa powder to the other portion until desired shades are obtained. Shape the leaves and ears with the help of cookie cutters if need be. 


I used a combination of cutters and a small knife to get the shapes I want.  If you need to estimate the size of the features, make a shortbread dough of about 45g in weight and shape it into 滚滚 shape as an estimate.

Bake at 150C for 6-7 min or until very slightly browned. Cool completely. Store in airtight condition. This can be made a day or a few days in advance.

Freshly baked cookie parts


2. Make the wintermelon filling. You may wash off the excess sugar coating the pieces of wintermelon like I did but this step is optional. The filling will still be sweet but not too sweet. Whisk together gaofen, icing sugar and salt. Add water and oil. Knead with spatula to form a dough. Cook over low heat until translucent. Knead in minced candied wintermelon and sesame seeds. Divide into 24g balls. You may make this a day in advance if you are busy. Store in airtight condition in the fridge.

There are only 12 in this picture but the recipe portion is for 15 pieces.


3. Make water dough. In a mixing bowl, whisk together flour, salt and sugar. In a heatproof jug, whisk together oil and hot water until thoroughly emulsified. Pour into flour mixture and knead until smooth and elastic. You can see in my reel, the dough passes the windowpane test, is smooth and stretchy. Cover with cling wrap and set aside while you make the oil dough.

4. Make oil dough. Rub shortening or fat of choice with flour until fine breadcrumb-like. Press crumbs together into a ball of dough. Cover and set aside.

5. Divide the dough. Divide water dough into 13g balls. Cover to prevent drying out. Divide oil dough into 8g balls. 

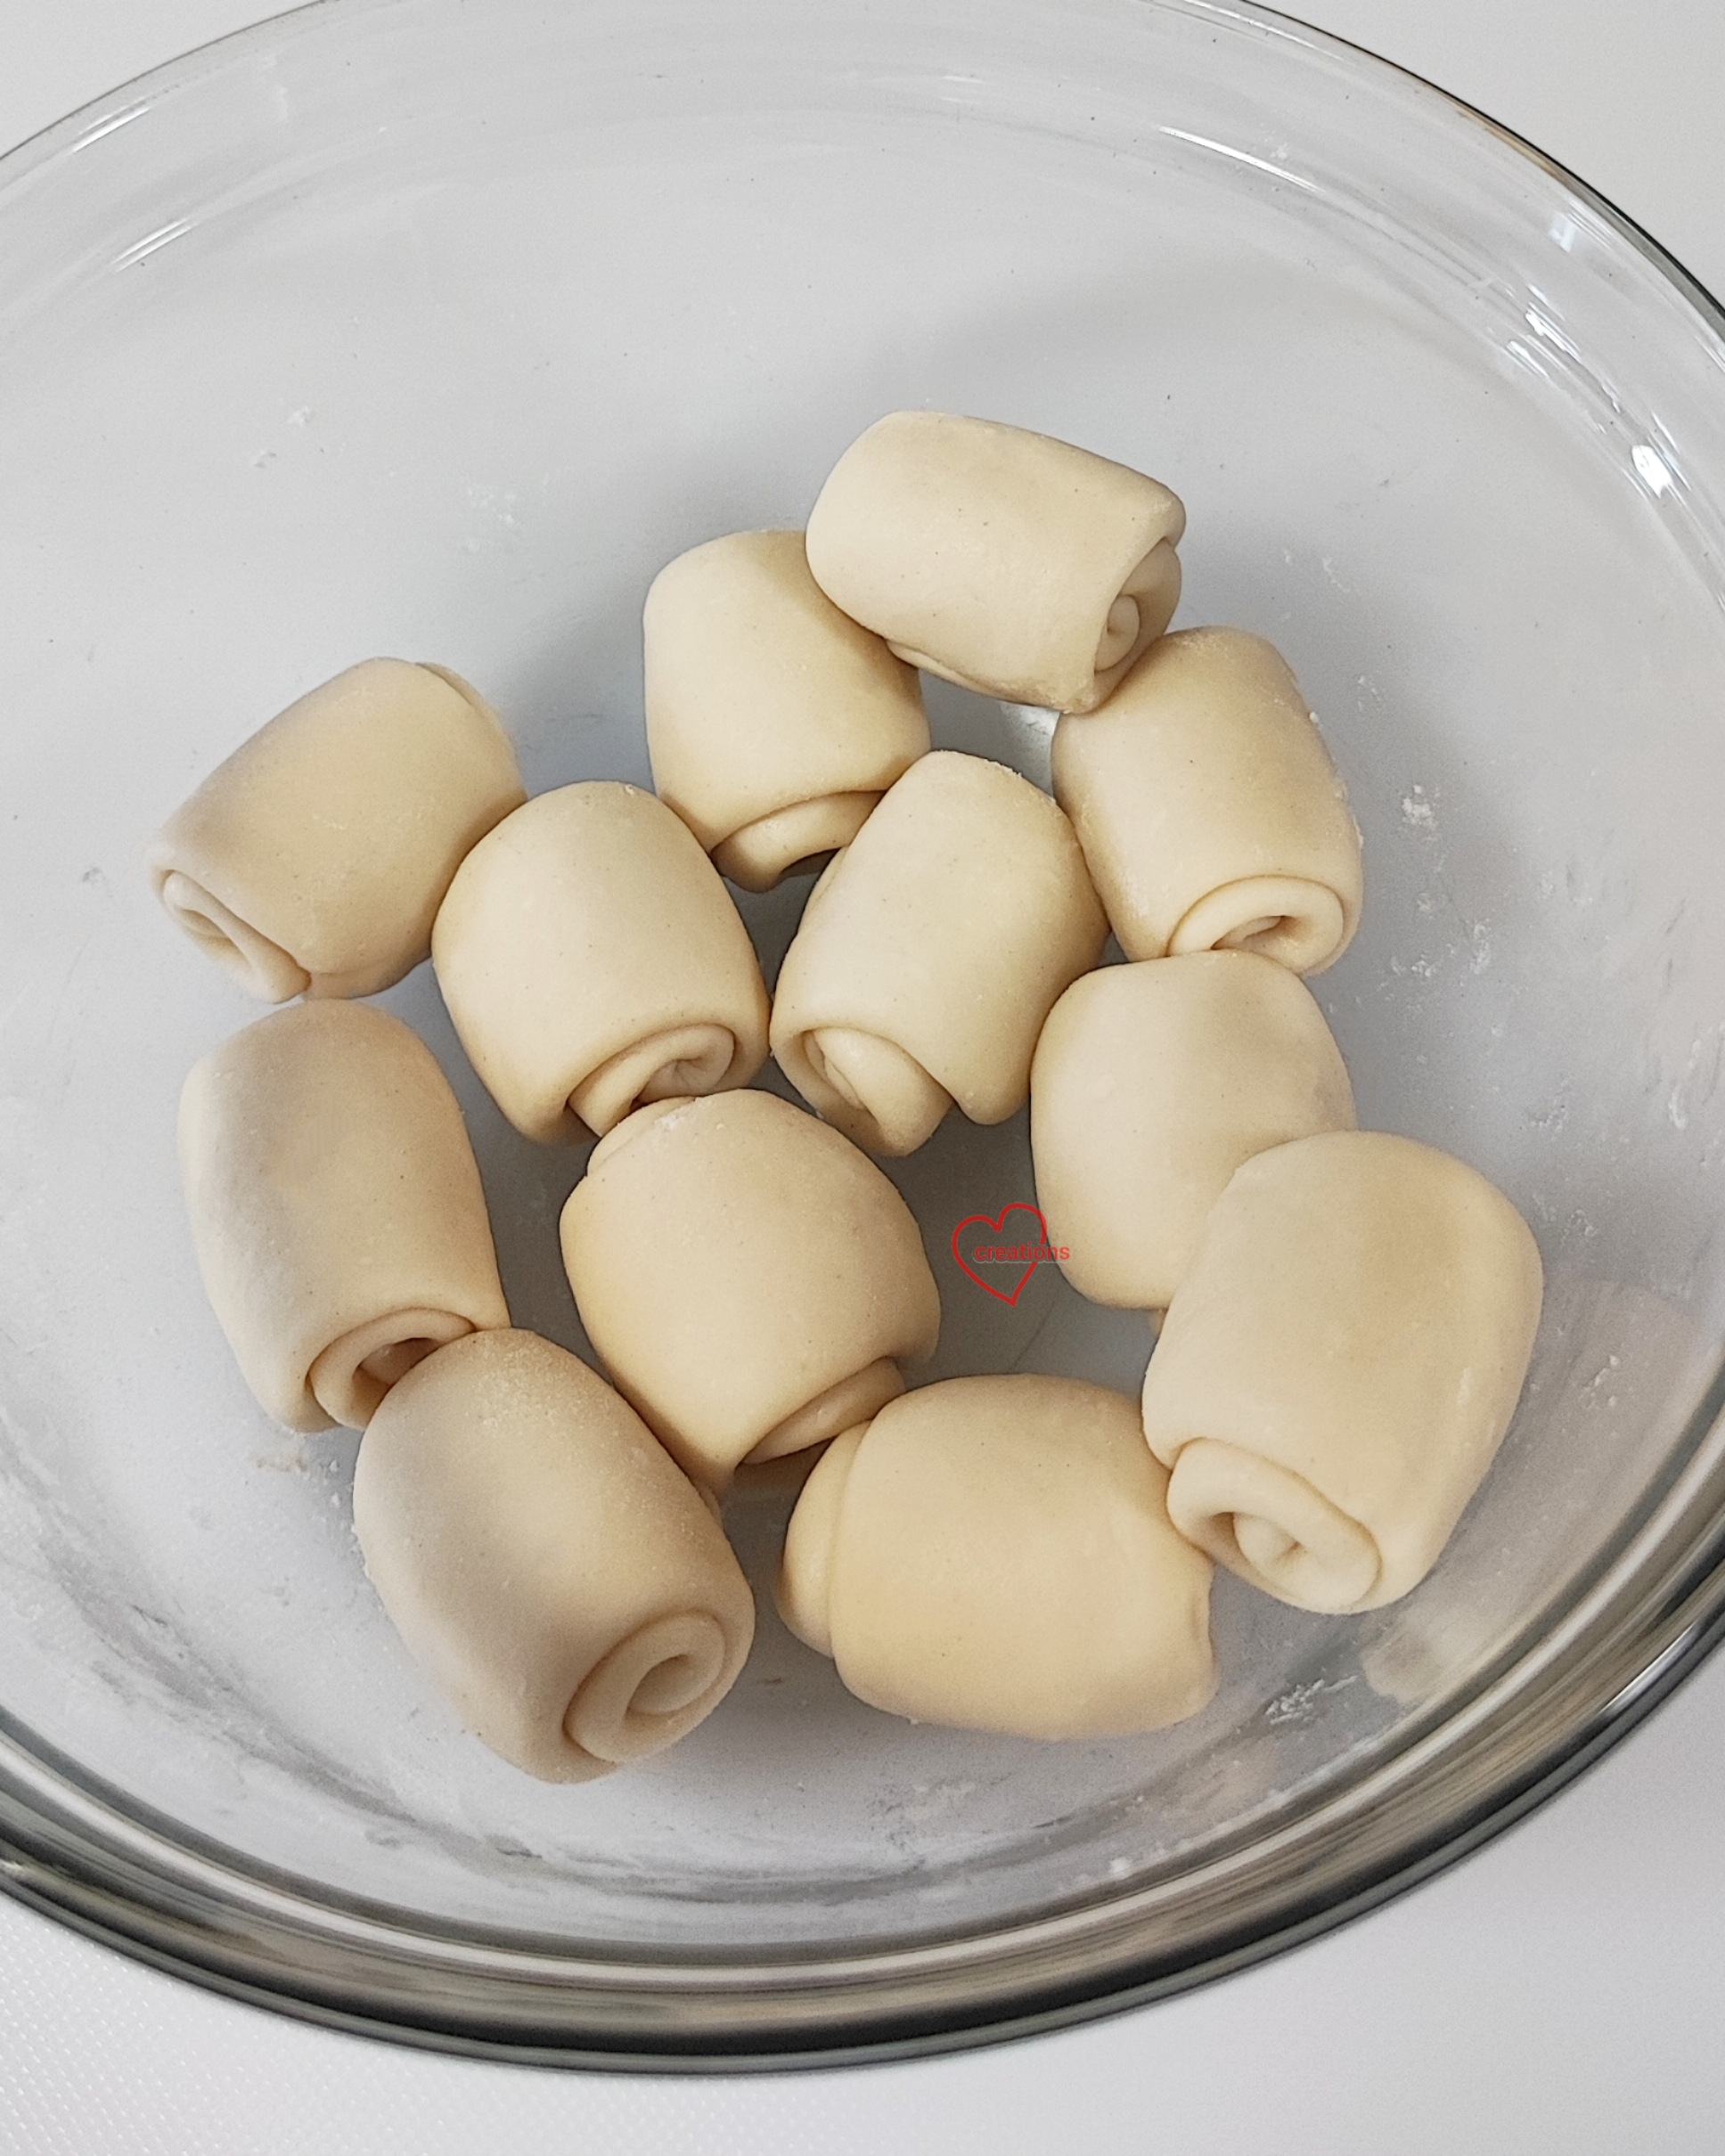
6. Laminate dough. Lightly dust work surface with flour. Press a portion of water dough flat. Wrap a portion of oil dough with it. Roll the combined dough into a long flat piece as shown in the reel. Roll it up like a swiss roll. Rotate by 90°, seam side up. Roll into a long flat piece again. Roll up like a swiss roll. Set aside covered while you work through all the dough. Rest covered for 15 min. It doesn't matter if you end up resting longer 

Again there are only 12 in this picture but the portion in recipe is enough for 15.


7. Preheat oven to 180C fan/190C. Line baking tray with parchment paper.

8. Wrap filling with dough. Press a swiss roll of dough with seam facing upwards flat. Fold the ends of the swiss roll inwards and press flat again. Roll the dough into a flat round disc with the edges thinner than the middle as shown in the reel. Place a ball of wintermelon filling in the middle and wrap it. Pinch the seams together and roll into a ball. Place on lined baking tray. Traditional wife biscuits are pressed into a flat disc on the baking tray but I left mine "roly-poly" shaped.

9. Apply egg wash. Mix egg yolk with 1 tsp of water. Brush each ball of pastry with egg wash in the pattern of guinea pig markings. 

10. Pierce the dough. The steam produced by the filling may cause the pastry dough to burst if air vents are not created for steam release. Ideally, wife biscuits have numerous holes or a couple of large slits at the top of the pastry for the vents. In this design, I didn't want to spoil the look by introducing lots of vents so I only made one where it would be hidden by the leaves. If you don't mind the holes, please make more holes evenly distributed over the top of the pastry. You may use a wooden skewer or cake tester to pierce the holes.

11. Bake the pastries. Bake for 15-18 min or until lightly browned. Reduce oven temperature to 110C fan/120C. 

12. Paint the facial features. Mix some charcoal powder with some egg wash to make a black paint. Use a fine brush to paint the nose. Use the blunt end of the toothpick to paint the round eyes.

13. Add on ears and leaves. Use some egg wash as glue to attach the ears and leaves on the head. Bake the pastries again at lowered oven temperature for about 7-8 min to set the egg wash facial features and the glue for the ears and leaves.


Cool completely before storing in airtight container. It can store at cool room temperature for 3 days or in the fridge for a week. I highly recommend toasting it before consuming if not consuming freshly baked. During storage, moisture from the filling permeates the crust so toasting it will re-crisp the crust.

Hubby gave a big thumbs up for these homemade wife biscuits!


Here's a closer look at the filling and flaky crust!


You may want to remove the ears and leaves just before toasting if you are afraid of burning them by accident during toasting.

Here's a peek at some wife biscuits that I made in the traditional shape!

They are so good freshly baked!

The water and oil dough can be refrigerated in airtight condition for a couple of days and used for wrapping filling and baking on another day. These traditional shaped wife biscuits were made with leftover dough (since I only made 12 圆滚滚wife biscuits). Hubby and I ate them fresh from the oven and they were superbly good!!


with lots of love,
Phay Shing
Read More »