Showing posts with label Mandarin orange. Show all posts

Wednesday, 1 February 2023

Mandarin Orange Marshmallows with Yuzu Mandarin Orange Filling

 This is the second Lunar New Year themed marshmallow creation that I wish I thought of making earlier. But it's ok, this will appear in my upcoming book Deco Marshmallows as well!

This is a rather nostalgic design because it looks so much like my chiffon cake mandarin oranges that I discovered 9 years ago. How time flies! I remember the excitement of discovering how I could make realistic looking mandarin oranges out of mandarin orange chiffon sponge so many years ago! What I did differently this time for the marshmallow version, is to add a filling to boost that citrusy kick! The filling is yuzu with mandarin orange zest and the marshmallow itself is made with mandarin orange juice.


Here's a video of it in squishy action! Perhaps you can fool your family and friends next Lunar New Year with these 😉

https://www.instagram.com/reel/CoHktm0gWdk/?igshid=NTdlMDg3MTY=


with love,

Phay Shing


Read More »

Friday, 7 January 2022

Tiger Chiffon Cake


Which version do you prefer? Cute🐯 or Stripy🐅 (below)?

Some of you had DM-ed me about the Recipe for making orange-chocolate Tiger chiffon cake. So here goes! Hope you will find this helpful!🤗 

Orange Chocolate Tiger chiffon cake 
4 egg yolks 
20g castor sugar 
40g vegetable oil 
45g orange/mandarin orange juice 
60g cake flour, sifted 
Orange zest (1 orange) 
1 tsp black cocoa powder in 1 tsp hot water (cocoa paste) 
@suncorefoods vermillion annatto for the color (or orange food coloring) 

4 egg whites 
45g castor sugar 
1/4 tsp cream of tartar 

Whisk egg yolks with sugar, followed by oil and juice. Add in sifted flour and whisk till well combined. Divide the batter into 1/3 and 2/3. To 1st part: add cocoa paste. To the 2nd part, add orange zest and vermillion annatto powder and mix well. 

In another mixing bowl, whisk egg whites with sugar till firm peaks. Divide the meringue into 1/3 and 2/3 and fold into each colored batter. Pipe tiger stripes at the base and inside the cake using black batter, interspersed with orange batter. 

*Tip: use a toothpick to drag the tips of your piped black stripes to make tiger stripes. 

Bake in a 7” cake pan at 140C for 1hr, or until a bamboo skewer comes out dry. 

Enjoy baking!! Tag me if you try it! See cross section of the stripes in the cake! ➡️🥰 


More pictures here.

Love and stay healthy, 
Susanne


Read More »

Sunday, 26 December 2021

Tiger Choux Pastry in Macaron Teacup Class

Welcoming the Year of the Tiger with three genres of bakes--- choux pastry tiger in macaron teacups with chiffon cake mandarin oranges on the side! 


We decided to replace the fortune tiger choux pastry class with this instead as it will be a class involving two genres of bakes. For the first time, I will be teaching deco choux as well as creative macarons in a single class. It will be pretty intensive but value for money based on the content and hands-on experience you will be getting. Some parts will be prebaked for you due to the limited time we have in class (we can't accomodate too many rounds of baking) but you will have the hands-on experience of piping all the pieces of choux and macarons, and assembling/decorating all the teacups and tigers. The filling taught for this creation is a savoury one--- bakkwa diplomat cream, which complements the sweet macaron and choux au craquelin very well. 

The chiffon cake mandarin oranges won't be taught in class as I have detailed recipe and  video tutorial in the blog on how to shape and decorate the oranges. 

Please refer to this link for more details and to register soon as the class is in mid-January 2022 . 


With love, 

Phay Shing 

Read More »

Wednesday, 3 February 2021

Fortune Ox Mandarin Orange Choux Pastry

 I am busy preparing for my Fortune Cat choux pastry class but couldn't resist taking time out to make the Ox version of "Fortune Cat"!


Since mandarin oranges are in abundance during this season, I made mandarin orange diplomat cream for the filling! 

You may refer to this blog post for the detailed recipe of choux pastry batter and craquelin. I left everything uncoloured except for a small portion of batter which I coloured with cocoa powder for the horns. 

Preparing to bake the choux pastry cases for the head and body. 


Freshly baked choux pastry cases! 

You may refer to this post for the template for the horns and ears, adjust the size if necessary depending on how big your baked choux pastry cases are for the head and body. Unfortunately I am not able to share the template for arms and feet as I use it for classes. But I am sure you can easily figure it out yourself! You may refer to my book Deco Choux Pastries to have an idea of how to construct cute characters out of choux pastry. 

I decorated the Ox the same way as my Fortune Cat choux pastry, using royal icing for the facial details and tag, and a sour candy strip for the collar. 

I am not able to share the recipe for the mandarin orange diplomat cream as well but you may refer to my book or other choux pastry blog posts of mine to have an idea of how to make it, or try other delectable flavours I have shared like lychee rose, chocolate, vanilla lavender honey, coconut pandan gula melaka, mango, earl grey and matcha! 


I hope these very cheerful oxen will indeed bring some blessings or "福” to you, just by looking at them! 


With love, 

Phay Shing


Read More »

Wednesday, 20 January 2021

Year of the Ox Macarons

This was something that was in my mind that I couldn't put away until I have made it because of the compulsion it evokes. I was just musing over how people all over the world would love to receive some blessings during this pandemic chaos, at a time when the Year of the Rat draws to a close and the Year of the Ox is about to be ushered in. This was what I made! 

I pictured Little Brother Rat offering Big Brother Ox an early new year greeting by offering up teeny mandarin oranges in his tiny paws, wishing/hoping that Big Brother Ox would bring many blessings to everyone. And Big Bro carries a gold ingot on his back with the chinese character "blessings" on it, all fired up to bring blessings to everyone. 


A closer look at them! 

I used the Swiss meringue method to make the macarons. You may refer to this post for the recipe. 

Here is a picture of the piped batter. After baking it, I realised I would do better by baking Little Brother Rat as a separate macaron shell since there are just too many layers of batter with long waiting time if I did the Ox and Rat together as one macaron shell. Since I had some leftover batter, I redid the rats as seperate pieces from the Ox and they turned out much better. 

Piped batter! 

I decorated the baked shells with royal icing and black edible marker. 

I filled the macarons with dark chocolate ganache and mandarin orange yuzu curd. You may refer to this recipe for dark chocolate ganache. I will share the recipe for the curd in this blog post. 

Recipe for mandarin orange yuzu curd 

Ingredients:

45g unsalted butter

40g caster sugar

1 egg

1 egg yolk

65g fresh mandarin orange juice 

15g yuzu juice concentrate (without sugar added)

1 tbs mandarin orange zest (about 8-10g)

A pinch of salt


Steps:

1. Using electric mixer, beat butter, sugar and salt until light and fluffy.

2. Add egg and egg yolk a little at a time, beating well after each addition. 

3. Add orange juice and yuzu juice and mix until combined. Don’t worry if it starts to curdle.

4. Pour contents into a saucepan and cook over low heat, stirring continuously with a spatula.

5. Once the curd is able to coat the back of the wooden spoon, remove from heat.

6. Fold in orange zest. 

7. Press a cling wrap over surface of curd and let it cool before storing in fridge for up to a week and freezer for up to two months.


Here is a close up view of the filling. Pipe a ring of dark chocolate ganache before filling the middle with curd and sandwiching the top shell on. If you don't want the macaron shells to turn soggy too soon due to the high liquid content in the curd, you may coat the base of the top and bottom macaron shells with a thin layer of ganache first, which was what I did.


It was my intention to bring some blessings or at leaat put a smile on people's faces with this creation. I hope it did! 

With love, 

Phay Shing


Read More »

Monday, 4 January 2021

Fortune Cat Mandarin Orange Choux Pastry Class

What better way to welcome the new year than with something cheerful, auspicious and delicious! Presenting my version of "招福猫" filled with mandarin orange diplomat cream! 


You will learn the basics of choux au craquelin, how to assemble and decorate this cat design, and how to make mandarin orange diplomat cream. 


The class is full but you can still contact Sharon for this class as we are opening up another one in early May. Fortune cat, while very much Chinese New Year themed, is still relevant throughout the year. Please contact Sharon at +65 96882777 over whatsapp if you are interested. 

With love, 

Phay Shing


Read More »

Monday, 28 December 2020

'黑皮牛耶!' Year of the Ox Choux Pastry In Macaron Teacups

It has become a personal annual tradition of sorts for me to put up content to welcome the new year featuring three genres of bakes that are dear to me. It started out with the personal tradition of making the mandarin orange chiffon cake "oranges" but it has since expanded to include macaron teacups with a new year greeting and the Chinese zodiac animal for the year. Since 2021 welcomes the Year of the Ox, I have to wish everyone "黑皮牛耶! Happy New Year!" 


To those of you who aren't familar with Chinese, "黑皮牛耶", the four characters on the macaron teacups literally translates to "black skinned ox yeah" but when read aloud, it sounds like "happy new year" in English. You can see why I can't resist making this pun in 2021🤣

"黑皮牛耶!" indeed! 🤣. Look at their happy and cheeky faces! Black may seem like an inauspicious colour but without this choice of colour, I won't be able to pull off the pun. 

You may refer to this post for details of the mandarin orange chiffon cake oranges. I took a nice photo of just the oranges this year but won't be doing a separate blog post for it because the one in 2016 is comprehensive enough. 


You may refer to this blog post for details on making the teacup macarons. I have been conducting macaron teacup classes and will continue to do so as they are rather popular. 

What is new that I would like to share here is the choux pastry Ox. Some of you asked for the template so I will share it here too. Please refer to this post for the detailed recipe for making the choux pastry batter and craquelin. Add charcoal powder to the craquelin and choux batter to colour it black, preferably sifted with the flour. About 1 tsp will do for a 2 egg portion of choux batter. Baking the pieces for the ox is relatively easy as you don't have to be concerned about browning. The main head piece is made using a 2.3-2.5cm diameter template for the piped circles of batter and 3cm cookie cutter for craquelin cutout. 

Here is a picture of the baked choux pastry cases. I baked some plain uncoloured large choux au craquelin at the same time. 


Prepare some plain coloured choux batter for the horns. If you don't want to prep the batter twice (once for each colour) , you can use halved sliced almonds for the horns. Although you may split the choux batter and colour a portion black while leaving a small portion plain, do note that adding charcoal powder after the egg has been added to the choux batter limits the expansion capacity of the choux bun a little but it will still work.

This is the template for making the ears, horns and arms of the Oxen. 

Stretch this picture to fit an entire A4 paper for the right sizing. I didn't want to switch on my laptop for the original so I took a photo of the template using my phone camera so pardon the shadow😅. 

Piped batter for the small parts. Bake at 175C for 15 min or until horns appear golden brown. You may need to return the long arms to the oven to bake at 130C for another 5 to 10 min to ensure it is totally crispy. 

When cooled completely, carefully use a toothpick to make a 2cm diameter hole at the base for piping in the filling when ready to eat. I always recommend filling just before eating. Use the toothpick to make holes for inserting the horns and ears. Use black royal icing to secure them if necessary. Use more royal icing to add on the facial details. You may dry the assembled choux cases in 70C oven for 20 min to thoroughly dry it out. 

Tadah! Cute little ox! 

I am not providing any recipe for filling because you can fill it with any filling you like and I have shared a number of flavours in our blog that you can choose from. 

Happy New Year to all who have followed us all these years! 2020 has been an eventful year for all. May 2021 be one that is better! God bless! 


With love, 

Phay Shing


Read More »

Wednesday, 8 January 2020

Rat Choux Pastry in Macaron Teacups

Continuing on from my previous blog post, I decided to have a creation that showcases three of the genres that I work with the most. Rat choux in macaron teacups with some mandarin orange chiffon "oranges" on the side!

The Chinese characters 鼠年大吉 means great fortune in the year of the rat

The choux pastry rats have little feet here (also made out of choux pastry) that aren't present in my previous post.

You may refer to my previous post for details on how to make this simple deco choux design to welcome the year of the rat. The mandarin orange pastry cream I shared is also refreshing and not too sweet. I filled the macaron teacups with earl grey ganache. You may refer to this post on how to create the teacup, including how to pipe hemispherical macaron shells. Details for recipe and how to shape the oranges can be found in this post.

I am still in the midst of adjusting to changes in the new year with the kids starting school again. But do stay tuned for some exciting macaron structure projects in the next month or two! Can't wait to challenge myself with those but also pacing myself so that I don't burnout with many things to juggle.

With love,
Phay Shing
Read More »

Monday, 30 December 2019

Rat Choux Pastries with Mandarin Orange Pastry Cream

As the year of the Rat is approaching soon, why not make these 😊

Rat choux au craquelin filled with lightened mandarin orange pastry cream! 

This also marks the 7th consecutive year I am making mandarin orange chiffon "oranges"! They have a special place in my heart as they were my first experiment to bake chiffon in glass bowls and one of the earliest deco chiffon creations ever, which was made for my mother-in-law. Details of how to make the mandarin orange chiffons can be found here.

I will share in detail how to make the rat choux and the pastry cream. You may refer to this post on how to make the craquelin and choux batter, but adapt it as follows. Use 1/8tsp charcoal and 1/8 tsp white gel colouring for the craquelin instead of orange gel colouring . Use 1/8 tsp charcoal powder and 1/4 tsp white gel colouring instead of orange gel colouring in the batter. Feel free to adjust the shade of grey to your liking. I piped the body of the rats using a wilton #12 tip. I piped 2.5cm and 2cm circles of batter and used 3cm and 2.5cm diameter of grey coloured craquelin respectively for the piped circles. You may choose to do just one size of rats although I did two different sizes. Preheat oven to 210°C before making the batter.

I highly recommend using perforated mats to bake if possible 

Once tray is in oven, immediately reduce temperature to 190°C and bake for 10 min. Reduce heat to 180°C and bake for another 10 min. Reduce heat to 160°C and bake for another 10 min. Reduce the heat once again to 140°C and bake for another 10 min. Do note that suggested baking temperature and time is a guideline and varies with different ovens. You need to experiment to see what temperature and time profile works best to give your pastry cases a good rise in the oven while not browning it too much. If you want the pastry cases to be baked until thoroughly dry, cut a hole at the bottom of the cases and bake for another 10 min at 130°C to dry out the insides.

For the ears, tail and (if you wish) feet, change the piping tip to wilton #5. Pipe the parts as shown below. I decided not to include the feet for this version of rat choux, but included for the ones sitting in my macaron teacups (will post that soon!). You may experiment with round or oblong shape for the feet. Bake these at 170°C for 12-15 min.

Piped ears, tails and feet

For the assembly, use a toothpick to pierce the pastry cases where the ears and tail are to be inserted. Then gently insert the ears and tail. You may use melted chocolate or royal icing to add in the details. I used royal icing for the ears and other facial features, except the rounded eyes where I used rolled black candy melts and cut out little circles using small round cutters. Feel free to be creative and decorate it the way you want to!

Mandarin orange pastry cream
Ingredients:
2 egg yolks
15g Castor sugar (you may replace with stevia for diabetic-friendly version)
A pinch of salt
20g cornflour
150g freshly squeezed mandarin orange juice
50g fresh milk
1/2 tsp orange emulco (optional)
Zest of 2 mandarin oranges
20g unsalted butter
60g whip topping (or double cream/heavy cream)
Some chopped dark chocolate (optional, I didn't add but you could to add another flavour dimension to break the monotony)

Steps:
1. Sift cornflour into a heavy mixing bowl. Add sugar and whisk together. Add egg yolks and whisk together until a smooth paste forms. Set aside.

2. Place juice, milk, orange emulco and salt in a small saucepan and heat until it just starts to bubble at the edges. Remove from heat.

3. Slowly pour the hot liquid mix into the egg yolk mixture while whisking continuously. Pour mixture back into saucepan.

4. Heat the mixture over low heat while whisking continuously until it starts to thicken. Remove from heat and whisk until smooth. Return to heat and continue cooking and whisking until your desired consistency. Remove from heat.

5. Add butter and whisk until smooth. Add orange zest and whisk it in. Transfer pastry cream into a bowl and press cling wrap on surface. Chill in fridge for at least an hour or until cool. You may prepare this a day in advance too.

6. Whip the whip topping until stiff peak. If using dairy cream, be careful not to over whip. Fold into chilled pastry cream. You may fold in chopped chocolate if you wish. Transfer into piping bag and keep it refrigerated.

Lightening up pastry cream with whip topping


I recommend filling the pastry cases just before serving so that you can enjoy the pastry while it is crisp on the outside but cold, smooth and creamy on the inside!

With love,
Phay Shing
Read More »

Monday, 9 December 2019

Chinese New Year Macaron Teacup Class

I finally mustered enough courage to conduct a class for creating something with hemispherical macaron shells!


Auspicious looking teacup macarons filled with dark chocolate ganache, yuzu mandarin orange curd and yuzu mandarin orange Swiss meringue buttercream!

It will be the first time I am teaching at ArtZ Baking and  Culinary studio so I am excited about this collaboration! Please click on this link to register and for more class details. Not only will I cover the basics of making macarons using the Swiss meringue method, I will teach you how to work with royal icing in decorating and assembling macaron structures, and you will also have hands on experience making 3 different delectable fillings! You will also get to bring home the silicone mould required to make the hemispherical macaron shells. This mould is multi-purpose and not just for making hemispherical macaron shells. You can use it for no-bake desserts like jellies, puddings, mousses and chocolates, as well as for baked goods like chiffon cakes and other cakes!

So hurry and register as spaces are limited!

With love,
Phay Shing


Read More »

Monday, 7 January 2019

Piggy Chiffon Cakes in Macaron Teacups

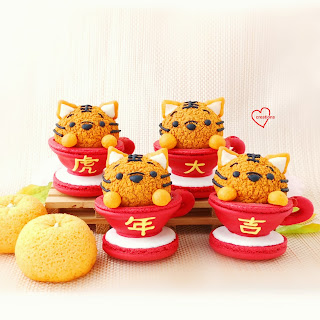
It's only natural that I put little piggies in the macaron teacups that I made! Please refer to my previous post on how to make the macaron teacups where I provided a video tutorial on how to pipe the hemispherical shells.

The piggies in cups with chiffon Mandarin oranges!

I will share the recipe for making the strawberry orange flavoured chiffon piggies which have no additional artificial colouring added. I have been making creative chiffons for five years now (how time flies!) but this is the first time I did something differently to make it easier and faster to complete a bake like this. Before I share the details on how to make the piggies, let me share a little about the Mandarin orange chiffons.

I have been making the chiffon Mandarin oranges around Chinese new year since 2014 and this is the sixth consecutive year I have been making them! They have a special place in my baking journey as the first successful experiment for baking chiffons in glass bowls and one of the earliest creative chiffon bakes. You may refer to this post for the recipe and shaping/decorating instructions. Just to share some photos of the process...

Freshly baked Mandarin orange chiffon cakes in glass bowls

Shaping the unmoulded cakes in the same glass bowls they were baked in

Imprinting the creases at the top of the orange

And now, on to the piggies!


I baked the three larger piggies in small glass bowls and the mini ones in small hemispherical silicone mould with 4cm diameter cavities. I actually intended to bake only the mini ones but had leftover batter so I baked three larger piggies in the glass bowls.

Strawberry orange chiffon cake
Ingredients (makes one 15cm chiffon cake or in my case it's about twenty to twenty-five 4cm hemispheres and one 8x8" chiffon sheet cake):
Egg yolk batter
2 egg yolks
5g caster sugar
30g vegetable oil
30g freshly squeezed orange juice
1/2-1 tsp strawberry emulco*
A pinch of salt
40g cake flour

Meringue
3 egg whites
1/5 tsp cream of tartar
40g caster sugar

* The strawberry emulco or strawberry paste added is variable as it depends on how strong the red colouring is in the strawberry paste you are using. Add a quarter tsp at a time into your batter and observe the resulting colour before you decide to add more.

Note: I use a slightly higher oil content and less juice content as the chiffon cake is to be stored together with the macaron teacup. Macaron shells turn soggy if they come in direct contact with moisture from chiffon cake. To keep the cake fairly moist without turning the macaron soggy during storage, I use a higher oil content but lower juice content.

Steps:
1. Line the 8x8" baking tray with parchment paper or Teflon sheet. If you don't have the tray of this size, you may substitute with other sizes. Just fill with enough batter to form a thin layer when you want to bake. I prefer using Teflon sheet as it produces sheet cakes without creases. Preheat oven to 160℃. Set oven rack to second lowest position.

2. Prepare egg yolk batter. Whisk egg yolks and sugar until pale and thick. Add oil and whisk until combined. Add orange juice and pinch of salt until well combined. Gradually add sifted flour and whisk until no trace of flour is seen. Add strawberry emulco a quarter tsp at a time until a desired warm pink shade is achieved.

3. Prepare the meringue. Beat egg whites with cream of tartar until firm peaks, adding sugar gradually once the egg whites are foamy.

4. Quickly but gently fold the meringue into the egg yolk batter a third at a time. Quickly spoon the batter into the mould cavities (or glass bowls or egg shells if you have neither silicone mould nor glass bowls). Spoon some batter into lined baking tray and use the spoon to smooth out the surface. It should just be a thin layer of batter.

5. Bake for 5 minutes. Reduce temperature to 135℃ and bake for another 7-8 minutes or until skewer comes out clean for the sheet cake. Immediately remove from oven and flip onto a parchment paper.


Continue baking the hemispheres for another 10-15 minutes or until skewer comes out clean. Cool completely before unmoulding.

6. Shape the unmoulded hemispheres to make the bottom look more rounded. I did this by gently inserting the bottom into a slightly smaller mould that I have. If you don't have, you can still gently mould it using your hands (see my video tutorial for shaping Mandarin oranges). I found that the silicone mould that the cakes were baked in were not rigid enough for moulding, unlike the glass bowls. That was why I used a smaller mould for shaping.


7. Cut little triangles from the sheet cake using a small fruit knife for the ears. Cut out snouts by using a round cutter to cut out a piece from the sheet cake. Gently squish it to make it oval. If you have oval cutters you may use it instead. Use the blunt end of toothpick to create the nostrils. The tail of the larger piggy and “hands” of the smaller pig was made by using a round cutter to cut out a circle and then gently moulding it into a ball with your fingers. Keep the small cutouts in airtight container to prevent them from drying out.

8. I used to bake thin black and white sheet cakes for the character's eyes. This meant that I had to go through the trouble of preparing extra batter and baking them. The thing that I did differently was to use black candy melts for the eyes. No, I didn't melt the candy melts, transfer into piping bag and pipe the eyes on. I did something much faster and easier. I used a rolling pin to roll the candy melt chip between parchment paper until it was flat. Then I used a small round cutter to cut out the eyes. Singapore's weather is warm enough such that it's easy to roll the candy melt chip flat. If you are working in a cold kitchen, you may want to warm up the chip with the heat of your fingers or hands before rolling it flat. Something that took half an hour using more ingredients can now be done in less than 10 seconds with only one ingredient!

9. I melted some white compound chocolate with a bit of vegetable shortening and used it as glue to stick on the small parts. I used the same melted chocolate to pipe the white highlights in the eyes. I usually use melted marshmellows with a sprinkle of water as glue but find that using this form of melted chocolate works wonderfully too. The addition of vegetable shortening is to make the chocolate stay in a workable fluid condition for a longer time. Otherwise the melted chocolate may harden quite quickly and you need to re-melt it before you are done with the assembly.

The last step of assembly involves filling the macaron teacups with whipped Earl grey white chocolate ganache and then gently placing the mini piggies and two round balls of chiffon for the hands on the ganache.

Store the assembled teacup with piggies in airtight container in the fridge.

Since it's the first time I am making a creation with this configuration of chiffon and macarons, I kept one test piece for five days in the fridge (trying to push the limits here) and did a taste test.

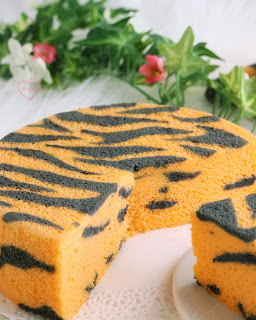
I love the look of the cross section 😍😍

I was pleasantly surprised that the chiffon wasn't overly dry nor was the macaron shell overly soggy! I normally brush the surface of baked chiffons with some syrup to prevent the sponge from drying out during storage in the fridge but didn't do so for the mini piggies in the cups as I didn't want to risk turning the macaron shells soggy. So I am really pleased that this configuration is workable and so cute!

With love,
Phay Shing
Read More »

Wednesday, 14 February 2018

'Kumquat Pot' Chiffon Cupcake


Wishing everyone a 大吉大利 with this little 'Kumquat Pot' Chiffon Cupcake I made from mandarin orange chiffon sometime back! Recipe from 'Ji' Mandarin orange chiffon cake from my 2nd cookbook Deco Chiffon Cakes.

Have a great holiday!! And a blesssed time of reunion with your loved ones!

新年快乐!阿够够旺旺过好年!


Best wishes,
Susanne


Another good news to share, the Chinese edition of Deco Chiffon Cake Basics is just on book depository!


Read More »

Thursday, 4 January 2018

Coconut Gula Melaka Ah Mah Sponge Cake Doggies with Chiffon 'Mandarin Oranges'

My first bake of the new year and since it's the Year of the Dog, I made some cupcake doggies along with  chiffon Mandarin oranges!


I was curious to know if Ah Mah sponge cakes can be shaped and worked with like regular chiffon sponges so I decided to experiment with it and was pleasantly surprised! Afterall, Ah Mah sponge cakes are nothing more than cooked dough chiffon cakes with the same number of egg yolks and whites used. I have baked large coconut Gula Melaka Ah Mah cakes on two occasions and both times it was very well received. You may find the recipe here. Since the Gula melaka cake has a natural warm light brown colour, I decided to use the same recipe (with minor tweaks) as the doggie body base.

I will focus on how the doggies are made in the post. I have made the chiffon Mandarin oranges every year since I came up with it in 2014 so this is the fifth consecutive year that I am making these babies. You may refer to this post for the video tutorial on how to make the oranges. Do note that I updated the method of shaping the oranges to make them look neater last year.

Recipe for coconut Gula Melaka sponge cupcakes 

Notes:
The number of doggies depends on the size of cupcake cases and size of the hemispherical moulds you use to bake the cakes. You may use silicone moulds or eggshells to bake if you don't have the  glass or metal moulds on hand. Just make sure you remove the inner membrane of the eggshells before baking in it. In my actual bake, I separated the bake into two rounds of baking instead of the one round I am sharing here for your convenience. I baked the coloured thin layer cake another day, froze it and defrosted it when I was ready to assemble. You may also choose to separate the bake if you find it easier to manage.

Here are the moulds and shape cutters I used to create the doggies.

Glass moulds have outer diameter of 8.5cm and 7cm. Metal hemispherical mould has outer diameter of 6cm.

I used a 44x35mm cupcake case for the smaller dog and 50x40mm cupcake case for the larger dog.

The recipe I am going to share is slightly different from the original one I posted in November last year as this version has more Gula Melaka. I wanted to make a more stable meringue so I chose to use 12g of Gula Melaka per egg instead of 11g.

Ingredients (makes about 4 doggies):
Egg yolk batter
42g coconut oil
56g cake flour, sifted into large bowl
1/6 tsp salt
48g coconut cream/coconut milk
3 egg yolks

Meringue
3 egg whites
1/5 tsp cream of tartar
36g powdered Gula Melaka (or very finely chopped Gula Melaka)

Colouring
1/2 tsp Dutch processed cocoa powder
1/2 tsp charcoal
A few drops of white gel food colouring
2 drops red gel food colouring
1/8 tsp red yeast powder (optional)

Steps:
1. Line a small baking tray with baking paper. I don't specify a size here as you just need to make a very thin layer cake of different colours for the body parts (ears, snout, paws) and collar. 8x8" tray should be sufficient. Larger tray is also fine. Preheat oven to 150℃ and set oven rack to lowest position. You may place a tray of water at base of oven if you wish to steam bake.

2. Heat oil in small saucepan until 70℃ or until you are able to see swirl lines in the oil but not yet bubbling. Pour into flour and whisk until well combined

3. Gradually add in coconut cream and salt and whisk until well combined. Mixture will be very thick so use an electric mixer if you need to. Add one yolk at a time and whisk until well combined.

4. In small mixing bowls, portion out 2 tsp of egg yolk batter for dark brown, 1 tsp for black, 1 tsp for white and 2 tsp for red. Add the respective colouring to the portioned batter and mix well. The red yeast powder is for red colour.

5. Make the meringue. Use an electric mixer to beat egg whites with cream of tartar until firm peaks form, gradually adding Gula Melaka along the way.

6. Quickly but gently fold in two leveled tbs of meringue for every tsp of yolk batter. Fold the remaining meringue into the main batter in three additions. Fill the hemispherical moulds till about 80% full. Carefully spoon out the different coloured batters on the baking tray and level it with the back of the spoon to form a thin layer. Remember to spoon out some light brown batter on the tray too for the paws. The red coloured portion should be a long strip as the collar is a long and narrow rectangle cutout.

7. Bake the layer cake for 10min or until baked through. Immediately remove from baking tray and cool with another baking sheet over it. Reduce temperature to 135℃ and bake the hemispherical cakes until skewer comes out clean. Baking time depends on your oven and whether steam baking was used (I did) so use mine only as a reference. I baked the smallest cake for 35min, medium sized cake for 40min and largest cake for 45min. Cool the cakes completely in the moulds before gently unmoulding by hand.

Cakes baked in metal mould

8. Shape the hemispherical cakes by inverting them back into the moulds they were baked in. This will give it a nice rounded bottom. Let it sit in that position for at least 15-20 min.


In the mean time, cut out the various parts from layer cake using shape cutters or knife/ bench scraper.

Cutting out the eyes, nose and mouth

I made the pendant on the collar from flower shaped sprinkles that had been spray painted with gold paint. Prepare marshmellow glue by melting marshmellows with a sprinkling of water. Place the largest cake as the body inside the 50x40mm cupcake case and the medium sized cake as the body inside the 44x35mm cupcake case. Insert 2 toothpicks in the body to act as dowels. Attach the head on. The head is one cake size smaller than the body. Glue on the collar and pendant, followed by the paws. Use a small fruit knife to cut the toes on the paws. Attach the parts on the face.

Almost done! Without the ears, hubby says it looks like a mole!

Brush on a bit of sugar syrup to keep the cake moist (dissolve 10g sugar in 20g hot water). And you are done! Store in the fridge in airtight condition. The cake can keep for a few days.

Just to share a work in progress photo of the oranges...

The "Mandarin oranges" before adding details of the stem.

Have a blessed Year of the Dog!

With love,
Phay Shing


Read More »

Wednesday, 18 January 2017

Mandarin Oranges and Yuzu Rooster Chiffon Cupcakes (updates for shaping oranges!)

I believe many of you have seen and attempted making mandarin orange look alike chiffon cupcakes ever since I came up with them 3 years ago. This is the fourth consecutive year that I am making these mandarin oranges! I made a couple of yuzu flavoured rooster cupcakes to go along with them to welcome the year of the rooster :)


These mandarin oranges have a special place in my heart and baking journey as it's one of my earliest creative chiffon bakes baked for a loved one, and I made the discovery that chiffon cakes can be baked in glass bowls and shaped by hand or knife. The first set of mandarin oranges were made for my mother-in-law when we visited for Chinese New Year. Read about it here :)

My friend requested for the mandarin orange cupcakes this year and it's the largest quantity I have baked for a request so far. 20 mandarin orange cupcakes! Since I don't have that many glass bowls, some of the oranges were larger using a 11cm OD bowl instead of my usual 8.5cm ones. I needed two rounds of baking to complete the oranges.


The recipe and video tutorial for shaping the oranges can be found in this post so I shall not repeat them here. What I would like to update is a new shaping technique that I found much neater, to round out the bottoms of the oranges. Instead of using your hand to tuck in the base of the cake, use the same glass bowl that the cake was baked in to round out the base of the cake as shown in the picture below:

Gently tuck the base of the cake (near the rim of the bowl before unmoulding) into the bowl and leave it in there for 15-20 minutes before taking it out. The bases will be very neatly tucked in!

I used this neat trick for the head and body of the roosters as well! I baked the heads in 8.5cm OD bowl and the bodies in 11cm bowl. The other parts of the roosters were baked as sheet cakes in a 7" square tray and cut out using cookie cutters.

Check out the neat rounded bottoms of the cakes! Assembling the head into the body with melted marshmellow and toothpick.

The recipe for yuzu chiffon cupcake can be found here.

Ta-dah! Roosters!

With love,
Phay Shing

Read More »