Showing posts with label Chinese New Year. Show all posts

Thursday, 23 January 2025

Yuzu Matcha Wintermelon Mochi Tarts

 Inspired by the filling of wife biscuits (老婆饼) & the pastry of pineapple tarts during the Lunar New Year season, I came up with these!


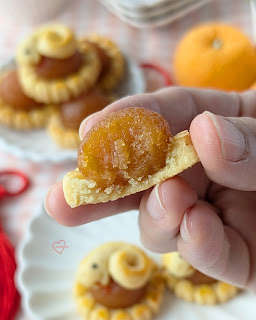
A closer look at the insides!


It was a challenge to get nice pictures of a bite cross-section because the pastry is light and crumbly. I have shared the recipe and video of the process on Instagram 

https://www.instagram.com/reel/DFJTQ1ghkpm/?igsh=MTh6aGJkeDJwZnRh

But I will just copy and paste the recipe and baker's notes on this blog post for those of you who find it hard to read off the captions of the reel. Feel free to upsize as this is a small batch.

Yuzu Matcha Wintermelon Mochi Tarts 
(makes about 25 tarts)

Filling:
100g candied wintermelon (糖冬瓜)* blended or minced
1/8 tsp salt
6g oil
4g honey
20g yuzu/Jeju citron* marmalade without rind
25g water* (more if necessary, 1/2 tsp at a time)
40g cooked glutinous rice flour* (a.k.a. 糕粉)
2g matcha powder*
12g yuzu/citron rind from marmalade, finely chopped

Pastry:
110g plain flour 
10g cornstarch 
6g matcha powder
20g milk powder
25g icing sugar
1/8 tsp salt
100g cold unsalted butter, cubed
1 egg yolk

Egg wash:
1 egg yolk
7g milk/water

1. Blend or mince candied wintermelon. Add salt, oil, honey, marmalade & water. Mix well

2. Whisk together cooked glutinous rice flour & matcha powder. Add to 1. & mix until dough forms

3. Add rind & mix well. Add more water if dough is dry*

4. Divide filling into 8g balls. Keep airtight & refrigerate until ready to assemble

5. Sift together all dry ingredients for pastry

6. Rub in butter until it resembles fine breadcrumbs

7. Add yolk. Mix until dough forms. Wrap & refrigerate for 30min

8. Divide dough into 10g portions. Wrap the filling. Make a hole to vent* during baking

9. Freeze & preheat oven to 135C fan/150C

10. Once oven is preheated, place chilled tarts on lined baking tray. Apply egg wash. Add black sesame seeds if you wish

11. Bake for 30 min or until lightly browned, rotating the tray halfway. You may reapply the egg wash halfway through baking if you wish. Remember to adjust baking temperature and time according to your oven as each oven is different. 


*Baker's notes:

🔸Candied wintermelon, cooked glutinous rice flour and yuzu/Jeju citron marmalade are most likely things you can find in an Asian grocer if you don't live in Asia. These are common items in Singapore. If you can't get cooked glutinous rice flour, simply dry fry glutinous rice flour over low heat for 10 min until aromatic. There's a distinctive cooked glutinous rice flour smell you can't miss

🔸I was given some high grade matcha powder from @alovelikesobo but you may use whatever you have on hand. Do note that lower quality matcha may oxidize with exposure/heat and the green colour may be less vibrant after baking. Needless to say, higher quality powder would taste better

🔸The amount of water needed for the filling will vary depending on how dry your candied wintermelon is. Err on the side of adding less water first because it can get difficult to handle if too much water is added and it becomes a sticky mess. Add enough water such that it's still soft and tacky to touch but doesn't stick to your finger when lightly pressed as shown in the reel

🔸I went for a slightly firmer pastry than regular pineapple tart pastry but still crumbly as the filling is slightly chewy due to the glutinous rice flour. Personally I feel if the pastry is too delicate, it wouldn't fit this filling but feel free to adjust the ratios of the dry ingredients in the pastry. The higher the percentage of cornstarch, the more delicate the pastry

🔸Traditional wife biscuits are made with flaky pastry that doesn't use butter. I decided to have a light buttery pastry to accompany the aromatic and slightly chewy filling. Slits or holes are usually made in the flaky pastry before baking. They act as vents to release steam from the filling, which in turn prevents the pastry from cracking uncontrollably. Don't be alarmed if you see your tart pastry cracking in the oven as this is due to the expansion of filling/ release of steam. The appearance of the cracks will reduce upon cooling. Using lower heat with longer baking time helps to keep cracking minimal


with love,

Phay Shing

Read More »

Tuesday, 14 January 2025

Diabetic-Friendly Pineapple Tarts with Prebiotics Added

I have some family members and friends who are diabetic so I thought of making some pineapple tarts they can enjoy without feeling guilty about it or worry about side effects of sugar replacements. To do so, I replaced some sugar with prebiotic fibres to make these!


Here's a closer look at the snake on top


A peek at a bite cross-section!

My hubby with picky palate can attest that these are yummy 😋 . I made some sugar-free pineapple tarts last year with totally no sugar added at all in the jam. You can read all about it over here where I share two types of tart designs, open-faced and the golf ball. The recipe I share for this year's tarts can be applied to both types of pineapple tarts although you should handle the open-faced version with care as the pastry is rather delicate. Please read the baker's notes* at end where I explain in detail technical aspects and substitutions you can use.

What's so good about the tarts?

✅ No stevia
✅ No alcohol sugars
✅ Real sugar optional
✅ Prebiotic added for lower glycemic load, benefits to gut health & cholesterol 
✅ Light, buttery, crumbly tart pastry

You may wonder does Alchemy Fibre impart any unpleasant taste. It doesn't! It tastes mildly sweet on its own without any chemical aftertaste.

I am not sponsored to share the use of Alchemy Fibre. I am sharing because it's a good product and has shown not to increase the blood sugar levels for my loved one when the pastries are eaten in moderation.

Diabetic-friendly pineapple tarts (🐍 optional)
(makes about 22-30 tarts so feel free to upsize)

Healthier Pineapple Jam*
1 large pineapple, cubed, blended & excess juice sieved out, about 475g for me
1 large apple (I used Gala for some natural sweetness and pectin), blended
20g Alchemy fibre* (omit or replace with sugar)
30g caster sugar* (omit if you wish)
A squeeze of lemon juice (optional, add more if you prefer sour jam)
1 cinnamon stick
Pinch of salt

Steps:
1. Reduce jam till 30% original weight over med-low heat & constant stirring (or use Thermomix). Discard cinnamon stick. This results in 1-1.5g sugar per tart if you follow my original recommendations of sugar & fibre

2. Cool completely. Refrigerate overnight uncovered for extra moisture to evaporate

3. Portion into 8-9g balls

Tart Pastry*:
45g plain flour or cake flour*
20g cornstarch or gluten-free flour*
8g full fat milk powder
8g Alchemy fibre* (may replace with icing sugar)
1/8 tsp salt
45g cold unsalted butter, cubed
1 egg yolk
A little milk if dough is too crumbly*

Egg wash:
1 egg yolk + 7g milk

Steps:
1. Sift together flours, salt, fibre & milk powder

2. Rub in butter until breadcrumb texture

3. Add yolk. Mix until dough forms. Add milk if necessary

4. Roll to 5mm thick. Freeze for 10-15min. Preheat oven to 150C fan/165C 

5. Lightly dust surface of dough with cornstarch. Stamp out pastry with mold. Place 3cm apart on lined baking tray

6. Apply egg wash. Press a ball of jam in the middle 


You can make the snakes* if you wish but these are rather fiddly and tests your fine motor skills!


7. Bake for 25-30 min or until golden brown. Baking the tarts low and slow will prevent huge cracks from forming

8. Cool completely. Store in airtight container at room temperature for up to a week or in the fridge for 3-4 weeks. Toast it lightly before consuming to recrisp if stored in fridge


*Baker's Notes: 
🔸Alchemy Fibre is a blend of inulin & edible gum. It's a prebiotic that has beneficial effects for gut health, lowers cholesterol & reduces the glycemic load of the food it's added to. You may substitute with inulin if you don't have access to this product, or simply replace with sugar

🔸I decided to use a little sugar in the jam & not include stevia or any alcohol sugars in the whole bake to avoid any gastrointestinal side effects. You may omit the sugar if you wish. I decided to add a little real sugar to improve the jam texture. I made it totally without sugar last year & although it's nice & healthy, it's a little less jammy in texture 

🔸Adding some Alchemy Fibre doesn't affect the final texture of the tart but the dough is more crumbly & less pliable so it's a little trickier to handle. Because of this, I made the snakes using dough made with icing sugar instead of Alchemy fibre but the tart base is made with the fibre added & no sugar. You may use the same dough for making golf ball type of tarts too if you don't have the plunger mold. Use 10g dough for each golf ball tart.

🔸Use plain flour instead of cake flour if you prefer a sturdier pastry. The gluten-free flour I used is from Bob's Red Mill. You may use cornstarch if you wish as it's commonly used in typical pineapple tart pastry along with wheat flour.

🔸I used black sesame seeds for the snake eyes & Goji berry skin for the tongue. Shaping done by hand, toothpick & Dresden tool. I used a pair of small sharp scissors and knife to cut the snake tongue out of Goji berry. I didn't weigh the amount of dough for the snakes but I estimate it at around 3-4g. 
 
You may watch the video of making the tarts over here:

https://www.instagram.com/reel/DEzUcTiSgv7/?igsh=MzYxYzhqeWFsYXlu


I guided my elder kid to make some golf ball type of tarts that didn't use Alchemy fibre (but used icing sugar in the dough and used store-bought pineapple jam)  so that's where I "borrowed" a little dough from to make the snakes on top.


These were seriously good according to my kid's classmates!


with love,

Phay Shing

Read More »

Saturday, 4 January 2025

Passionfruit Honey Vanilla Reduced-Sugar Snake Marshmallows

 Someone asked privately if the sugar content in my default marshmallow recipe in Deco Marshmallows can be reduced. My first thought was wouldn't it affect the stability and simply be essentially a volume reduction? I decided to give it a try anyway. Here's what I made to welcome the Year of the Snake!

Passionfruit honey vanilla marshmallows that are more tangy than sweet and full of passionfruit flavour!

A closer look at the kawaii version!

While reducing sugar did make the marshmallow batter softer to work with, it also did make it a little more unstable as expected so one has to work quickly and adjust the process a little to make it work. What's more significant is the reduction of invert sugar. I reduced the amount of invert sugar (can be light corn syrup, glucose syrup, dark corn syrup, golden syrup or honey) just enough to prevent sugar crystallization. The resulting marshmallow tends to be less sticky in humid Singapore's air, which is a plus point for me!

Here are the piped snakes before dusting.


This design is inspired by clarakitchen21 (Youtube channel)

They are super fun to play with especially the long snake which can slither!

Piping tutorials are on my Instagram.

Long snake piping tutorial:

https://www.instagram.com/reel/DEeuHtpSlOX/?igsh=YmJmbXIxYmg1aW9m

Kawaii snake piping tutorial:

https://www.instagram.com/reel/DEj3vf0S5Lp/?igsh=c20ydnp3ZXE4amY2


Do give these a try to welcome the Year of the Snake!


P.S. If you are interested to know about my reduced sugar recipe, I will be sharing it in my upcoming studio marshmallow class for mandarin orange and pineapple tarts that will delight (and fool 🤭) your family and friends this Lunar New Year!


with love,

Phay Shing

Read More »

Friday, 2 February 2024

Pineapple Tart Dragon


I was inspired to transform the Pineapple Tart roll into a Flying Dragon! 🍍🐉🥰 
Do you like it?❤️ 
Rolling is such a quick way to shape pineapple tarts, and even easier to construct into a dragon! 

Assembly video here.  

Tart crust recipe (makes 3 dragons) 
228g (2 sticks) unsalted butter 
120g icing sugar 
2 large egg yolks 
60g heavy cream 
400g plain flour 
15g corn flour 
15g milk powder 
Red yeast rice powder (or red food coloring) 

Happy CNY in advance! 

Love, 

Susanne 


Read More »

Thursday, 1 February 2024

Dragon Roll Cake


Scaling into the new year with a long (龙) dragon roll cake (pun intended😜)! 🥰
See the video of the making here

Happy Lunar New Year in advance! 

With love, 
Susanne 

Read More »

Saturday, 20 January 2024

Year of the Dragon Lunar New Year Greeting

It's my annual tradition to create a new year greeting showcasing all the major genres of bakes I work with. Here's what I made welcoming The Year of the Dragon!


What's in this picture?
1. Chiffon cake mandarin oranges. This year marks 10 years since I made my first mandarin orange chiffon cake oranges back in January 2014!
2. Macaron teacups on saucers. One of my signature 3D macaron creations.
3. Choux pastry dragon suit head, horns, frills and paws. I couldn't think of how to incorporate choux and marshmallow in a coherent creation until I thought of the rabbit in dragon suit idea. Glad it worked out!
4. Marshmallow bunny face and ears, as well as dragon wings. I made a fully marshmallow version of the rabbit in dragon suit too!

Watch the video in this post to see the squish in the marshmallow parts!

https://www.instagram.com/p/C2WADcgSJVH/?igsh=MTEyczdsMzFsYXY3NQ==


with love,

Phay Shing

Read More »

Saturday, 6 January 2024

'Rabbit in Dragon Suit' Marshmallows

 With the Year of the Rabbit is ending in about a month's time, comes the Year of the Dragon with a roar! Here's my interpretation of the Rabbit ushering in the Year of the Dragon....in a dragon suit!


You may watch the piping video tutorial in my reel over here:

https://www.instagram.com/reel/C1wf90tS61l/?igsh=MTQ1NmswOTZ1MGkxeg==

For those of you who would like to see some process still photos, here they are!


A stable base with wide, flat top surface on the body is important as you don't want the head to start slipping off when you pipe it!

Piped heads on the body

Completed piping! The wings are stuck onto the body and are piped on a separate tray 


Although I have shared the ingredient list of my basic recipe in social media, I continue to stress that decorative marshmallows is more about technique than specific recipe. You can learn all about how to tweak my basic recipe to suit your unique work environment, equipment and flavour of marshmallows in my Deco Marshmallows book!


Stay tuned for my mixed genre Chinese New Year greeting in my future post!


with love,

Phay Shing

Read More »

Wednesday, 1 February 2023

Mandarin Orange Marshmallows with Yuzu Mandarin Orange Filling

 This is the second Lunar New Year themed marshmallow creation that I wish I thought of making earlier. But it's ok, this will appear in my upcoming book Deco Marshmallows as well!

This is a rather nostalgic design because it looks so much like my chiffon cake mandarin oranges that I discovered 9 years ago. How time flies! I remember the excitement of discovering how I could make realistic looking mandarin oranges out of mandarin orange chiffon sponge so many years ago! What I did differently this time for the marshmallow version, is to add a filling to boost that citrusy kick! The filling is yuzu with mandarin orange zest and the marshmallow itself is made with mandarin orange juice.


Here's a video of it in squishy action! Perhaps you can fool your family and friends next Lunar New Year with these 😉

https://www.instagram.com/reel/CoHktm0gWdk/?igshid=NTdlMDg3MTY=


with love,

Phay Shing


Read More »

Tuesday, 17 January 2023

Rabbit Sugar-Free Tau Sar Piah

 One activity that people do around Chinese New Year is to declutter and clear out the old stuff. For bakers, that includes freezer as well. I had some frozen mung bean puree to clear from my Mooncaron class last year so I thought hy not bless my family with sugar-free Tau Sar Piah! 

It's the Year of the Rabbit so of course I had to cutesify it to match the Zodiac 🤭

A closer look at the cut cross-section...


For those of you who are not familiar with tau sar piah (豆沙饼) or mung bean biscuit, it originated from Penang (known as Tambun biscuits over there). It's a sweet and savoury pastry with thin flaky crust and mung bean filling bursting with fried shallot flavour. What I made is different from the original as I was working with a rather moist and extremely finely sieved mung bean puree, rather than from dried split mung beans. As a result, my paste is very smooth instead of grainy, and took longer to cook off the moisture, causing most of the fried shallots to disintegrate and dissolve into the paste at the end of cooking time. BUT the flavour is still very good and spot-on, according to hubby who was a Malaysian.

I didn't want to compromise the taste and wanted it to taste as authentic as possible despite using sugar replacements and frozen puree. Upon doing research, bakers suggest using butter for best taste but it doesn't hold the shape well, doesn't give you the best flaky texture and the dough is difficult to handle. While buttery pastry tastes and smells great, personally I feel it isn't authentic tasting as traditional Chinese pastries generally don't use butter as fat. 

Before I share the recipe and steps, let me give credit to my references and discuss the ingredients used. I based my recipe on this recipe and followed the filling and dough proportions from here. I also found interesting information from here and here.


FAT
Traditionally, pork lard is used as the fat for the pastry and vegetable oil is used for frying the shallots. But due to religious reasons or dietary preferences, other forms of fat such as vegetable shortening or ghee are common replacements for lard as they still produce the nice flaky texture. Coconut oil or butter can be used as well but as mentioned earlier, butter is difficult to handle so you may want to substitute only part of lard/shortening/ghee with butter. Oil is generally not recommended except for coconut oil which has a higher melting point than other oils. I rendered my own pork fat to get the lard. I used it for the pastry and mixed with some peanut oil for cooking the mung bean paste. Neutral tasting vegetable oil is usually the default oil for frying shallots but I wanted to use up the lard I made just for this bake 😆.

Homemade lard!

I used this recipe as my reference but used only about 400g of pork fat.

Use more oil if you prefer a moister filling, and less oil if you prefer a drier filling that crumbles upon bite.

SUGAR
Generally, fine white sugar is used for the filling and powdered sugar is used for the pastry. You may use brown sugar if you like. I used a mix of Erythritol and Allulose for the filling, and Sukrin (powdered form of Erythritol) for the pastry as the sugar replacements. You can't detect any artificial taste from them at all because the flavour of the other ingredients is strong! As with all alcohol sugars, consume in moderation as some people may have digestive sensitivities to them. But having said that, both Erythritol and Allulose are zero calories and does not raise the blood sugar levels at all.

FLOUR
Plain flour with moderate protein content is usually used as you want the pastry to hold the shape well. If you prefer a more tender bite, you may replace some of the plain flour with a low protein flour like cake flour.

MUNG BEAN
Dried split mung beans are used. The beans should be thoroughly washed and drained before steaming. You may choose to add water to the beans before steaming or omit it. Which ever the case, steam until the beans are soft and you can mush the beans easily between your fingers. The steamed mung beans are then blended before mixing with the other ingredients. There is no need to sieve the blended beans like I did. I was just using up old freezer stock meant for another bake.

Rabbit Sugar-Free Tau Sar Piah
(Makes about 24-25 rabbit pastries)
Mung Bean Filling
Ingredients:
200g dried split mung beans rinsed & drained*
300g water*
80-90g oil of choice (I used 30g peanut oil, 60g lard)
60-70g chopped shallots
135g sugar (I used 75g Erythritol, 60g Allulose)
1/2 heaping tsp salt
1/4-1/2 tsp white pepper

*I used 540g mung bean puree from my frozen stock.

Steps:
1. Steam mung beans in water for 20min or until soft enough to mush the beans between your fingers. Blend the steamed mung bean to make puree.

2. Fry shallots in oil until browned.

3. Place mung bean puree, fried shallots with the oil, salt, pepper and sugar into a saucepan or frying pan and cook on low heat until a dough forms. Enough moisture needs to be cooked off such that you are able to form a ball of dough that is able to hold its shape. Set aside to cool before dividing into balls of 20g each. You may prepare this a day ahead of time and store in airtight condition at cool room temperature.

This recipe yields about 500g filling.

Mung bean filling portioned into 20g balls


Water dough
Ingredients:
180g plain flour
70g icing sugar (I used Sukrin)
1 tsp salt
54g lard (cold from the fridge)
63g ice water

Steps:
1. Sift together flour, sugar & salt. 

2. Rub in lard until mixture resembles fine bread crumbs. 

3. Add ice water & mix until ball of dough forms.

4. Knead for 5 min, cover with cling wrap & let it rest for 30min. In the mean time, work on the oil dough.

5. Divide into 12g portions & cover with cling wrap until ready to combine with oil dough.

There may be a little excess dough. You may add more flour if the dough is very sticky. Different brands of flour have different absorption properties.

Oil dough
Ingredients:
128g plain flour, sifted
56g lard (cold from the fridge)

Steps:
1. Combine the ingredients until a ball of dough forms. 

2. Keep in fridge until water dough has rested fully.

There may be a little excess dough.

Assembly
Components:
1. Mung bean filling in 20g portions
2. Water dough in 12g portions
3. Oil dough in 7g portions
4. 1 egg yolk, lightly beaten
5. 1 tsp water
6. Black sesame seeds
7. Almond slices
8. Pine nuts (optional)

Steps:
1. Divide oil dough into 7g portions.

2. Flatten a portion of water dough to form a disc. Wrap a ball of oil dough with it. 

3. Roll the dough flat with rolling pin. Roll the flattened dough up like a Swiss roll. Rotate by 90° and roll the dough flat again. Roll it up like a Swiss roll the second time and set aside. Let the dough rest for 20min.

4. Preheat oven to 180C fan/190C. Line a baking tray with parchment paper/Teflon sheet/baking mat.

5. Lightly dust a portion of dough and the work surface with plain flour, or just light dust the work surface and cover a portion of dough with cling wrap (shown in video). Roll the dough into a disc about 10-12cm in diameter. Wrap a ball of filling. Pinch seal the base tightly. Dab with a little water to help with the seal if necessary. Gently roll one side of the ball of wrapped filling to make a slight taper for the rabbit body shape if you wish. Place on lined baking tray.

6. Mix egg yolk and 1 tsp of water. Sieve the mixture to make the egg wash. Brush the egg wash on the pastry tops with a brush.

7. Add on the pine nut tail (optional), almond slice ears and black sesame seed eyes. You may outline the almond ears with egg wash but that's optional.

8. Bake for 20 min or until golden and lightly browned. Cool completely before storing in airtight container at cool room temperature.

The amazing thing about this design is you can apply to other types of cookies and pastries like pineapple tarts, butter cookies, peanut cookies etc for the Year of the Rabbit!

You may find it helpful to watch my Instagram reel for the whole process:


Happy Chinese New Year everyone! 


with lots of love, 
Phay Shing
Read More »

Monday, 16 January 2023

My Melody Burger Chiffon Cake


Food meets fun this CNY! My Melody-inspired burger chiffon cake coming fresh of the grill!
 I've shared the assembly video here on my IG. 

Some other updates in response to some messages. My new classes here: 

Happy CNY in advance!! 

With love, 
Susanne 


Read More »

Wednesday, 11 January 2023

Rabbit Pineapple Creampuff

 Lunar New Year is just around the corner and many bakers are baking pineapple tarts. I have decided to share a creampuff version of this well-loved pastry in cute bunny form to welcome the Year of the Rabbit!


I made the pineapple jam from scratch using the Ninja Foodi Power Blender Ultimate System from Ninja Kitchen Singapore. I was amazed at how easy it was to get pineapple puree that is so evenly blended at the touch of a button! There wasn't a need to manually pause & scrape down the blender multiple times. See it for yourself in the video below! It was super easy to clean too as the blade is removable.

https://www.instagram.com/reel/CnQUOEkAmZa/?igshid=NTdlMDg3MTY=


Please use my promo code: PSCB402 to enjoy $150 off original price of $499 for the blender! Visit Ninja Kitchen Singapore's website if you would like to make the purchase.

I used the pineapple jam on its own & added a sieved portion to whipped cream as filling for the creampuffs.

PINEAPPLE JAM
Ingredients:
1kg fresh pineapple flesh, cut into chunks (about 2 pineapples)
120g caster sugar
30g brown sugar
1/8 tsp salt
1 cinnamon stick

Steps:
1. Blend pineapple chunks
2. Cook pineapple puree with rest of ingredients over low heat till reduced to half (500g).
3. Discard cinnamon stick
4. Store in airtight glass jar in the fridge until ready to use.

Baker's Notes:
- Jam for pineapple tarts is reduced to 20% original weight of puree. But for choux pastry it's reduced to 50% for a softer & moist filling to complement the whipped cream & light, buttery pastry case. Taste isn't compromised! It tastes like a creampuff version of pineapple tarts!
- Adjust sugar according to taste & tartness of pineapples
- Add lemon juice if you like it really tart
- Add cloves/vanilla if you like
- Extra jam can be reduced further for making pineapple tarts 

CHOUX PASTRY
Please refer to chapters 7-9 on my YouTube channel on the basics of choux au craquelin for more details on the technique involved. Over here for chapter 7 on craquelin, over here for chapter 8 on basics of choux pastry batter, and over here for chapter 9 on piping and baking choux buns. I will just briefly describe the steps in this blog post.

Ingredients (makes about 18 mini choux buns):
Craquelin
21g unsalted butter, softened
18g sugar
21g plain flour, sifted

Choux batter
1 egg, lightly beaten (about 50g)
30g plain or bread flour, sifted 
1/4 tsp salt
1/2 tsp sugar
55-60g water
20g butter 
1/2 tsp vanilla extract (optional)

Decoration
Toasted almond slices
Dark chocolate couverture/chips
A little shortening or oil

Steps:
1. Make craquelin. Briefly cream butter and sugar together. Fold in flour. Roll the dough to thickness of 2-3mm between parchment paper. Freeze until firm. Cut out 3cm circles and place on lined baking tray, and freeze the cutouts again until ready to use.

2. Preheat oven to 200C(fan)/220C. Line baking tray with perforated mat (preferable) and 2.3cm circle template. You may line with parchment paper if you don't have the mat. Perforated mat helps choux pastries to retain better shape and have a flat base.

3. Make choux batter. Place water, butter, salt, sugar and vanilla into small saucepan. Heat on low heat to melt butter while stirring. Once butter is melted, quickly bring to roiling boil, stirring occassionally. Remove from heat and pour all the flour in at once. Stir until a ball of dough forms. Make sure all lumps of flour are mixed in. Cook on medium-low heat until some water from the dough is cooked off for about 2-3min (about 10% reduction in weight of dough). Transfer to bowl to cool for 10min.

4. Add half of egg and mix well until batter is smooth. Add half of remaining egg. Mix until batter is smooth. Add the remaining egg a tsp at a time, mixing until smooth with each addition, until batter is able to fall off spatula in 3 seconds.

5. Transfer to piping bag fitted with a 8mm round tip (Wilton #12). Pipe batter onto prepared tray. Dab some water around the piped batter. Carefully place craquelin on top of piped batter.

6. Put tray in oven. Immediately reduce temperature to 180C (fan)/190C and bake for 20-25 min. Reduce temperature to 140-150C and bake for another 20-25min or until thoroughly crisp. We need it crisp all the way as we are adding decorative pieces on the choux case. Do note that baking temperature and time may vary as each oven is different so adjust accordingly.

7. Cool completely before decorating by cutting the top one-third off. Carefully pierce 2 slits on the top piece before inserting almond slices for the ears. Paint or pipe on the eyes and nose of the bunny cap using melted chocolate with a little oil or shortening. Addition of shortening or oil helps the chocolate stay in piping/painting consistency for a longer time. Store in airtight container while preparing the pineapple whipped cream.

PINEAPPLE WHIPPED CREAM
Honestly I would prefer using pineapple diplomat cream to pair with the pineapple jam in the middle for filling but it would be conflict of interest to share my class material here. I chose to share a simple filling that is much faster to make and uses less ingredients so that you may be encouraged to give this a try!

Ingredients*:
150g Whip Topping (non-dairy whipping cream)
50g heavy cream (35% fat dairy cream)
80g sieved pineapple jam

*You may choose your preferred choice of cream depending on climate and where you are serving the pastries. Full dairy cream tastes the best and you may use double cream (45% fat) if you wish. Use stabilizers like gelatin and add a little sugar if using dairy cream. Singapore is very warm so I use non-dairy whipping cream with some dairy cream mixed in. Non-dairy cream is very stable and is pre-sweetened but doesn't taste as good as pure dairy cream. Adjust amount of sieved jam according to taste too.

Steps:
1. Whip whipping cream of choice until firm/stiff peak. Be careful not to overwhip if using purely dairy cream. 

2. Whisk/fold in sieved jam a little at a time.

3. Transfer a little cream into small piping bag with a small hole cut or Wilton #7 tip attached. Transfer the remaining cream into a large piping bag fitted with a large round tip (e.g.  Wilton 1A which is around 13mm in diameter)

ASSEMBLY
1. Fill the choux pastry with whipped cream until about half to three-quarters full. Use the rounded base of a half teaspoon to push the cream against the base and sides of the pastry case to create a well.

2. Fill the well with a heap of pineapple jam.

3. Pipe a generous mound of whipped cream over the jam from large piping bag for the bunny head.

4. Use cream from small piping bag to pipe on the paws, snout and ears. 

5. Add eyes using melted chocolate. Add rosy cheeks if desired. I coloured a little whipped cream with pink gel colouring for the rosy cheeks but you may use natural sources of food colouring like beetroot or red yeast if you like.

I was in a hurry racing against the sunset as it was getting a little too dark to take good videos and photos! I was also multi-tasking by working on this and cooking dinner at the same time 😆😅.

6. Place top piece of pastry case on top of bunny head and you are done!

Keep refrigerated for up to 3 days, or in the freezer for a month in airtight condition. The frozen pastry tastes like ice-cream filled creampuffs, and the chilled version tastes like creampuff version of pineapple tarts!

I tried to keep the design simple and artificial colouring minimal so that you can give this a try!

Please see my second reel below for making of the choux pastry, pineapple whipped cream and assembly:


Read More »

Friday, 6 January 2023

Rabbit Family Chiffon Cakes


My Little Rabbit Family hopping into the New Year and the Year of the Rabbit! Sincerely wish my dear friends here the best in 2023!❤️❤️ 

Some assembly scenes here.

With lots of love,

Susanne 


Read More »

Thursday, 24 November 2022

Pineapple Bunny Choux Pastry in Macaron Teacup Class

 Let's welcome the Year of the Rabbit in 2023 with these cute Choux Pastry Bunnies in Macaron Teacups!


Filled with sweet and tangy pineapple jam and pineapple diplomat cream!


This class for learning two genres of bakes, macarons and choux pastries, will happen in January 2023. Please click on this link for more information on class details or to register .


with love,

Phay Shing

Read More »

Saturday, 5 February 2022

Tiger Pineapple Chiffon Cake

 
Pineapple creation inspired by the cutest @mediacorp Hu Tiger mascot!🐯😍

Have you wondered why pineapple tarts are so popular during CNY? Apparently it's to do with pineapple sounding like 'ong lai' in dialect hehe!🍍

I've been making the cny mascots every year to show my support! Missed seeing the plushies around the last 2 years. Hope that my 3D impression of the cute cartoon makes you smile too!😀💕

Hu tiger (from the pineapple) sending lots of love!❤❤🥰

Love,

Susanne


Read More »

Wednesday, 19 January 2022

Tiger Family Chiffon Cakes


My little Tiger family wishing everyone a Happy New Year!🐯💕 

Thank you for your love, friendship and support!❤ 

They are made from orange chiffon cake pops. 

May you be safe, healthy and blessed!😘 


With love,

Susanne


Read More »

Monday, 17 January 2022

'Ox Welcoming Tiger' Yuzu Mango Matcha Macarons

This was an unplanned bake that had to be made because it stuck in my head and I needed to get it out of my system😅. Last year I made an impromptu bake of "Rat welcoming the Year of the Ox" macarons. This year I thought of making something with similar theme but in 3D form. So here's my version of this year's "Ox welcoming the Year of the Tiger"! 


A closer look at the Ox without the cart. 

Of course I had to test out the cart to make sure it works... 


What was really stuck in my head was this that I had to get out of my system... 


I broke down the baking into 3 separate sessions since this was unplanned. The red macaron shells for the new year greeting was baked with batter for my teacup macaron class using Swiss meringue method. The cart was made using French method and the ox and tigers were made using swiss method. The cart and animal macaron shells are lightly mango flavoured and filled with a new flavour I was testing out: yuzu mango matcha! I was inspired by the full leaf yuzu green tea I drank and the mention of this flavour in one of the baking contest shows I watched. 

The quantities of each component can be tweaked according to preference. I needed something firmer and not too intensely green so I went easy on the matcha and used less wet ingredients. You may use more yuzu juice or mango compote instead of brewed green tea like I did. I was trying to get more tea flavour without the colour. Feel free to up size the portion as this is a small portion. 


Yuzu mango matcha ganache 

Ingredients:

60g White chocolate, finely chopped or use chips 

10g Concentrated brewed green tea (made from 35g hot water and 3 teabags steeped for 20min)

4g 100% yuzu juice concentrate

1/2 tsp freeze-dried mango powder

1/4 tsp matcha powder

6g unsalted butter 

Steps:

1. Place everything in microwave safe bowl. Use medium-low power to heat for 10 seconds and stir. Repeat heating and stirring until mixture is homogeneous and melted. Alternatively you may use the double boiling method. 

2. Leave it at aircon room temperature to set until toothpaste consistency. Whip it up to lighten texture if you wish. 

3. Transfer to piping bag and fill the macarons. Let thr macarons mature at room temperature or in fridge for at least 24h before consuming. 


With love, 

Phay Shing

Read More »

Sunday, 16 January 2022

Tiger Roll Cake


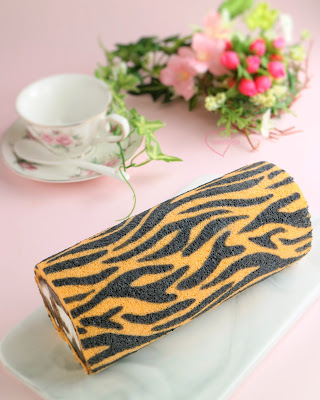
This Tiger roll uses the same technique as orange chiffon recipe. Check out the previous post for the recipe.

For this roll cake, bake in a quarter sheet pan at 160C for 20-22 mins.

*Tip: If you are worried you may accidentally smudge the black stripes while piping the orange batter, you can bake the patterns for 2-3min at 160C before filling with orange cake batter to set the patterns first (optional but useful for first-timers)❤

I further tried to make Tiger stripes in the cream using chocolate and chantilly cream 🙈. Not sure what to make of it😆. 


Recipe for Chocolate-Chantilly Filling: Whip 1 cup cold heavy cream (240g) with 55g icing sugar and 1/2 tsp vanilla till firm peaks. Remove 1/3 cream and fold in cocoa paste (1 tsp cocoa powder/1 tsp cream).
Pipe humps of chocolate cream, fill the rest with chantilly cream and then roll up.

Have a great CNY in advance!
With love,
Susanne

Read More »

Friday, 7 January 2022

Tiger Chiffon Cake


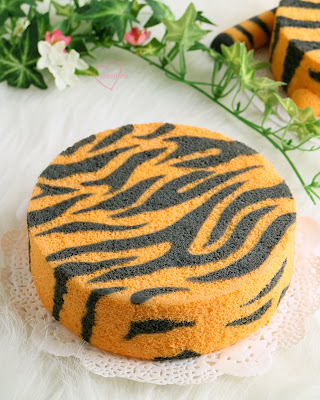
Which version do you prefer? Cute🐯 or Stripy🐅 (below)?

Some of you had DM-ed me about the Recipe for making orange-chocolate Tiger chiffon cake. So here goes! Hope you will find this helpful!🤗 

Orange Chocolate Tiger chiffon cake 
4 egg yolks 
20g castor sugar 
40g vegetable oil 
45g orange/mandarin orange juice 
60g cake flour, sifted 
Orange zest (1 orange) 
1 tsp black cocoa powder in 1 tsp hot water (cocoa paste) 
@suncorefoods vermillion annatto for the color (or orange food coloring) 

4 egg whites 
45g castor sugar 
1/4 tsp cream of tartar 

Whisk egg yolks with sugar, followed by oil and juice. Add in sifted flour and whisk till well combined. Divide the batter into 1/3 and 2/3. To 1st part: add cocoa paste. To the 2nd part, add orange zest and vermillion annatto powder and mix well. 

In another mixing bowl, whisk egg whites with sugar till firm peaks. Divide the meringue into 1/3 and 2/3 and fold into each colored batter. Pipe tiger stripes at the base and inside the cake using black batter, interspersed with orange batter. 

*Tip: use a toothpick to drag the tips of your piped black stripes to make tiger stripes. 

Bake in a 7” cake pan at 140C for 1hr, or until a bamboo skewer comes out dry. 

Enjoy baking!! Tag me if you try it! See cross section of the stripes in the cake! ➡️🥰 


More pictures here.

Love and stay healthy, 
Susanne


Read More »

Tuesday, 4 January 2022

Yuzu Tiger Macaron Class

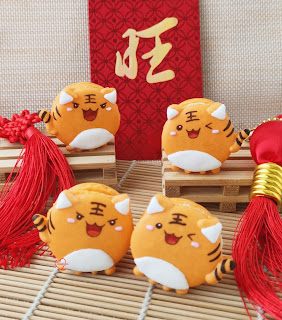
 Welcoming 2022 and the Year of the Tiger with these "旺旺虎” macarons!


This is the first time a group of people from the same company wants a class from me and they requested for some cute tiger macarons to welcome the Year of the Tiger. 

I will be teaching this class at Tottstore end January, just in time for Chinese New Year. Yuzu macarons where the shell is lightly yuzu flavoured and the filling is a yuzu ganache with chopped milk chocolate bits. As the group size maxed out the capacity, this class is not open for registration for others to join. Posting this here on the blog as I hope these cutely fierce tigers will put a smile on your face as we welcome 2022 and the Year of the Tiger! 


With love, 

Phay Shing 

Read More »

Monday, 3 January 2022

Tigger Chiffon Cake


Happy 2022 to everyone! Lunar new year is coming! So all the cute tigers are coming out to play, including Tigger! =)

Tigger is made from my favorite orange chiffon cake. Will be sharing the orange chiffon recipe in an upcoming post!🥰

Does the cake look like a plushie?😛❤

With lots of love,
Susanne

Read More »