Showing posts with label Unicorn. Show all posts

Friday, 27 May 2022

Unicorn Plushiemallow Class

 I am excited to announce that I will be conducting my first plushiemallow class that had both online and studio versions in June!


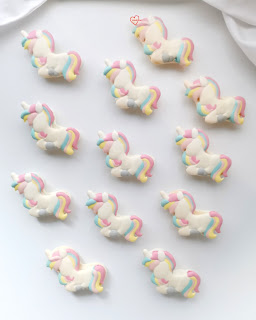
These unicorns are modelled after actual plush toys that usually come in three postures:
1. Lying on front
2. Lying on back
3. Sitting upright.


You will learn how to make the basic marshmallow base, colour it into different colours, pipe the various unicorns and how to add on details like nostrils, rosy cheeks and small facial features like the eyes. There will be bonus demo on how to pipe the rainbow cloud and what to do with the extra marshmallows.

For more details of this class and if you are interested to sign up for the studio/online class, please click on this link.


with love,

Phay Shing

Read More »

Wednesday, 18 May 2022

Rainbow Unicorn Macaron Carousel

 I made this rainbow unicorn macaron carousel a couple of months ago and finally posting it!


I always preferred bakes without age and name for social media posts so I used the above as the cover picture. But actually the completed bake looks like this:


I used swiss meringue method to make the macaron shells.

Sharing a collage of the piped macaron batter. Please excuse the difference in colours of the carousel frame as it was due to camera auto white balance correction. I was running low on teal coloured batter so I used a little white batter on the large base shells. If you are interested to know how to pipe the swirl macarons, you may refer to my Macaron Basics book.The video tutorial linked to the book can be found in this post.

I used black edible marker and peach coloured lustre dust to decorate the unicorns.

I filled the carousel with vanilla ganache and dark chocolate ganache.


I have made many unicorn macaron carousels over the years but I think this set is the most elegant 😊


Follow me on Instagram at phay_shing if you would like to see more up-to-date bakes from me as I may not post everything in the blog in a timely manner.


with love,

Phay Shing


Read More »

Thursday, 5 May 2022

Unicorn and Mermaid Pusheen Cookies n Cream Macarons

This is another way overdue post. I made these unicorn and mermaid Pusheens together with the choux pastry version way back in way January this year!

Trying to create a cloudy beach scene here😆

I made these macarons using the swiss meringue method and decorated the macaron shells using edible marker and a mixture of edible marker and vodka wash (for the details on the unicorn horn).
Top view look at decorated macaron shells

Checkout the awesome feet on the shells!

I filled the macarons with cookies n cream swiss meringue buttercream as requested.


with love,

Phay Shing


Read More »

Sunday, 13 March 2022

Nut-Free Rainbow Unicorn Macarons

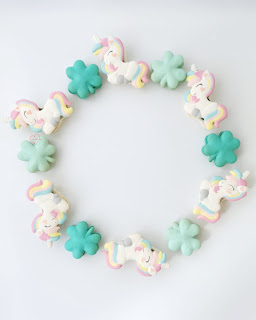
My friend requested for some nut-free rainbow unicorn macarons. Since St Patrick's Day is just around the corner, I threw in some shamrock and rainbow cloud macarons as well for photography! 


I made nut-free macarons before using a mix of rice flour and pumpkin seed flour, as well as cake flour. This time round I needed a pure white base so I can't use pumpkin seed. Wheat-based flour is a convenient alternative.  The last attempt of wheat flour-based macarons were made using french method. This time round I use swiss method.

Cake flour based nut-free macaron recipe
Ingredients (makes about 40 - 50 macarons) :
Mass
200g cake flour (low protein wheat flour) 
200g icing sugar (mine has cornstarch added) 
80g egg whites
1 tsp white powder colouring (optional) 
Gel food colouring 

Swiss Meringue 
145g caster sugar
40g icing sugar
110g egg whites 
1 tsp egg white powder (optional) 
1/2 tsp cream of tartar (optional) 

Steps:
1. Prepare template and line baking tray with parchment paper. 

2. Prepare the mass. Sift together dry ingredients in the mass. Add egg whites to form a thick paste. Cover with cling wrap and set aside. 

3. Make swiss meringue. Whisk together egg white powder, icing sugar and caster sugar.  Add the sugar mix and cream of tartar into egg whites in standmixer bowl (or clean metal mixing bowl if using handheld mixer). Set bowl over saucepan of water. Heat the water over low heat and whisk the egg whites with sugar mix until temperature reaches about 50C. Take your time to heat up the water to ensure all sugar is dissolved. 

4. Transfer to standmixer and whip on medium speed until firm peak. The meringue peak should be fairly straight with a small curl at the end when you slowly lift the beater. 

5. Fold in about a third of the meringue into the mass and mix well thoroughly. Fold in the rest of meringue until just combined. Split into the various rainbow colours and add the respective gel colouring. Fold until the consistency is correct. The batter should fall off the spatula in a continuous manner and any peaks of batter disappear in about 15 seconds. 

6. Transfer batter into piping bag and pipe the unicorns. Let the piped batter rest until it isn't sticky to touch at all.  Duration of resting depends on humidity. It can vary from 30min to 2 hours.


Piped batter. Takes about an hour to pipe a tray! 

7. Preheat oven to 165C and set oven rack to second lowest position. Once the tray is in, reduce temperature to 140C and bake for 10-12 min. Reduce temperature to 120C and bake for another 10-12 min or until feet doesn't appear wet. Cool completely before peeling parchment paper away from macaron shell. 

Freshly baked shells! 

I decorated the shells with black edible marker and peach coloured lustre dust. A little vodka is used to make paint with black marker for the light horn lines and with lustre dust for the heart shaped inner ear and cheek. 

Pandan coconut white chocolate buttercream
Ingredients:
75g unsalted butter
90g white chocolate (finely chopped or use chips) 
12g 100% dark chocolate couverture (may replace with white chocolate and/or butter if unavailable) 
38g coconut cream powder
1/4 tsp salt 
1 and 1/4 tsp pandan paste

Steps:
1. Place all ingredients in a heatproof bowl. Set over pot of freshly boiled water without the water touching the base of the bowl. Melt the chocolate and butter and mix well. 

2. Set aside in aircon room temperature for an hour to firm up. Alternatively, refrigerated for 10 to 15 min or until toothpaste consistency. You may choose to whip the mixture until it is lighter in texture. 

3. Transfer to piping bag and fill the macaron shells. Mature the filled macarons by storing in fridge in airtight container for at least 24 h before consuming. Let the container stay at room temperature for 20 min before opening and consuming the macarons. 

Filling the unicorns! 


Follow me on Instagram @phay_shing as I post my work more frequently there and not everything I do gets posted on the blog.


With love, 

Phay Shing

Read More »

Monday, 7 March 2022

Rainbow Angel Food Cake


(Recipe) Rainbow Angel food cake using natural coloring from @suncorefoods!
My first time trying out deco-angel food cake. Very glad it worked out! Texture is light and airy.

Rainbow Angel Food Cake
1 cup cake flour (120g)
¾ cup caster sugar (150g)
½ tsp (2g) salt

10 egg whites (360g)
1/3 cup caster sugar (150g)
1.5 tsp cream of tartar 96g)
2 tsp vanilla extract (10g)

@suncorefoods cerise prickly pear, yellow safflower, blue spirulina, jade matcha, ebony carrot for the rainbow colors

Pulse cake flour with ¾ cup caster sugar and salt till fine and powdery.
In a clean mixing bowl, whisk egg whites with cream of tartar till frothy. Add in ¾ cup caster sugar gradually and whisk till firm peaks. Beat in vanilla extract till just combined.
Fold the powdery dry mixture into the meringue in 3 additions. Before the mixture is completely folded, divide the mixture into 5 and fold in the rainbow color powders (I used blue and yellow to make green).

Pipe rainbow colored batter into a 6” square tube pan, as well as heart-shaped and round baking cups to make the ‘lollipops’. Bake the tube pan at 150C for 50+min and the cupcakes for 18min. Pour leftover yellow batter into cake pop molds to bake the ‘unicorn’ (18 mins).
Assemble the rainbow angel cake using marshmallow glue. Enjoy! =)

With love,
Susanne

Read More »

Monday, 15 February 2021

Chubby Unicorn Macaron Carousel

My friend requested for a unicorn macaron carousel for her daughter's birthday. She's a special friend because I got to know her through her supporting us in our bake sales way back when we were new to baking. Ever since then, I have been baking for her daughter's birthday almost every year since Jorayn was 2 years old. How time flies! 


This unicorn design is a customized one that mean something to Jorayn because it is modelled after her favourite plush toy. I had to change some of the colours so it doesn't blend into the pink carousel frame. 

I love how this chubby unicorn looks so contentedly sluggish that it has to rest its bum on the ground instead of float in the air gracefully 🤣. 

I used a combination of French method and Swiss meringue method to make the macaron shells due to schedule limitations. I split the baking into 2 separate days. I used French method for the unicorns and lettering as it is a small batch, and swiss method for the carousel frame. 

Piping unicorns. 

The macarons are filled with dark chocolate ganache and  a firm mixed berry (raspberry and strawberry) ganache. I will share the recipe that is firm enough for macaron structures like carousel in this post. 

Recipe for firm mixed berry ganache 

Do note that ratio of white chocolate to compote or ratios within ingredients can be tweaked according to taste. But do bear in mind that the filling has to end up fairly firm at your current climate for it to be suitable as a filling for macaron structures like the carousel frame. When set, it should be just slightly softer than the bar chocolates that you eat. 

Ingredients :
90g White chocolate, finely chopped or use chips
12g cocoa butter (may replace with white chocolate ) 
24g Vegetable shortening (may replace with butter but Singapore is too warm for that!) 
5g Strawberry compote* (or raspberry) 
9g Freeze-dried raspberry powder (or strawberry or mixed) 
1/4 tsp Salt
1/4 tsp strawberry emulco/ paste (optional) 

* You may omit the compote if it is too much trouble, and add more freeze-dried fruit powder according to taste for a firmer filling. I was preparing a larger batch of compote for class at the same time. To make the compote, blend (and sieve if using raspberries) the fruit and cook over low heat with some sugar (I use about 10%weight of fruit because it is for macaron filling and I don't want it to be too sweet) until reduced to about half the original weight. You may add a tsp of lemon juice and pinch of salt. Excess compote may be refrigerated or frozen. 

Steps:
1. Place all ingredients except freeze-dried berry powder in a microwave safe bowl. Heat on medium-low power for 10 seconds and mix well. Repeat until melted and smooth. Alternatively, you may use double-boiling method to melt the white chocolate mixture. 

2. Gradually add the freeze-dried fruit powder amd mix well. Set aside to firm up to toothpaste consistency 

3. You may use it as it is or whip it with a spatula if you wish to lighten the texture. 

Filling up a unicorn with both types of fillings

Filling the base macaron

I love how the base macaron looks when assembled! 


I had to take a picture of the carousel before the name and age were added on too because I love how the carousel looks in this uncluttered state. 


As with my other bakes, I hope this carousel full of sleepy and chubby unicorns put a smile on your face 😊. 


If you are interested in knowing how to construct a macaron carousel, you may refer to my book Creative Baking: Macaron Basics or purchase my online class for macaron carousel with ArtZ Baking and Culinary studio. I provide ongoing support and troubleshooting help as part of the perks of my online classes and you can also  learn from others who join it based on their experience, and watch the recorded class unlimited number of times. 


With love, 

Phay Shing

Read More »

Friday, 1 May 2020

Lubo Dino Chiffon Cake


Sharing a cheerful dino chiffon cake inspired by Lubo from @lulusweetkawaiishop made during better times. 💕


Hope this brings a smile to your faces during this period! When I create cute things, my heart smiles from inside out 🥰. Is this the same for you?💖

Chiffon cake was pandan with a tinge of blue. If you can find blue pea flowers, you can use it to extract natural blue food colouring. They are quite commonly grown and can also be bought from baking supplies stores like Phoon huat or some wholesale markets.

Stay safe and take care!🙏
With lots of love,
Susanne

Read More »

Thursday, 19 March 2020

Carousel Chiffon Cake


Sharing some LOVE during these trying times with this Chiffon Cake Carousel 💖. Hope that this magical sweet carousel brightens your day 🥰.

The carousel is made entirely from chiffon cake, including the pillars and the roof. Very thankful that it worked out. I finally overcame my fear of making another chiffon cake carousel after my first one 5 years ago. Thank God for this opportunity and also to bake for my dear friend's daughter too. She is a very special gift from God. And because of her lovely name and meaning behind it, I could use this cake to encourage others during this difficult time. I had difficulty uploading the video on FB in the right format, so you can watch a video of it here. I will try uploading another video here later.

Let's stay strong and positive during these times🙏💪. Stay healthy, drink lots of water and take care..

With lots of LOVE ,
Susanne


Read More »

Thursday, 24 October 2019

Rainbow Unicorn Macaron Carousel on Chocolate Drip Cake

September was a month of chocolate drip cake and this was the third one I made in a month because it is really delicious! This is a special birthday bake because it's a combined birthday celebration for two girls who love unicorns and rainbows!


I used the Swiss meringue method to make the macarons as there are many colours involved. I must admit that it was really time consuming to pipe the unicorns. But the effort is quite worth it! The template for the pink carousel frame can be found in my Creative Baking: Macaron Basics book. You may use Italian method for making these macarons too as it also produces the same smooth finishing as Swiss method.

Just to share some photos of the process of putting together the carousel.

Freshly baked macaron shells

I painted the number 8 and unicorn horns using gold lustre dust dissolved in a little vodka. I filled in the eyes and hooves with edible markers


I filled the unicorns and the outer ring of the carousel frame filling with strawberry white chocolate. I filled the middle of the carousel frame with dark chocolate ganache (didn't take photo of it).

Filling with strawberry white chocolate


Completed carousel! 

Ever since I discovered that I can incorporate some cocoa butter into macaron filings that are white chocolate based, I have been adding it to make a firm filling while at the same time making it less sweet. Here's the revised strawberry white chocolate filling recipe that is firm enough for structures like macaron carousel.

Strawberry white chocolate recipe
Ingredients:
70g white chocolate, finely chopped or use chips
10g cocoa butter
20g vegetable shortening
1/8tsp salt
1.5 tsp strawberry emulco

Steps:
1. Place chocolate, cocoa butter and shortening in a microwave safe bowl and heat at medium-low power for 20sec and mix well. Repeat until mixture is smooth and melted. Be careful not to overheat. Alternatively, you may use double boiling method over a pot of freshly boiled water (but off the heat).

2. Add salt and mix well. Add strawberry psste/emulco half a tsp at a time and mix well with each addition.

3. Leave the mixture to firm up on the counter top until toothpaste consistency, about 20-40min. Transfer into piping bag to fill the shells.

I made a platform out of jumbo straws as dowels and a small cakeboard as the stand to place the carousel on top. The carousel is heavy enough that it's not advisable to place it directly on the cake.

I used Royal icing to pipe the names too! 

I hope this combination of unicorns, rainbow and delectable chocolate puts a smile on your face as it did to mine 😊.

With love,
Phay Shing
Read More »

Monday, 3 June 2019

Unicorn Pusheen Lychee Macarons and Brown Sugar Cookies

Not only did I make unicorn Pusheen choux pastry. I made them as macarons and brown sugar cookies too!


You may find the brown sugar cookie and royal icing recipe from this post.

Just to share some photos of the process...

Cutting out cookie dough. I make my own templates using flexible clear plastic. 

Using edible marker to mark out the lines

Adding on royal icing features. I waited until the royal icing is fully dry before adding in the fine facial features using black edible marker and painting the center of the mouths with pink gel colouring dissolved in a little vodka.

I baked the macaron shells concurrently with my Totoro and friends macaron tree project as they share similar colours. I used a Swiss meringue method recipe for the macarons.

Piping the macaron shells

Freshly baked shells

Decorated macaron shells

I filled the macarons with lychee whipped white chocolate ganache and chopped lychee. You may refer to the filling recipe and instructions from this post.


That's all for my short series of unicorn Pusheen bakes!

With love,
Phay Shing
Read More »

Monday, 27 May 2019

Unicorn Pusheen Lychee Choux Pastry

I finally made Choux pastry again and this time, it's Pusheen as a unicorn wannabe!

The horn is made out of choux pastry too!

I must admit that I was quite apprehensive about getting the pastry to retain it's shape well enough while not browning too much during baking. I am glad I managed both! The key to this is good temperature control and a perforated mat. Do note that each oven is different so use the baking temperature and time as a gauge only.

I have written a detailed recipe for Choux au Craquelin so you may refer to this post. The only difference is I used charcoal powder to colour the cookie dough and pastry batter. I added a little white gel food colouring for the cookie dough and to colour the batter for the horn.

Just to share some pictures of the process ...

Piping pastry batter for the horns

Piping batter for the main body and topping it off with cookie dough. I make my own templates. Baking the main pastry case on perforated mat helps the pastry to retain it's shape better

Freshly baked case with choux pastry horn!

I added on the fine features using royal icing and the tail using candy melts. I coloured the candy melts before shaping it. As Singapore is rather warm, I had to work in an air-conditioned room when shaping the candy melts. I reshaped the pastry case base so that Pusheen is able to "stand up" instead of lie flat. I made a video tutorial for making such cases for the penguin Choux entry in my Deco Choux Pastries book. Store baked and assembled choux pastry cases in airtight condition at cool room temperature.

My friend requested for lychee filling so I made lychee pastry cream with chunks of chopped lychee, and lightened with some whipped cream. I have made lychee pastry cream before but without whipping cream added so I will type out the updated recipe here.

Recipe for lychee pastry cream with added whipping cream
Ingredients:
2 egg yolks
20g cornflour, sifted
25g castor sugar
A pinch of salt
1.5 tsp freeze dried lychee powder*
200g fresh milk
1/2 tsp vanilla extract
12g unsalted butter, slightly softened
150g chopped canned lychee, woody part removed
100g whipping cream (I used non-dairy for better stability)

* If you are unable to get this, you may replace 50-80g of milk with strained lychee puree.

Steps:
1. Place milk, vanilla extract, lychee powder (or lychee puree) in small saucepan and heat on medium-low heat until bubbles just start to appear around the edges.

2. In the mean time, whisk together cornflour, sugar and salt in a heavy mixing bowl. Add egg yolks and whisk until a smooth paste forms.

3. Once the milk is sufficiently heated up, remove from heat and pour in the slow thin stream into egg yolk mixture while whisking continuously. Pour the egg mixture back into saucepan.

4. Cook the custard by whisking continuously and heating over medium-low heat. Once the mixture appears to thicken, remove from heat and continue whisking vigorously until smooth. Return back to heat and continue whisking and cooking until your preferred consistency, removing from heat to whisk whenever necessary. Do not use high heat or you may end up with scrambled eggs.

5. Remove from heat and mix in unsalted butter until smooth. Strain the mixture through a fine sieve into a clean bowl if there are any lumps formed. Press a cling wrap onto the surface and refrigerate until cool, at least half an hour. You may prepare this a day in advance.

6. Remove pastry cream from fridge and beat it briefly with spatula to loosen it up. Fold in chopped lychee a tablespoon at a time.

7. Whip up the cold whipping cream until firm peaks form. Fold into pastry cream in a few additions until smooth.

Folding whipping cream into pastry cream

Store covered in the fridge for up to a few days.

Remember to fill your pastry just before consuming in order to enjoy the crisp pastry case with cold and refreshing lychee pastry cream! I always don't recommend filling the cases way in advance as it will turn the cases soggy.

Please click on this link for more unicorn Pusheen bakes in other forms!

With love,
Phay Shing

Read More »