Showing posts with label Pokemon. Show all posts

Sunday, 15 June 2025

Sleepy Snorlax and Pikachu Marshmallows

 My friend requested for Snorlax marshmallows along with the Pikachus so I made these!

Don't you feel like sleeping seeing them 🤭?

You may see the upright version of Pikachu marshmallows in my older post.

I made the Snorlax marshmallows vanilla flavoured with a hint of lavender, and tried to colour it naturally partially with dried blue pea flowers infusing the water used for making the sugar syrup.

I made some smaller Snorlaxes...


...as well as some large ones...


...so that the sleepy Pikachus can fit on top of the giant Snorlax!

You may watch the videos of making the smaller Snorlax over here:

https://www.instagram.com/reel/DI_HKH_StLx/?igsh=d3loMmxtdnhjYnVq

And the bigger Snorlax with sleepy Pikachu over here:

https://www.instagram.com/reel/DJTtfc7pfR-/?igsh=MWQ4NXBuaXB1MXVubQ==


I share the basic recipe, how to tweak it for different flavours and consistencies for adapting to 2D or 3D figurines in my Deco Marshmallows book.


with love,

Phay Shing

Read More »

Sunday, 11 May 2025

Pikachu Passionfruit Vanilla Marshmallows

 My friend requested for some Pokemon marshmallows for her nephews that aren't too sweet. I made Pikachu passionfruit vanilla marshmallows to satisfy the brief!


Upright versions of characters are always the most challenging to pipe because you have to work against gravity and it's largely freehand piping. I challenged myself further to create the entire marshmallow as a single piece instead of piping the gravity defying ears and tail as separate pieces and then gluing them onto the main body after dusting.


Recipe and techniques that you need to know can be found in my Deco Marshmallows book. Here's the piping tutorial:

https://www.instagram.com/reel/DIqg1r1Jp6v/?igsh=ajZ0OXl3ajd1cGQy

Besides this Pikachu design, I also made another Pokemon character along with him. Keep a lookout for that!


with love,

Phay Shing

Read More »

Sunday, 8 October 2023

Charizard Macaron Carousel

 This is the third consecutive year I am baking for a little man's birthday so you may find a common theme here 😉


The knight is slaying Charizard this year and it's a mini macaron carousel! The Pokeball on top of the carousel is an iced cookie with chocolate coated marzipan ball inside

I used my default Swiss meringue method recipe for the macaron shells and used royal icing and edible markers for the details. I used royal icing transfers for the Pokeball that the knights are holding to make it easier. 

Just to share some photos of the process...

Piped batter for knight with royal icing transfer Pokeballs

Charizard piped batter

Filling the knights with dark chocolate ganache and white chocolate buttercream with a dark chocolate chip added to turn it very slightly brown

Filling Charizards the same way

I added crunchy chocolate balls for the large carousel pieces

Assembled carousel frame. I think it looks breathtakingly beautiful in this earthy neutral colour😍

The fillings I used are adapted from my default recipes to make it either dairy-free or with minimal dairy. I made them firm enough to stay firm at 30C, which is a pretty common temperature for room temperature in Singapore.

Dark chocolate ganache
Ingredients:
90g bitter dark chocolate, finely chopped or chips
25g water
3g light corn syrup
9g unsalted butter, softened
Pinches of salt
1/2 tsp vanilla extract

Steps:
1. Place all ingredients except butter in microwave-safe bowl. Use medium power and 20 second bursts to melt the chocolate. Stir after each heating cycle. You may also use double boiling method to melt the chocolate.

2. Add butter and mix well. Let the ganache sit at room temperature to firm up for half an hour before transferring into piping bag.

White chocolate buttercream
Ingredients:
100g white chocolate, finely chopped or chips 
20g vegetable shortening (or butter if your ambient temperature is cooler)
1 dark chocolate chip (optional, I added for a slight brownish tinge)
1/2 tsp vanilla extract
Pinches of salt

Steps:
1. Place everything in microwave-safe bowl and melt the chocolate. Mix well.  You may use double boiling method too if you wish.

2. Place bowl in a cold water bath and use electric mixer to beat until light and fluffy. Remove from cold water bath once the buttercream starts to firm up, continue beating until desired fluffiness. You may also choose to let the mixture firm up slowly at room temperature for half an hour before transferring into piping bag.


Here's a reel for the assembly process. I took the liberty of using two-toned icing for Charizard's flame.

https://www.instagram.com/reel/CyLaa8-ynqE/?igshid=MWZjMTM2ODFkZg==

If you would like to learn how to create macaron carousels like this one, join me for my studio or online masterclass for the reindeer macaron carousel, one of my classic pieces. The online class version is available internationally, ready for viewing any time and there is no expiry date. You may ask me any technical questions that you have and learn from other participants who have joined the class over the years 


with love,

Phay Shing

Read More »

Saturday, 30 September 2023

Pokeball 3D Cookies with a Hidden Surprise

 Over the years many people have made edible Pokeballs out of chocolate and hid surprises inside. I have to confess I dislike working with chocolate for structures or construction because my home kitchen is on an average 29-30C, RH 65-80% all year round, with some days out of the range in either direction. This makes it almost impossible to temper chocolate and handle it for assembly. I only do dry work in the aircon room like drying piped macaron batter or packaging marshmallows.

I made the Pokeballs out of cookies instead!

The surprise inside is chocolate coated marzipan balls from Marks and Spencer


Putting marzipan balls in the cookie cavity

Because I didn't take the chocolate route, this was more time consuming to create as I needed to bake the cookies and coat them with royal icing. Thankfully, Julia Usher shared multiple detailed videos on how to create spherical/hemispherical iced cookie structures so I had a very good guide on how to make them. Do checkout her YouTube channel for the videos!

I used Julia's cookie recipe but omitted the spices and replaced it with a little cocoa powder. I only had the dark molasses on hand at home so the cookies appear darker. You can also use honey instead. As I only needed a small amount of dough, I reduced the portion by a few times. I used my default royal icing recipe with a little light corn syrup added to soften to texture a little.

Another thing I learnt in this project is making and using fondant from scratch. I thought long and hard about how to create the details of the Pokeball and came to the conclusion that fondant is still the best. Although I used homemade marzipan or modelling chocolate for details that are fondant-like in the past, I wanted something that is easier to handle (than modelling chocolate) in my hot and humid environment, and appear less grainy (than marzipan as almond flour grains may show a little in marzipan). I will still consider modelling chocolate and marzipan for future projects if they are appropriate because they taste good, just not for this project.

I chanced upon recipes by Veena Azmanov for homemade fondant which doesn't taste as bad as I thought! I have to stress that it has to be made from scratch and not from store bought marshmallows, for homemade fondant to taste good. I have avoided working with fondant because they don't taste good. Well I am proven wrong with homemade ones, especially when black cocoa powder is used for black😋! I used this recipe for white fondant and this recipe for black fondant. I made really small batches since I only needed a little fondant and won't be using it in the foreseeable future. 

Here's a reel for the process of making these cookies! Pardon the lack of coverage during most of the fondant parts as I didn't want to have to focus on the camera while working with the sticky mess that took me some time to get the hang of it 😆. It turned out I needed to knead in a lot more icing sugar/ cornstarch mix for it to be workable because of my hot and humid working conditions.

https://www.instagram.com/reel/Cx0K3Sty8gF/?igshid=MWZjMTM2ODFkZg==

I managed to make a dozen of them!


It was a good learning experience throughout the whole process and my chocoholic elder kid happily ate all the cut Pokeballs (I cut a few of them for taking videos and taste testing) . One of them is going on top of a macaron carousel. Stay tuned for it!


with love,

Phay Shing


Read More »

Thursday, 16 June 2022

Solar System Macaron Ferris Wheel II

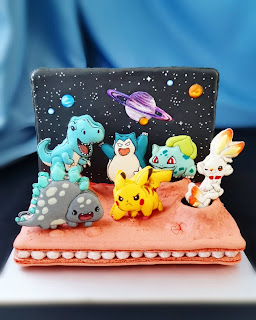
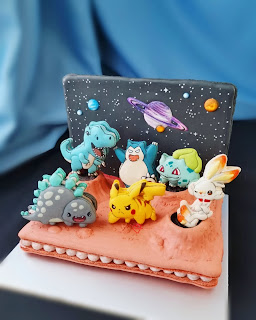
My friend requested for a solar system ferris wheel back in 2017 for her boss's birthday. You can see it in this post. More than four years later, her boss has since gotten married, has two young kids, and is about to leave the company. He is still an astronomy enthusiast. That's the backstory to this second solar system ferris wheel 😊. And yes his wife is a ballerina.

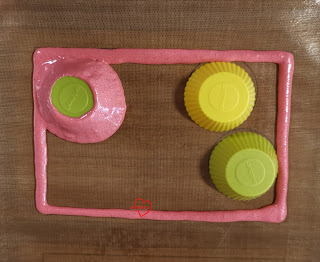
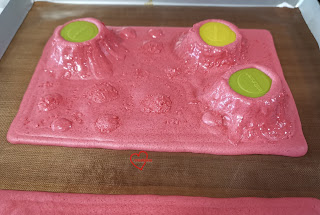
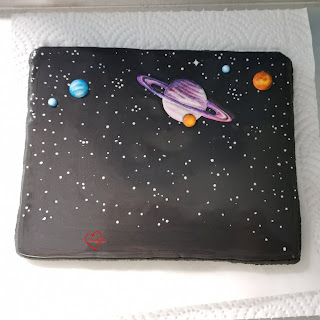
I made this second ferris wheel smaller than the first for more stability (lower center of gravity), and I mounted it on a giant macaron base. I chose a firmer filling too to help with structural stability in tropical Singapore: dark chocolate buttercream with freeze dried raspberry powder and crushed oreo cookies, and lemon white chocolate buttercream. Macaron structures like this one needs careful planning, execution and suitable choice of filling to prevent misalignment and/or collapse. I will be sharing the recipe for the fillings I used and the assembly process in this post.

I used my default swiss meringue method recipe for making the macaron shells.

Decoration is done using a little royal icing but the bulk of it is done using edible marker and vodka wash, or white paint made with white gel colouring, white powder colouring and vodka.

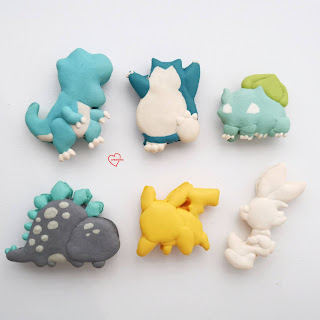
I make duplicates in case of butter fingers or accidental uglification.

The filling recipes here are more suited for macaron structures. For regular macarons, feel free to replace butter with whipping cream to make a ganache, and reduce the proportion of chocolate for a softer filling that will mature the macarons faster.

Dark chocolate raspberry oreo filling
Ingredients:
150g Dark chocolate couverture (you may choose your percentage of cocoa according to preference)
30g Unsalted butter
1/8 tsp salt
30g crushed oreo cookie crumbs, sieved
10g freeze-dried raspberry powder

Steps:
1. Melt dark chocolate with butter and salt either by double-boiling or microwaving at low power.

2. Add freeze-dried raspberry powder and sifted crushed oreo cookie crumbs and mix well.

3. Let it sit for half an hour at room temperature to firm up a little to toothpaste consistency before using. Refrigerate briefly if room temperature is too warm to firm up the filling.

Lemon white chocolate filling
Ingredients:
70g white chocolate, finely chopped or use chips
15g unsalted butter
A pinch of salt
Zest of one lemon
10g lemon juice
1/2 tsp lemon extract (optional)

Steps:
1. Melt white chocolate, butter and salt by double-boiling or microwaving at low power. Be careful not to overheat. stir between 10 second bursts of heating if using microwave.

2. Add lemon zest and extract (if using) and mix well. Gradually add lemon juice and mix well.

3. Set aside to firm up to toothpaste consistency at room temperature.

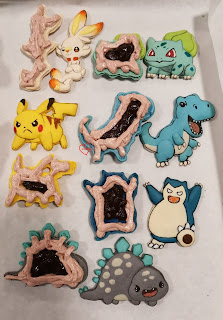
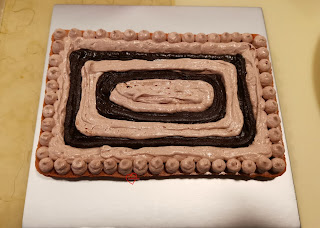
Filling the macarons with two types of filling.

Here's a short video of how I assemble the ferris wheel, originally posted in my Instagram reels.

Do have a look at the reel along with the caption as I provide more tips there.


with love,

Phay Shing

Read More »

Tuesday, 7 December 2021

Pokemon vs Dinosaurs Macaron Scene

This is one bake that took a lot of time and planning to create because of the many elements involved! An epic battle between Pokemon and dinosaurs in space! 


I had trouble taking photos of this because something tends to be obscured no matter which angle I take it from 😅. 

Here's a better view of the individual characters. 

T-rex and stegosaurus vs Snorlax, Bulbasaur, Pikachu and Scorbunny! 

I used the swiss meringue method for making the characters, landscape and backdrop. I flavoured and coloured the large macaron pieces with freeze-dried raspberry powder and cocoa powder. 

The cratered landscape is made by using silicone cupcake cases, and waiting for a sticky membrane to form before piping on more "bumps" on the surface and using toothpick to roughen up the surface. 


The batter looks more pinkish now but more brown later on because raspberry powder oxidises when exposed to air and during baking. 

Baked macaron shells for the landscape

The large backdrop is decorated using royal icing but I made the planets using royal icing transfers and painted in the details with edible marker and vodka wash. 

Preparing royal icing transfers for the planets. Dry this thoroughly before adding in the details. 

The backdrop is made by carefully placing the icing transfers onto wet black icing dotted with stars. Use flooding consistency for the royal icing work. 

A look at the undecorated character macaron shells. 

I actually made two full sets just in case of accidental "uglification"or butter fingers 😂. 

The macarons are filled with raspberry swiss meringue buttercream with a little cocoa powder added (for a more brownish hue) , and dark chocolate ganache. I added some reduced raspberry puree (cooking puree over low heat until some water evaporates) into the smbc with ratio of 1:4, and added more freeze-dried raspberry powder. I didn't measure how much freeze-dried powder and cocoa powder went into the smbc but went according to taste and colour. 


I added some crunchy chocolate balls in the craters for some added difference in texture. 


Putting the backdrop and landscape together. 


This was an epic project for me as well! Thank God I managed it! 

With love, 

Phay Shing

Read More »

Monday, 8 June 2020

'My Favourite Toys' Chocolate Macarons & Stump Cake

My friend requested for a personalized birthday cake for her son, with all his favourite characters and plushies!

Being a chocoholic, birthday boy requested for chocolate cake with chocolate macarons

I used the Swiss meringue method to make the macarons, along with a small set of dinosaurs for another request.

Piped batter 

Freshly baked shells! 

I decorated the shells with edible marker, paint made by dissolving gel colouring in vodka, and royal icing.

Decorative work was done concurrently with the princess macarons

Filling the shells with dark chocolate ganache. Feel free to adjust the chocolate: whipping cream ratio to suit your climate 

I made several of each design to pack them individually for the birthday boy to give away. 

I baked a few extra plain round macaron shells to create a mini pyramid of the characters for the cake topper.


You may refer to this post for the detailed recipe of the ultimate chocolate cake sponge and this post for the assembly steps and respective fillings and frosting of the stump cake. I know it isn't Christmas but the boy wanted a stump cake.


Thank God all were well received! Stay tuned for my next post where I experimented with tweaking my ultimate chocolate cake recipe to make it dairy free as well as changing the preparation method of the sponge to make it lighter.

With love,
Phay Shing

Read More »

Thursday, 28 November 2019

Pikachu and Torchic Lychee Choux Pastry on Pandan Kaya Cake

My friend wanted me to do a Pokemon themed bake for her nephew's birthday but with pandan kaya cake as the cake base. She also wanted choux pastries for the characters and I told her some of the Pokemons are very good candidates as deco choux creations. Here it is 😊


I will focus on the choux pastry part as the recipe for the pandan kaya cake can be found in this post. I just replaced Stevia with caster sugar for the pandan chiffon and the pandan gula melaka pudding.

Detailed recipe for choux pastry batter and the craquelin (cookie dough) can be found in this post. As a rule of thumb, I try to colour the batter as close as possible to the same shade as the craquelin for creating various characters.

Craquelin on top of piped batter for Pokeball and the heads and bodies of Torchic and Pikachu 

The rest of the small body parts are made from piped choux pastry batter without the use of craquelin.


I love the look of this rainbow choux!

Freshly baked pastry cases

I used royal icing to decorate as well as join the parts together.

I had fun giving Pikachu various expressions! 

I provided lychee pastry cream lightened with non-dairy whipped cream in piping bags for my friend to fill just before the pastries are consumed at the party. The recipe can be found here.

"Are you also surprised that choux pastries can be made into someone like me? "

According to my friend, everyone at the party, the neighbouring tables of diners and the service staff at the restaurant had the same expression as the Pikachu above 🤣. I hope this bake brings a smile to your face too! After the initial surprise.

With love,
Phay Shing

Read More »