Showing posts with label pineapple tarts. Show all posts

Tuesday, 14 January 2025

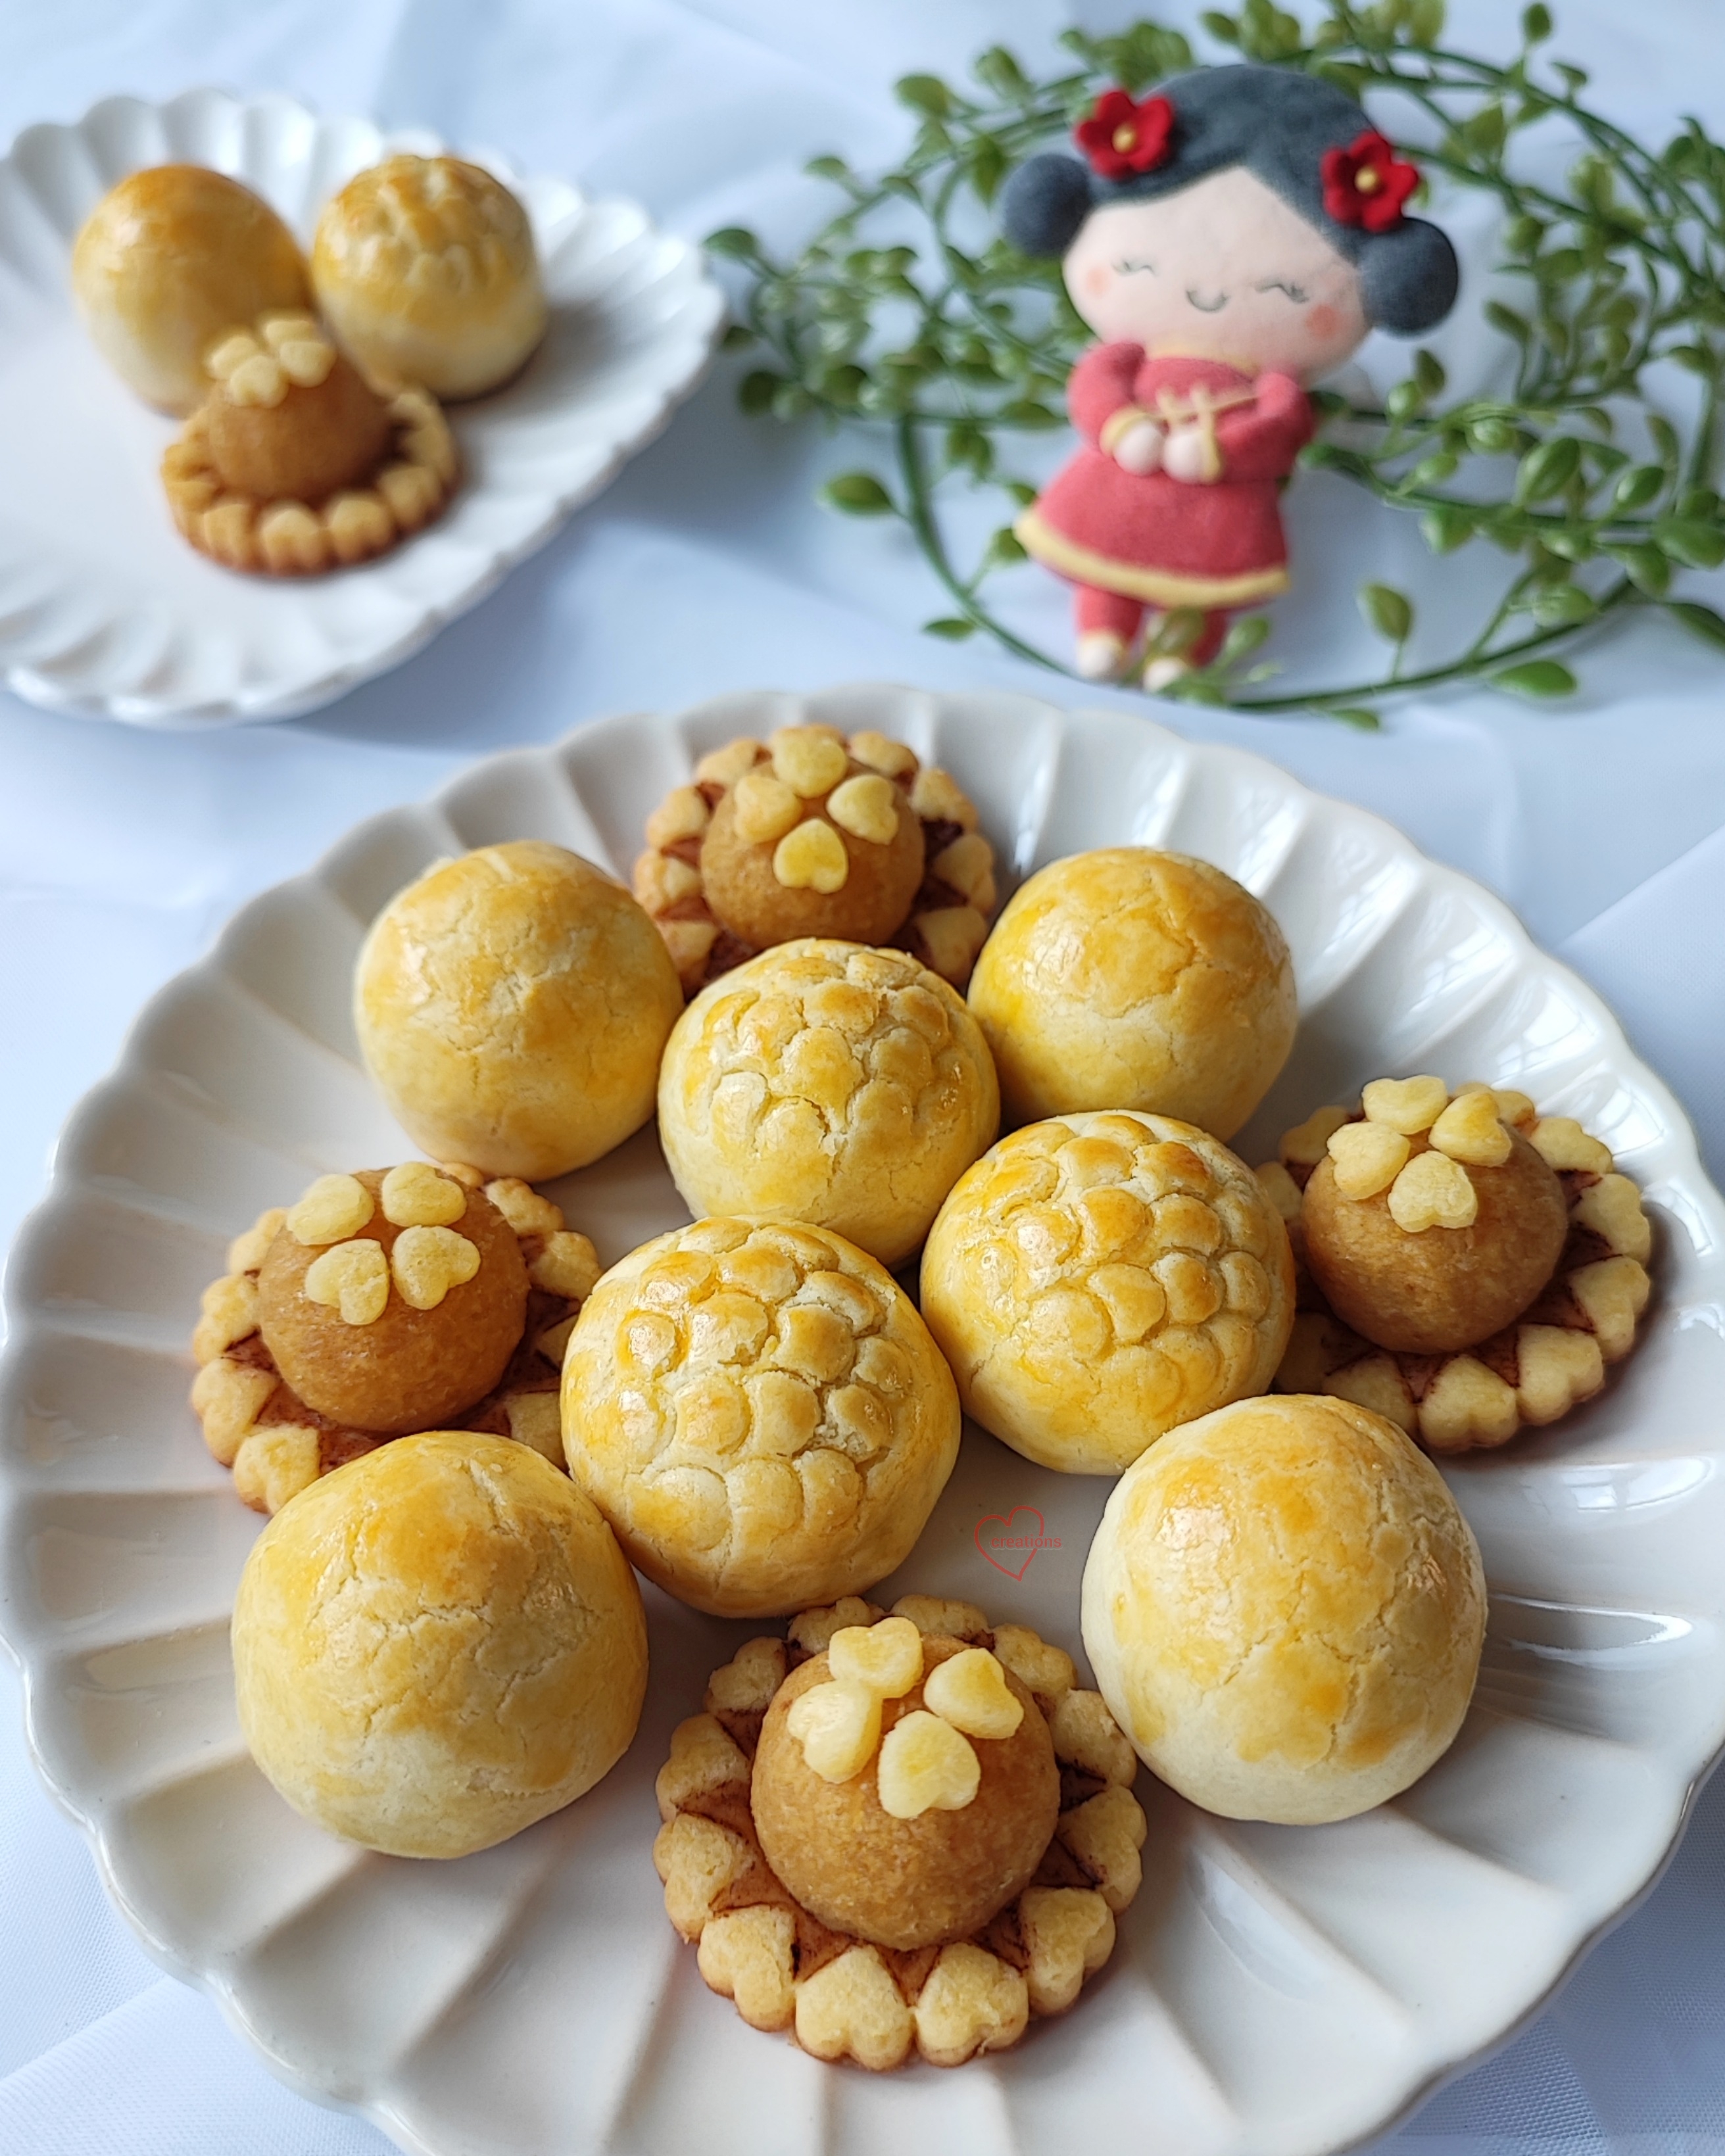
Diabetic-Friendly Pineapple Tarts with Prebiotics Added

I have some family members and friends who are diabetic so I thought of making some pineapple tarts they can enjoy without feeling guilty about it or worry about side effects of sugar replacements. To do so, I replaced some sugar with prebiotic fibres to make these!


Here's a closer look at the snake on top


A peek at a bite cross-section!

My hubby with picky palate can attest that these are yummy 😋 . I made some sugar-free pineapple tarts last year with totally no sugar added at all in the jam. You can read all about it over here where I share two types of tart designs, open-faced and the golf ball. The recipe I share for this year's tarts can be applied to both types of pineapple tarts although you should handle the open-faced version with care as the pastry is rather delicate. Please read the baker's notes* at end where I explain in detail technical aspects and substitutions you can use.

What's so good about the tarts?

✅ No stevia
✅ No alcohol sugars
✅ Real sugar optional
✅ Prebiotic added for lower glycemic load, benefits to gut health & cholesterol 
✅ Light, buttery, crumbly tart pastry

You may wonder does Alchemy Fibre impart any unpleasant taste. It doesn't! It tastes mildly sweet on its own without any chemical aftertaste.

I am not sponsored to share the use of Alchemy Fibre. I am sharing because it's a good product and has shown not to increase the blood sugar levels for my loved one when the pastries are eaten in moderation.

Diabetic-friendly pineapple tarts (🐍 optional)
(makes about 22-30 tarts so feel free to upsize)

Healthier Pineapple Jam*
1 large pineapple, cubed, blended & excess juice sieved out, about 475g for me
1 large apple (I used Gala for some natural sweetness and pectin), blended
20g Alchemy fibre* (omit or replace with sugar)
30g caster sugar* (omit if you wish)
A squeeze of lemon juice (optional, add more if you prefer sour jam)
1 cinnamon stick
Pinch of salt

Steps:
1. Reduce jam till 30% original weight over med-low heat & constant stirring (or use Thermomix). Discard cinnamon stick. This results in 1-1.5g sugar per tart if you follow my original recommendations of sugar & fibre

2. Cool completely. Refrigerate overnight uncovered for extra moisture to evaporate

3. Portion into 8-9g balls

Tart Pastry*:
45g plain flour or cake flour*
20g cornstarch or gluten-free flour*
8g full fat milk powder
8g Alchemy fibre* (may replace with icing sugar)
1/8 tsp salt
45g cold unsalted butter, cubed
1 egg yolk
A little milk if dough is too crumbly*

Egg wash:
1 egg yolk + 7g milk

Steps:
1. Sift together flours, salt, fibre & milk powder

2. Rub in butter until breadcrumb texture

3. Add yolk. Mix until dough forms. Add milk if necessary

4. Roll to 5mm thick. Freeze for 10-15min. Preheat oven to 150C fan/165C 

5. Lightly dust surface of dough with cornstarch. Stamp out pastry with mold. Place 3cm apart on lined baking tray

6. Apply egg wash. Press a ball of jam in the middle 


You can make the snakes* if you wish but these are rather fiddly and tests your fine motor skills!


7. Bake for 25-30 min or until golden brown. Baking the tarts low and slow will prevent huge cracks from forming

8. Cool completely. Store in airtight container at room temperature for up to a week or in the fridge for 3-4 weeks. Toast it lightly before consuming to recrisp if stored in fridge


*Baker's Notes: 
🔸Alchemy Fibre is a blend of inulin & edible gum. It's a prebiotic that has beneficial effects for gut health, lowers cholesterol & reduces the glycemic load of the food it's added to. You may substitute with inulin if you don't have access to this product, or simply replace with sugar

🔸I decided to use a little sugar in the jam & not include stevia or any alcohol sugars in the whole bake to avoid any gastrointestinal side effects. You may omit the sugar if you wish. I decided to add a little real sugar to improve the jam texture. I made it totally without sugar last year & although it's nice & healthy, it's a little less jammy in texture 

🔸Adding some Alchemy Fibre doesn't affect the final texture of the tart but the dough is more crumbly & less pliable so it's a little trickier to handle. Because of this, I made the snakes using dough made with icing sugar instead of Alchemy fibre but the tart base is made with the fibre added & no sugar. You may use the same dough for making golf ball type of tarts too if you don't have the plunger mold. Use 10g dough for each golf ball tart.

🔸Use plain flour instead of cake flour if you prefer a sturdier pastry. The gluten-free flour I used is from Bob's Red Mill. You may use cornstarch if you wish as it's commonly used in typical pineapple tart pastry along with wheat flour.

🔸I used black sesame seeds for the snake eyes & Goji berry skin for the tongue. Shaping done by hand, toothpick & Dresden tool. I used a pair of small sharp scissors and knife to cut the snake tongue out of Goji berry. I didn't weigh the amount of dough for the snakes but I estimate it at around 3-4g. 
 
You may watch the video of making the tarts over here:

https://www.instagram.com/reel/DEzUcTiSgv7/?igsh=MzYxYzhqeWFsYXlu


I guided my elder kid to make some golf ball type of tarts that didn't use Alchemy fibre (but used icing sugar in the dough and used store-bought pineapple jam)  so that's where I "borrowed" a little dough from to make the snakes on top.


These were seriously good according to my kid's classmates!


with love,

Phay Shing

Read More »

Friday, 2 February 2024

Pineapple Tart Dragon


I was inspired to transform the Pineapple Tart roll into a Flying Dragon! 🍍🐉🥰 
Do you like it?❤️ 
Rolling is such a quick way to shape pineapple tarts, and even easier to construct into a dragon! 

Assembly video here.  

Tart crust recipe (makes 3 dragons) 
228g (2 sticks) unsalted butter 
120g icing sugar 
2 large egg yolks 
60g heavy cream 
400g plain flour 
15g corn flour 
15g milk powder 
Red yeast rice powder (or red food coloring) 

Happy CNY in advance! 

Love, 

Susanne 


Read More »

Tuesday, 30 January 2024

Sugar-Free Pineapple Tarts

 This was a bake (bakes actually) that came a little unplanned. It all started because I had leftover pineapple puree from my Lunar New Year themed marshmallow class and I thought of making pineapple tarts that some of my family members can eat without being afraid of spiking their blood sugar levels as much as regular pineapple tarts.

After some trials, I finally came up with something that I am satisfied with. I challenged myself to make pineapple tarts sugar-free without it tasting weird and while minimizing the use of sugar replacements because that's what makes bakes taste weird in general. Those that don't taste that bad aren't zero GI or impart a strong flavour of their own like maltitol (not zero GI) and maple or agave syrup (imparts their own flavour). I made both open-faced and "golf ball" types!


Since the Lunar New Year is so close to Valentine's Day this year, I made the open-faced tart with a little Vday vibes. It also gave me a reason to use a tart mold I have had for years but never used. I added some dragon scale pattern to some of the golf ball tarts since this year is the Year of the Dragon.

Take a look at the cross sections after I took a bite!


Sugar-Free Pineapple Jam
I made the jam without any real or artificial sugar at all. You won't miss it! Adding sugar replacements simply adulterate the taste of the jam when it isn't actually necessary. I tried. It tastes awful to me 🙈. What's the secret ingredient then? Apple! I have seen some people make the jam out of pineapples alone. Adding the right type of apple helps to regulate the level of sweetness/tartness to your preference. Apple is relatively neutral flavour wise and contains lots of natural pectin so it is used in creating homemade sugar-free jams by people who want to omit processed sugar in their diet. Use Granny Smith (sour green apples) if your pineapple is very sweet or you prefer a more sour jam. Use Golden Delicious apples or Gala if you prefer sweeter jam or if your pineapple is very sour. The approximate ratio I use is 1:5 for apple : pineapple by weight. Feel free to upsize your recipe as this is a small batch.

Ingredients (makes enough filling for about 20 tarts):
500g pineapple chunks (about 1 large pineapples)
100-110g apple chunks (about 1 apple)
1 tsp lemon juice (more if you prefer it more sour)
Pinches of salt
1 Cinnamon stick
Cloves and star anise if you wish

Steps:
1. Blend apple and pineapples chunks together with salt. 

2. Add fruit puree and all other ingredients into large frying pan. Cook over medium heat and stir frequently. Reduce heat when the liquid has dried up. Continue cooking until total weight of ingredients is about 30% of original weight. Your jam should be dry. It took me about 20-25 minutes to get there. I used the largest frying pan I have to maximize surface area of the jam to the heat to speed things up. Some bakers use the oven to dry out the puree without having to stand at the stove for some time. To do this, line your largest baking tray with a few layers of foil. Bake the puree with spices at 90C for a few hours or until dry, stirring gently every 1-2 hours. Of course if you have Thermomix, use it😊!

3. Let the jam cool. Spread the jam in a thin layer on a plate/bowl/tray and refrigerate overnight uncovered. This will help excess moisture to evaporate.

4. Portion into 8g balls. Refrigerate until ready to assemble.

8g balls of pineapple jam


Egg wash
Ingredients:
1 egg yolk
1-2 tsp water or milk
A few drops of oil 

Steps:
1. Mix everything together and sieve. Refrigerate covered until needed.

Sugar-Free Open-Faced Tart Pastry
I adapted my recipe by chef Anup Kumar in a Straits Times article written by Hedy Khoo. You may read all about it here.

I highly recommend replacing the almond flour with cake flour as we would be more used to the wheat flour only version. Adding almond flour makes the texture a lot sturdier and the tart base tastes more like almond pate sucree used in classical French pastries. Using cake flour instead of plain flour is fine as I don't find the structure of the pastry compromised and it's overall still sturdy enough to be molded with a plunger mold. I went for the lower end of the suggested sugar amount and find that the sugar replacement aftertaste is hardly detectable at all so it tastes pretty good when eaten together with the jam! But if you are looking at a healthier tart pastry, replacing 12% of the cake/plain flour with almond flour is the way to go.

Feel free to upsize the portion as I made only a small quantity. 

Ingredients (makes about 20 open-faced tarts):
76g cake flour 
15g powdered erythritol (or icing sugar for non sugar-free)
1/4 tsp fine salt
40g cold unsalted butter, cubed
1 egg yolk
1/4 tsp vanilla extract

Steps:
1. Sift together all dry ingredients.

2. Use finger tips to rub cold butter into flour mix until it resembles fine breadcrumbs.

3. Add egg yolk and vanilla. Form a ball of dough with spatula. Flatten into a disc.

4. Wrap dough with cling wrap and refrigerate for 30 min.

5. Roll the dough flat between two sheets of parchment paper to thickness of about 5mm. 

6. Lightly dust the surface of the dough with cornstarch or flour to prevent the dough from sticking to the mold.

7. Press out the dough with the mold and place on baking tray lined with parchment paper about 3cm apart.

8. Apply egg wash with a soft brush. You don't have to make it fancy like I did. I coloured part of it dark brown with chocolate emulco mixed into the egg wash.

9. Place pineapple jam in the middle and press it down lightly. 


10. Decorate with leftover pastry on top of the jam if you wish. 

11. Bake in preheated oven at 170C for 15-20 min or until pastry is lightly browned.

Here's a picture of the plunger mold I took with the freshly baked tarts.


Sugar-Free Golf Ball Tart Pastry
Tart pastry for this type of tarts doesn't need to be as sturdy as the open-faced version. I think this is the more popular version in Singapore because of it's delicate crumbly texture. I adapted the recipe from Celia over here. Feel free to upsize as I made a small portion.

Ingredients (makes about 20 golf ball tarts):
120g cake flour
15g cornflour
15-20g powdered erythritol (or icing sugar for non sugar-free)
20g full fat milk powder
1/4 tsp salt
100g cold unsalted butter, cubed
1 egg yolk 
1/4 tsp vanilla extract

Steps:
1. Follow steps 1-4 in open-faced tart pastry.

2. Divide dough into 10g portions. Wrap the pineapple filling. 

3. Place 3cm apart on lined baking tray. Use a straw cut lengthwise in half to create dragon scale imprints if you wish. Chill for 10-15 min

I left some of them plain without the imprints


4. Preheat oven to 150C. Apply egg wash. Bake for 18-20min or until golden brown. You may take the tray out halfway to reapply egg wash if you wish.

Celia mentions that little bit of cracks is fine as it will reduce in appearance after cooling down.

Cool both types of tarts completely before storing in airtight condition. It can keep well for up to a week at cool room temperature. For longer storage, please refrigerate or freeze after wrapping it airtight. Toast before consuming.

Here's the video of the process:

Update:
My parents tried eating the pineapple tarts cold from the fridge (because they didn't want the hassle of toasting it) after more than two weeks of storage and loved it! They said the tarts were still very good! I also have data from home that eating these in moderation doesn't spike the blood sugar levels!


with lots of love,
Phay Shing


Read More »

Monday, 30 January 2023

Pineapple Tart Marshmallows

 I have not only one but two awesome AND simple Lunar New Year themed marshmallows to share! The first one is pineapple tart marshmallows!


I made these marshmallows with reduced pineapple juice so the marshmallows are naturally pineapple flavoured and has a tartness to it which is always lovely in marshmallows. I apologize for sharing this so late into the new year because I just came up with it😅.

Please see my reel below for a sneak peek at how I piped these and how squishy they are!

https://www.instagram.com/reel/CoEE5qIA3e6/?igshid=NTdlMDg3MTY=

Stay tuned for my other CNY marshmallow creation!

This pineapple tart creation will be in my upcoming Deco Marshmallows book!


with love,

Phay Shing

Read More »

Sunday, 17 January 2021

Melt-in-the-mouth Ox Pineapple Tarts (easy tip to make pink noses)


Would you bear to eat these pineapple cow tarts?🥰😛

Watch the video! I share a new way to make the noses pink! 🐮🐽 I first shared this method to make my Valentine's day pineapple tarts many years back.


'Melt-in-the-mouth' Ox Pineapple Tarts (portion is enough to make 42 ox tarts)

420 grams Pineapple Jam 
227g unsalted butter, cut into chunks, soften at room temperature (2 sticks butter)
60g icing sugar
2 egg yolks, lightly beaten
1 tsp vanilla extract
350g plain flour
47g corn flour
1/2 tsp salt
cold water (few drops if needed)

1. Roll pineapple jam into 10g balls.

2. Using a kitchen mixer with paddle attachment or food processor, mix together plain flour, corn flour, icing sugar and salt. Mix or pulse for a few seconds.

3. Add cold butter cubes and beat on low speed or pulse in a food processor until mixture has the texture of coarse meal. You can also use your fingertips. This is called the rubbing-in method.

4. Add in egg yolks and vanilla extract beat until a dough is form. If your dough is too dry, add a few drops of cold water. Do not overbeat.

5. Remove dough from mixing bowl and shape into a ball. Wrap the dough with cling wrap and chill in the fridge for about 30mins.

6. Divide the dough into 16g balls (42 pieces). Leave the remaining dough for making the ears, horns and hands.

8. Preheat oven to 160°C. Dust the work surface with corn flour.

9. To each 16g dough ball, flatten each dough into a small disc using a rolling pin and wrap with a pineapple jam. Roll the dough with filling into a ball. Use a curved tip and chopsticks to make the eyes and ears. Pinch 2 ears, 2 horns and 2 hands from the remaining dough and stick on.

10. Place the tarts on baking tray lined with parchment paper. Gently brush the noses with pink egg wash (1 egg mixed with 1 drop of pink food colouring).

11. Bake in preheated oven at 160°C for 25 mins. Leave to cool on baking tray completely before storing in air-tight containers. 

Enjoy!
With lots of love,
Susanne

Read More »

Sunday, 27 January 2019

Pink Piggy Golf Ball Pineapple Tarts


I also made these Pink Piggy Pineapple Tarts as I was curious about the many colored pineapple tarts that have been trending. These are made similar to my previous post, Salted Egg Yolk Piggy Pineapple Tarts, with the following changes:

1) Reducing the butter to 125g.
2) Using a pale-colored butter eg Anchor or Lurpak (previously I used SCS which is very yellowish).
3) Replacing the vanilla extract with 5g cold water with drops of pink food coloring mixed in.
4) Omitting the salted egg yolk crumbs.
5) Baking at a lower temperature of 150°C for 20+min (in contrast to 180°C in previous recipe).
6) Omitting the egg wash.


Summary of the cookie dough is as follows:

Cookie Dough (for 60 golf balls):
250g of plain flour, sifted
125g of cold butter cut into small pieces (use pale colored butter)
30g icing sugar
One egg (lightly beaten)
1 tsp cold water with some added pink food coloring
A pinch of salt

You may follow the instructions of the previous post but omit the egg wash and bake at a lower temperature of 150°C for 20+min.

I did not need to use any egg white to stick the 2 balls together as the dough is already sticky. The same is the case for the previous post.

So which type of pineapple tarts do you prefer? The pink or the golden brown version?

Personally I still prefer the golden brown Salted Egg yolk pineapple tarts that are more crusty and shiny! Looks more delicious in my opinion hehe. My kids gobble up anything cute though! =p

Hope you like it and happy CNY in advance! =)

With lots of love,
Susanne


Read More »

Thursday, 24 January 2019

'Melt-in-the-mouth' Salted Egg Yolk 'Piggy' Golf ball Pineapple Tarts


What a mouthful for a title =p. I've always been a fan of salted egg yolk! Recently I saw some being sold, and just had to try my own version! I like 'melt-in-the-mouth' type of pineapple tarts, so this is adapted from my previous post, with yummy added salted duck egg yolks!

'Melt-in-the-mouth' Salted Egg Yolk 'Piggy' Golf ball' Pineapple Tarts

Pineapple jam: I used Premium Redman pineapple jam (nice blend of sour and sweetness that I like!)

Cookie Dough (for 60 golf balls):
250g of plain flour, sifted
175g of cold butter cut into small pieces
30g icing sugar
One egg (lightly beaten)
100g salted duck egg yolk crumbs
1 tsp vanilla extract
A pinch of salt

600g pineapple jam (divided into 60 pineapple jam balls of 10g)

Method:

1. Mash the egg yolks of the boiled salted eggs and pass through sieve to obtain fine salted egg yolk crumbs. One salted egg yields around 14g of salted egg yolk crumbs for me. I used around 7 salted eggs to make 100g salted egg yolk crumbs. See previous post for more details.

2. Divide into the pineapple jam in to 10g balls with cling wrap separating the layers of balls (remember to wet your hands so they don't stick). Keep in the refrigerator until use.

3. In a big mixing bowl, use the fork or finger tips to rub the cut butter cubes and sifted flour together until it becomes crumbly. Add in sifted icing sugar, salt and salted egg yolk crumbs and continue to rub until well mixed.

4. Add lightly beaten egg and vanilla extract and gently work until it becomes a dough. Chill in the refrigerator for 30 mins (makes dough easier to handle and makes clearer imprints).

5. Roll out the chilled dough to about 5 mm thick. *I rolled the dough between two pieces of cling wrap to prevent dough from sticking to surfaces.

6. Remove one side of the cling wrap and use a circle cutter (5-cm) to cut out the dough. Wrap the dough around each pineapple ball and roll into a smooth ball. For the piggies, use an oval cutter to cut out the nose from the dough and stick onto the face. Cut more ovals, dividing the ovals into 2 for each ears and limbs.

*Tip: If you cannot work quickly enough, I will suggest to remove the dough from the chiller in batches to shape and bake for best shape and results.

7. Prepare the egg wash. Lightly beat 1 egg yolk with 1 tbsp water and a few drops of oil.

8. Lightly brush with egg wash and bake the piggies in the middle rack at 180°C for 15 min.

9. Leave to cool and store in airtight containers until consumption.

*Can keep up to 14 days outside in a cool, dry place, and months in the fridge.

*Other tips:
If you like milky flavour, you can substitute some of the flour with milk powder (10g).
Some recipes also call for cornflour or custard powder (substitute 10g flour with custard powder) for extra melt-in-the-mouth, but final tart may be more crumbly and harder to handle.

My Piggies!

Cross-section... yummy!

Hope you enjoy the tarts too! Happy CNY in advance!

With love,
Susanne


Read More »