Showing posts with label Neopolitan. Show all posts

Monday, 30 July 2018

Marbled Neapolitan Fidget Spinner Cookies

This is the second in my series of "Edible toys" cookie bakes for parent and child to participate. Fidget spinner cookies that you can play with and eat!


No artificial colours are added as far as possible in this bake. The Neapolitan flavours -- vanilla, strawberry and chocolate are the ones that will colour the cookie. In this class you will learn how to marble a cookie dough and assemble an edible fidget spinner.

Please click on this link to register if you are interested.

With love,
Phay Shing
Read More »

Saturday, 5 May 2018

Hurricane Swirl Neapolitan Macarons

Hurricane Swiss rolls have trending on social media lately and Susanne has done a very nice hurricane chiffon. With so many hurricane bakes around, I am inspired to make my version on macarons too :).

Chocolate and vanilla shells with raspberry white chocolate ganache filling

I am also taking this chance to announce that there will be a Creative Baking: Macaron Basics book coming up hopefully before Christmas this year!! The focus will be on various techniques (mainly piping techniques) on how to create various effects or shapes for macaron shells. This will be a companion book to Creative Baking: Macarons.

As such, I won't be able to disclose too much details about this bake as it may be included in the book.

I thought of doing a completely naturally coloured and flavoured macaron to try out this technique. And so this became Neapolitan flavoured. I have a few packets of freeze dried raspberry powder so I used it instead of fresh raspberry for the ganache.

I used the French method for this small batch of 11 macarons as I wanted to use as little ingredients as possible for this experiment. You may refer to any of my French method recipes from the blog (regular and reduced sugar) to work on this design although I used a different ratio of ingredients for this bake.

What I can reveal is, you have to fill the piping bag with two colours of batter and rotate the piping bag as you pipe. There's quite a bit of details that I left out but you get the idea :). I also have a video tutorial on how to pipe these beautiful swirls but will only make it available in this blog post probably in a few months time.

Freshly baked shells!


Raspberry white chocolate ganache*

* Please refer to this blog post for the ganache recipe if you are using fresh or frozen fruit puree. Just replace strawberry with raspberry.

Ingredients:
66g white chocolate, chopped
12g unsalted butter
18g whipping cream
1/8 tsp salt
5g freeze dried raspberry powder

Steps:
1. Put all ingredients except raspberry powder in a microwave safe bowl. Melt at medium power for 20 sec and stir. Repeat until melted and smooth

2. Add raspberry powder and mix well.

3. Freeze for 2 min and whip with spatula until homogeneous. Repeat freezing and whipping until texture is light and creamy.

4. Transfer into piping bag fitted with an open star tip if you wish. Pipe swirls on the macaron shells.


Refrigerate for at least 24h before serving.

My friend who shared this with her family said it's yummy!

With love,
Phay Shing

Read More »

Sunday, 2 April 2017

Neopolitan 'Easter egg' Chiffon Cake Pops in Rainbow Chiffon Bundt 'Nest'


These cute Neopolitan (Chocolate, Vanilla, Strawberry) "Easter eggs" are for an "egg"-citing upcoming event for my church's Culinary arts ministry! I will be sharing how to make these soft, yummy and pretty bite-sized "Easter egg" chiffon cake pops.

It is also a labour of love, and together with many loving helpers, we have collected almost 120 egg shells for the baking class! I made a simple video to show them how to wash and clean the egg shells for baking chiffon cakes. For chiffon cakes, it is best to peel off the membrane inside the egg shells to prevent the cake from sticking to it. Egg shells support chiffon cake batter very well, and the egg pops are very light and fluffy.

I also had the sudden inspiration to turn a Rainbow bundt into a "nest" for the "Easter eggs". I already toyed with the idea of using the bundt for "nest" 2 years back but didn't have the chance to try. Recipe for the Rainbow bundt has been shared previously here.

I will first share the tri-colour Neopolitan chiffon cake egg pop recipe for you to try at home with your family. At the bottom, I will also share a scaled-down one-egg recipe which we will use during the class, for the reference of our participants.


Neopolitan chiffon cake egg pop (Chocolate, vanilla, strawberry) 
Makes 18-20 egg pops

3 egg yolks
20g castor sugar
40g vegetable/corn oil
43g water
4g vanilla extract
60g Prima cake flour, sifted
Strawberry paste/emulco
Chocolate paste/emulco, or cocoa powder

4 egg whites
45g castor sugar
¼ tsp cream of tartar

1. Prepare egg shells for baking:
Gently poke a hole with a chopstick and drain the egg. Wash the insides thoroughly and peel off the membrane (see video below). Allow to dry and place them in mini cupcake liners for support (see picture above).


2. Preheat oven to 140°C.

3. Prepare egg yolk batter:

a. Whisk egg yolk with sugar using hand whisk until light and well-mixed.

b. Add in oil first, then water and vanilla extract and mix well.

c. Whisk in sifted cake flour and whisk well, ensuring that no lumps are formed.

4. Divide the batter into 3 parts. To the first portion, leave plain. To the second portion, add approximately 1/5 of a teaspoon of strawberry paste/emulco. To the last portion, add approximately 1/5 of a teaspoon chocolate paste/emulco or 5g cocoa powder.
*If you prefer stronger flavours and colours, you can add 1/4 tsp of each but the shade will be darker.

5. Prepare meringue:

a. In a grease-free, dry bowl, using electric mixer, whisk egg whites with cream of tartar till frothy.

b. Add in ½ castor sugar for meringue and whisk at high speed till soft peaks form - peaks slope downwards forming a hook.

c. Add in rest of the castor sugar for meringue and whisk till firm peaks form - peaks point up but slightly hooked at the tip.

6. Divide the meringue into 3.

7. Fold in meringue gently into each colored egg yolk batter 1/3 at a time. *Fold in unidirectional, gentle strokes and do not overfold.

8. Fill the egg shells with the 3 colored batter one after another till 2/3 full.
*You can choose to spoon with teaspoon or use piping bag. As the egg shell hole is small, piping bag may be easier for beginners for the small hole, but piping bag deflates chiffon batter twice as fast (due to handling, the small nozzle and heat from your hands), so you need to work quickly.

9. Bake at 140°C for 30-35 min, or until skewer inserted into center of cakes come out clean.

10. Allow to cool completely on wire rack.

11. Unmould the egg cake pops:
Using the back of a teaspoon, crack the shell into small cracks before feeling off the shell to reveal the cute egg chiffon pops!

12. Place the egg chiffon pops in cupcake liners or insert a cake pop stick in to the cake for cake pops.


You can try Rainbow versions using the same recipe! Cute Rainbow chiffon cake egg pops using a different recipe with picture tutorials are also in Creative baking: Chiffon Cakes book =).


****

Scaled down recipe for reference for the class participants, approximately 1 egg recipe. Each group makes one colour and swap. 

Easter egg chiffon cake pop
Makes 6 egg pops

Egg yolk batter
10g egg yolk
5g castor sugar
10g vegetable/corn oil
11g water
1g vanilla extract
15g cake flour
Either plain, strawberry emulco, pandan paste, or chocolate paste (<1/4 tsp)

1 egg white
11g castor sugar
¼ tsp cream of tartar


1.       Prepare egg shells by washing and peeling off the internal membrane. Allow to dry and place them in mini cupcake liners.

2.       Preheat oven to 140°C (helpers in charge).

3.       Prepare egg yolk batter:
a.       Whisk egg yolk with sugar using hand whisk.
b.      Add in oil, water, vanilla extract and flavourings (different for each group) and mix well.
c.       Whisk in sifted cake flour. Mix well. *Ensure no lumps are formed. 

4.       Prepare meringue:
a.       In a grease-free, dry metal bowl, using electric mixer, whisk egg whites with cream of tartar till frothy.
b.      Add in ½ castor sugar for meringue and whisk at high speed till soft peaks form.
c.       Add in rest of the castor sugar for meringue and whisk till firm peaks form.

5.       Fold in meringue gently into egg yolk batter 1/3 at a time. *Fold in unidirectional, gentle strokes and do not overfold.

6.       Fill the egg shells till 2/3 full.

7.       Bake at 140°C for 30-35 min, or until skewer inserted into centre of cake comes out clean (or you can also use 160°C for 10 min then 140°C for 10-15 min).

8.       Allow to cool completely on wire rack.


9.       Unmould the egg cake pops by cracking the egg shell into small pieces using the back of a teaspoon. 


Hope you will enjoy making these light and cute Easter egg chiffon pops! 


With lots of love,
Susanne


By the way, have you wondered why are there eggs during Easter? Because during Easter, Christians celebrate the "egg"-ceptional resurrection  of an "egg"-traordinary man, Jesus, who died on the cross, and "egg"-xiting new life! And eggs represent new life... <3 


Read More »

Wednesday, 14 December 2016

Tea and Neapolitan Iced Gem Biscuits (updated Earl Grey Salted Caramel gems recipe)

It's been some time since I had a request for iced gems so I am glad to take a break from macarons to make these :). Earl Grey salted caramel, Neapolitan and Lavender flavours were requested.


You may find the recipe for Neapolitan iced gems from here and Lavendar iced gems from here. The old Earl Grey salted caramel gems recipe can be found together with the Neapolitan one. Ever since I discovered Earl Grey tea powder, I have been using it for a range of bakes but have yet to use it for iced gems. I decided to incorporate it here so I will just provide the updated recipe for this flavour. I use homemade salted caramel and the recipe can be found here.

Just to share some photos of the process...

Infusing hot milk with dried Lavender flowers. Yes I use the real stuff!

Top: fresh milk, Bottom left: lavendar infused milk, bottom right: Earl grey milk tea with salted caramel. All have vanilla extract added in.

The biscuit dough for the respective flavours.

I tried using an oval scalloped cookie cutter for some of the biscuit bases. I think I prefer simple 2cm round cookie cutter.

Icing Lavender gems! Remember to pipe some icing onto baking sheet to test for royal icing doneness during drying in the oven.

Neapolitan royal icing! Looks pretty from this angle coming out from the piping tip too!

I use a combination of Earl Grey tea powder and dried tea leaves from the teabag for the royal icing.

The icing firms up and lightens in colour after whipping. I used a spatula to whip by hand all 5 different flavours in this batch!

Icing Earl grey salted caramel gems!

Recipe for Earl Grey salted caramel biscuit
Ingredients:
(Makes about 96 biscuits)
30g hot milk
1.25tsp Earl grey tea powder
25g salted caramel
1/4 tsp caramel essence/flavouring (optional)
1/4 tsp vanilla extract
105g plain flour
1/16 tsp fine sea salt
1.5 tsp baking powder
36g vegetable shortening

Steps:
1. Dissolve tea powder, salted caramel, caramel flavouring and vanilla in hot milk.

2. Sift together flour, baking powder and salt in a large bowl.

3. Rub in shortening into the flour mixture until it resembles breadcrumbs.

4. Gradually add the milk mixture to the flour and shortening mix and knead into a ball of dough. You may not need all the milk. Once a ball of dough is formed without breaking apart, you can stop adding the milk.

5. Roll to 3-4mm thick and cut out circles with cookie cutter (I usually use a 2cm round cutter). Place the cut-out on baking tray lined with baking sheet.

6. Bake in preheated oven using the fan mode at 170°C for 13-15 minutes or until brown. Cool completely before icing.

Earl Grey caramel royal icing
Ingredients:
112g icing sugar
8g meringue powder
20-24g hot water
1.5 tsp Earl grey tea powder
1 teabag worth of Earl grey tea leaves
1/2 tsp caramel essence
1/16 tsp salt

Steps:
1. Sift icing sugar, meringue powder and salt together in a grease-free mixing bowl.

2. Dissolve tea powder in hot water. Add caramel essence (if you have) to the tea.

3. Add tea into the sugar mixture and use a whisk until well combined. Add the tea leaves from the tea bag and mix well. Use a whisk or spatula to whip by hand for about 6-7 minutes continuously until icing is stiff and able to hold a stiff peak. If that is too much muscle work for you, you may use the electric mixer and medium low speed for a few minutes.

4. Transfer royal icing into piping bag fitted with a star tip.

5. Pipe some icing onto the baking sheet as well for testing of doneness of the icing. Dry the iced biscuits in the oven at 60°C using the fan mode for an hour or until the royal icing is able to be lifted off the baking sheet easily and it's totally dry. Taste test a biscuit too to check that it's crisp. If it has turned a little soft due to the icing, dry the gems longer and taste test again.

6. Cool the dried biscuits completely before storing in airtight container.

With love,
Phay Shing
Read More »

Friday, 11 November 2016

Lego Friends Themed Neapolitan Macarons

A friend requested for some Lego Friends themed macarons. Here they are :)

There's hedgehog, handbag, butterfly, ribbon, $100 bill and Lego figurine head

You may accuse me of being lazy by not typing out the full recipe :p. It's because it's the same and I don't want to repeat myself for something that is tried, tested and the recipients love. But I promise to do a detailed write-up if and when I see the need to provide more information.

I used the reduced sugar recipe for the macaron shells here. Both regular and reduced sugar recipes can be found here. You may refer to my Creative Baking: Macarons book for a systematic presentation of the basics and complex shaped macarons. You may refer to my video tutorials for macaron basics and piping of complex shapes on the blog too.

Just to share the photos of the piped shells...

Ribbons!

Rectangles for the $100 bill

The circular indents on these butterflies were made using a drinking straw when the shells are partially dried

Handbags!

Lego figurine head

Hedgehogs!

Freshly baked shells! I baked some pirates along with this set.

Decorated with royal icing and edible marker

You may refer to this post for the recipe for Neapolitan filling -- dark chocolate, strawberry and vanilla white chocolate ganache.

Don't they look delectable with the fillings showing :)

With love,
Phay Shing

Read More »

Monday, 24 October 2016

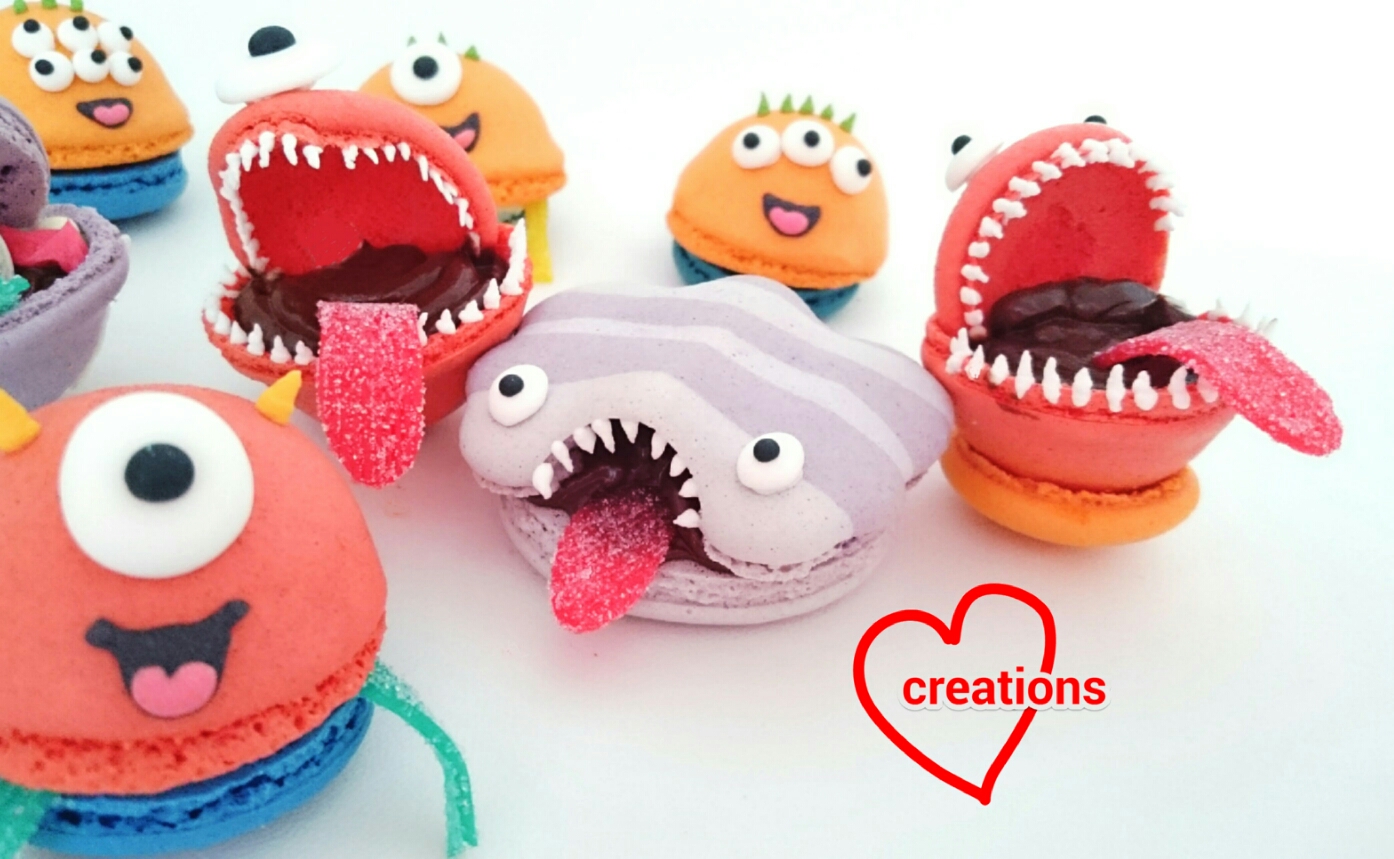
Monster Macarons -- Made from 3D Macaron Shells!

You have probably not seen anything like this before! Presenting my first 3D macaron shells dressed up as monsters in time for a Halloween party!


Here's a closer look at the 3D shells!


I made these hemispherical shells or shells with a hole in the middle because I had leftover batter one day and decided to play around with it, fully expecting it to fail. But to my pleasant surprise, it worked! You can't imagine my excitement when I successfully unmoulded the shells!

I shall not go into detail for the basic macaron recipe or basic techniques as they are the same for 3D shells. I will focus on the technique of creating these 3D shells instead and anything to take note of when baking and unmoulding these shells.

I used the regular recipe for the macaron shells. Both regular and reduced sugar recipes can be found here. You may refer to my Creative Baking: Macarons book for a systematic presentation of the basics and complex shaped macarons. You may refer to my video tutorials for macaron basics and piping of complex shapes on the blog too.

As it is my first attempt at making 3D shells, they are still not that neat so pardon the weird shaped shells.

There are two types of 3D features that I explored in my experiment.

The first type of 3D feature is a cup-shaped or hemispherical shell. I used silicone cakepop mould as the surface to pipe the shells on. Piping it neatly is a challenge as the batter will flow down the sides of the hemisphere and there is no way to estimate precisely how much batter to pipe. Perhaps practice will make perfect? :P


See the hat shaped one above? The batter spread out more at the base.

The second type of 3D feature involves creating a hollow at the base of the shell, such that it forms a bridge-like structure. In order to create the hollow, I roll up a small piece of baking sheet and pipe the batter over it. Be careful not to let the edge of the paper come into contact with the piped batter or it will be impossible to unmould it cleanly.

In order to create a "handle on a lid" pop-up feature, I let the base shell dry partially (dry until almost not sticky to touch) before carefully placing the roll of baking sheet on it and piping the "hump" on top.


In order to create the larger bridge structure, first stick the roll of baking sheet onto the baking sheet on the baking tray. Next, pipe the batter over it.


Regular macaron shells (about 4-5cm diameter) may take about 17-25 minutes to bake. These hemispherical shells on silicone moulds take longer, about 30-40 minutes to be fully baked. Underbaked shells are impossible to unmould without breaking them. Be sure to use a lower temperature of 110-115°C to bake the shells after the initial 12-15 minutes of baking to prevent browning.

When unmoulding the shells from baking sheet or silicone mould, wait for it to cool completely, then do it very, very gently and carefully. Always peel the baking sheet/silicone mould away from the shell and not the other way round.

Check out the freshly baked shells!!


I decorated the shells with royal icing. Stiffer icing was used for the teeth and horns.


I filled the shells with Neapolitan filling - vanilla, strawberry and dark chocolate ganache.

Recipe for vanilla/strawberry/dark chocolate ganache
Ingredients:
Vanilla:
100g white chocolate, chopped
10g unsalted butter
10g vegetable shortening
28g heavy cream
1/4 tsp fine sea salt
1 tsp vanilla bean paste

Strawberry:
100g white chocolate, chopped
10g unsalted butter
10g vegetable shortening
28g heavy cream
1/8 tsp fine sea salt
1 tsp strawberry emulco
1/4 tsp rose water (optional)

Dark chocolate:
120g dark chocolate, chopped
10g unsalted butter
3g vegetable shortening (may replace with butter)
40g heavy cream
1/8 tsp fine sea salt
1/2 tsp vanilla bean paste

Steps:
1. Place chopped chocolate, butter and vegetable shortening in a microwave-safe bowl. Heat at medium power for 20 seconds. Use a spatula to mix well. Repeat until mixture is smooth and melted.

2. Place cream in small saucepan. Heat until it starts to bubble. Pour over melted chocolate mixture and stir in one direction with a spatula until smooth.

3. Add fine sea salt and vanilla/strawberry paste. Mix well.

4. I like to whip up my ganache so it's lighter in texture but this is optional. You may let the mixture stand at room temperature until it firms up to toothpaste consistency. Alternatively, refrigerate for several minutes before beating mixture with spatula. Return to fridge for another 3-4 min and beat the mixture again. If it's not as light and fluffy as you prefer it to be, return to the fridge one last time for another 3-4 min and beat again.

5. Transfer to piping bag and fill the shells.

When filling hemispherical shells, be careful when you assemble as the filling may fall out. Quickly assemble top and bottom shells together to prevent this from happening.

Filling hemispherical shell with dark chocolate....

...followed by vanilla white chocolate 

I used sour gummy candies for the tongue and arms.


Here's a close up view of my only tiny monster hiding in a jar!


Store assembled macarons in fridge for at least 24h before serving. Let the macarons stand at room temperature for about 15 minutes before consuming.

I had fun with the 3D shells :). Hopefully there will be more inspiration and ideas on what to do with these.

With love,
Phay Shing


Read More »

Friday, 18 December 2015

Koala Bear Neopolitan Chiffon Cake


It’s my first chiffon Koala Bear, here’s my cute Koala Bear sitting atop a Neopolitan Chiffon Cake (Strawberry, Vanilla, Chocolate), hiding a hidden surprise in the tube hole which also helps to support the weight! The Strawberry/Vanilla/Chocolate Neopolitan chiffon flavours were requested. I was pretty happy/thankful making this cake as the Koala bear was a delight and I loved the overall effect of the 3 flavours/colour. It's a reduced egg yolk recipe for whiter cake.

Neopolitan Chiffon Cake (7-inch chiffon tin)
1 egg
26 g castor sugar
52 g vegetable/corn oil
58 g fresh milk/water (I used 50:50)
80g cake flour
7ml vanilla extract
1 tsp cocoa powder + pinch of baking powder
1/2 tsp strawberry paste/emulco

5 egg whites
60g castor sugar
¼ tsp cream of tartar
1. Preheat oven to 160°C. Prepare a tray of water at the bottom of the oven (I used the lowest rack to bake the cake). *You may omit steam baking; I like to use it for moister cake.

2. Beat egg yolks with sugar with whisk till pale yellow before stirring in oil, milk/water and vanilla extract.

3. Add in sieved flour and whisk till no trace of flour found. Divide the batter into 3 parts. To the first portion, add 1 tsp cocoa powder (and a pinch of baking powder). To the second, add ½ strawberry paste. Leave the 3rd untouched.

4. Meringue: Beat the egg whites with ¼ tsp cream of tartar till firm peaks form or just to the point of reaching stiff peak, mixing in caster sugar in 2 additions.

5. Divide the meringue into 3 parts for each of the 3-coloured egg yolk batter above. Gently but quickly fold in the meringue into each batter 1/3 at a time.

6. Spoon the strawberry batter into the chiffon tin evenly, followed by the plain vanilla batter, and then lastly the chocolate batter, leaving around 2 cm from the tip.

7. Gently tap the tin on table 3x to remove air bubbles

8. Bake the chiffon cake for 15 min at 160°C and then at 140°C for 30 min.

9. Invert immediately once out of the oven to cool

10. Unmould by hand after the cake is cool. Gently pull the cake from the sides of the tin at each angle and push the removable base up to unmould the sides. To unmould the cake from the base, gently lift up the cake from the base using hands, repeating this at each angle before turning the base over (see 'Hand Unmoulding Chiffon Cakes for a Smooth Finishing' video tutorial).

*Tip if you are using natural cocoa powder (not Dutch-processed), you need to add ¼ baking soda to the chocolate egg yolk batter to prevent formation of bigger air pockets.

The Koala bear uses the same base recipe. I used 1/4 tsp of charcoal powder to colour the bear grey. The Koala bear was baked in glass bowls and cake pop molds. Picture tutorial and recipe of the Koala bear is now in Deco Chiffon Cakes cookbook.


The review was 'very nice!' =) Thank God.

With lots of love,
Susanne

Read More »