Friday 31 May 2024

Sugar-Free Floral Blue China Chiffon Cake II

 I was inspired by floral patterned blue china porcelain for my mum's birthday cake this year as she loves flowers and watercolor painting. Here's what I made, and it's sugar-free!


I made the mini cake version a month ago and shared the detailed recipe there. You may refer to this post for the details.

What I made differently in this bigger version, was to include more but thinner layers. So this cake consists of 5 layers of sugar-free lavender rose chiffon sponge and 4 layers of vanilla rose diplomat cream, along with fresh strawberries and a strawberry-raspberry reduction brushed on sponge layers. I used the same honey lavender jelly coloured naturally with blue pea flowers for decoration at the sides of the cake, as well as wafer paper butterflies at the top and base.

You may see the reel here for the process of piping the batter, painting and assembly of the cake layers:


Just to share a few pictures:

Decorated top layer of sponge

A peek at the insides

Cross-section of a slice of cake 

My family couldn't tell that the cake was made with sugar replacements! They all found it delicious and fragrant, as did my taste testers for the mini cake trial bake!


with lots of love,

Phay Shing

Read More »

Friday 24 May 2024

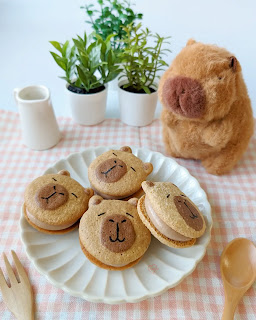
Capybara Yuzu Chocolate Hazelnut Bouchee

 I had lots of yuzu diplomat cream and chocolate hazelnut whipped cream left from making the display set and a few other capybara choux pastries so I decided to make bouchees to use up the filling. Here's something cute and quick to put together that capybara fans will love!


I was inspired by Winnie (Instagram: ohcakeswinnie) to give bouchees a try as to her, it's easier than macarons 

I shared the recipe for making these bouchees in my Instagram reel over here:


If you never had bouchees before, they are light & airy sponge sandwiches with tasty filling. They are also rather quick & simple to put together!

This recipe makes only five-six 5cm capybara bouchees so feel free to upsize the portion.

Ingredients:
1 large egg
1/8 tsp cream of tartar (optional)
1/8 tsp salt (optional)
30g caster sugar 
1/2 tsp vanilla extract or paste
20g cake flour 
12g almond flour (may replace with hazelnut flour)
1/4 tsp + 1/8 tsp cocoa powder
Powdered sugar for dusting (optional)

1. Beat egg whites with cream of tartar, salt & sugar until stiff peaks

2. Briefly whisk egg yolk & vanilla. Fold in gently with spatula until smooth 

3. In another bowl, whisk together flours & 1/4 tsp cocoa powder. Sift over egg mixture. Gently fold until just combined

4. Portion out one heaping tablespoon of batter. Add 1/8 tsp sifted cocoa powder. Gently fold until combined 

5. Transfer light & dark brown batters into piping bags. Pipe as shown in reel. Use a template if you wish for consistent sizing

6. Lightly dust with powdered sugar if you wish (not shown in reel)

7. Bake 150-160C 15 min or until crisp. Adjust time & temperature according to your oven as each one is different

8. Cool completely before decorating & filling. I filled mine with chocolate hazelnut whipped cream & yuzu diplomat cream because I have that on hand but you may fill with any filling of choice like jam/curd with vanilla whipped cream. Refrigerate overnight for the sponge to soften & absorb the flavours of the filling. Best eaten cold

I didn't explain what's the difference between dusting with icing sugar and without dusting before baking in the reel. You can see the difference in this picture below:


The lighter coloured ones were dusted with icing sugar and the darker ones didn't have it. Final texture wise especially after maturing with the filling, I don't find a difference. I prefer to bake the bouchees until they are rigid enough to handle and dry enough because when I leave them spongey like cake, the surface turns sticky very quickly in humid Singapore, even when I dust with icing sugar before baking. The moist, high water content filling will soften the texture to be more sponge cake-like so it's ok to "overbake" and dry out your bouchees until they taste more like light airy cookies when freshly baked if you prefer something that's easier to handle in humid climates.

Just to share more pictures of these treats!


Cross-section looks like a macaron!

Do give this a try as bouchees are really quick to put together (in under an hour!), yummy and you may fill with any filling of your choice!


with love,

Phay Shing

Read More »

Friday 17 May 2024

Optimus Prime & Bumblebee Macarons II

 My friend wanted some Optimus Prime and Bumblebee macarons for her son's birthday and I took the chance to challenge myself. Although I made these way back in 2018 over here, I thought of trying the full body versions this time round!


I used my default Swiss meringue method to make the shells.


Checkout the awesome feet on the shells!

I added in the details after baking using edible marker and cake paint from Sweet Sticks.


I filled the macarons with strawberry-raspberry stabilized ganache that is temperature stable enough to stay at room temperature during this heat wave period in Southeast Asia (but don't leave it out in the sun of course!). I packed it with lots of fruit too! To make it temperature stable and safe for leaving it out of the fridge for some time, I made the filling dairy -free.

Dairy-free berry ganache for macarons 
240g white chocolate couverture 
80g berry jam (cook and reduce berries of choice with 10% sugar)
5g freeze dried berry powders
10g light corn syrup
pinches of salt
1/4 tsp strawberry emulco
3g gelatin bloom in 12g ice water
2g soy lecithin added with chocolate to melt (optional)

Steps:
1. Melt chocolate with soy lecithin to 41C
2. Heat corn syrup, berry powder, salt, emulco and jam until warm, about 46C
3. Melt bloomed gelatin. mix with warm liquid ingredients.
4. Add 3. to warm melted chocolate. Stir briefly and emulsify with blender.
5. Press cling wrap to surface, leave at aircon temperature to firm up for an hour or fridge for 30 min. Transfer to piping bag and pipe onto macaron shells


Watch the video tutorial with my tips on how to make macaron shells that are smooth, sturdy and have even feet all around for complex shaped characters like these in my reel:

https://www.instagram.com/reel/C6aL_ykS25e/?igsh=Mjk1MmlmMDUwaDVl


I had feedback that the macarons tasted fantastic, full of fresh berry flavour!


with love,

Phay Shing

Read More »

Thursday 16 May 2024

Chocolate Cheesecake Tarts (Classic Chocolate and Sanrio)


Which is your favorite cheesecake tart? Recipe for these no-bake chocolate cheesecake tarts below =) 

I experimented with a no-bake cookie dough as tart crust so that it is easier to shape, and will be teaching the chocolate version at my church APRC’s culinary arts ministry this Sunday. You can watch a reel video here for some steps. 

Dark Chocolate Cheesecake Tarts (by Susanne Ng
Makes 4 

Tart crust 
60g oat flour 
160g oreo cookie crumbs 
80g unsalted butter, melted 
30g honey 

Combine all in a medium mixing bowl. Mix with spatula and divide into 4 (around 70g mixture per tart). Spread and line base and sides of tart case with tart crust mixture. You can also roll out the dough to line the tart case. 

Chocolate cheesecake filling 
160g cream cheese, room temperature 
80g castor sugar 
110g dark chocolate callets (58%), melted 
10g cocoa powder, sifted 
110g heavy cream, chilled  

1. Melt chocolate in microwave (30+20 secs) or double boiler and allow to cool. 
2. Soften cream cheese with spatula, then beat cream cheese with sugar using spatula till smooth. 
3. Whip heavy cream to firm peaks using an electric mixer. 
4. Whisk/fold in half cream to melted chocolate, then whisk all in. 
5. Fold in cocoa powder, then quickly whisk to incorporate evenly.  
6. Whisk in cream cheese mixture till even. 
7. Fill 90-95g per tart (divide into four). Chill at least 15min to set cheesecake. 
        *Best to unmold after 2 hours. 
8. Decorate with gold flakes, or as desired. 

Recipe for the classic cheesecake version is found here (in caption)

With lots of love, 
Susanne


Read More »

Friday 10 May 2024

Capybara Yuzu Chocolate Hazelnut Chiffon Cake

 My family loves capybaras and the multitude of capybara plushies at home are a source of inspiration for my capybara bakes😆. Here are some simple yuzu chocolate hazelnut chiffon cakes that I made for fun but decided to make it into a kids baking class material!


The sponge is yuzu flavoured and coloured brown with a little cocoa powder. The pudding in the middle is a delicious chocolate hazelnut pudding. The ears and facial features are not made out of fondant, marzipan or modelling chocolate, AND you don't have to make an extra item using more ingredients to make those too!


Find out the secret of the simple hack I use to transform a plain chiffon cake to my family's favourite creature from this class happening during the June school holidays! Please click on this link to register. 


with love,

Phay Shing

Read More »

Tuesday 7 May 2024

Puppy-in-Watermelon Chiffon Cake


How much is that doggie in the watermelon? =) I did this for a baking class (class video here) and it was super fun. I also made a reel video for this cake. Hope this made you smile! =)

With lots of love,

Susanne


Read More »

Saturday 4 May 2024

Negiusagi Honey Lemon Vanilla Marshmallows

 A friend from Italy requested for me to create Negiusagi marshmallows for content creation in October last year but I only got around to making it in March this year. I am taking the chance to share a flavoured marshmallow recipe as well!

Photo dumping some shots I took of the marshmallows that are honey lemon vanilla flavoured!


Here's the reel for the piping process:

https://www.instagram.com/reel/C5DhgM7SK9J/?igsh=MTUyM3A3cWRtZGNnZw==

Honey Lemon Vanilla Marshmallow 
Italian meringue
60g egg whites
10g sugar
4g lemon juice

140g sugar
1/8 tsp salt
60g honey
10g lemon juice
30g water
1 tsp vanilla extract

Gelatin bloom
9g gelatin
15g lemon juice
20g ice water

Please read the captions of the reel for tips on working with character marshmallows in hot climates and if you are artistically challenged.

Flavour variations, keto-friendly sugar-free options, detailed steps and technical tips are in my Deco Marshmallows book.


 The book is already available in Singapore, Malaysia and Thailand, and available for pre-orders in most countries.

with love,
Phay Shing 
Read More »