Showing posts with label dinosaur. Show all posts

Tuesday, 29 April 2025

Pistachio Chocolate Dinosaur Macarons

 I bought some pistachio flour end of last year which I didn't use so I decided to make some macarons with it. Although many bakers advise against using only pistachio meal for making the shells, they don't mention what happens if you do. To satisfy my curiosity, I made some macarons without using any almond flour at all. Presenting my 100% pistachio macarons as cute dinosaurs!


If this design looks familiar, it's because I re-used my old dino design from some years ago. 

I did a 1:1 replacement of almond flour with pistachio flour by weight to see what happens. Before that, I dried the pistachio meal to pick up excess oil which can ruin the bake. To my surprise, the paper towels didn't pick up as much oil as almond flour. Surprised because some bakers warned about the oil from pistachios ruining the bake. 

I went ahead to make the batter and immediately realised what's different. Besides the obvious visible dark specks from the flour, the batter turns runny quickly despite taking care in making sure the meringue is tight and stable and the batter is not overfolded. I went ahead to pipe and bake the macarons thinking it's a failed bake but they turned out beautiful!  See the awesome feet and full interior! 


In conclusion, unlike what the other bakers warned against, I would say go ahead and make macaron shells out of pistachio flour alone because the aroma and taste is amazing. Just give more room for the batter to spread after piping and intricate shapes are not a good idea due to the runnier batter. Do make sure proper technique in preparing the batter is used and you are good to go!

Here's the reel of the process of making the dinosaur macarons:

https://www.instagram.com/reel/DHqI39JynMq/?igsh=MXBhc2k4YzhzNml3cg==

I re-used leftover dark chocolate ganache and coffee ganache from a test bake at a new studio as fillings so you may use pistachio ganache or buttercream instead to make the pistachio flavour pop, and pair it with milk chocolate or raspberries if you wish!


with love,

Phay Shing 

Read More »

Saturday, 24 September 2022

Dinosaur Chiffon Cakes (Online class)


 Let's make some cute Dinosaur chiffon mini cakes! These are mint-flavored, fluffy, moist and super cute!! Link to sign up is here

You can watch a short preview of the class here

Hope you like it!! 

With lots of love, 

Susanne 


Read More »

Sunday, 23 January 2022

Triceratops Chocolate Choux Pastry (Video Tutorial)

Making character choux pastries sometimes involves making Choux au Craquelin that aren't your regular round, oblong or even donut shapes. I made a video tutorial on how you can make any shape you like! Triceratops is used as an example but the same principles can be applied to all shapes.


Here's a view of the main body of the Triceratops before and after baking. 

 
The pastries are filled with chocolate diplomat cream. I adjusted the amount of cocoa powder and dark chocolate couverture so that it is less intense. 


For the full video tutorial, please click on this link


With love, 

Phay Shing

Read More »

Sunday, 22 August 2021

Dinoland Mango n Peaches Cake

Dinosaur theme for birthdays never go out of fashion and is surprisingly popular with little boys. Presenting my Dinoland macaron scene on top of a mango and peaches fresh cream chiffon cake! 


I learnt something new from a baker on Instagram (account is flourhour_afterdark) that you can pipe macaron batter on silicone cupcake cases. I am not a stranger to piping macaron batter on silicone hemisphere mould trays but have not tried cupcake cases before. It was surprisingly easy to pipe on and easier to unmould than the tray types! I used the swiss meringue method recipe for the macarons. I created the volcano and tree foliage using silicone cupcake cases. 

I achieved the height of the volcano by piping on stacked cases. A little wiggling with a toothpick is enough to dislodge the silicone case from the baked shell. 

Freshly baked shells! 

The lava on the volcano was added on post-baking with royal icing. The dinos were decorated with royal icing and edible markers. 


Putting it all together! The volcano is filled with crunchy chocolate balls (store bought) and dark chocolate ganache. The rest of the macarons are filled with dark chocolate ganache. 

I made the vanilla chiffon sponge using my default recipe

Freshly baked vanilla chiffon cake! 

I used a mix of stabilized dairy cream and non-dairy cream to get a good balance of stability and taste. 

Recipe for cream
Ingredients:
100g + 100g heavy cream
2 gelatin sheets, bloomed in ice water
1 tsp vanilla extract
200g whip topping (non-dairy cream) 

Steps:
1. Heat 100g of heavy cream until about 40C. 

2. Add bloomed gelatin and vanilla. Whisk until gelatin is melted. 

3. Add 100g cold whipping cream and whisk until well combined. 

4. Press cling wrap on surface of the cream and refrigerate for a few hours or overnight.

5. When ready to assemble, whip non-dairy cream till stiff peaks. Whip chilled dairy cream until stiff peaks as shown below. 


6. Fold dairy cream into non-dairy cream and transfer into piping bag with a hole cut for assembly. 


To assemble, the sponge was sliced horizontally into 3 pieces. Between the sponge layers was the cream, mangoes and canned peaches and some homemade mango yuzu compote. Use an acetate sheet to hold the layers together during assembly. Chill in fridge for at least 2 hours or overnight before removing the acetate sheet. 


I love the clean and fresh look! 


Thank God it was a well-received bake! 


With love,

Phay Shing


Read More »

Monday, 10 May 2021

Naturally Coloured Dark Chocolate Macarons

While I have the natural sources of food colouring, I might as well use it 😊. I have made this dinosaur design a few times over the past one plus year but never using almost purely natural sources of food colouring. So I am happy to say that I have managed to capture their whimsical nature using natural colours as well! 


A little blue and chocolate brown gel food colouring is added to enhance the blue and darker brown colours. Everything else is 100% natural from blue pea flower, spirulina, pandan, cocoa and tuemeric powders. The first 3 powders were bought from Scoop. 


I used the Swiss meringue method for the macaron shells, and baked it together in the same batch as We Bare Bears for my friend (stay tuned for that post in the weeks to come!) 


Piped batter! 

You may refer to this post on how I managed to reduce the appearance of specks on the shell surface when using the natural food powders from Scoop. 

Freshly baked shells! Visibly less specks on the shells as compared to my Sumikko Gurashi attempt! 

I decorated the shells with edible markers and lustre dust, and filled them with dark chocolate ganache


Here is another look at all the designs of dinos being filled! 


These were individually packed to be given away as gifts at a birthday party. 


With love,

Phay Shing 

Read More »

Friday, 7 August 2020

Matcha Milk Chocolate Dinosaur Macaron Class

If you are new to making macarons but would like to learn how to make simple character macarons, join me for this class happening in Sept 2020!


I prefer to colour and flavour my bakes using natural ingredients so I chose matcha as the primary flavour of these cute dinos. 

The filling is Matcha whipped white chocolate ganache with some chopped milk chocolate to break the monotony. 


You will learn the basics of french method and how to pipe, bake and decorate these dinos.


 I assure you it will be a fun class as with all my simple character macaron classes! Please click on this link for more details and to register 

With love, 
Phay Shing

Read More »

Wednesday, 29 July 2020

Dinosaurs on Choo Choo Train Choux Pastries

When I received this project, I was really excited because there's endless possibilities to what you can make with choux pastries that hasn't been explored. Presenting my take on dinosaur choux au craquelin on choo choo choux train!

The train and dinos are made up of choux pastries! 

Another view of them! 


This is actually the second time I am making a train out of choux pastry. My very first deco choux was made way back in June 2014, and it was a choo choo train carrying a yummy load of vanilla pastry cream and apple pie filling!

You may refer to this post for the detailed recipe of this rustic looking choo choo train with the yummy goodies. 

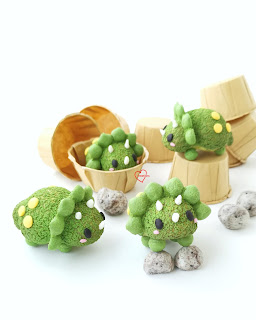
I have made the dino gang before and you may refer to this post to have a look. So making the dinos wasn't too big a challenge this time. The train however, involved using some new techniques that I either used before only once or was entirely experimental. So glad everything turned out fine!

You may refer to this post for the detailed recipe of making the choux au craquelin (choux pastry with cookie dough on top) for the dinos.

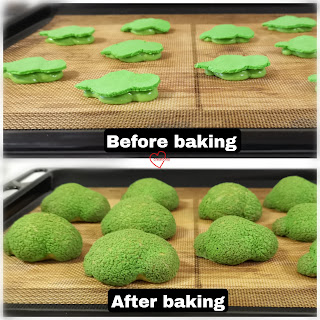
Just to share the before and after baking photos of the main body parts of the dinos. 

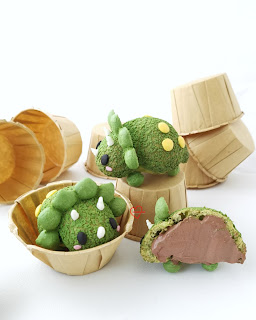
Assembled dinos! I added on the facial details withpink and white royal icing and black candy melts. 

What I really want to share in this post that is new, is how I made the train components. Notice that I didn't use craquelin at all for the train parts so I had to rely on other techniques to create a well defined, non-blobby structure.

I used metal cookie cutters as moulds for baking the chimney and blocky parts of the locomotive.
Metal cookie cutters

I chose red and black as the colours for the train as these can bake at high temperatures of 180C and above for long time without noticeable browning. In order to create pastry cases in the shape of the moulds, place the cookie cutters/moulds on perforated mat and line the sides of the mould with parchment or perforated mat. Fill the moulds till about a third full. Place another piece of perforated mat over and place a heavy tray on top. The last bit is important as the rising pastry may push the tray away, causing it to be out of shape. The black chimney piece was the result of such a happy accident 🤣. I didn't expect the pastry to rise and flatten out into a larger disc above the cylinder block below so nicely! I actually baked 2 cylinders of different sizes, thinking I could stack them for the chimney but this happy accident worked out better!


The flatbeds of the carriages are flat rectangular pieces of choux. I am glad my experiment for making these worked too! The challenge was to make the flatbeds roughly the same width as the locomotive. Piping out the choux batter the usual way will not do as the baked pieces are bound to puff up by a lot. I also only have one mould of a particular rectangle size so it is not practical to bake the flatbeds in the mould. Instead, I rolled out the batter between two teflon sheets (parchment paper will wrinkle) to thickness of about 3-4mm and froze it until firm.


Red batter rolled between teflon sheets. I use these sheets for baking chiffon sheet cakes/swiss rolls. I used a cakeboard as my work surface for ease of transport from worktable to freezer. Try not to deform the rolled out batter

I used the same mould for baking the locomotive to cut out the frozen batter. You need to try and work quickly as once the batter softens, it would not retain the cutout shape well when handled.

Place the cutouts on perforated mat. You will notice that I use perforated mats to bake choux whenever I need the baked cases to have well defined shapes that are similar to the piped batter shape. Bake until dry and crisp. Baking temperature and time for this will vary as each oven is different. 

I did the same for the black batter for the roof of the locomotive. 

I piped out the other small parts like the wheels and the cow catcher.

Piped wheels

Baked pastry cases! 

I used a zester to file the contact surfaces so that they fit together nicely.

Voila! Choo choo choux train! I just glued the parts with royal icing. The locomotive has a hole at the base for filling with pastry cream. 

I made a less chocolatey version (as requested) of chocolate pastry cream lightened with whipping cream (a.k.a. Diplomat cream) for the recipient to fill the cases just before consumption. I always recommend filling pastries just before eating so that you don't have to eat soggy pastry. My recipients never complain about the extra work they have to do to fill the pastry cases themselves because I always provide extra filling and they can always pile up with more filling with each bite of the pastry if they want to, and freeze any excess to eat as ice cream or refrigerate and use it as tart fillings or bread spreads.

Thank God that this creation was very well received! I was told the guests were all amazed by it and everyone happily ate the train and all 9 dinos in one sitting!


With love,
Phay Shing

Read More »

Tuesday, 14 July 2020

'Spiderman with Dinosaurs' Mango Sticky Rice Macarons on Mangoes n Cream Cake

My friend wanted a dinosaur and Spiderman themed mango birthday bake for her son so this was what I came up with!

Mango sticky rice macarons on top of a mangoes n cream chiffon cake! 

I used the Swiss meringue method to make the macaron shells.

No mean feat to include so many colours and intricate details into this set! 

Freshly baked shells! I had leftover batter which I used to pipe some pretty swirl macarons! Look at the full shells made from leftover batter! 

I decorated the shells with edible markers. I usually work on multiple projects concurrently, thats why the dessert themed macarons appear on the right

Filling the macarons with a ring of mango sticky rice filling and mango compote in the middle. You may refer to this blog post for the detailed recipe of the filling. 

Inspired by what my client did with my dino macs during the circuit breaker period, I decided to create a landscape out of rocky road too, and put the character macarons in it. She used a store-bought rocky road but I decided to make my own from scratch. Here was what she did...

So super cute 😍

I used a modified version of Nigella's rocky road recipe, and then realised that I should have taken into account Singapore's hot and humid climate *slaps forehead*. Despite reducing the amount of butter and cornsyrup from Nigella's recipe, I still had difficulty working with the blocks of rocky road. It was a challenge to stack them without leaving gooey streaks of chocolate on my fingers. But they were delicious because I took the liberty of adding some pistachios and macademia nuts into the cookie and marshmellow mix!

I mounted the dinos and Spiderman onto the rocky road landscape. Spiderman is being cheeky here! 

The mangoes n cream cake recipe can be found here. It is almost the exact same cake, except that I cut the mango pieces into a cloud/ half flower shape.

I layered the vanilla chiffon sponge with some homemade mango sauce, fresh mango slices and whipping cream

Looks like some sunshine in these dark days! 


I inserted jumbo straws as dowels into the cake such that the dowels take the full weight of the rocky road wth character macarons on it.

Thank God the whole creation was very well received!

With love,
Phay Shing

Read More »

Friday, 1 May 2020

Lubo Dino Chiffon Cake


Sharing a cheerful dino chiffon cake inspired by Lubo from @lulusweetkawaiishop made during better times. 💕


Hope this brings a smile to your faces during this period! When I create cute things, my heart smiles from inside out 🥰. Is this the same for you?💖

Chiffon cake was pandan with a tinge of blue. If you can find blue pea flowers, you can use it to extract natural blue food colouring. They are quite commonly grown and can also be bought from baking supplies stores like Phoon huat or some wholesale markets.

Stay safe and take care!🙏
With lots of love,
Susanne

Read More »