Showing posts with label Frozen. Show all posts

Monday, 2 December 2019

3D Olaf Chiffon Cake


"Do you want to build a Snowman?" <3

Have you watched Frozen 2?

I loved it so much, so here's my first full 3D chiffon cake Olaf!

He made me laugh so much in the show =D. So this is my humble work of love.

The last time I made Olaf was 5 years ago when Frozen just came out. It is a much simpler semi-2D version. I had forgotten how to make it though, for this cake, I actually redid the eyes for this cake 2 times! It is not easy to capture the look of characters really.

Do you like Olaf in summer or in winter?


Hope this adorable Olaf cake made you smile too!

With lots of love,
Susanne


Read More »

Friday, 11 January 2019

Tsum Tsum Elsa and Anna Brown Sugar Cookies

I just realised I have quite a few cookie posts that have been in cold storage as drafts because there are more exciting posts to share. I am finally posting this...After several months 😅. My friend requested for these Elsa and Anna cookies for her daughter who was recovering from surgery and needed cheering up.


I have made this Elsa design in macaron form a few years ago, along with Olaf and you can see it in this post.

I have not changed my brown sugar cookie and royal icing recipe over the years because they have always been well received. People who tried using my recipe loved it too. You may refer to this post for both brown sugar cookie and royal icing recipe. I also make my own cookie templates from cheap, easily available materials. You may refer to this post on how to make and use your own templates.

Thank God that the little girl loved it!

With love,
Phay Shing

Read More »

Monday, 10 September 2018

Macaron Ice Castle on Lavender Vanilla Honey Lemon Cream Cheese Chiffon Cake

I was excited as well as apprehensive about embarking on this bake as it's my first time making a castle cake out of macarons! Presenting my version of ice castle macaron cake on top of a lavender vanilla honey lemon cream cheese chiffon cake!


I often get requests for character bakes which are essentially illegal since I don't have the license to bake them. So I turn down those requests (unless they are from my family or friends). But there is a leeway where bakers can exercise their creativity to create a scenario where it is entirely out of their imagination. And it won't be considered copyright infringement anymore. That's why I have a case of Pororo and Petty meet Elsa and Anna, along with a couple of penguins at a castle that is designed entirely from my adaptation of what is feasible for macarons 😆.

It was a challenge to make these macarons as there are 12-13 different colours involved! I had to use the Italian method for an undertaking like this. You may use your favourite macaron recipe or any recipe in our blog. You may refer to my macaron books Creative Baking: Macarons and the upcoming Creative Baking: Macaron Basics for a more systematic review of the basics and piping techniques. I used the reduced sugar Italian method recipe for this batch but scaled down to 220g of almond flour.

Freshly baked shells!

Shells decorated with royal icing and edible markers. I made these along with some doughnut and seashell macarons.

I filled the shells and macaron cake base with vanilla honey lemon cream cheese filling. Recipe can be found here.

The assembly of castle macaron cake begins with layering four layers of large round macaron shells and three layers of cream cheese filling.

It takes some planning and calculations to decide how big to make each piece in the castle structure. Some Math involved which can be an interesting mental challenge 😉.

Assembled castle. I used royal icing to add on some snowflake designs.

Looking really adorable with the inhabitants!

I baked some plain vanilla chiffon sheet cakes for the name and top layer of the chiffon cake.

I love the look of the soft colours and smooth, velvety surface!

What I really want to share in this blog post is the recipe for the chiffon sponge cake and the cake frosting. The various ingredients I used here work harmoniously together to bring about a delicious flavour. It's a mouthful to read out aloud but each ingredient is crucial -- lavender, vanilla, honey, lemon and cream cheese.

Reduced egg yolk lavender milk cream cheese chiffon cake
Ingredients (makes two 9.5" cakes):
Egg yolk batter
2 egg yolks
20g caster sugar
84g canola oil/ vegetable oil
100g lavender milk*
50g cream cheese
1tbs vanilla extract
120g cake flour
1/4 tsp salt
A pinch of lemon zest

Meringue
8 egg whites
1/3 tsp cream of tartar
110g caster sugar

*Boil 150g of milk. Pour hot milk into a bowl with 2tbs of dried lavender flowers. Steep for 10 min. Strain out the lavender flowers and measure out 100g of lavender milk.

Steps:
1. Melt softened cream cheese in hot lavender milk. Heat over low heat if necessary. Set aside to cool.

2. Line bottom of cake tins with parchment paper. Set oven rack to lowest or second lowest position. Place a tray of water at bottom of oven (optional). Preheat oven to 160℃.

3. Prepare egg yolk batter. Whisk egg yolks with caster sugar until pale and thick. Add oil and whisk until well combined. Add cream cheese lavender milk, vanilla and salt and mix until well combined. Gradually add in sifted cake flour and whisk until no trace of flour is seen. Add lemon zest and mix well.

4. Make the meringue. In a clean metal bowl, beat egg whites with cream of tartar until firm peaks form, gradually adding in caster sugar once the egg whites are foamy.

5. Quickly but gently fold the meringue into egg yolk batter in three batches. Divide the batter among the two baking trays. Use a chopstick to swirl the batter gently to pop any trapped air bubbles.

6. Bake for 5 min then reduce temperature to 140℃ and bake for another 25 min. Reduce temperature to 130℃ and bake for another 10min. The lower temperature used here is to prevent browning of the cake as the requester prefers have it as pale as possible.

The cake frosting recipe is just the macaron filling with stabilized whipped cream added in order to give it a lighter taste and texture to match the chiffon cake.

Vanilla honey lemon cream cheese frosting recipe
Ingredients:
150g vanilla honey lemon cream cheese filling
125g whipping cream, poured into mixing bowl and chilled in bowl
1 tbs icing sugar
1 tsp gelatin powder
1 tbs water
1/2 tsp vanilla extract

Steps:
1. Make the stabilized whipped cream. Sprinkle gelatin over water in a small microwave safe bowl. Let it bloom for a few minutes. Microwave on medium power for 10-20 seconds. Stir until gelatin is dissolved. Set aside to cool for a few minutes.

2. Add icing sugar and vanilla extract to chilled whipping cream. Beat on low speed using electric mixer until it starts to thicken. Gradually add gelatin and whisk the cream by hand. Continue whisking until the cream is able to hold a firm peak. Be careful not to over whip or the cream will separate.

3. Fold the whipped cream into the cream cheese filling in a few additions.


Transfer the frosting into piping bag and fill the bottom layer of cake with frosting.

I drizzled a little more honey on top of the frosting.

Assembled cake!

I inserted 6 jumbo straws into the chiffon cake to act as dowels to support the heavy macaron cake on top.

The requester is kind enough to send me a few photos of the party in school.

Here's a picture of the cake at the party venue

Thank God that it was very well received in terms of looks and taste!

With love,
Phay Shing


Read More »

Friday, 29 July 2016

'Monster Truck' Snowy Chiffon Cake


Can you spot the odd one out among the Monster trucks? ;)

This was a very unique request for a friend. She wanted me to make one chiffon Monster truck together with her toy pals on a snowy Frozen landscape. If you find this cake familiar, yes the cake and recipe is in Creative baking: Chiffon Cakes!


It may look simple but carving and assembling of the Monster truck was a lot of work! I was rather apprehensive about this project but thankful the cake came out well and it was well-received.

Am out of steam still with blogging and family so this will be a short post. Sorry and have a great weekend!

With love,
Susanne


Read More »

Thursday, 14 July 2016

Elsa and Olaf Macarons with Whipped Earl Grey White Chocolate Ganache

I had a last minute request for Elsa and Olaf macarons from my friend that just managed to squeeze in the night before my planned macaron mania. For those of you who know how I work, I usually work on a couple to a few orders at the same time when I plan to bake macaron shells (although decoration and assembly work take place at different times).  Sometimes I am able to accomodate last minute requests to ride on existing planned bake if the requested quantity is small. The good news is some people are happy that they managed to place an order. The not so good news is it's quite a rush job to plan for the unplanned. Because of that, sometimes I make boo-boos while baking and it happened here. Thankfully it still turned out well thanks to the forgiving nature of Italian method. I shall tell you what happened during the process and it may convince you to switch from French to Italian :p.


Looking at these, you won't suspect that I made a booboo! I made Elsa and Olaf macarons at the same time as the elephants and Minnie Mouse ribbons.

I used the reduced sugar macaron shell recipe for these but you may use the regular recipe without sugar reduction too. Please refer to my Creative Baking: Macarons book and video tutorials for the basics and piping of complex shapes. Just to share the piping process...

First I piped the base with a fairly large-tipped piping tip (6-7mm diameter). Bang tray on table to release trapped air.


Let the base shells partially dry before piping on the pop-up features. Waiting time can be anywhere from 15-30 minutes. Use your finger as a gauge instead of drying time. The shells should feel sticky but the batter should not stick to your finger. Pipe the hair and hands of Olaf with a 2mm piping tip. Add on his snout using a 4-5mm tip and use a toothpick to pull the batter in place. Pipe Elsa's nose and ears with a 2mm piping tip. Pipe alternate segments of her hair with a 3mm piping tip and use a toothpick wherever necessary. Pipe the base shell of Elsa with 6-7mm tip. Remember to bang the tray again.


After piping the above tray, I happily used up ALL the yellow batter for the yellow elephants. I looked at the Elsa and Olaf tray again and slapped my forehead. With no more yellow batter left in the piping bag but an extra elephant piped, I had no choice but to use a small spatula to scoop up some yellow batter on the baking tray from one elephant and the base shells of the Elsas and put it back into the piping bag. I re-piped the base shells and added on the extra bits of hair on Elsa.

Finally piped finished!

Let the shells dry. Bake at preheated oven for 10 minutes for 140°C at lowest rack, followed by 130°C for 7-8 minutes. If the feet still appear wet, reduce temperature to 110-120°C and bake for another 5 minutes or until feet appear dry.

Freshly baked shells!

I used royal icing to add in the features and a little black gel dissolved in vodka to make a grey paint to highlight the pop up features. This highlight is subtle and serves to accentuate the pop-up features like Elsa's hair and Olaf's snout. Fine black edible marker was used for Elsa's eyebrows. A little dusky pink lustre dust was used for the eyeshadow and peach lustre dust for the cheeks. Elsa's crown was piped on a baking sheet with the crown template underneath, oven dried before transferring onto her head.


I filled the shells with whipped Earl Grey white chocolate ganache as requested.


With love,
Phay Shing


Read More »

Monday, 4 April 2016

Rainbow Elsa Doll Chiffon Cake


I made this Rainbow Elsa Doll Chiffon Cake for a friend's princess sometime back! I was happy to try this idea I originally had for my #3 :). It's my first try baking my Pastel Rainbow Chiffon Cake in a doll cake tin! Its full recipe is now in Creative Baking: Chiffon Cakes book and it graces the book cover!


I have shared before the doll tin has a centre tube which acts as support for the chiffon cake so that the cake is soft and fluffy like in normal tube pans. Feedback from my friend was very good too! :)

Just sharing pics of my Times book event that just passed. Very thankful for everyone's support!


With lots of love,
Susanne

Read More »

Monday, 3 August 2015

Snowflake Earl Grey & Matcha White Chocolate Macaron Pops

Here's a simple macaron bake for dear Susanne's elder daughter's teachers :). Tea flavoured snowflake macaron pops! Melted white chocolate was used as the base filling so these macarons do not need refrigeration. Perfect as gifts in hot and humid Singapore :).


I almost decided on Anna and Elsa brown sugar cookies for the little girl's Frozen themed birthday party in school. Thankfully I changed to these! Much easier on my eyes.

Since only 4 macarons were requested by Susanne, I baked the plain round shells with my Totoro macaron bake and froze them. Macaron shells freeze very well. Simply store them in layers between baking sheets in an airtight container. Thaw at room temperature before opening the box to work on decorating the shells.

I made snowflake templates out of clear plastic files and used blue edible marker to carefully trace out the pattern by dotting the surface. Be very careful not to apply too much pressure or shift the template as the ink will smudge! Clean the template with paper towel after tracing each snowflake.


Use medium stiff royal icing and a small tip like Wilton 1S to pipe out the patterns. I added icing sugar to my standard royal icing recipe until I get the right consistency. Any peaks should disappear in about 20 seconds. Use a toothpick to nudge the icing where necessary. Any excess icing can be stored in the fridge in an airtight container and with clingwrap touching the icing surface.


Air dry the shells. The icing dries pretty quickly so you may just leave it out while you prepare the filling.

Tea flavoured white chocolate (Fills about 8-9 macarons)*
Ingredients:
50g melted white chocolate (I used Meiji)
1/2 tsp Matcha (green tea) powder
1/2-1 tsp Earl Grey powder

*You may adjust the amount of tea powder used according to taste. Note that the macaron shells are sweet and plain flavoured so you may want a stronger tea flavour in the filling.

Steps:
1. Finely chop the white chocolate and melt it in the microwave oven at medium power with short bursts of 10seconds, stirring well after each round of heating. You may use the double boiling method to melt the white chocolate too.

2. Divide the white chocolate into two equal portions. Add sifted tea powder to each portion and mix well.


Transfer the melted chocolate into piping bags with the end snipped off. Pipe the chocolate onto the bottom shells. Place an ice-cream stick on and top up with a bit more chocolate. Cover with the top shell.


Wait for the chocolate to set. You may wish to place the macarons in the fridge for 10 minutes to speed up the process but it's not absolutely necessary.

Wrap up these dainty confectionary or store in airtight container. Store at a cool and dry place.

All wrapped up!


Blessed birthday Tintin!

With lots of love,
Aunty Phay Shing

Macaron pops make elegant Teacher's Day gifts too! Stay tuned for more macaron pops in about a month's time!


Read More »

Sunday, 2 August 2015

Princess Anna Doll Chiffon Cake


Happy birthday my dear Tintin!!

My #2 turns 4 today! I have been wanting to make a Princess Anna cake for her because she loves Frozen and the kind, spirited, sunshine personality of Anna reminds me a lot of her (not to mention cute :p). This is my 4th Princess Doll Chiffon Cake after Princess Elsa and Sophia but my first Princess Anna. Briefly, it involves baking chiffon cake in a wilton doll cake tin on top of a 9-inch chiffon cake. The teal blue chiffon cake is made from vanilla chiffon cake with blue pea flowers. I added pink chiffon cake frills and lacing to match her outfit on top, and decorated with pink chiffon gerberas and colourful flowers to reflect her sunshine personality! I wanted the cake to ‘glow’ with warmth (versus Frozen cold lol). 

May God continue to watch over her and help her grow in love and grace! Thanks auntie Phay Shing too for the beautiful Frozen macarons!

With lots of love,
Susanne

Read More »

Friday, 17 April 2015

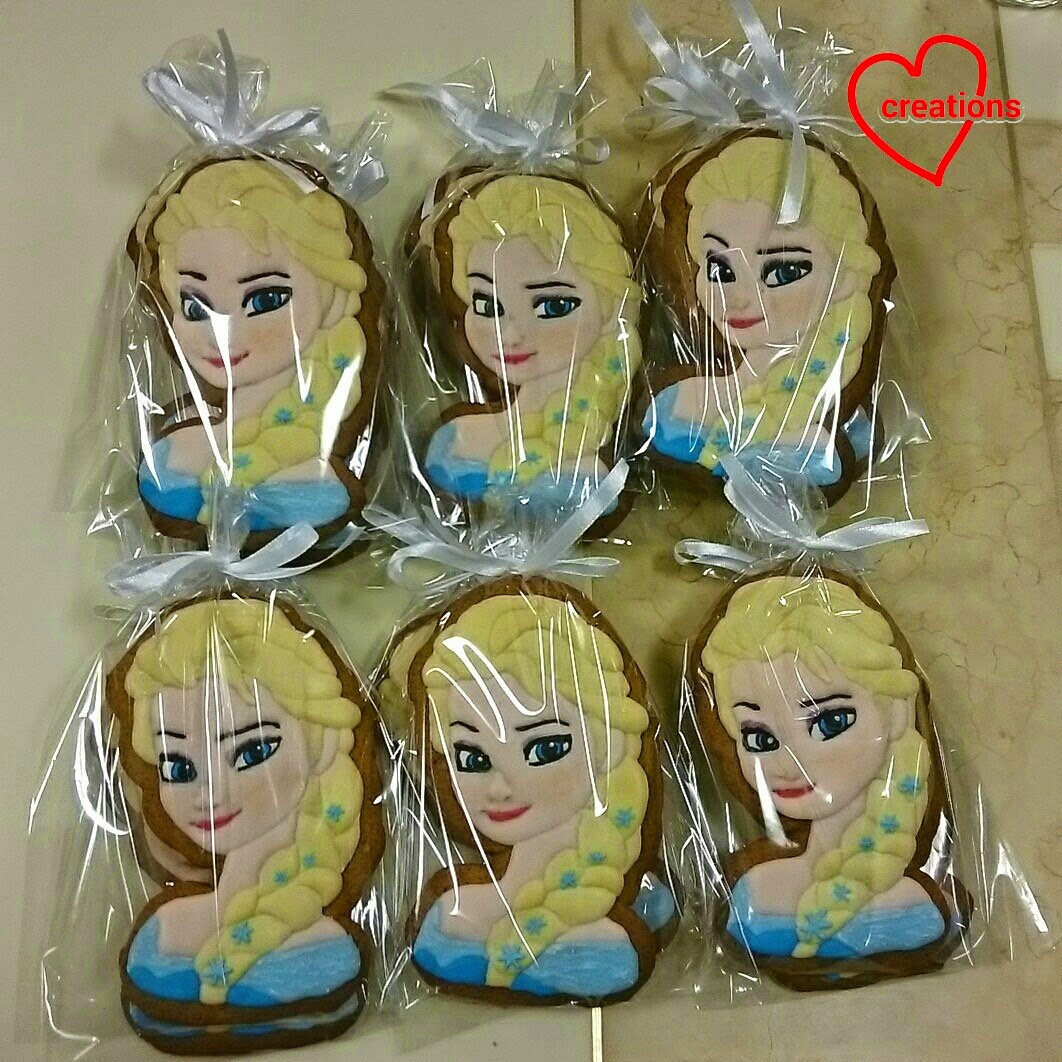
Elsa Brown Sugar Cookies

As mentioned in my previous post for Olaf cookies, this particular request includes Elsa as well. 14 were requested but here's a close-up view of one of them :).


I must admit that this batch really tested my patience and whatever little artistic skills I have! I think I will not make as many as 14 in the future! About 6 is as many as I am willing to go :p. There's definitely room for improvement and I need to figure out how to add on really fine features. Sometimes the icing doesn't land on where I wanted it to go so Elsa ended up having a thicker eyeliner than she was supposed to have!

I used the same brown sugar cookies and royal icing recipe which can be found here. Roll the dough to 5-6 mm thick and bake at 160-170°C for 16-18 minutes or until browned.

As for the colours of the icing, here's what I did to get more natural looking colours:
Skin: ivory + a bit of rose pink
Hair: ivory + a bit of golden yellow + a bit of black/ dark brown
Lips: rose pink + red + bits of purple and teal
Clothes: sky blue + a bit of violet and/or royal blue or teal

Just to share some photos of the whole process...

Cutting out the dough from homemade template and freshly baked cookies

Tracing and filling out the outlines with edible marker

Icing the face!

 I used an unorthodox method of icing by filling in all facial features before outlining and flooding the face. Most people would add on the eyebrows and mouth later. Probably the nose as well. The reason is, my freehand drawing is not that good so I find it hard to fill in the features after the face has been filled with flesh colored icing, even with the help of a template. Homemade templates are good enough if very fine precision is not required. As far as human portraits go, any slight deviation in features will change the entire face. If I had a Kopykake projector, it would be a different story!

 I tried to create a 3D nose by first icing a thick blob and waiting for it to harden before flooding with flesh coloured icing. I am not clever enough to come up with this cool trick for the nose. I got the idea from here.

Adding in the clothes... I had an extra bit of cookie for testing out icing and painting effects.

Adding in the hair. This alone took me 3-4 hours!

Adding in the purple eye shadow and black portions of the eyes. I used a fine brush/toothpick/needle to help me apply the icing. Very fiddly work!

Adding in fine details like white glint in the eye, peach coloured lustre dust blusher, snowflakes in the hair and brushed some white icing on the clothes.


All packed together with Olaf!

It took me almost a whole week to work on these two characters (20 cookies in total) from making the templates to packing the completed cookies. You definitely need lots of patience for these!

With love and patience,
Phay Shing

Read More »

Wednesday, 15 April 2015

Olaf Brown Sugar Cookies

I have a request for some Olaf cookies. Here they are :).


It was quite a challenge to take photos of Olaf as he has quite a huge contrast. I finally figured out that a black background works best to show up the features just when I was about to pack them :p.

As usual, I used my favorite brown sugar cookie recipe and same royal icing recipe.
The cookie dough is rolled to 5-6mm thick, chilled and cut into Olaf shape.

Homemade plastic template at work here! Check out this post for detailed steps on how to create and use one.

Bake for 15-18 minutes at 160-170°C or until browned. I tend to overbake a little as the cookie will soften a bit after icing. Baking time may vary depending on the size of your cookie template/ cutter.

Trace/ draw Olaf onto cookies with edible marker.


Start icing! It's my first time testing out some painting techniques so I made an extra Olaf head. Use the outline-and-flood icing technique to gradually add on parts of Olaf. You may use oven drying at 60°C fan mode to speed up the drying, especially for large sections of the body. Be careful not to dry for too long or the oil from the cookie will leach into the icing, making it look patchy.

Almost done!

I painted on some light brown highlights for Olaf's twigs, some blue and grey shadows around the eyes, and some grey shadows at selected portions of the head, body and buttons to create a more 3D and realistic effect. The light brown highlights was made from royal icing. The shadows were made from some gel food colouring dissolved in *ahem* Chinese rose wine. I didn't have vodka so I used the next closest thing I have at home :p.

Painting on the "eye shadow"

Putting on the "eyeliner"

Finally, add on the carrot nose with medium stiff icing. Just add icing sugar to the flooding icing until the peaks can somewhat hold the shape. Add on shadows for the nose if you wish.


A closer look at Olaf!


The highlights and shadows are meant to be understated so you don't really notice them if you are not looking out for them. But adding details like these makes Olaf more life-like.

I couldn't resist a retro shot!


All packed!

You may be wondering how come someone ordered so few cookies? Keep a lookout for my other Frozen-themed cookies. Elsa!

With love,
Phay Shing


Read More »