Showing posts with label Castle. Show all posts

Tuesday, 18 February 2020

'Rainbow Bunny In Pink Castle' Macarons on Chocolate Banana Cake

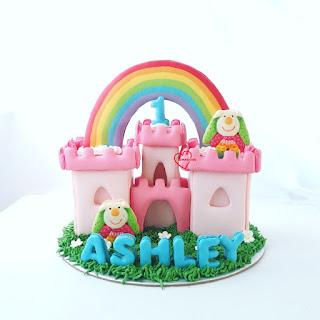
This is perhaps one of my most massive bakes that is almost on par with my macaron playground on strawberries n cream cake I made in 2018. I made a pink ombre castle with rainbow and rainbow bunnies out of macarons! The whole thing sits on top of a 6-layered dark chocolate banana cake!


A macaron structure like this really needed time for planning and execution. I used the swiss meringue method but tweaked the recipe for a reduced sugar version without needing to use rice flour to replace some icing sugar in the dry ingredients portion like I always did. In order to maintain stability of the meringue while reducing sugar content, I replaced some of the caster sugar with icing sugar that has cornflour added, and cook the egg whites to a slightly higher temperature. I am still in the process of finding the optimal higher temperature to heat the egg whites to so I won't be sharing the detailed updated reduced-sugar swiss method recipe yet. You may refer to this post for the original swiss method recipe, and this post for the reduced-sugar swiss method recipe using rice flour and cornflour substitution for icing sugar.

Just to share some pictures of the process...

Piping the batter for various components! 

Freshly baked shells! 

Adding the details of the rainbow bunny using edible marker and gel colouring dissolved in vodka that is painted on. This bunny is modelled after baby Ashley's favourite toy

Just to show the heartbreak I get sometimes when working...

Oops! I accidentally dropped one fully decorated shell! All the hardwork 😂. Thank God I made extras! 

The rainbow is a huge macaron that extends quite tall vertically so I had to take pains to make sure that it is securely anchored. I didn't want to risk it toppling over during transport. Here is a sneak peek of how I did it.

The anchoring actually starts all the way down to the cakeboard with 2 wooden skewers on each end of the rainbow. Stiff royal icing at both ends of the rainbow may not be sufficient to secure it. 

Works-in-progress! Stiff royal icing is used to glue the pieces together, as well as to create the grass

Does this sight put a smile on your face? 

My ultimate chocolate cake has always received rave reviews and this time round, I decided to add bananas to complement the rich chocolate. I baked the banana slices briefly in the oven at 200°C, with some slices sprinkled with sugar on top so that it caramelizes. You may refer to this blog post for the detailed recipe.

Here was how I assembled...

Add a little chocolate custard on cakeboard, place a layer on sponge on top, pipe on the mixture of chocolate ganache and custard, add the bananas, add a thin layer of custard-ganache mixture, place the next layer of sponge and repeat, finally crumb coat with whipped dark chocolate ganache

You may choose to leave the cake in a semi-naked style or cover it with more dark chocolate ganache. I ran 3 wooden skewers through the whole height of the cake to prevent the cake layers from sliding.

I did a simple vertical-line pattern using a spatula, and covered the base with some chocolate pearl crunch sprinkles. 

Thank God the cake was really well received and people were amazed that you can actually construct a castle out of macarons!

With love,
Phay Shing
Read More »

Monday, 10 September 2018

Macaron Ice Castle on Lavender Vanilla Honey Lemon Cream Cheese Chiffon Cake

I was excited as well as apprehensive about embarking on this bake as it's my first time making a castle cake out of macarons! Presenting my version of ice castle macaron cake on top of a lavender vanilla honey lemon cream cheese chiffon cake!


I often get requests for character bakes which are essentially illegal since I don't have the license to bake them. So I turn down those requests (unless they are from my family or friends). But there is a leeway where bakers can exercise their creativity to create a scenario where it is entirely out of their imagination. And it won't be considered copyright infringement anymore. That's why I have a case of Pororo and Petty meet Elsa and Anna, along with a couple of penguins at a castle that is designed entirely from my adaptation of what is feasible for macarons 😆.

It was a challenge to make these macarons as there are 12-13 different colours involved! I had to use the Italian method for an undertaking like this. You may use your favourite macaron recipe or any recipe in our blog. You may refer to my macaron books Creative Baking: Macarons and the upcoming Creative Baking: Macaron Basics for a more systematic review of the basics and piping techniques. I used the reduced sugar Italian method recipe for this batch but scaled down to 220g of almond flour.

Freshly baked shells!

Shells decorated with royal icing and edible markers. I made these along with some doughnut and seashell macarons.

I filled the shells and macaron cake base with vanilla honey lemon cream cheese filling. Recipe can be found here.

The assembly of castle macaron cake begins with layering four layers of large round macaron shells and three layers of cream cheese filling.

It takes some planning and calculations to decide how big to make each piece in the castle structure. Some Math involved which can be an interesting mental challenge 😉.

Assembled castle. I used royal icing to add on some snowflake designs.

Looking really adorable with the inhabitants!

I baked some plain vanilla chiffon sheet cakes for the name and top layer of the chiffon cake.

I love the look of the soft colours and smooth, velvety surface!

What I really want to share in this blog post is the recipe for the chiffon sponge cake and the cake frosting. The various ingredients I used here work harmoniously together to bring about a delicious flavour. It's a mouthful to read out aloud but each ingredient is crucial -- lavender, vanilla, honey, lemon and cream cheese.

Reduced egg yolk lavender milk cream cheese chiffon cake
Ingredients (makes two 9.5" cakes):
Egg yolk batter
2 egg yolks
20g caster sugar
84g canola oil/ vegetable oil
100g lavender milk*
50g cream cheese
1tbs vanilla extract
120g cake flour
1/4 tsp salt
A pinch of lemon zest

Meringue
8 egg whites
1/3 tsp cream of tartar
110g caster sugar

*Boil 150g of milk. Pour hot milk into a bowl with 2tbs of dried lavender flowers. Steep for 10 min. Strain out the lavender flowers and measure out 100g of lavender milk.

Steps:
1. Melt softened cream cheese in hot lavender milk. Heat over low heat if necessary. Set aside to cool.

2. Line bottom of cake tins with parchment paper. Set oven rack to lowest or second lowest position. Place a tray of water at bottom of oven (optional). Preheat oven to 160℃.

3. Prepare egg yolk batter. Whisk egg yolks with caster sugar until pale and thick. Add oil and whisk until well combined. Add cream cheese lavender milk, vanilla and salt and mix until well combined. Gradually add in sifted cake flour and whisk until no trace of flour is seen. Add lemon zest and mix well.

4. Make the meringue. In a clean metal bowl, beat egg whites with cream of tartar until firm peaks form, gradually adding in caster sugar once the egg whites are foamy.

5. Quickly but gently fold the meringue into egg yolk batter in three batches. Divide the batter among the two baking trays. Use a chopstick to swirl the batter gently to pop any trapped air bubbles.

6. Bake for 5 min then reduce temperature to 140℃ and bake for another 25 min. Reduce temperature to 130℃ and bake for another 10min. The lower temperature used here is to prevent browning of the cake as the requester prefers have it as pale as possible.

The cake frosting recipe is just the macaron filling with stabilized whipped cream added in order to give it a lighter taste and texture to match the chiffon cake.

Vanilla honey lemon cream cheese frosting recipe
Ingredients:
150g vanilla honey lemon cream cheese filling
125g whipping cream, poured into mixing bowl and chilled in bowl
1 tbs icing sugar
1 tsp gelatin powder
1 tbs water
1/2 tsp vanilla extract

Steps:
1. Make the stabilized whipped cream. Sprinkle gelatin over water in a small microwave safe bowl. Let it bloom for a few minutes. Microwave on medium power for 10-20 seconds. Stir until gelatin is dissolved. Set aside to cool for a few minutes.

2. Add icing sugar and vanilla extract to chilled whipping cream. Beat on low speed using electric mixer until it starts to thicken. Gradually add gelatin and whisk the cream by hand. Continue whisking until the cream is able to hold a firm peak. Be careful not to over whip or the cream will separate.

3. Fold the whipped cream into the cream cheese filling in a few additions.


Transfer the frosting into piping bag and fill the bottom layer of cake with frosting.

I drizzled a little more honey on top of the frosting.

Assembled cake!

I inserted 6 jumbo straws into the chiffon cake to act as dowels to support the heavy macaron cake on top.

The requester is kind enough to send me a few photos of the party in school.

Here's a picture of the cake at the party venue

Thank God that it was very well received in terms of looks and taste!

With love,
Phay Shing


Read More »

Sunday, 2 October 2016

‘Dragonite’ Medieval Castle Chiffon Cake


I was really excited to make this Dragon-themed Medieval castle for my friend’s son! I’ve made lots of Princess castle chiffon cakes so I felt it was really refreshing to try something different. Most of the medieval castles are square castles with 4 towers protecting the fortress. So I was happy to try out my first square castle, baked using an 8-inch square chiffon tube pan (thank you Evon for it again!).

I used bamboo charcoal to colour the castle grey, and used the recipe from my Graduation cap Charcoal Chiffon Cake, multiplied by 3 (9 egg recipe). The volume of an 8-inch square chiffon cake (length x width x height) is much bigger than an 8-inch round chiffon cake (Pi x radius squared), ie 256 cubic inches (for square pan) versus 201 cubic inches (for round pan), hence much more eggs are required. 8-inch round tube pan only requires a 5 egg recipe, while 8-inch square tube pan requires a 9 egg recipe! So that’s something to take note when using a square pan. 

Another point to note, I usually do not use baking powder in my chiffon cake recipes, but charcoal powder has the dampening effect on chiffon batter, so baking powder is required.

Very thankful the cake was well-received and the kids asked for seconds! So I will share the recipe for the yummy charcoal chiffon cake! =)


8-inch square tube pan


Bamboo Charcoal Chiffon Cake (8-inch square chiffon tube pan)
9 egg yolks
60g sugar
117g vegetable/corn oil
117 ml water
15 ml vanilla extract
Bamboo charcoal (to colour desired, around 1.5-2 tsp)
*You can also substitute with extra dark cocoa powder in part
168g cake flour
1/2 tsp baking powder

Meringue:
12 egg whites
135g sugar
1/4 tsp cream of tartar

1. Preheat oven to 160°C (I used steam baking but it is optional).

2. Beat egg yolks with sugar with whisk till pale yellow before stirring in oil, water and vanilla extract.

3. Add in sieved flour, bamboo charcoal powder and baking powder and whisk till no trace of flour found.

4. Meringue: Beat the egg whites with cream of tartar till firm peaks, mixing in caster sugar in 2 additions.

5. Fold in the meringue gently into the batter 1/3 at a time.

6. Pour the batter into the chiffon tin from a height.

7. Gently tap the tin on table 3x to remove air bubbles

8. Bake the cake for 15 min at 160°C, 10 min at 150°C, 20 min at 140°C then 15-20 min at 130°C.

9. Invert immediately once out of the oven to cool

10. Unmould by hand (video in link) after the cake is cool. Gently pull the cake from the sides of the tin at each angle and push the removable base up to unmould the sides. To unmould the cake from the base, gently lift up the cake from the base using hands, repeating this at each angle before turning the base over. 


For the dragonite, I baked a lemon chiffon in an egg and an oval bowl for the head and body, with some cutting/sculpting, and the arms, feet and tail are from small swissrolls, sliced into halves. For the claws, instead of baking them in paper cones like the Durian Cottony Cake, I was lazy and cut them from small round cake pops (sliced at the edges). Dragonite was really difficult to do! I doubt I will want to make it again haha. 

The details are all cut from chiffon cake. A special detail to share, for the fire holder, I actually baked a darker-coloured charcoal chiffon in a paper cone to make the nice conical holder shape. I also painted the inside of the fire red using food markers =).

Hope you will enjoy this nice chiffon cake! The texture is very light and fine.

With lots of love,
Susanne =)


More loving creations here (poured my heart into it, hope you will love too!):


Read More »

Wednesday, 13 July 2016

Rapunzel Chiffon Cake


This is borne from my castle chiffon cakes, a little different here as there’s only one tower, and on a two-tone pandan chiffon landscape. I loved this very much because of the medieval feel. Though there was only one tower here, it was one of my more nerve wrecking castles as it’s my tallest thus far. I made a pop-out attic, capped by a blue cone. The base is made a two-tone pandan chiffon cake – waves in Creative baking: Chiffon Cakes.

With love,
Susanne
ps: I have difficulty coping with blogging, baking and 3 kids hence the short post.. really apologize for that... and have a blessed day!

Read More »

Monday, 28 September 2015

Rainbow Castle Chiffon Cake


This is perhaps my favorite Castle Chiffon Cake so far! It's a sweet special Rainbow Castle Chiffon Cake I designed for a very dear friend's daughter. She loved My Little Pony so the castle was Rainbow-themed, designed for My Little Pony toppers. The towers are capped with Pastel Rainbow Chiffon Cake Cones by baking chiffon cake in paper cups, and the top of the castle with an Arching Chiffon Cake Rainbow (made from a 6-inch chiffon cake) and Chiffon Lake (made from layer chiffon cake)!

Made with lots of love! Happy blessed birthday Mikaela!
Susanne

Read More »

Sunday, 12 July 2015

'Princess Sophia' Castle Chiffon Cake


I've made a few Princess castle cakes but this is one of my favorites as I love the purple, and the purple-pink colour scheme is so sweet! This is my first Princess Sophia-themed castle. I tried to incorporate some flowers and green vines here using pandan chiffon layer cake. As you see, I couldn't make too elaborate and extensive flower vines as the swiss rolls became soft really quickly so it was a race against time. I will be making a bigger castle for Princess Sophia and all her friends in August for a dear friend. Thankful it was well-received!

With love,
Susanne

Read More »

Monday, 23 March 2015

Frozen Castle Chiffon Cake II


We can never get past the Frozen fever! This is version 2 of my Frozen Castle Chiffon Cake. Here I experimented with making chiffon cake stairs for the castle with leftover cake from making the blocks. I also changed back the trimmings from jagged (ice berg-like) back to castle-like (hexagonal-top). These were manually cut and so was rather tedious. Castle cakes are also never one of my favorite cakes to make as they need to go in and out of the fridge many times, so really thankful it pulled through and it was well-received!

With love,
Susanne

"50 years ago, he wept for the nation. 50 years later, the nation wept for him". Thank you Mr Lee Kuan Yew for leaving behind a beautiful legacy for us.

Read More »

Wednesday, 7 January 2015

Two Princesses 'Hidden Rainbow' Castle Chiffon Cake


This is a Princess Castle made for 2 princesses to live in! One princess stays in the polka dot towers while the other stays in the hearts towers. Everyday, they meet together in the main castle where a big beautiful rainbow resides! This is the tale of the two princesses and this is their dream castle =).

I had the great privilege to build the dream castle for my friend’s two princesses who dreamed of having this castle. The two little girls decided on the design of the swissroll towers as well as the details of the cake. One girl wanted a rainbow cake while the other didn’t want, hence we ended up with a hidden rainbow peeking out from the castle door. One of the princesses even wanted hidden m&m’s so I hid some colourful m&m’s under the main castle tower!

This Two Princess Castle Chiffon Cake is similar to my previous creation Princess Castle Chiffon Cake, except that this time I used Ochikeron’s decoroll recipe for the polka dot and hearts swissroll. In addition, I wrapped a Rainbow Chiffon Cake with a wall of vanilla chiffon layer cake cut with jagged edges.

It was one crazy cake to make! But a very special one!! I was really thankful that I pulled through and the two princesses were very happy (best reward at the end of the day)!!

Happy birthday to Charlotte and Chloe!!

With lots of love,
Susanne

PS: I have to thank dear Evon for lending me her silicone mats!! ♡

Read More »

Thursday, 25 December 2014

Princess Castle Chiffon Cake


I finally got to try out my dream castle! This Princess Castle Chiffon Cake is made wholly from chiffon cake from the cones to the towers and all the trimmings! The main cake is made from a 7-inch vanilla chiffon cake surrounded by 5 swissrolls made from vanilla chiffon cake with lemon-infused swiss meringue buttercream (smbc) fillings. These are capped by strawberry chiffon cake cones. In addition the bricks and trimmings are cut out from vanilla chiffon cake baked as layer cakes (thick for bricks and thin for trimmings). I’ve never been a cream person, but this smbc is delicious to me! I’m a convert :). Be prepared for 3 days for this crazy dream cake! :p

Vanilla chiffon cake (7-inch chiffon tin)
1 egg yolk
20g sugar
39g corn/vegetable oil
36 ml water
5 ml vanilla extract
60g cake flour

Meringue:
4 egg whites
45g sugar
1/4 tsp cream of tartar

1. Preheat oven to 160°C. Prepare a tray of water at the bottom of the oven (I used the lowest rack to bake the cake). *You may omit steam baking; I like to use it to control my oven temperature rise.
2. Beat egg yolks with sugar with whisk till pale yellow before stirring in oil, water and vanilla extract.
3. Add in sieved flour and whisk till no trace of flour found.
4. Meringue: Beat the egg whites with ¼ tsp cream of tartar till stiff peak, mixing in caster sugar in 2 additions.
5. Fold in the meringue gently into the batter 1/3 at a time.
6. Pour the batter into the chiffon tin from a height.
7. Gently tap the tin on table 3x to remove air bubbles
8. Bake the chiffon cake for 15 min at 160°C and then at 140°C for 32 min.
9. Invert immediately once out of the oven to cool
10. Unmould by hand after the cake is cool. Gently pull the cake from the sides of the tin at each angle and push the removable base up to unmould the sides. To unmould the cake from the base, gently lift up the cake from the base using hands, repeating this at each angle before turning the base over.

The lemon in the smbc balances the butter flavour very well. The 5 swissrolls are cut from 3 10-inch swissrolls.

Lemon swiss meringue buttercream (for 3 10-inch swissrolls, adapted from baking library)
112g sugar
120g egg whites
250g unsalted butter, cubed and slightly softened but still cold
2 tbsp fresh lemon juice
1 tsp vanilla extact

Making the buttercream:
Dissolve sugar in egg whites - Place egg whites and sugar in a heatproof bowl sitting over a pan of slightly simmering water without the base of the bowl in contact with the water (double-boiler). Whisk the mixture constantly until the sugar dissolves completely. Rub the egg white mixture with your fingers to check if it is still gritty to test if the sugar has fully dissolved. Egg white mixture should be warm to the touch. Remove bowl from the heat. Do not allow egg whites to scramble/coagulate.

Beating egg whites - Beat egg whites with an electric beater on medium high speed until whites are very stiff and glossy. Egg whites should form stiff upright peaks and will not budge when bowl is overturned. Egg whites should be cool to the touch at this point.

Incorporating butter - Add in butter to beaten egg whites in 3 additions and beat on medium speed. The mixture may become watery as butter is being incorporated. Just continue beating. After the third addition, beat the mixture until it becomes fluffy and firm, like creamed butter.

Flavouring the buttercream - Add lemon juice and vanilla extract to buttercream and beat well to mix.


I did not use a special recipe for the swissrolls but used the same recipe for the vanilla chiffon cake which is very bendy for the swissrolls, scaled to 2 egg yolks. Gently spread the smbc over leaving an inch from the sides.


Roll up again and cling wrap them to set in the refrigerator for a few hours so that it is easier to handle them, as they are still soft even with the smbc.


The cones were baked in paper cups as vanilla chocolate ice cream chiffon cake. Here, I used strawberry chiffon cake recipe to use more natural coloring.


The assembly was the difficult part. I had to insert 3 dowels into the 3 tallest towers to prevent the towers from slanting over, and bring the cakes in and out of the fridge as they are difficult to work with when softened (not easy as the towers are tall!). These were attached to the main castle using more smbc. I had slight difficulty with the left tower which was taller, so had to add a brush of melted marshmallows to reinforce. The cones were attached to the top of the swissrolls also using smbc. The cake needed to be refrigerated for another few hours to set properly before the final adjustments and decorations were added.

Phew! Finally done!


Thank God my friend shared her daughter loved the cake! Made me feel the efforts paid off! =)

With lots of love,
Susanne

Read More »