Showing posts with label Mermaid. Show all posts

Thursday, 5 May 2022

Unicorn and Mermaid Pusheen Cookies n Cream Macarons

This is another way overdue post. I made these unicorn and mermaid Pusheens together with the choux pastry version way back in way January this year!

Trying to create a cloudy beach scene here😆

I made these macarons using the swiss meringue method and decorated the macaron shells using edible marker and a mixture of edible marker and vodka wash (for the details on the unicorn horn).
Top view look at decorated macaron shells

Checkout the awesome feet on the shells!

I filled the macarons with cookies n cream swiss meringue buttercream as requested.


with love,

Phay Shing


Read More »

Monday, 18 April 2022

Mermaid Pusheen Vanilla Choux Pastries (New technique!)

 I made these Mermaid Pusheen choux pastries in early January this year but only got around to posting it now. Better late than never!


These creampuffs with crunchy cookie dough (or craquelin) are filled with vanilla diplomat cream.

Choux pastries need not come in round choux buns, long Eclairs or donut shaped like Paris Brest. They can come in any shape you want! Besides demonstrating how to make non-regular shaped choux pastries, I am going to show you that it is possible to add on details using choux pastry batter on a baked choux pastry case instead of using chocolate, fondant or royal icing in a double-baking technique.

You may refer to this post for my default craquelin and choux pastry batter recipe. Note that baking temperature and time may vary according to your oven.

Begin by preparing the craquelin. You may refer to this post to see how I create customized shaped cookie dough cutouts without a customized cookie cutter.

Freeze this tray of craquelin cutouts until frozen hard, at least an hour or overnight.

Prepare choux pastry batter as per normal and pipe the mermaid Pusheen shape on perforated mat with a template underneath.

Place the craquelin on top of the piped batter. Note that the craquelin is about 5-10mm larger than the piper batter.

Bake as you normally would. Let the baked pastries cool for about 20-30min before piping on the pink frills on the pastries with choux batter. Pipe the pink tail and grey front paws separately on the perforated mat as well. Pipe only a thin layer of pink batter for the frills and dab down any peaks with a damp finger. Thick batter piped will not stick well to the contours of the pastry after baking.


Bake in preheated oven at 130-150C for 30min or until thoroughly dry. This baking temperature should be high enough to thoroughly bake the batter but not so high that it browns the pastries further. 

I have mentioned before that long baking times for choux isn't a concern for me as the filling has such high water content that it softens the cases within half an hour of filling it. If you prefer it really crisp, double-baking is perfect for you!


Add on the facial features, stripes and scales on the tail with royal icing . I used a gold star sprinkle for decoration as well. The pink tail and front paws were glued on using royal icing.

Recipe for vanilla diplomat cream can be found in this post .

Here's a short video of cutting a choux pastry, revealing the cross section!


Pardon the poor lighting as it was rainy, and the slightly messy cut as the crumbs trailed down the cream😅. I took this video and cover photo on a different day from the day I finished assembling the pastries (which had better lighting).

I made some mermaid Pusheen and unicorn Pusheen macarons along with these choux pastries as well! Stay tuned for another Pusheen themed post!

Get a copy of my Deco Choux Pastries book if you would like to have a comprehensive guide to making decorative choux pastries! I am also most active on Instagram so do check out my account at phay_shing if you would like to have a look at what I am up to in a more timely manner😊.


with love,

Phay Shing


Read More »

Friday, 21 June 2019

Princess Mermaid Chiffon Cake


Princess Mermaid Chiffon Cake, filled with a jelly surprise!

The beautiful photo above is taken by the talented @mmlittlee. I wish I could take photos like her!

The backdrop was also beautifully done by her. The cake was modeled after Ufufy Princess Ariel and entirely decorated with chiffon cake. The tricky part was baking a huge sheet cake big enough for the hair!

I managed to find a picture of the jelly inside. There was more jelly in the top side. Thank God cake was very well-received, especially the jelly surprise, and this always brings me so much joy! =)


Still school holidays so not much time to blog. Hope all of you are having a great time with the family too!

With lots of love,
Susanne


Read More »

Monday, 6 August 2018

Baby Shark Chiffon Cake


Sing with me now.. Baby Shark do do do do, Baby shark do do do do.. Baby shark do do do do.. Baby shark!

Heehee seems every toddler can sing this song! This chiffon cake is made similar to my previous cake, except that is is dual flavour, the top uses lemon chiffon recipe instead. The deco is all cut from sheet cakes similar to my previous creations and cookbooks.

Hope this made you smile!! Looking forward to the holidays this week!

With lots of love,
Susanne


Read More »

Saturday, 18 November 2017

Mermaid Tail Chiffon Cake


I love turquoise colour very much so it was a joy to make this Mermaid Chiffon Cake with pretty mermaid tail and purple shells, inspired by the Little Mermaid. I was a little reminded of Legend of the Blue Sea show which I loved earlier =p.


Briefly, it was made by sculpting and cutting a chiffon cake into the shape of a tail, and then covering it with scales cut from chiffon sheet cakes of different colours. I used marshmallow cream to stick the pieces on. It was very tedious as you can imagine, to assemble the scale piece by piece from circle cut-outs from chiffon sheet cakes. It was a lot of work but thankful cake was very well-received, which brings the most joy =).

This is actually the 2nd time I am making a Mermaid Tail Chiffon Cake! The last cake was pink in scheme for a close mummy friend a year ago, still in my backlogs.. oops!

I've been really busy with kids, so sorry for less posts lately. Thank God for his grace in sustaining daily!

With lots of love,
Susanne

PS: Story of the behind the scenes on my IG @susanne.decochiffon (20/11/17)


Updates
New Deco Chiffon Cake Basics Book launch event on 2nd Dec 2018, 4pm at Kinokuniya, Ngee Ann City! Cu there :) (taken from kinokuniya instagram). Thankful it was in Top 10 Non-fiction bestsellers in Kinokuniya!


Deco Chiffon Cake books


Read More »

Sunday, 8 October 2017

Pusheen Mermaid Chiffon Cake


This must be my new favorite creation!! As I love Pusheen and the Pusheen Mermaid is so super sweet!

This is a little like my previous creation Pusheen Cat Chiffon Cake, except it's vanilla-charcoal flavoured instead of black sesame. I opted for this flavour as it was a little hard to control the shade of the black with black sesame. For charcoal powder, I could add any amount I want without changing the flavour of the cake.

Some exciting news! My new book Deco Chiffon Cake Basics is going to hit the bookstores next weekend! It's a step-by-step picture guide to make it easier to understand as compared to previous books. Its focused on basic techniques of Deco Chiffon Cakes. Book cover is below for your reference =).

Have a meow-gical week ahead!

With lots of love,
Susanne


Read More »

Monday, 24 July 2017

Mermaid Themed Macarons II (Swiss method)

I have another request for mermaid macarons along with seashells and starfish. But it's assorted flavours this time.


You may refer to this post for my first set of mermaid themed macarons.

I made these using my usual reduced sugar Italian method recipe but something happened and I needed to rebake the starfish so I took the chance to try out Swiss method. The "accident" was quite hilarious and I was fortunate it happened to the starfish and not to the mermaids which were a lot more time consuming to pipe. I was trying to speed up drying of royal icing decorations on the starfish using my oven but I forgot to check the temperature setting which was left at 200℃ from baking the previous night's dinner. When I realised something was wrong, the stars have charred! They looked so much like cartoon characters after an explosion that I had to laugh! Baking boo-boos do happen :p.

Since it was only a small batch that needed rebaking, I took the chance to use the Swiss method which I have been wanting to try but had no time for. The Swiss method is similar to the French method, except that you partially cook the egg whites. It is more stable than the French method and good for making small batches. I have posted another Swiss method recipe which I used to make my first ferris wheel. I am going to share my first attempt at Swiss method here which was more successful than my second attempt with another recipe which I adapted from here.

Swiss method macaron shell recipe
Ingredients (makes 12-15 macarons):
42g egg whites
42g caster sugar
56g superfine almond meal
38g icing sugar (with cornflour already added)
Gel food colouring (if using)

Steps:
1. Prepare baking trays with template and baking paper over it. Sift together almond and icing sugar. Set aside. I divided the powder mixture into two as I was making two colours of batter.

2. Whisk caster sugar and egg whites together over a pot of simmering water until all the sugar has dissolved and temperature is 45-50℃. Remove from heat.

3. Beat the egg whites at medium speed using an electric mixer until stiff peaks form. Divide the meringue into two. Use some meringue to stick the baking paper down to tray.

Note that the meringue should still be smooth but peaks are upright.

4. Add gel colouring to the meringue and gently fold in to mix the colour in.


5. Scatter the powder mixture over the meringue and fold in. You may choose to scatter a few times or all at once.


6. Keep folding until batter is smooth and is able to flow off the spatula in an almost continuous manner. Please refer to this video for the correct consistency.


7. Transfer into piping bag fitted with piping tip of desired size. Pipe away! You may refer to this post on how to pipe complex shapes and a more systematic presentation from my Creative Baking: Macarons book.

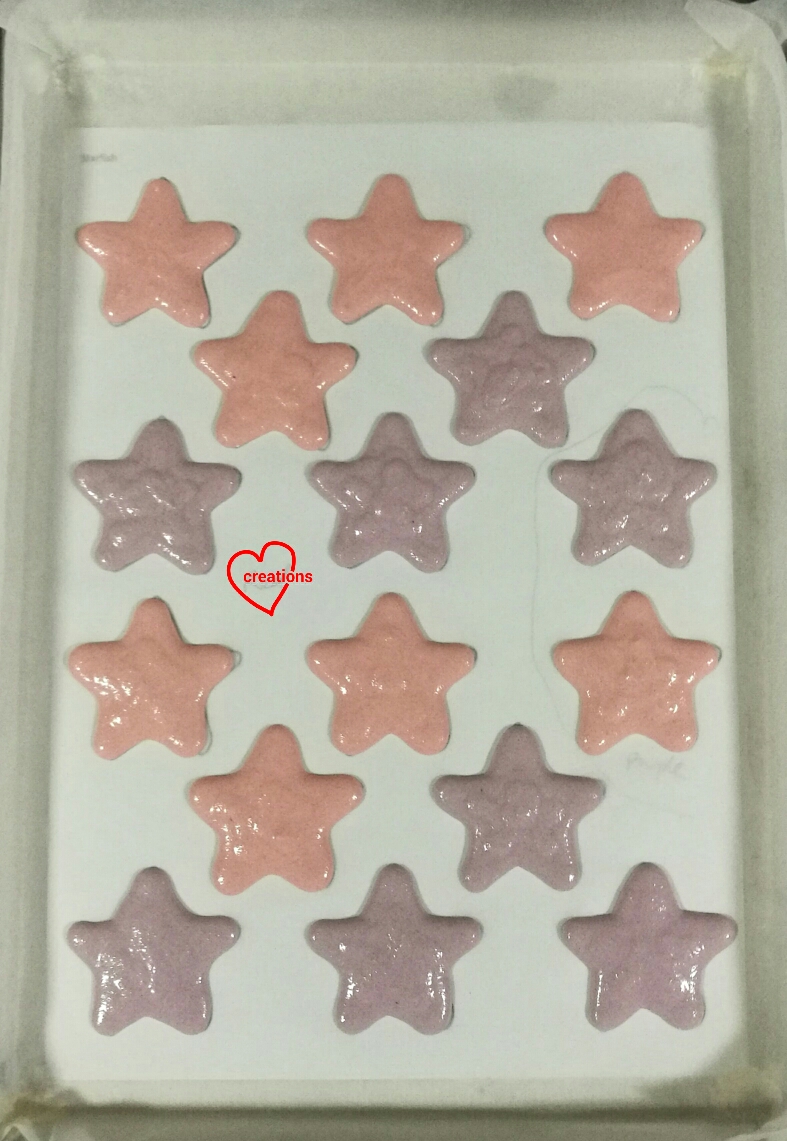
Piping stars!

8. Some suggest that you don't need to rest macaron shells baked using Swiss method. Simply bang the tray on the table after piping and bake in preheated oven at 130℃. I didn't have the guts to try it so I still went ahead and dried in aircon room until dry to touch before baking in preheated oven. I preheated to 150℃ but turned the temperature down to 130℃ once the tray is in. Set oven rack to lowest rack. Bake for about 20 min or until feet no longer appears wet. Cool completely before removing baking sheet away from shell.

Checkout the feet!

Nice fluffy interior with no hollows!

However, I find that I am unable to get a really smooth shell surface with this method without risking over folding.

I filled the shells with dark chocolate ganache, mango white chocolate ganache or strawberry white chocolate ganache. Find out how I made the edible pearls from here.

Dark Chocolate ganache filling

Mango white chocolate filling with white chocolate pearls

Strawberry white chocolate filling

Since it was my first try, I had to do a taste test as well. Freshly baked shells didn't seem as delicate (slightly chewy) but after maturing with filling for a day, the texture was perfect. Here's a peek at the insides!


You may want to give Swiss method a try if you would like to work with small batches but want something more stable than the French method. There are people who swear by the Swiss method whereas some have difficulty mastering it. For me, it's an option if I want to work with small batches. On macaron mania days when I have to work with multiple colours and large batches, I still prefer to stick with Italian method.

With love,
Phay Shing


Read More »

Wednesday, 15 March 2017

Mermaid, Seashell & Starfish Cookies N Cream Macarons

This is a very girly set of sea themed macarons, complete with sweet girly colours and a pretty mermaids :).

Mermaids, seashells and starfish!

The starfish and seashell macarons can be found in my Creative Baking: Macarons book so you may refer to it if you need the templates and piping instructions. I was given a picture of the mermaid and made a template out of it.

I used the reduced sugar recipe for the macaron shells here. Both regular and reduced sugar recipes can be found here. You may refer to my Creative Baking: Macarons book for a systematic presentation of the basics and complex shaped macarons. You may refer to my video tutorials for macaron basics and piping of complex shapes on the blog too.

Piping the mermaids

Freshly baked shells. I baked this batch together with the pirate themed batch

Just to share some photos of the decorated shells. I decorated the shells with royal icing and edible marker. The rosy cheeks on the mermaids were added on using peach coloured lustre dust and a small soft brush.


I had a hard time trying to source for candy/chocolate balls that are just the right size for the pearls in the shells so I made my own instead. I followed the recipe for modelling white chocolate from here, using a ratio of 2:1 for white chocolate : light corn syrup.

Homemade modelling white chocolate

Let the balls of "pearls" dry and harden in the open a little before adding on a coat of pearlescent lustre dust.

Brushing on pearlescent lustre dust

I filled the shells with cookies n cream swiss meringue buttercream. The recipe can be found here.


Thank God these were very well received at the party both looks and taste wise :).

With love,
Phay Shing


Read More »

Wednesday, 11 November 2015

'Little Mermaid' Chiffon Cake


"Under the sea...Under the sea..
Darling it's better, down where it's wetter, take it from me.." =)

As I am writing this, this cute song by Sebastian the crab goes in my head! I remember this cartoon when it came out while I was still a young girl in MGS! I loved it so much I probably watched this over 8 times and can sing all the songs! ;)

This Little Mermaid Cake was super fun for me as it’s my first ‘Under-the-sea’ chiffon cake, though I’ve made a few nautical theme cakes. I had to chance to make Corals, Seaweeds and Clams from chiffon cake!

The base chiffon cake is a 2-tone Blue pea flower (vanilla)-chocolate chiffon cake, like my Cars. It seems blue with brown can be used for various themes, both ‘under-the-sea’ and desert lands. The 2-tone chiffon cake was actually unintended, but the birthday girl loved chocolate and so asked it chocolate flavour can be incorporated into the cake, hence we came up with this ‘Sea-seabed’ Blue-Brown chiffon cake scheme. Since the chiffon cake is inverted after unmoulding, the way to make the ‘Sea-seabed’ 2-tone chiffon cake is to pour Blue pea flower (vanilla) chiffon cake batter in first to fill the base to more than half, then deposit humps of blue batter, then fill with Chocolate chiffon cake batter.

The seaweeds are made from pandan chiffon layer cake. I happened to have a cute dino cutter in which I used the spikes to cut out zigzag seaweeds shapes (make a double cut side-by-side).
I made 2 types of corals, both the tube-like ones as well as the sheets. For the sheets corals, I baked a similar vanilla layer chiffon cake and cut out holes of different sizes using a circle cutter. For the tube corals, I baked strawberry chiffon cake in mini cake pop molds and then used a straw to punch out a hole for the tube ones. The clams were made using a clam mold which I have.

Thankful the kids loved the cake! Phay Shing made some beautiful mermaid macarons to go along with them.

With lots of love,
Susanne

Read More »

Tuesday, 3 November 2015

Mermaid Assorted Macarons -- sea themed macarons part 1

When I received this request for mermaid macarons, my first thought was "Is this even possible?!" I did a quick search. Apparently it has been done before :p. I have to thank the requester for providing the opportunity to stretch my abilities for piping macaron batter! Here's my first attempt at mermaid macarons along with some starfish and seashells!


The starfish and seashells are going to be featured in the upcoming Creative Baking: Macarons book published by Marshall Cavendish so keep a lookout for those! Keep a lookout for my next macaron post which has more sea themed macarons too :). All fillings are non-refrigerated as these are given out as door gifts. There's Earl Grey, strawberry and orange white chocolate (new flavour!), and dark chocolate flavours.

You may refer to this post for the basic macaron recipe.  Omit the strawberry emulco and colouring ingredients that are not relevant. You may refer to this post for piping complex shapes as a guide on how to create virtually any shape of macaron. As this subject has many colours, keep in mind to use the ratio of 0.55 for weight of Italian meringue/ weight of mass as you portion out the batter for the various colours. Use the area of each colour as a gauge of how much your should portion for each colour. Create skin colour by using a tiny dip of orange gel food colouring. As you can see, there is a lot of planning and math involved before embarking on such a complex design. Thank God for my Engineering background :p.

Just to share some photos of the process...

Piping the skin-coloured parts along with the hair, which is coloured using charcoal powder or cocoa powder.


Piping out the rest of the parts

Wait for the skin-coloured batter to form a sticky membrane before piping on the bra or the mermaid will appear flat-chested :p.

Freshly baked shells!

Prepare some royal icing to add on the flower and crown. The crowns were piped onto baking sheet, thoroughly oven dried at 60°C fan mode before transferring onto the mermaid. The facial features were drawn on with black edible marker. Peach coloured lustre dust was brushed on for rosy cheeks.

Freshly iced and decorated shells!

Non-refrigerated filling was requested so I selected a few to include in this assortment. I have tested out a new flavour for this batch. Orange white chocolate filling! You may refer to the respective recipes for strawberry white chocolate and Earl Grey white chocolate.


Dark chocolate filling is made by simply melting 50g chopped dark chocolate with 5g shortening and 1/10 tsp salt.

 Here's the recipe for orange white chocolate but I strongly recommend you to refer to my updated recipe for a yummier filling.

Orange white chocolate
Ingredients (fills about 8-9 macarons):
50g white chocolate, finely chopped
1/2 tsp orange emulco
7g vegetable shortening
1/10 tsp salt

Steps:
1. Melt white chocolate in microwave oven in 10 second bursts at medium-high power, stirring well in between bursts of heating. You may melt using the double-boiling method too.

2. Place the rest of the ingredients in a small saucepan and heat over low heat until shortening is melted.

3. Stir the orange mixture before adding a little at a time into the melted chocolate. Stir the chocolate well with each addition.

4. Transfer to piping bag and pipe onto macaron shells. Let the white chocolate sit for a few minutes at room temperature if it is too runny to pipe. Consistency should be like toothpaste before piping.

Store the macarons in airtight container in a cool and dry place.

First time changing to this type of packaging for individual macarons...


White chocolate pearl covered with pearlescent lustre dust were used as the "pearls"


Mermaids, seashells and starfish weren't the only shells I made for this batch of sea themed macarons. Here's a sneak preview of all the shells I made!


Keep a lookout for part 2 of the sea themed series!

Thank God the macarons were very well received and feedback was they were yummy and not too sweet despite being white chocolate based :).


With love,
Phay Shing

Read More »