Showing posts with label Tsum Tsum. Show all posts

Friday, 11 January 2019

Tsum Tsum Elsa and Anna Brown Sugar Cookies

I just realised I have quite a few cookie posts that have been in cold storage as drafts because there are more exciting posts to share. I am finally posting this...After several months 😅. My friend requested for these Elsa and Anna cookies for her daughter who was recovering from surgery and needed cheering up.


I have made this Elsa design in macaron form a few years ago, along with Olaf and you can see it in this post.

I have not changed my brown sugar cookie and royal icing recipe over the years because they have always been well received. People who tried using my recipe loved it too. You may refer to this post for both brown sugar cookie and royal icing recipe. I also make my own cookie templates from cheap, easily available materials. You may refer to this post on how to make and use your own templates.

Thank God that the little girl loved it!

With love,
Phay Shing

Read More »

Sunday, 27 May 2018

Donald Duck Ufufy Chiffon Cake


I realized I have a "thing" for things that are round! =D I find them sooo adorable! So my characters are getting rounder and fatter hehe =p.

This is a Donald duck Ufufy Chiffon Cake for my friend's adorable 2 year old (who is so adorable as well!!). This recipe used is similar to my previous Marie Cat Ufufy Chiffon Cake that I made for my own daughter. It uses the Reduced Egg yolk Angel Cottony Cake recipe that naturally produces whiter chiffon cakes without use of coloring, which I also used my Cloud Chiffon Cake in Deco Chiffon Cake Basics.

Don't you just want to hug the cake?? My friend shared it was so difficult for her to cut the cake hehe.

On another note, school holidays are here, so will be very busy for me again *nightmare* lol. Wishing everyone a blessed week and holidays (for those going oversease)!

With lots of love,
Susanne


                  3rd book (Basics techniques)      2nd book (Deco)           1st book (Rainbow)


Updates:
Deco Chiffon Cake Basics now on Book depository with free shipping worldwide (and on discount)!


Read More »

Thursday, 12 April 2018

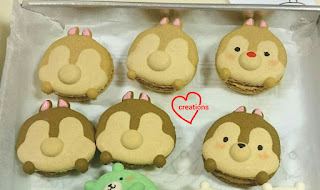
Tsum Tsum Chip and Dale Earl Grey and Chocolate Custard Cream Puffs

I made these Chip and Dale cream puffs along with my cross shaped Éclairs.


Chip is made from chocolate choux pastry case and filled with smooth and creamy chocolate custard. Dale is made from plain choux pastry case and filled with Earl grey custard. You may find the recipe for plain and chocolate Choux pastry case and Earl Grey custard from my cross eclair post. Adjust baking temperature and time accordingly as this shape has small parts that may burn easily. Bake at 180℃ for 20 min. Reduce temperature to 160℃ and bake for another 20 min. Turn off the heat and let it cool for 10 min in the oven. I will share this really rich, smooth and yummy chocolate pastry cream here.

Recipe for chocolate custard
Ingredients:
200g milk
35g sugar
18g cornflour
2 egg yolks
10g cocoa powder
10g unsalted butter
1/2 tsp vanilla extract
1/2 tsp Kahlua coffee liqueur (you may replace with vanilla)

Steps:
1. Sift together cornflour and cocoa powder  into a bowl. Add sugar and whisk together. Add egg yolks and whisk until a paste is formed. Set aside.

2. Heat milk with vanilla extract and coffee liqueur until it starts to bubble. Remove from heat and slowly pour into egg yolk mixture while stirring all the time.

3. Pour the mixture back into saucepan. Heat on medium low heat while whisking all the time. Keep an eye on the mixture as it will suddenly thicken. Once it thickens, remove from heat and continue whisking. This is to prevent the custard from becoming lumpy. Return to heat while whisking until desired consistency, like curd.

4. Add butter and mix well. Sieve the custard into a bowl. Press a cling wrap over the custard surface. Refrigerate until ready to fill the pastry. You may make this up to a few days ahead of time.

I made the chocolate custard along with Earl Grey custard

Just to share some pictures of making the Choux pastry cases...

Piped Chip and Dale!

Freshly baked Choux cases!

Here's a close-up view of the cross section with yummy custard filling!


Although this design was not specifically requested, my friend who shared this with her Bible study group said that Chip and Dale is her favourite and in time for her birthday! They all loved how yummy it was!

With love,
Phay Shing


Read More »

Wednesday, 30 August 2017

Tsum Tsum Winnie the Pooh, Piglet & Tigger Earl Grey Macarons

My friend wanted to surprise her sister with a Winnie the Pooh themed birthday treat so she requested for some Pooh themed macarons :)

Pooh, Piglet and Tigger!

She wanted to bring the macarons to an island resort where she would spring the surprise on her sister. So I had to make sure that the macarons are not too fragile (therefore the choice of Tsum Tsum designs) and contain fillings that can survive a boat ride. I have highlighted in this post the various pointers about creating macarons that are meant to survive longer (and possibly slightly bumpy) transportation and storage out of fridge so I will not repeat it here.

I used the reduced sugar recipe for the macaron shells here. Both regular and reduced sugar recipes can be found here. You may refer to my Creative Baking: Macarons book for a systematic presentation of the basics and complex shaped macarons. You may refer to my video tutorials for macaron basics and piping of complex shapes on the blog too.

Just to share some photos of the process...

Piping the shells!

Freshly baked shells and beginning to decorate with royal icing and edible marker. Check out the feet on the shells too!


I filled the macarons with Earl Grey white chocolate ganache.


I hope these cuties brightened up your day just as they did for me as I worked on them :).

With love,
Phay Shing

Read More »

Sunday, 16 October 2016

'Hello Kitty Tsum Tsum' with Chiffon Layers 'Drip Cake'


I made this for a close friend's daughter on Friday! Thankful the cake was well-loved by everyone!

I have previously tried a Chiffon Rainbow 'Drip Cake' combining both 'waves' with 'rainbow chiffon' from Creative baking: Chiffon Cakes. Here, I was trying to see if I could improvise by making the waves and rainbow layers 50-50. Maybe the effect is not as nice, but I will continue to think about it and improve haha! I used the same base recipe as my Rainbow Tiedye Vanilla Chiffon but changed the configuration of the batter as mentioned above, i.e. spoon the pink batter in waves, fill with cream batter, and layer with blue and purple. The picture tutorial for 'waves' and 'rainbow layer chiffon' is found in Creative baking: Chiffon Cakes.

I have made a few Tsum Tsum previously too, joining two bowl cakes with a 4-inch chiffon cake in between (for picture for the molds, see my previous Donald/Daisy Tsum Tsum). I used melted marshmallows to glue everything together, including the letters cut out from chiffon cake!

Hope you will like this sweet creation too! <3

With lots of love,
Susanne


Here's the cover for
Creative baking: Chiffon Cakes (Chiffon book 1)
mentioned above


has just been restocked at Popular.


Read More »

Thursday, 14 July 2016

Elsa and Olaf Macarons with Whipped Earl Grey White Chocolate Ganache

I had a last minute request for Elsa and Olaf macarons from my friend that just managed to squeeze in the night before my planned macaron mania. For those of you who know how I work, I usually work on a couple to a few orders at the same time when I plan to bake macaron shells (although decoration and assembly work take place at different times).  Sometimes I am able to accomodate last minute requests to ride on existing planned bake if the requested quantity is small. The good news is some people are happy that they managed to place an order. The not so good news is it's quite a rush job to plan for the unplanned. Because of that, sometimes I make boo-boos while baking and it happened here. Thankfully it still turned out well thanks to the forgiving nature of Italian method. I shall tell you what happened during the process and it may convince you to switch from French to Italian :p.


Looking at these, you won't suspect that I made a booboo! I made Elsa and Olaf macarons at the same time as the elephants and Minnie Mouse ribbons.

I used the reduced sugar macaron shell recipe for these but you may use the regular recipe without sugar reduction too. Please refer to my Creative Baking: Macarons book and video tutorials for the basics and piping of complex shapes. Just to share the piping process...

First I piped the base with a fairly large-tipped piping tip (6-7mm diameter). Bang tray on table to release trapped air.


Let the base shells partially dry before piping on the pop-up features. Waiting time can be anywhere from 15-30 minutes. Use your finger as a gauge instead of drying time. The shells should feel sticky but the batter should not stick to your finger. Pipe the hair and hands of Olaf with a 2mm piping tip. Add on his snout using a 4-5mm tip and use a toothpick to pull the batter in place. Pipe Elsa's nose and ears with a 2mm piping tip. Pipe alternate segments of her hair with a 3mm piping tip and use a toothpick wherever necessary. Pipe the base shell of Elsa with 6-7mm tip. Remember to bang the tray again.


After piping the above tray, I happily used up ALL the yellow batter for the yellow elephants. I looked at the Elsa and Olaf tray again and slapped my forehead. With no more yellow batter left in the piping bag but an extra elephant piped, I had no choice but to use a small spatula to scoop up some yellow batter on the baking tray from one elephant and the base shells of the Elsas and put it back into the piping bag. I re-piped the base shells and added on the extra bits of hair on Elsa.

Finally piped finished!

Let the shells dry. Bake at preheated oven for 10 minutes for 140°C at lowest rack, followed by 130°C for 7-8 minutes. If the feet still appear wet, reduce temperature to 110-120°C and bake for another 5 minutes or until feet appear dry.

Freshly baked shells!

I used royal icing to add in the features and a little black gel dissolved in vodka to make a grey paint to highlight the pop up features. This highlight is subtle and serves to accentuate the pop-up features like Elsa's hair and Olaf's snout. Fine black edible marker was used for Elsa's eyebrows. A little dusky pink lustre dust was used for the eyeshadow and peach lustre dust for the cheeks. Elsa's crown was piped on a baking sheet with the crown template underneath, oven dried before transferring onto her head.


I filled the shells with whipped Earl Grey white chocolate ganache as requested.


With love,
Phay Shing


Read More »

Friday, 20 May 2016

Donald and Daisy Tsum Tsum Rainbow Stripes Chiffon Cake


I made this Donald and Daisy Tsum Tsum for an old school friend! It was one of my last cakes before my month long break to prepare for chiffon cakes for photoshoots for the new cookbook Deco Chiffon Cakes.

The recipe for the Rainbow Stripes Tiedye Vanilla Chiffon Cake is here.

Here I used a round 9-inch tube pan. So I scaled the recipe 'divided by 5 times 8'. Baking time as follows: 160°C for 15 min, 150°C for 10 min, 140°C for 20 min, then 130°C for 15+ min, or until skewer comes clean. The temperature gradient is to prevent browning.

The Tsum Tsum is made the same as as my Rainbow Pooh Piglet Tsum Tsum. I used two 4-inch Iwaki glass bowls (picture below) to sandwich a chiffon cake from a 4-inch tube pan (you know those super mini cute ones in baking shops). The beak was cut from cake pops and I baked a charcoal chiffon sheet cake to cut out the facial features. Rosy cheeks from Americolour pink food marker.


Thankful cake was well-received and the little girls were so happy and cute!

With lots of love,
Susanne

Read More »

Sunday, 17 April 2016

'Pooh Piglet Tsum Tsum' Rainbow Chiffon Cake


I finally did what I thought was impossible to stack a Tsum Tsum! I don’t think I would have tried it again after the previous lesson, if not that my friend was really persistent about it =p. Having learnt from my lesson and gained more experience, I tried an architecturally more sound design, making the top Tsum Tsum smaller, the full body to support and only having two to try (don’t think it can go any higher without squashing the base cake!). But still it was very experimental and nerve wracking… I’m really thankful it worked out!

It’s also my first time baking a Rainbow Chiffon Cake in a 10-inch (25-cm) chiffon tube pan. The Rainbow Chiffon is now the cover of Creative baking: Chiffon Cakes and its 7-inch (18-cm) recipe shared on Pg 65. For the 10-inch pan, I used a 10 egg recipe, multiplying all ingredients by two. Usually egg whites are rounded to the nearest egg white.


To make the body of the Tsum Tsum, I combined chiffon cake baked from two bowl cakes, with a normal chiffon cake in tube pan corresponding to the diameter of the bowls for the middle. Eg. for the pooh, I used 4-inch bowls with 4-inch chiffon tube pan. These were glued together using melted marshmallow cream (sprinkle some water and pop marshmallows into a microwave). You will still need dowel support in the Tsum Tsum to ensure everything doesn’t fall apart. All other details are made from chiffon cake baked as sheets on layer trays and glued on using marshmallow cream.

Really thank God I pulled this off and everything was well–received!

With lots of love,
Susanne
IG: @Susanne.DecoChiffon


Read More »

Monday, 29 February 2016

Tsum Tsum Chip and Dale Earl Grey Macarons

I was making a batch of Earl grey cocoa cross shaped macaron shells as one of the items for the dessert table for an event. I couldn't resist the chance to use some of the batter to make these for my kids who have been badgering me to make something Earl grey flavoured for them!


I made only 3 of each but will type out the recipe as if it were for a bigger batch.

Do checkout my Creative Baking: Macarons book as it brings you through the basics to the various techniques required for creating complex shaped macarons!


Recipe for Chip n Dale macaron shells
Ingredients (makes about 40-45 macarons):
200g almond meal (preferably superfine)
200g icing sugar
200g caster sugar
160g egg whites, divide into two equal portions (aging is not necessary but I do it to save time separating eggs on actual day of baking)
75ml water

Colouring and flavouring**:
Beige: 2g Earl grey powder + tiny drop of yellow gel food colouring
Brown: 1g Dutch processed cocoa powder + 2g Earl grey powder + yellow and orange gel food colouring
Dark brown: 5g Dutch processed cocoa powder + pinch of charcoal powder + orange and yellow gel food colouring.

** replace with gel food colouring or more cocoa powder if Earl grey powder is unavailable

Steps:
1. Prepare baking trays with Chip n Dale template under baking paper. Stick the corners of baking paper with Italian meringue when you have made the meringue.

2. Make the mass. Sift almond and icing sugar together in a large mixing bowl. Add 80g egg whites and mix well to form a thick paste. Divide the paste into 3 equal parts. Add food colouring/ flavouring until desired shade is obtained.

3. Prepare the Italian meringue. Boil caster sugar and water in a small saucepan until 115°C. Use a candy thermometer to monitor the temperature. In the mean time, beat the rest of the egg whites in a clean metal bowl at medium low speed until soft peaks form. Do not beat past this stage. Reduce mixer speed if necessary. Once temperature of syrup is reached, remove from heat, turn up mixer speed to medium high speed and carefully pour syrup into egg whites, avoiding the beaters. Continue beating for another 10 minutes until cool, stiff and glossy. Divide the Italian meringue into three equal portions.

4. Macaronage. Fold the Italian meringue into the mass in two additions until the consistency is like slow-moving lava. The first addition is about a third of the meringue. You may refer to this post for video tutorials of the macaron basics.

5. Transfer the batter into piping bags fitted with round piping tips of appropriate sizes. Use a toothpick to nudge the batter into place where necessary. You may refer to this post for video tutorials on how to pipe complex shaped macarons. Bang the tray hard on the table top a few times to release trapped air bubbles.

Piping out in stages!

6. Let the shells dry under a fan or in an air-conditioned room until no longer sticky to touch. About 1-2 hours, depending on humidity. Preheat oven to 140°C towards end of drying time. Set oven rack to lowest position.

7. Bake for 17-20 minutes, rotating the tray halfway through baking. If the feet of the shells still appear wet, bake for another 5 minutes at 115°C. Cool completely before peeling the baking sheet away from the shells.

Freshly baked and starting to decorate with royal icing, edible marker and lustre dust! Yes I was baking some bears concurrently as well!


Recipe for whipped Earl grey white chocolate ganache

I chose to use a ratio of 3:1 for white chocolate : cream + butter for a firm ganache. You may play around with this ratio or replace the butter with cream if you want a softer ganache.

Ingredients (fills approximately 40 macarons):
180g white chocolate, chopped
45g heavy cream
15g unsalted butter, cut into small pieces
1.5-2 tbs Earl grey tea powder*
1/4 tsp fine sea salt
1/4 tsp vanilla bean paste

* you may infuse 3 Earl grey tea bags in hot heavy cream if you are unable to obtain Earl grey tea powder. Prepare about 60g of cream instead and steep teabags in hot cream for 5 minutes. Squeeze out the bags and measure out 45g of Earl grey infused cream.

Steps:
1. Place chopped white chocolate and butter in a microwave safe bowl and melt using medium power in 10-20 seconds heating cycles, stirring well in between.

2. Place cream in small saucepan and heat over low heat until it starts to bubble. Remove from heat and pour over melted chocolate.

3. Use a spatula or whisk to mix the cream into the melted chocolate, stirring in one direction until well combined.


4. Gradually add sifted tea powder and mix well. Add salt and vanilla and mix well. Adjust amount of tea powder according to taste.


5. Chill the ganache for about 10 minutes in the fridge. Use an electric mixer, hand whisk or spatula to whip the chilled ganache for a couple of minutes until texture lightens up. If you prefer a denser filling, you may skip this step and use the ganache once it firms up to toothpaste consistency after sitting at room temperature for half an hour to an hour.

Whipped Earl Grey White Chocolate ganache! 

6. Transfer to piping bag and pipe onto shells.


 Sandwich the shells and refrigerate for half an hour or overnight. This ganache is firm enough to leave the macarons in cool air-conditioned room temperature for a few days. Perfect as gifts :). If you are storing them in the fridge, leave them out at room temperature for 15 minutes before serving or the ganache will be too firm to eat.

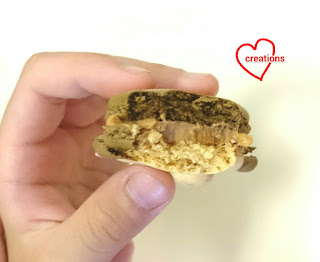
Take a peek at the insides! I only get to take these photos when my kids eat the macarons! Excuse the blur image. My kid's hand was shaking. Can't wait to eat the macarons!

Yums!

Strong flavour without being too sweet! The Earl grey makes the whole package fragrant but less sweet. I made this filling because I have the privilege of making some macarons for the staff of Marshall Cavendish and Earl grey flavour was requested. They were very well received so do give this recipe a try if you are looking at not-so-sweet macarons that need to stay out of the fridge for a few days.

With lots of love,
Phay Shing


Read More »

Sunday, 8 November 2015

Baby 'My Melody' Vanilla Chiffon Cake


Making this sweet cake made me really happy because the Baby My Melody is so sweet!

The cream light yellow base chiffon cake below is a 9-inch Vanilla Chiffon Cake. My friend said it was super yummy! As I was afraid the base chiffon cake colour would clash with the Melody (also cream colour), the base chiffon cake is not a reduced egg yolk version, and I added a few drops of natural Queen’s turmeric-based coloring to give it a tinge of sweet pale yellow. 

Vanilla Chiffon Cake (9-inch chiffon tin)
7 egg yolks
47g sugar
89g vegetable oil
97ml water
140g cake flour
12 ml vanilla extract

9 egg whites
105g sugar
1/4 tsp cream of tartar

1. Preheat oven to 160°C. Prepare a tray of water at the bottom of the oven (I used the lowest rack to bake the cake). *You may omit steam baking; I like to use it to control my oven temperature rise.
2. Beat egg yolks with sugar with whisk till pale yellow before stirring in oil, water and vanilla extract.
3. Add in sieved flour and whisk till no trace of flour found.
4. Meringue: Beat the egg whites with ¼ tsp cream of tartar till stiff peak, mixing in caster sugar in 2 additions.
5. Fold in the meringue gently into the batter 1/3 at a time.
6. Pour the batter into the chiffon tin from a height.
7. Gently tap the tin on table 3x to remove air bubbles
8. Bake the chiffon cake for 15 min at 160°C and then at 150°C for 10 mins and 140°C for 20 min, then 130°C for 15 min.
9. Invert immediately once out of the oven to cool
10. Unmould by hand after the cake is cool. Gently pull the cake from the sides of the tin at each angle and push the removable base up to unmould the sides. To unmould the cake from the base, gently lift up the cake from the base using hands, repeating this at each angle before turning the base over (see 'Hand Unmoulding Chiffon Cakes for a Smooth Finishing' video tutorial).

The pink My Melody is made by prepiping the white vanilla chiffon batter in a bowl, and then baking strawberry batter over it (similar to Hedgehog but replacing the cocoa powder with few drops of strawberry paste). The ears were cut out from strawberry chiffon similarly. The body required additional small round bowl cake and 4 cake pops (for limbs) using the same vanilla chiffon cake recipe.

Happy belated birthday to Renae!

With love,
Susanne

Read More »

Monday, 21 September 2015

Hiro Raspberry White Chocolate Macarons (Tsum Tsum series part 5)

This is the last in the series of Tsum Tsum macaron bake! Finally! Here are some Hiro macarons with raspberry white chocolate filling amongst the rest of my Tsum Tsum bakes!


These macarons do not need refrigeration.

You may refer to this recipe for the basic batter and steps, and my newly made macaron video tutorials just in case you need more visuals :).  Just some points to note...

Use a Wilton #12 tip to pipe on the purple shell. Use a Wilton #3 tip to pipe on the thin purple part. Bang the tray on table before resting for 15 minutes. Pipe in the beige part with a Wilton #10 tip. Bang tray on table before drying the shells for 1-2h in air-con room or until dry to touch.

Freshly piped shells

Bake at 130-140°C for 17-20minutes, rotating the tray halfway through baking. Bake at 120°C for 5 minutes more if still not dry and check again.

Freshly baked shells!

Prepare some royal icing to add on the face.


Filling the shells!

Here's the whole collection of the macarons I made in a batch! Well... Almost. There's still an extra Rilakkuma, a few bears and basic shapes not included in the picture. I froze the bear shells for future work. Otherwise it's too much work for me in a single sitting!

Macaron mania!

Thank God that these macarons were very well received!

With love,
Phay Shing

Read More »

Wednesday, 9 September 2015

Cinnamaroll & Tuxedo Sam Earl Grey White Chocolate Macarons (Tsum Tsum series part 4)

This is the fourth in the series of Tsum Tsum macaron bake! Tsum Tsum Tuxedo Sam and Cinnamaroll Earl grey white chocolate macarons!

Looking cute in little hats!

These macarons do not need refrigeration.

You may refer to this recipe for the basic batter and steps, and my newly made macaron video tutorials just in case you need more visuals :).  Just some points to note...

Pipe the head, bang the tray hard on the table and rest for 15 minutes in air-conditioning room before piping in the ears for Cinnamaroll and hands for Tuxedo Sam. In my muddle with so many different types of macarons to pipe, I forgot to take photos of Tuxedo Sam shell freshly piped.

Cinnamaroll head!

Make sure shells are dry to touch and you are able to run a finger across the shells. Bake at 140°C for 10 minutes, rotate the tray and bake for another 6-10 minutes at 130°C. Bake at 120°C for another 5 minutes if the shells are still stuck to baking sheet and check again.

Freshly baked!

Prepare some royal icing and pipe the hats on using the same templates as the shells. Thoroughly dry the icing before attempting to remove. Oven dry at 60°C with fan mode.

Little hats!

Use royal icing to add in the details and stick the hats on using a small dollop of royal icing. Brush on some peach coloured lustre dust for the rosy cheeks.

Freshly iced!

These were filled with Earl Grey White Chocolate.

Yums!

With love,
Phay Shing
Read More »