Showing posts with label Blackforest. Show all posts

Wednesday, 10 November 2021

Blackforest Choux Pastry (with bonus cute doggy version!)

Due to the ongoing Covid situation, we are still unable to have an in-person session for our Culinary Arts Ministry event by Adam Road Presbyterian Church. So I prepared a full-length video tutorial on how to make these elegant blackforest choux pastries, with a cutesy option as well! 

Elegant version complete with gold dust for added posh! 

Cutesy doggy version with exact same fillings but different presentation! 

Here's a peek at the delectable filling that goes into each pastry! 


Below is a screenshot of the video tutorial for an explanation of what filling/topping goes into each pastry. 


I tried my best to include the essence of the classic blackforest cake into choux pastry. But everyone has their own preference so feel free to adjust amount of certain ingredients when I make mention of it where appropriate. Certain things like ratio of key ingredients shouldn't be messed around with (may cause a failure if you adjust too much) but where fillings are concerned, feel free to adjust according to taste. 

Some of you may want to prepare ingredients in advance, ahead of the event, so here are the list of ingredients for the respective components. 

Chocolate craquelin is a high butter content cookie dough that gives the pastry a wonderful crunch and helps it to puff up nicely and evenly during baking. 


I chose to flavour the pastry case as well with Valrhona cocoa powder. If making plain cases, replace cocoa powder with flour. 


Special notes for filling ingredients:

-Choose the type of whipping cream you prefer according to taste and technical ability. I explained this in detail in the video tutorial. In summary, there is a trade-off between stability/ease of handling and taste. You may use dairy, non-dairy or a combination of both. 

- Use cherries that are best tasting. You may use canned cherries if fresh cherries aren't in season. Amount of sugar may be adjusted according to how sweet /sour your cherries are. I recommend using Morello or Maraschino cherries with no red colouring added if possible. 

- You don't have to buy cherry jam if you have richly flavoured syrup from canned cherries. I reduced the canned cherry syrup to remove water content and to intensify the cherry flavour.

- I demonstrated the non-alcoholic version. If you like your blackforest boozy, feel free to add Kirsch. 

Here's a pretty view of freshy baked chocolate choux au craquelin! 


Without further ado, this is the video link to the event with full length video tutorial and an evangelistic sharing! Do note that the video will be available only at and after the event date on 28 Nov 2021 at 2pm.


With love, 

Phay Shing

Read More »

Friday, 30 August 2019

Dairy-Free Blackforest Chiffon Cake

My friend sent me a picture of her daughter lying on a field and reading, and asked if I could make something like that for her daughter's birthday. I thought long and hard about the various genres of bakes I could use to make this and finally settled on chiffon cake since I think it is the best medium for this theme. It is the first time I made a full-bodied human figurine so I am glad it came out quite decently! Presenting my chiffon creation on top of a dairy-free naked blackforest cake!


Instead of cooked dough method for making chocolate chiffon, I tried doing it the regular chiffon way but bloomed the cocoa powder in boiling water instead of sifting together with cake flour. Blooming cocoa powder for bakes helps to intensify the chocolate flavour. I baked three 9" round layers. My friend's kids are allergic to dairy at some degree so the whole bake had to be dairy free.

Recipe for dairy-free chocolate chiffon cake
Ingredients (makes three 9" layers):
Egg yolk batter 
9 egg yolks
95g cake flour
50g Dutch processed (alkalized) cocoa powder
1/2 tsp baking soda
1/4 tsp salt
102g canola/vegetable oil
108g boiling water
2.5 tsp vanilla extract
1 tsp Kahlua coffee liqueur

Meringue
9 egg whites
1/2 tsp cream of tartar
150g caster sugar

Note: divide the meringue ingredients into three to bake the layers individually unless you are able to bake all three at once.

Steps :
1. Dissolve cocoa powder in boiling water in a small mixing bowl. Cover with cling wrap and leave to cool. Preheat oven to 150°C, set oven rack to second lowest position. Line bottom of baking tray with parchment paper.

2. Prepare egg yolk batter. In a large mixing bowl, whisk egg yolks until thicker in consistency and paler in appearance. Add oil and whisk until we'll combined. Add cocoa and water mixture and whisk until combined. Add vanilla and coffee liqueur and whisk until combined. Gradually sift in flour and salt and whisk until no trace of flour is seen. Divide the batter into three equal portions if baking one layer at a time.

3. Prepare meringue. In a clean metal bowl, beat egg whites with cream of tartar until firm peaks or just reach stiff peaks while gradually adding in castor sugar once the egg whites are foamy.

4. Quickly but gently fold the meringue into the egg yolk batter in three additions. Pour batter into prepared baking tray. Gently run a chopstick around the batter to pop any air bubbles.

5. Bake for 10 minutes. Reduce temperature to 135°C and bake for another 30-35min or until top of the cake springs back when lightly pressed and a skewer comes out clean. Cool for 5 minutes before unmoulding by hand or gently using a spatula. Cool on cooling rack with a other parchment paper over it. Not that baking time and temperature varies from oven to oven so adjust accordingly.

I assembled the cake using non-dairy whipping cream and cherries. I brushed the surface of the cake with simple syrup (1:1 ratio of sugar and water) before putting on the cream.

Using acetate sheet to surround the cake helps with neat assembly. 

I covered the naked blackforest cake with a thin layer of chiffon sheet cake before mounting the figurine on top. The most challenging part of the figurine was figuring out how to make the arms holding a book as it is a little gravity defying. I made the book out of bean paste dough as I thought bean paste is more suitable for the look of a book. I bought the recipe from a talented baking friend so am unable to share the exact recipe but you may refer to this post for my experience of making the dough. It is like fondant except that it is a lot less sweet and tastes like bean flavoured mochi. The figurine is made of dairy free vanilla chiffon sponge. I used a combination of thin sheets of chiffons and chiffon baked in small moulds to create the figurine.

Here is a peek at the works in progress state of the figurine. Looks a little spooky 😂

Thank God I managed to pull it off!

With love,
Phay Shing

Read More »

Friday, 25 January 2019

'Family Picnic' Cherry Macarons on Blackforest Cake

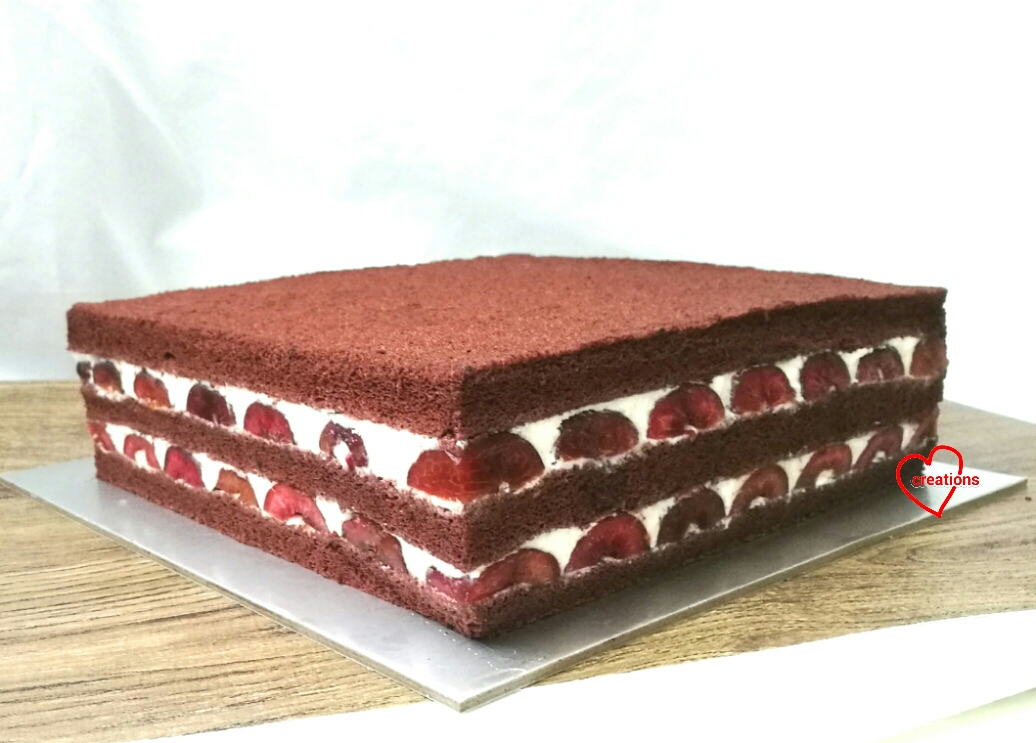
My friend requested for a birthday bake for her mum that is personalized and special for her family...A family picnic scene on top of a blackforest cake!


I was not given reference pictures for a caricature of the family members and it's beyond my skill to design my own. And so I got a talented artist (@ryaccoon, Instagram account) to design the picnic scene and invidividual characters. I made the macaron template based on the drawings but with some minor modifications based on my friend's feedback and the number of coloured batter I could cope with.

I am usually quite nervous about working with fresh dairy creamed cakes that are under a macaron structure as Singapore's weather is really warm. Pure dairy cream doesn't hold up well although it tastes delicious. I usually use gelatin or white chocolate as a stabilizer but never both of them together. I tried using both this time round as an experiment. The cream still tastes of fresh cream although it's richer and slightly sweeter than if I use icing sugar and gelatin but it's a lot more stable and easy to work with! Usually my pure dairy whipped cream stabilized with gelatin and sweetened with icing sugar will melt into a puddle within 30 min of being left out on my kitchen counter. But this cream held it's shape after being left out on the counter for an hour!  I will share this recipe later in this post. But first let me share some photos of the process...

I used the swiss meringue method with egg white split into two batches. Reason being, it's easier to work with many colours that way as I can colour the almond paste portion before meringue is added in.

Piping out the human figures and picnic basket. My friend requested for the grandpa not to be bald so I had to patch that post-baking 😂

It was quite a mad bake trying to cope with other designs concurrently. These are only some of the shells I baked that day!

Fully decorated macaron shells. Decoration is done with combination of edible markers and gel food colouring made into paint. By diluting it with a little vodka.

I filled the macarons with cherry white chocolate buttercream.

A little too generous with the jam for the picnic mat! I wouldn't recommend it unless you are topping up with more buttercream to cover the jam spots as it would wet the upper shell rather quickly.

I added some royal icing grass to finish off the picnic scene.

I used the yummy chocolate chiffon sponge recipe from the blackforest logcake I made last year soo you may refer to that. I upsized the recipe to a 6 egg white recipe for baking three 9x9" square cakes.

I am always on the lookout for creating a fresh cream tasting filling that is more stable in Singapore's hot weather. This time round, I am trying not to resort to adding non-dairy cream which already has some stabilizers added. I didn't want to end up with so many half-used cartons of cream 😂. I stumbled across one such recipe that I thought I could adapt. It uses both gelatin and white chocolate as stabilizers for dairy cream, instead of simply just gelatin or white chocolate. I didn't have double cream (which as higher fat percentage (45%) than heavy cream (35%)) at the moment so I used a little unsalted butter to increase the fat content, which in turn makes the filling more stable too.

Stabilized dairy whipped cream recipe (richer version)
Ingredients:
400g whipping cream/double cream
20g unsalted butter (replace with double cream if using double cream)
1 and 1/4 tsp gelatin powder
20g cold water
110g white chocolate, chopped or use chips
A pinch of salt
1.5 tsp vanilla extract or bean paste

Steps:
1. Put water in a small microwave safe bowl. Scatter gelatin powder over and let it sit for 10 minutes at room temperature.

2. Place the rest of the ingredients in a heatproof bowl and set it over a saucepan of water without the water touching the base of the bowl. Bring the water in the saucepan to a gentle simmer while stirring the mixture in the bowl. Melt everything together until smooth. Remove from heat.

3. Microwave the bloomed gelatin at medium power for 10 seconds and stir, making sure it is totally dissolved. Add melted gelatin into white chocolate and cream mixture and mix well.

4. Cover bowl with cling wrap and chill in fridge for at least 4h or overnight.

5. Whip at low speed with electric mixer until stiff peaks. Be careful not to overbeat. Do this step only when you are about to assemble the cake.

Assembly
1. Cut about 30-40 cherries into halves and remove the seeds. Dry with paper towel so excess juice doesn't seep out and mess up the cream when you slice it.

2. Prepare stabilized whipped cream. Add a little cream on cake board before putting first layer of chocolate sponge cake on.

3. Brush on some liquid from the cherry jam. Use a spatula to apply a thin layer of cream before lining the sides with cut cherries. I filled the middle of the square with fresh cherries and the homemade cherry jam.


Cover the cherries with more cream. Just enough cream to cover will do.

4. Carefully place another sponge cake on top. Repeat step 3 and then place the final layer of sponge on top.


5. Use a spatula to apply a little cream on the sides and smooth it out. This is to fill any air gaps around the edges.


6. If you happen to like this rustic look, you may leave the cake as it is. If you want to show the sliced cherry view, cover the cake with cling wrap and freeze for 2 hours. Use a long serrated knife to slice about 1cm off each side of the cake. I heat the knife over a flame and clean the blade after each cut to help ensure a cleaner cut. I wish I had a longer knife though 😆. It would have been even neater if I had one.
Cake with trimmed edges

If you are serving the blackforest cake as it is without fancy deco, you may want to add a little more stabilized cream on top in dollops with fresh whole cherries and a light sprinkle of chocolate rasps. At least that's what I would have done for a naked version of plain blackforest cake 😊.

Remember to keep the cake chilled in fridge until it is time to serve. I can assure you it is delicious 😋! Best served a day or two after assembly but it's good for a few days. If you prefer a lighter, less rich cream, you may use the stabilized whipped cream recipe from this post but double the amount of gelatin used to make it more stable.

A tip about macaron cake toppers on naked or semi naked cakes. Always store them separately as the moisture from the sponge cake will turn the macarons soggy quickly. If you need to make a cake with the macarons left on it during storage, you need to frost the whole cake with cream to create a barrier between exposed sponge and macarons.

With love,
Phay Shing
Read More »

Thursday, 20 December 2018

Blackforest Log Cake II

Ever since I started baking seriously, I have been baking the cake for my extended family's Christmas gathering. I planned to make a blackforest log cake this year as I made an awesome one last year for someone else. You may read the detailed recipe and assembly steps in this post. As always, I make the cake nativity themed as that's what Christmas is really about -- God’s love shown for our fallen world through the birth of our Lord Jesus!

The signboard is filled with dark chocolate ganache and homemade cherry jam!

Bear with me as this is a rather long post with many parts to the log cake. The focus of what I want to share in detail is the new chocolate sponge recipe but with many short tidbits of the whole process of other components. I used the cooked dough method instead of the regular method of making chiffon sponge.


I must admit that the design idea came at the last minute because I have been busy with book writing. I was wondering what design I can do within a short period of time that is navitiy scene themed. Thank  God I was inspired by what I saw in the church's bulletin one weekend! Silhouette of the nativity scene! I was gambling on the fact that I could pull this off with freehand drawing of course. Thank God I managed it!

I used a variation of Audrey Goh's Swiss method recipe to make the signboard along with the reindeer macarons. You can read about it in my previous macaron post.

Piping the signboard macarons shells. Yes I made extras just in case my freehand drawing needed practice...

...Indeed I needed practice! I ran into issues with writing the words for my first attempt so the second word ended up looking squashed at the end. Making a template would have made it more professional but I was in a hurry. Each attempt took less than half an hour to complete.

You may think that I am a great artist...But I don't think I am. Silhouettes are deceptively easy to draw compared to drawings with full features as they have a larger margin for error. How do I go about drawing this then? The trick is to choose your reference points wisely. I began by writing the words near the bottom of the rectangular frame. Next I drew the base of the manger, followed by baby Jesus. Then I drew Mary from bottom up, then Joseph from bottom up and finally the star. Going by this order ensures that the various parts have the right proportions and are positioned correctly.

Checkout how full the shells are with this method! I hardly rested the shells. I let the piped batter dry in the oven at 100℃ with fan mode on for 3 min with the oven door open slightly. I closed the oven door, switched off the fan mode and ramped up the temperature to 130℃ and baked until feel no longer appears wet.

I kept one of the Christmas bears from a previous bake (frozen for a few weeks) and used some of the pandan coconut Christmas tree macarons I prepared as display pieces for my upcoming junior chef baking class to add on to the deco.

I managed to find some sprinkles that look like mini baubles!

I chose the cooked dough method to make the chocolate sponge as blooming the cocoa powder in hot liquid allows the chocolate flavour to come through more strongly. Cooked dough method also allows the flour to absorb more liquid, making the cake naturally more moist and soft. That's why I revised my recipe to include an extra whole egg to make a more moist and rich cake, and used a different method.

You may prepare the cherry jam and dark chocolate ganache ahead of time before baking the sponge cake. Chill the whipping cream overnight in the mixing bowl together with icing sugar as well so that it whips up more easily when you are ready to assemble the cake as the sponge takes less than 15 minutes to bake. You may refer to my previous blackforest log cake post  for the recipe of the cherry jam, stabilized whipped cream and dark chocolate ganache. I made minor changes to the filling for this year's log cake. I used red wine instead of Choya to cook the cherry jam. I bloomed 2 tsp of gelatin in 2 tbs of milk instead of using 1 tsp of gelatin in 1 tbs of milk as I wanted to make a more stable cream. I used 1 tsp of vanilla extract instead of 1/2 tsp for the cream. You may stick to the original recipe if the log cake is going to be served in a cooler place.

Cooked dough chocolate chiffon sponge cake
Ingredients (makes one 12x12" cake):
3 egg yolks
1 egg
42g cake flour
22g Dutch processed cocoa powder
1/4 tsp baking soda
1/8 tsp salt
45g vegetable oil/ canola oil
47g fresh milk
1 tsp vanilla extract
1/2 tsp Kahlua coffee liqueur (optional)

4 egg whites
1/4 tsp cream of tartar
65g caster sugar

Steps:
1. Sift flour, cocoa powder, baking soda and salt in a large mixing bowl. Set aside. Place egg and egg yolks in a small bowl. Set aside. Line the tray with parchment paper. Preheat oven to 170℃, set oven rack to second lowest position.

2. Heat milk and oil in a small saucepan until it just starts to bubble. Remove from heat and pour into flour mixture. Quickly mix well. A soft dough should form. Set aside to cool for a few minutes.

3. Add one egg yolk or egg at a time and mix well between each addition. Add vanilla and coffee liqueur and mix well. A batter that is able to flow should be formed at this point in time.

4. Make the meringue. In a clean metal bowl, beat egg whites with cream of tartar until firm peaks form, gradually adding sugar once the egg whites are foamy.

5. Fold the meringue into the batter a third at a time. Fold quickly but gently until no trace of meringue is seen.

6. Pour batter into baking tray and smooth out the top of batter with spatula. Gently tap on table to release trapped air bubbles. Bake for 12-14 minutes.

7. Immediately flip the cake out of baking tray and roll it up with parchment paper to cool.

You may refer to my previous blackforest log cake post for assembly instructions. Just to share some photos of the assembly this time round...

Rolled up Swiss roll. Checkout the fine texture of the sponge! The cake is indeed denser but soft and moist! Hubby who doesn't like cake in general (because most are too fluffy and dry) said this is really good!

Coating with dark chocolate ganache. I whipped the ganache this time so it appears lighter coloured 

After drawing the bark markings with a fork, the cake is done!

You may dust with sifted icing sugar if you wish, and add on decorations.

If you are a fan of blackforest cake, do give this a try. I am sure you will love it!

With lots of love,
Phay Shing


Read More »

Monday, 17 December 2018

Reindeer and Christmas Bear Cherry Dark Chocolate Macarons (Swiss method)

I have been focusing on book writing and classes during the month of December and just remembered that the logcake I am making for my extended family may need some decorations. The reindeers came about as an impromptu bake because what I planned to do for logcake deco only required one large macaron and I had leftover batter to play with. The Christmas bears came about because I had leftover batter from making some bear macarons in November. Back then, I baked the bears and froze the extra macaron shells. Despite the last minute-ness of it all, I had my dose of cute overload 😊.


As mentioned in my previous macaron post, raving about how good the Swiss method recipe was, I decided to try the experiment as promised. I used all the egg whites to make the Swiss meringue, instead of keeping a portion of it to mix with almond and icing sugar to form a paste. What's the verdict? It takes many more folds to get to the correct batter consistency. The piped batter dries a lot faster. The batter is not as silky smooth although that could be due to my macaronage. But you are still able to get nice and full shells too. Having tried both with and without splitting the egg white portion, I think I personally prefer splitting the egg white portion for the smoother batter and ease of making many colours from one batter portion.

You may refer to my earlier Swiss method post for the detailed recipe and steps. Just use all the 77g (75ml) of egg whites to make the Swiss meringue. Add the sifted almond and icing sugar to the meringue in two batches and fold until batter is at the right consistency. Just to share some photos...

Piped shells for reindeer. I added 1 tsp of cocoa powder to the dry ingredients and one generous dollop of orange and one generous dollop of yellow food colouring to the meringue after its been beaten to firm peak. I portioned out a little of the underfolded batter to add a little more cocoa powder for the antlers and folded both light and dark brown batters until they reach lava consistency.  

See how full the interior is! 

I used royal icing and edible marker to add in the details on the baked shells.

I made cherry jam in preparation for the logcake so I thought of using some for filling the macarons. Instead of Choya, I used red wine. You may refer to this post for the dark chocolate ganache and cherry jam recipe.

Homemade cherry jam!

I have no idea how to take a photo of the filling on the macaron shell that will do it justice...Rich dark chocolate ganache with juicy cherry bits cooked in red wine. Yums!


I hope these cutesies put a smile on your face as they did to mine 😊

With love,
Phay Shing
Read More »

Sunday, 22 July 2018

'Miffy with Rainbow Scarf' Blackforest Macarons

My friend requested for a few Miffy macaron cake toppers for her daughter's birthday as the celebrations span over a couple of weeks. I made Miffys with rainbow scarves as requested :)

The round macs with little Miffy heads were made with extra batter.

I usually prefer the Italian method for making character macarons as it is easier to adjust the colouring. But because this batch is so small, I decided to use French method. The recipe is a little different from what I normally use as I would like to keep the white colour on the shell whiter without adding too much white colouring. I replaced 20% of almond with rice flour and a bit of cornflour. You may replace the rice flour with almond in the recipe below if you find it too troublesome to include another ingredient.

You may refer to my video tutorial for the basics of French method over here.

Recipe for Miffy macaron shells
Ingredients (makes about 12 macarons):
Powdered ingredients
40g superfine almond flour
10g rice flour
1/8 tsp cornflour
1/8 tsp salt
50g icing sugar

Food colouring
1/8 white powder food colouring
Orange gel food colouring

Meringue
40g egg whites
36g castor sugar
1/8 tsp cream of tartar (optional)

Steps:
1. Sift together all powdered ingredients. Divide into two equal portions. Add white powder into one portion.

2. In a clean metal bowl, beat egg whites with cream of tartar until stiff peaks form, gradually adding sugar. Divide into two equal portions. Add orange food colouring to one portion.

3. Add half of sifted ingredients into meringue for the respective colours. And gently fold in. Add the second half of the powdered ingredients and gently fold until combined. Deflate the batter with spatula against sides of bowl until consistency is like lava (please see video tutorial).

4. Transfer both coloured batter into piping bags fitted with a Wilton #7 round tip. Pipe the Miffys!


5. Bang the tray on the table to release trapped air. I piped the parts in stages to create some definition between boundaries. Dry in air-con room or under a fan until surface is dry to touch.

6. Towards end of drying time, preheat oven to 150℃ and set the rack to lowest position. Bake 7 min and reduce temperature to 110℃. The oven temperature will gradually fall. Bake for another 15-20 minutes or until feet doesn't appear wet. Cool completely on tray before peeling parchment paper away from macaron shells.

I drew the eyes and mouth with black edible marker and iced the rainbow scarf with royal icing.

All decorated!

I made my own cherry jam. You may refer to this post for the recipe but blend the pitted cherries before cooking the jam as this is for macaron filling, unless you prefer chunky cherry pieces in your macarons

Jam in piping bag, ready to fill!

I made a rather firm dark chocolate ganache as the full body Miffys are supposed to be cake toppers. You don't want the macaron shells to start sliding halfway through display. You may refer to this recipe for the dark chocolate ganache but reduce the amount of cream to 25g.

Filling the Miffys!

You may include some stabilized whipped dairy cream into the filling to make it truly a blackforest macaron. It will definitely be really delicious! I was making the Miffys mainly as cake toppers so I had to make sure that overall the filling is still firm enough so I didn't include the cream.

As it was, these were really well received in looks and taste according to my friend :).

Stay tuned for my next blog post with one of the Miffys on top of a coconut sweet potato rainbow chiffon sponge and pudding cake!

With love,
Phay Shing
Read More »

Tuesday, 19 December 2017

Blackforest Logcake

I didn't plan to make any logcake this year so this one came about unplanned. Someone requested for a small cake for her wedding anniversary which is around Christmas time and it's a request I couldn't refuse but can't disclose the reason here. Having limited time and a whole lot of fresh cherries in the fridge, I decided to make a blackforest logcake for her. Logcakes generally look impressive but are fairly quick and simple to make so if you want to impress your family and friends at a Christmas party, make them this logcake ;).


I will include tips on how to simplify or adapt your bake if you want to save time or make things simpler. Let me describe what this cake is made of...

Soft and fluffy but rich chocolate chiffon sponge with coffee liqueur added for that extra oomph, rich and juicy fresh cherries simmered in fruity wine, sugar and lemon juice, these two elements bound together by lightly sweetened dairy whipped cream and wrapped in a layer of dark chocolate ganache on the outside....Droolz!!

Cherry jam
I began preparations a few days before baking. You may skip this step and just buy canned cherries. Drain the liquid from the can before using the cherries. I made my own cherry "jam" as I can control what goes inside. Making this a few days before hand allows the flavours to mature over time in the fridge. You may use the homemade jam freshly made or just rested overnight and it still tastes good.

Ingredients:
250g fresh cherries (pitted), halved or quartered
35g caster sugar (more if you have sweet tooth)
35g Choya (you may use Brandy or any fruity wine of your choice)
1/2 tsp lemon juice
A pinch of salt

Note: you may add cornstarch if you wish to have a more jam-like texture but it's optional.

Steps:
1. Place all ingredients into a saucepan and bring to a boil while stirring with a spatula.

2. Simmer and keep stirring for about 20 minutes or until liquid is reduced and thickened.

3. Transfer into a bowl or container to cool. Cover and refrigerate for a few days until ready to assemble the cake.

Cooking cherries!

On the day of assembly, you may spoon out about 1 tbs of the liquid. This is used to brush the sponge cake before filling with cream.


Chocolate chiffon sponge cake
This is a tried and tested recipe over a couple of years that has gotten great reviews.

Ingredients (10x12" baking tray):
2 egg yolks
5g caster sugar
28g canola or vegetable oil
30g fresh milk
1/2 tsp vanilla extract
1 tsp Kahlua coffee liqueur (optional but adds to the flavour)
13g Dutch processed cocoa powder*
26g cake flour
1/6 tsp baking soda*
A pinch of salt

3 egg whites
1/4 tsp cream of tartar
40g caster sugar

* If you only have regular cocoa powder instead of Dutch processed cocoa powder, add 1/4 tsp baking powder and use 1/4 tsp baking soda as it is acidic in nature and the batter will deflate quite fast.

Steps:
1. Line baking tray with baking paper. Set oven rack to lowest position. Preheat oven to 170℃.

2. Prepare egg yolk batter. Whisk egg yolks and sugar until pale and thick. Add oil and whisk until combined. Add milk, vanilla and coffee liqueur and whisk until combined. Gradually sift in cocoa powder, flour, baking soda and salt and whisk until no trace of flour is seen.

3. Prepare the meringue. In a clean metal bowl, beat egg whites with cream of tartar until stiff peak just begins to forms, adding sugar gradually along the way.

4. Fold the meringue into the egg yolk batter in three additions quickly but gently. Pour the batter into prepared baking tray. Tap the tray on table a few times to release trapped air bubbles.

5. Bake for 10-12 minutes or until skewer comes out clean. Remove immediately from baking tray and cool the cake in a rolled up position while it is still warm. It doesn't matter whether you roll the long or shorter side. It's up to you.


While the cake is cooling, you may prepare the dark chocolate ganache and whipped cream. The ganache is optional if you don't have time. Simply prepare more whipped cream (use 250ml of whipping cream instead of 200ml. Please do the math conversion yourself :p) and add cocoa powder to half of the whipped cream.

Dark chocolate ganache
Ingredients:
180g dark chocolate (chopped)
18g unsalted butter
60g heavy cream
1/4 tsp salt
1/2 tsp vanilla extract
1/2 tsp Kahlua coffee liqueur (optional)

Steps:
1. Melt chocolate and butter in microwave oven or using the double boiling method.

2. Heat cream in a saucepan until it just starts to bubble. Pour over melted chocolate. Stir until well combined.

3. Add salt and flavourings and mix well. Set aside to stand at room temperature. It will firm up over time.

Note: this is a rather firm ganache, suitable for hot and humid Singapore. If you stay at a cooler place, increase the cream to 90g instead.

Whipped cream
Ingredients:
200ml heavy cream/ whipping cream (35% fat)
2 tbs (15g) icing sugar
1 tsp gelatin powder
1 tbs water
1 tbs fresh milk or heavy cream
1/2 tsp vanilla extract

Steps:
1. Place heavy cream into mixing bowl and chill it in the fridge.

2. In a small microwaveable bowl, sprinkle gelatin powder over water. Let it bloom for a few minutes. Microwave for 10 sec at medium power and stir until gelatin has dissolved. Add milk and mix well. Microwave for another 10 sec at medium power if necessary (still have gelatin lumps). Set aside to cool.

3. Use a hand whisk or electric mixer at low speed to beat whipping cream with icing sugar. Beat until soft peaks form. Gradually add in gelatin mixture and whisk by hand until well combined. Check that the cream is able to form firm peaks. Stop whisking if it does or it may separate. Continue to whisk until firm peaks form.

If you don't intend to use ganache, divide the cream into two equal portions. Add about 2 tbs of sifted cocoa powder to one portion and gently fold it in with a whisk or spatula.

Assembly
1. Unroll the chiffon sponge. Brush the sponge with some liquid from cooking the cherries. Use a spatula to apply whipped cream on the surface. Apply less cream about 5cm from the edge away from you.

2. Add cherry jam in three rows as shown below.


3. Carefully roll up the Swiss roll with the baking paper wrapping around it. Gently squeeze the roll to ensure the cream fills all the crevices inside. Freeze the roll for one hour.

Swiss roll after an hour of freezing. See the bit of cream and fruit squeezed out at the ends

Chill the cocoa flavoured whipped cream in the fridge if you aren't using ganache while the Swiss roll is in the freezer.

4. Cut the ends of the Swiss roll with a serrated knife, cleaning the knife after the first cut. Apply a bit of ganache on the cakeboard before placing the Swiss roll on. This is to "glue" the cake to the cakeboard. Apply some ganache on the roll to stick on the cut ends of the Swiss roll to form "branches" from the main trunk.

Note that you may use cocoa flavoured whipped cream instead of ganache.

5. Continue to apply ganache on the whole surface of the logcake using a small spatula. You don't have to be very neat about this so it's perfect for beginners and messy bakers like me ;). Use a fork to draw lines on the surface of the logcake such that it resembles bark patterns.

6. Dust some snow powder on and add christmas decorations if you wish. Chill the cake in the fridge. Best eaten one or two days later.

Note: the portion of whipped cream, cooked cherries and dark chocolate ganache I typed out here is rather generous and you probably won't use finish all of it. If you have leftovers, I suggest you mix the leftover cherries into the whipped cream and drop some dollops of dark chocolate ganache in there. Freeze the whole mixture in a container and you have homemade version of Cherry Garcia ice-cream that is not overly sweet! My neighbour who tried it said it tastes fantastic and I should consider selling ice cream! If you skip the dark chocolate ganache, you probably have just enough cream to fill and cover the Swiss roll.

Have a Blessed Christmas!

With love,
Phay Shing

Read More »

Thursday, 24 July 2014

Black Forest Chiffon Cake

My friend wanted a black forest cake for her dad's birthday that is not too sweet and not too high in fat (but as yummy as possible so dairy cream was used instead of whip topping) so I came up with this :).


I filled the cake with cream only between 2 sandwich layers and on top to minimize the amount of cream and used less sugar to fulfil my friend's requirement. I loaded the cake with lots of cherries and used fruit liquor to ensure that the cake is still packed with flavor.

I love the simple but elegant design of my ombre lime chiffon cake so I decided to use a similar design for this black forest cake. I melted some dark chocolate and piped out some leaves on a baking sheet with template of leaves drawn on the reverse side. I didn't know what to do with the excess chocolate so I piped out teeny chocolate kisses :p.


The recipe is adapted from Do What I Like. There aren't that many black forest chiffon cake recipes around to begin with but I tried looking for one. My friend preferred chiffon cake as the cake base as it is lighter and vegetable oil can be used instead of butter.

Recipe for chocolate cake
Ingredients (makes two 7" layer cakes):
3 egg yolks (65g eggs)
11g caster sugar
60g canola oil
100g water
2.5 tsp kirsch or rum (I used Choya because I am drinking the rest of it :p.)
1/3 tsp vanilla extract
20g cocoa powder
92g cake flour
1/6 tsp salt
1/3 tsp baking powder
1/3 tsp baking soda

4 egg whites
1/4 tsp cream of tartar
40g caster sugar

Steps:
1. Line base of 7" round pans with baking sheet and wrap the exterior with homemade cake strips. This ensures that the cake will be level. You may choose to bake without cake strips but reduce baking time by 5-10minutes,  or you may choose to make a single tall cake and then slice into 2 or 3 layers. Adjust baking time accordingly if you are doing so. I prefer not to have the hassle of slicing cakes :p.

2. Preheat the oven to 160 degrees Celsius.

3. Prepare the egg yolk batter. Whisk together egg yolks and sugar until pale and all sugar has dissolved. Add in oil and whisk until well combined. Add water, kirsch and vanilla extract and mix well.

4. Gradually add in sifted flour, cocoa powder, baking powder, baking soda and salt. Whisk until no trace of flour can be seen.


5. In a clean metal bowl, use an electric mixer to beat the egg whites until foamy. Add cream of tartar and beat until soft peaks form. Gradually add in sugar and beat until stiff peaks form. You should be able to overturn the bowl without the meringue falling out.

6. Gently but quickly fold in the meringue in 3 additions until no trace of egg whites can be seen.


Scoop the batter into the 2 pans and level the batter with a spoon or spatula. Bang the pans on the table a few times to release any trapped air bubbles.

7. Bake for 15 minutes then reduce the temperature to 150°C and bake for another 20 minutes or until the cake is cooked through. You may test using a skewer or by gently pressing the top of the cake to see if it springs back.


8. Let the cake cool in the pan upright for about 5 minutes before removing from the pan and cooling it inverted on a cooling rack.


Freshly baked chocolate cakes!

You may wrap it up with cling wrap  and freeze it until it is time to assemble.

Assembly of black forest chiffon cake
Ingredients:
250ml whipping cream
2 tbs icing sugar
1 tsp gelatin powder
1 tbs cool water
1/2 tsp vanilla extract
Canned cherries, drained
Fresh cherries for decoration
2 7" chocolate cakes
Some dark chocolate for decoration

Steps:
1. Sprinkle gelatin in water and let it sit for a couple of minutes until the gelatin has absorbed the water.  Microwave at medium high heat for 20 seconds or until the gelatin has dissolved.

2. Take 2 tbs of cream and warm it up. Add the warm cream to the gelatin mixture. Add vanilla extract to the gelatin mixture. Set aside.

3. Use an electric mixer to whip the whipping cream with icing sugar until soft peaks form. Gradually add in gelatin mixture and gently whisk by hand until firm peaks form. Be careful not to over whip or the cream will separate.

4. Place one layer of cake on the cake board. Pipe or apply a layer of cream. Add canned cherries.


5. Add a bit of cream before placing the other layer of cake on top. Pipe a layer of cream on top of the cake. Add chocolate decorations/ shaved chocolate and fresh cherries.


You may trim the stems of the cherries if you prefer a neater look.


My friend is looking forward to having this healthier version of black forest cake with her family. Will update with reviews :).

Update: Cake was very well received by my friend's family, from the really young to the elderly. Even my friend who is not a cake person enjoyed it :). They really loved the fact that the cake is not too sweet or creamy and is loaded with fruits. So maybe if you are considering a healthier version of black forest cake, this cake fits the bill!

With love,
Phay Shing

Read More »