Showing posts with label cookies n cream. Show all posts

Saturday, 12 August 2023

Ice-Cream Cone Marshmallow Surprises (Class)

 This is the first marshmallow class I planned after finishing my work with Deco Marshmallows: Ice-cream cone marshmallow surprises!


I intend to share a few kid-friendly flavour combinations in this Junior chef class. Participants are of course free to mix-and-match whichever way they prefer!

Just look at the yummy surprises inside!


Strawberry marshmallows with homemade strawberry jam centers. The cones are coated with strawberry white chocolate inside. I use a combination of freeze-dried strawberries and strawberry paste to impart the flavour and colour to the marshmallow.

Biscoff and vanilla marshmallow with crunchy Biscoff surprise inside! The cones are coated with dark chocolate.

Strawberry and vanilla swirl marshmallows with cookies n cream marshmallow and Ferrero Rocher surprise inside. Cones are coated with dark chocolate.

Here's a reel of piping the swirls, squishing and cutting open the cones!

https://www.instagram.com/reel/CuO-W8lgtC4/?igshid=MzRlODBiNWFlZA==

If you are interested to join this class with your child, please click on this link for more details or to register.


with love,

Phay Shing

Read More »

Thursday, 5 May 2022

Unicorn and Mermaid Pusheen Cookies n Cream Macarons

This is another way overdue post. I made these unicorn and mermaid Pusheens together with the choux pastry version way back in way January this year!

Trying to create a cloudy beach scene here😆

I made these macarons using the swiss meringue method and decorated the macaron shells using edible marker and a mixture of edible marker and vodka wash (for the details on the unicorn horn).
Top view look at decorated macaron shells

Checkout the awesome feet on the shells!

I filled the macarons with cookies n cream swiss meringue buttercream as requested.


with love,

Phay Shing


Read More »

Friday, 3 April 2020

Naturally Coloured Penguin Macarons (Junior chef class)

I had fun much fun preparing for the photoshoot for this class' ad. Presenting my take on penguin macarons!

Ouch! Somebody fell off the iceberg! 

I try to keep junior chef classes simple with only one colour of batter to work with. To make it easier for little hands, I will prepare royal icing transfers for the white belly of the penguins. The filling is cookies n cream swiss meringue buttercream. I will just do a demo of this filling due to time constraint.

More details about the class and the registration link can be found here.

With love,
Phay Shing

Read More »

Thursday, 14 November 2019

Safari Animal Cookies n Cream Choux Pastries

My first attempt at making a variety of animals for a single choux pastry request. Safari themed this time!


On hindsight there are things I would do differently to improve the looks of things but I didn't have time to rebake and it is honestly yummy enough. Just the perfectionist in me talking 😂. If I had a next time, I would make all the heads slightly smaller such that the pastry cases need higher temperature baking only for a shorter time, and add white food colouring to the light brown part of the monkey's face as well as to the yellow face of the lion for better colour contrast. These colours tend to brown more.

You may refer to this post for the detailed recipe for the choux pastry case. I will share the detailed filling recipe later in this post that is different from the 5-minute version I shared in this blog post as it is made with proper pastry cream for a yummier taste. What might be of interest to you is how I made the craquelin for the monkey face and the various small parts of the face of the animals. I made use of round and heart shaped cookie cutters to get the shape of the monkey's face.

Cut out rounds and hearts on separate trays. Use the heart cutter to cut out part of the brown circle and fit the heart shape in. Gently press the seams of the different coloured dough together. Use round cutter to cut off excess portion from the uncoloured heart dough

Use coloured choux pastry batter to pipe out the various body parts. Pipe similar sized parts on the same tray. Here is a tray of monkey, lion and leopard ears

I use perforated mat for baking the main body (or head in this case) for a more even expansion in the oven. Try to match the colour of batter to craquelin. 

Recipe for lightened cookies n cream pastry cream
Do note that you may adjust the amount of crushed oreo cookies, as well as the whipped cream according to personal preference. This recipe is for a fairly strong chocolatey oreo flavour with slightly heavier texture so I provided extra whipped cream for those who prefer a lighter texture and less intense chocolate cookie flavour in separate piping bags. I always recommend filling the pastry cases just before or shortly before eating.

Lightened cookies n cream pastry cream and plain non dairy whipped cream

Ingredients:
3 egg yolks
30g cornflour, sifted
35g caster sugar
Pinch of salt
300g fresh milk
1 tsp vanilla extract
25g butter, softened
160g Whip topping (non dairy whipping cream. You may use double cream or heavy cream. You may increase amount of cream for lighter texture, up to 1:1 ratio with plain pastry cream)
200g crushed oreo cookies without the cream (use less if you prefer less chocolatey)

Steps:
1. In a heavy mixing bowl, whisk together cornflour and sugar. Add egg yolks and whisk until a smooth paste forms.

2. Place milk, vanilla and salt in a saucepan and heat over medium low heat until steaming or just starting to bubble at the edges.

3. Slowly pour hot milk in a thin stream into egg mixture while whisking the egg mixture continuously. Pour the contents back into saucepan.

4. Heat the egg mixture over medium low heat while whisking continuosly. Keep an eye on the consistency. Once it starts to thicken, remove from heat and whisk vigorously until smooth. Place saucepan back on stove and whisk until pastry cream is cooked to your preferred consistency.

5. Remove saucepan from heat and add butter. Whisk until well combined.

Nice and smooth plain pastry cream! 

6. Transfer pastry cream into a bowl and press cling wrap on the surface to prevent a skin from forming. Refrigerate until cool.

7. Whip the whipping cream until firm peaks form. If using full dairy whipping cream, be careful not to overwhip. Adding whipping cream lightens the texture of pastry cream.

8. Loosen the chilled pastry cream with spatula. Fold in the whipped cream in a few batches.

9. Fold in crushed oreo cookies. Transfer into piping bag and keep chilled until ready to fill the cases. Pastry cream can keep in the fridge for a few days. Do not freeze.

Do check out my Deco Choux Pastries book for more techniques and designs of creating cute choux pastries!

With love,
Phay Shing


Read More »

Thursday, 7 November 2019

Brawl Stars Cookies N Cream Macarons

This is an unprecedented project due to the amount of details and quantity involved. Because it is for my younger kid and my friend's nephew's birthdays. I baked and decorated more than 70 of these!

Nita, Spike and Tick cookies n cream macarons! 

Now that I am teaching at two studios, I have to plan my time more carefully. Due to the scale of this project, I baked two characters in advance and froze the undecorated shells, planning to defrost them only when I was ready decorate nearer the date.

I used the Swiss meringue method for these and baked one character at a time, spreading the baking over 3 separate days.

Just to share some photos of the process...

Piping Nita

Piping Spike

Piping Tick

I layered the baked shells between pieces of parchment paper in an airtight container and froze it. To defrost, leave the container at room temperature overnight without opening. 

Freshly baked Tick! I didn't freeze these as I baked them closer to the date. 

Decorating the shells with edible marker, homemade paint* and royal icing is not a job for the faint hearted. It took me one and a half days of intensive work to finish all 70 plus pieces. This was just day 1 of work. 

*I made edible paint in dark green colour for Spike by dissolving some gel food colouring in vodka.

All that hard work was worth it when you see the fruits of your labour 😊.

This is only about a third of the decorated macaron shells! 

I made a Swiss meringue buttercream based cookies n cream filling.

Recipe for cookies n cream filling (fills about 30-35 macarons) 
Ingredients:
50g egg whites
1/8tsp salt
35g caster sugar
80g unsalted butter, cut to small pieces and slightly softened
1 tsp vanilla extract/ bean paste
70g oreo cookies without cream, crushed

Steps:
1. Place egg whites, salt and sugar in mixing bowl set over a pot of simmering water without the water touching base of the bowl. Whisk continuously while monitoring the temperature with a candy thermometer.

2. When temperature reaches about 70°C, remove the mixing bowl from heat and beat the egg whites with electric mixer at medium high speed until stiff peaks form and meringue is cooled to room temperature.

3. Add butter about a tablespoon at a time and beat with mixer until incorporated before adding more. Don't worry if mixture appears to curdle. It will come together in the end. Continue to beat at high speed after all butter is added for 2 min.

4. Add vanilla and beat until incorporated.

5. Fold in crushed oreo cookies. Transfer filling into piping bag to fill the macaron shells. Store filled macarons in airtight container in fridge for at least 24h before serving. Always leave the airtight container at room temperature for 15-20min before opening and serving the macarons because condensation will appear immediately on the shells if you expose them to the air when they are cold.


Thank God that it was really well received!

A peek at the insides of a macaron for my younger kid, which I filled with pistachio white chocolate ganache and salted caramel instead.

Nice and full shells! 


With love,
Phay Shing
Read More »

Friday, 11 October 2019

Rilakkuma, Korilakkuma and Kiiroitori Cookies n Cream Choux Pastries

I have been getting a lot of macaron requests but few choux pastry requests. I am not sure if it's because people don't really like choux pastry or they don't know that there's so much potential for creativity. And so, I decided to take one day out of my schedule to work on something to showcase what choux pastry can be like 😊. Presenting my full body version of Rilakkuma, Korilakkuma and Kiiroitori choux au craquelin filled with cookies n cream filling!


Pardon me for the lack of pictures as I was really hoping not to take too much time for this impromptu project but I am glad to share my experience.

You may refer to this post for detailed recipe of the choux pastry case. I always use craquelin for the main body of pastry cases as it controls the expansion of the pastry in the oven. But for small parts like ears and limbs, this is not necessary. One little trick I use to make it possible for a range of Deco Choux pastry designs is to get the batter to be as close as possible to the same colour as the craquelin you make. Do keep in mind that there will be some level of browning after baking so aim to go for a brighter, more neon shade that you would actually like when you add colouring to craquelin and batter.

This is the template I made for making the ears, limbs, beak and wings. I have detailed tips in my Deco Choux Pastries book on how you can assemble it on the main body with perfect fit.

Tenplate for ears, limbs, wings and beak. I made extras just in case 


Matching the colours of the batter and the craquelin may be a little tricky at first but with practice you get better at it.

Craquelin on top of piped batter 

I decorated the baked cases with royal icing and some bits of black candy melts..

By the time I was done with decorating the pastry cases, it was around 4 plus in the afternoon and I wanted to catch the sunlight for photography. So instead of making my usual lightened pastry cream which would take a good hour or so including chilling the pastry cream before lightening it up with whipped cream, I decided to go for a filling that can be whipped up in a matter of 5 minutes.

I have some frozen whipped topping left in my freezer so I just defrost it a little using the microwave oven and then whipped it up to stiff peaks. Added some crushed oreo cookies (I bought those without cream from Redman) and viola! I have an instant cookies and cream filling! Not exactly the best tasting since full dairy cream tastes way better than non dairy whipping cream but non dairy cream beats dairy hands down in terms of stability in hot Singapore. What I would recommend if you have the time and ingredients, is to use a mix of dairy and non dairy cream for the best compromise of stability and taste. Use double cream if you are able to as the higher the fat content, the more stable your whipped cream will be.

Non-dairy cookies n cream filling 
Ingredients:
90g whip topping*
30-45g crushed oreo cookies without filling

Steps:
1. Use and electric mixer to whip whip topping until stiff peaks.

2. Add crushed oreo cookies in a few batches to whipped cream and fold in using a spatula

3. Transfer into piping bag and fill the pastry cases just before consumption

*you may replace half with full dairy whipping cream with at least 35% fat.

My kids had fun eating this!

With love,
Phay Shing
Read More »

Monday, 23 September 2019

Alpaca Cookies n Cream and Matcha Macarons

When given freedom to design a centerpiece with the theme "alpacas", this was what I came up with, along with a bunch of loose pieces of alpaca macarons 😊.

Whimsical land! 

I used the Swiss meringue method to make these but reduced sugar in the meringue since Audrey (my friend who shared the recipe) mentioned it works just as well. You may refer to this post for the detailed recipe. I reduced the castor sugar from 85g to 75g. Remember not to overbeat the meringue but beat it firm enough until it is able to form a firm peak (peak with a curled hook) when beater is slowly raised.

I love the mesmerising look of a well beaten meringue! 

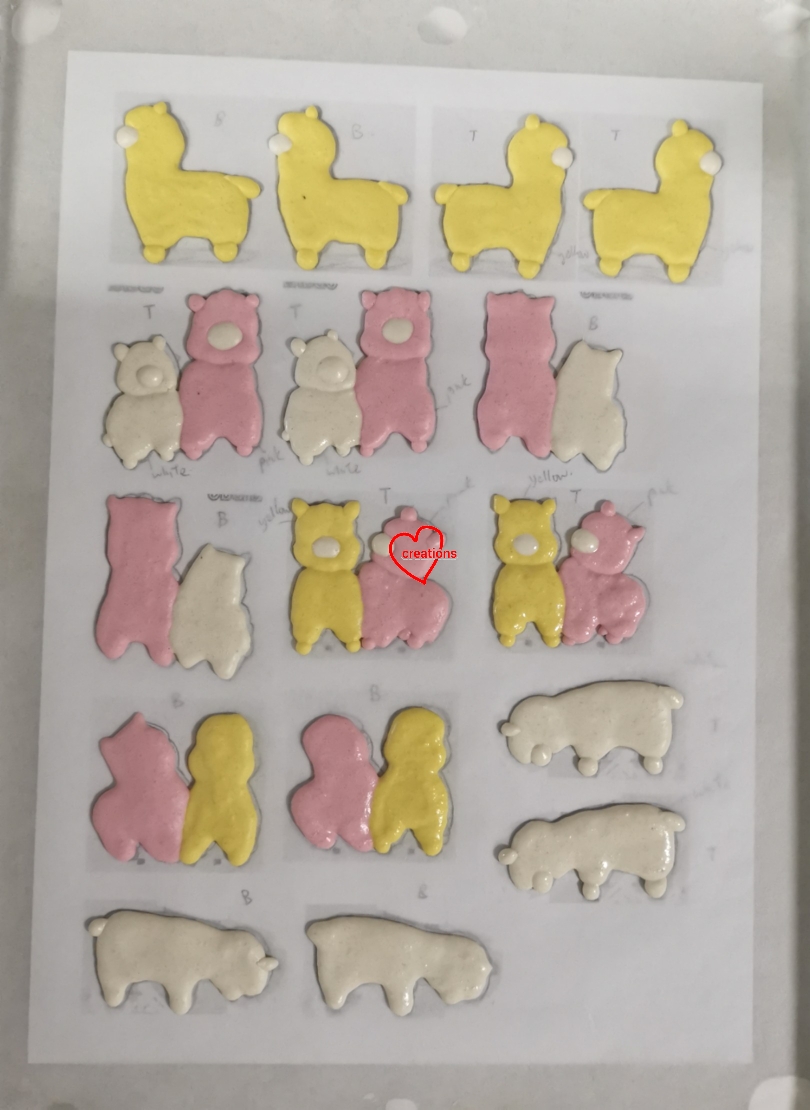
Just to share some photos of piped batter...

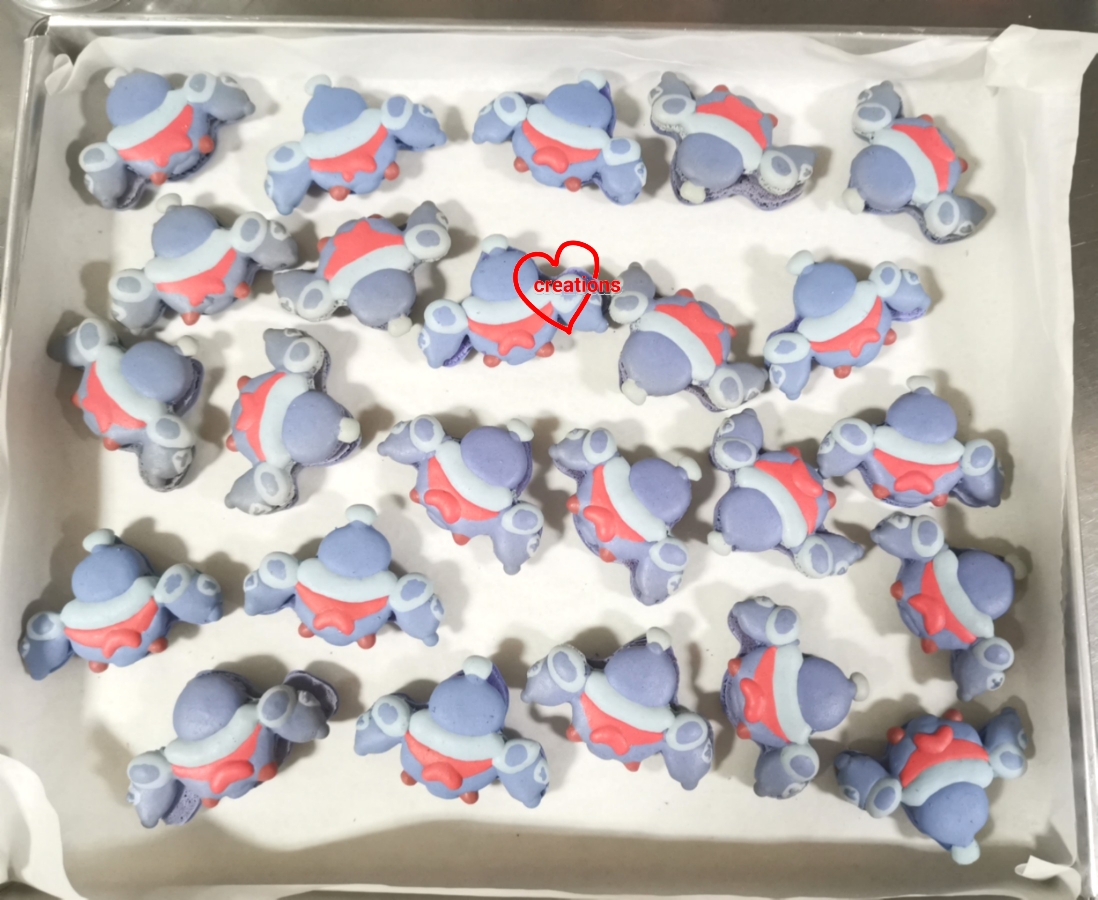
Loose pieces of alpacas

Pieces of alpacas that go on the structure. I made an extra set just in case. 

I decorated the macaron shells with edible black marker and pink royal icing.

I have been including cocoa butter in my white chocolate based ganache nowadays since it works just as well and it makes the ganache less sweet too! I will share the recipe for the fillings here. Feel free to scale it up if you wish to make a bigger portion.

Matcha whipped white chocolate ganache
Ingredients:
45g white chocolate chips or finely chopped
10g cocoa butter shavings
10g unsalted butter
15g heavy cream
2 tsp Matcha powder, sifted
1/4 tsp vanilla bean paste
1/8 tsp salt

Steps:
1. Place white chocolate, cocoa butter, butter and cream in microwave safe bowl. Heat on medium-low power for 10 sec and mix well with spatula. Repeat heating and mixing until mixture is smooth. If there are stubborn pieces of chocolate or cocoa butter that refuse to melt, sieve them out. Be careful not to overheat. Press the chocolate/cocoa butter against sides of bowl during mixing to help them melt more evenly.

2. Add salt and vanilla and mix well. Add matcha powder in a few additions and mix well after each addition.

3. Chill in freezer for 1-2 min and mix well with spatula. Repeat chilling and beating until texture is light, smooth and creamy.


Cookies n cream Swiss meringue buttercream
Ingredients:
35g egg whites (about 1 egg)
22g castor sugar
1/8 tsp salt
60g unsalted butter, slightly softened but cool
1/2 tsp vanilla bean paste
32g oreo cookies without cream, crushed

Steps :
1. Place egg whites, castor sugar and salt in a clean metal mixing bowl. Set the bowl over a simmering pot of water without the water touching the base of bowl. Whisk continuously while monitoring the temperature of the egg whites wihh a candy thermometer. Keep whisking until temperature reaches 71.1°C.

2. Remove mixing bowl from heat and beat on medium high speed with electric mixer until cool to room temperature. The meringue should be able to form stiff peaks.

3. Gradually add butter and beat well with electric mixer fter each addition until fully incorporated.

4. Add vanilla and mix well. Fold in crushed oreo cookies.


I filled the "hill" pieces with the matcha filling on outer ring and Oreo filling in the middle.

Filling the "hill" 

I filled the alpacas with Oreo filling.

Filling the alpacas 

Store assembled macarons in fridge in airtight condition for at least 24h before eating. Let the macarons sit at room temperature for 15 min before opening the airtight container to prevent condensation from forming on the shells.

I glued the alpacas on the hill and created the grass using Royal icing. The flowers on the hill are store bought sugar flowers.

I hope this whimsical bake puts a smile on your face as it did mine 😊.

With love,
Phay Shing
Read More »

Monday, 24 September 2018

Acorn Macaron Ferris Wheel

It's been almost a year since I made a macaron ferris wheel. This is my third Ferris Wheel but the first one that is mounted on top of a giant macaron!

Don't the squirrels look like they wish they had the bigger acorns? 😆

Here is a view of the Ferris Wheel in action!


This Ferris Wheel is also smaller than my first two. My first two were mounted on an 8" cakeboard. This one could fit on a 6" cakeboard.

You may use your favourite macaron recipe or any recipe in our blog. You may refer to my macaron books Creative Baking: Macarons and Creative Baking: Macaron Basics for a more systematic review of the basics and piping techniques, as well as the macaron shell recipes I used here. I baked the shells for two other requests concurrently with this one so I used the Italian method to cope with the many colours involved.

I decorated the shells with royal icing and black edible marker.

Works in progress

As macaron structures with moving parts need to be structurally stable, I filled the macarons with filling that does not contain milk, dairy cream or butter but the flavours are "safe" flavours that will be tasty even without those ingredients. Choose good quality chocolate for best taste.


Cookies n cream filling
Ingredients:
90g white chocolate
20g vegetable shortening
25g Oreo cookies (without cream and crushed)
1/4 tsp vanilla bean paste
1/8 tsp salt

Dark chocolate filling
Ingredients:
80g dark chocolate couverture chips
20g shortening
1/8 tsp salt
1/4 tsp vanilla bean paste

Steps:
1. Place all ingredients (except Oreo cookies) in microwave safe bowl. Heat on medium power for 20 seconds and mix well with a spatula. Repeat heating and stirring until all ingredients are melted.

2. For the cookies n cream filling, stir in crushed cookies. Let the melted mixture stand at room temperature until it firms up until toothpaste consistency.

3. Transfer to piping bag and pipe on the shells.

I piped a ring of cookies n cream on the outside and filled the middle with dark chocolate for the giant macaron base shell.

Here's a peek at the Ferris Wheel frame being filled.

I can't reveal what I did to make a fragile confectionery item like macarons to support the weight of a Ferris wheel frame yet but I can reveal that I did add reinforcements to bear the load.

Ferris wheels can be fairly tall so I made my own customized cakebox that is more than double the height of one box.

I used two regular cakeboxes, four long and thick wooden skewers, flexible plastic cake ring and sticky tape to assemble this.

To remove the baked item from the box, simply lift the lid, open up the flaps of the base box and slide the bake out.


Thank God that the Ferris Wheel was delivered safely by a very conscientious courier! I had to lock the Ferris Wheel to prevent it from turning during transport. The recipient was very happy to receive this 😊

Update: the recipient sent me a photo of the Ferris Wheel on top of the cake she bought and allowed me to share it here. She fedback that the Ferris Wheel tasted yummy too!

You can tell that the birthday girl was really happy 😀


With love,
Phay Shing

Read More »

Tuesday, 27 March 2018

'Our Favourite Characters' Cookies n Cream Macaron Playground

My friend's Bible study group was planning to have a combined birthday celebration for everyone with birthday that falls in the month of March. What better way to personalize the birthday bake for everyone than to create a playground where their favourite character is!

All macarons are filled with cookies n cream filling

Back view of the playground. You don't get to see the steps of the slide that well from the front.

Here's a short video of how the playground works!

This is the second time I am making a macaron playground. Checkout my cute overload version that I made in January over here.

I used the reduced sugar recipe for the macaron shells here. Both regular and reduced sugar recipes can be found here. You may refer to my Creative Baking: Macarons book for a systematic presentation of the basics and complex shaped macarons. You may refer to my video tutorials for macaron basics and piping of complex shapes on the blog too.

Just to share some pictures of the process...

Piping the characters

Freshly baked shells

Decorating the shells with royal icing and edible marker.

You may find the recipe for cookies N cream filling that is suitable for outdoor display over here.

Filling the shells. I have a couple of extra macarons to fill that aren't included in the playground.

Checkout the awesome feet!

Thank God it was very well received with the kids eating up every single edible part!

With love,
Phay Shing

Read More »