I just finished an extremely busy episode of macaron mania, completing three different requests concurrently in a single planned bake. I had some leftover batter of various colours and decided to play around with 3D hemispherical macaron shells again. And this was what I came up with! Roosters, a ladybug and a watermelon!

Guess what's the filling inside?

My last recent experiment with 3D shells by making ondeh-ondeh macarons and a cute turtle was so successful that I was game to try it again! I mentioned in that blog post that I was keen to try other trendy runny/lava fillings. I made runny salted egg yolk custard fillings before some time last year and the feedback was that it's really yummy so I thought why not make it again. The difference is, instead of using buttercream as the barrier layer between the shells and runny custard, I used whipped white chocolate ganache as the base.
I used the reduced sugar recipe for the macaron shells here. Both regular and reduced sugar recipes can be found here. You may refer to my Creative Baking: Macarons book for a systematic presentation of the basics and complex shaped macarons. You may refer to my video tutorials for macaron basics and piping of complex shapes on the blog too.
Piping on a hemispherical surface is a little tricky as the batter flows down the sides of the silicone cakepop mould due to gravity. The watermelon was the trickiest and it was my first attempt at piping tapered alternating stripes on a curved surface. Use a toothpick to pull the batter where necessary. Please refer to my first 3D macaron shell post for some notes on creating these odd shaped shells where I will highlight some difficulties you may face and how to overcome them.
For this experiment, I just piped hemispheres and a corresponding plain circle shell for each macaron...And decide what to make out of them after the bake. By this time I was exhausted from piping and baking the whole day already!

Other than the watermelon, I was not wondering what to turn each coloured macaron into. Since it's still the Chinese New Year period, I thought why not make more roosters. And so I started to decorate the yellow and white shells with stiff royal icing...

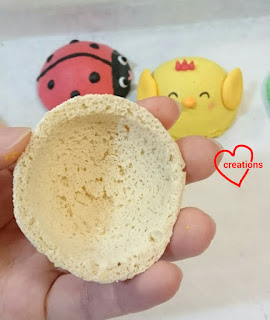
Here's a peek at the under side of a hemispherical shell. As you can see, it's quite a challenge to get the batter to flow evenly down the sides of the hemisphere.
I can't help but smile when I see these cute, cheerful creatures!

I tweaked the runny salted egg yolk recipe from the original post to make it slightly less runny here as it would be messy to eat. It's more like a thick lava consistency here. Keep in mind that the consistency of the custard should be the desired one at refrigerated temperatures.
I chose to use ganache instead of buttercream as it is easier to make and it stays firmer longer at room temperature in hot Singapore. I adapted the ganache from the low sugar version used in my ondeh-ondeh macarons.
The recipe for the salted egg yolk ganache and custard is just nice for 7 such hemispherical shells.
Begin by preparing the salted egg yolk puree. Steam 2 salted egg yolks for 9 minutes and mash while hot. Add 15g (1 tbs) of milk and mix well. Press the mixture through a sieve to remove the lumps. Divide the puree into two equal portions (about 24g each). Do add more salted egg yolks (and increase the milk correspondingly) if you would like a stronger flavour. I ran out of salted eggs at home at this point in time and didn't want to waste food for an experiment.
Recipe for lava salted egg yolk custard
Ingredients:
30g fresh milk (slightly warm)*
6g instant custard powder
1/4 tsp vanilla extract
1/16 tsp fine sea salt
24g salted egg yolk puree (or 1 egg yolk mashed with 7-8g milk. Use 2 salted egg yolks mashed with 15g milk for stronger flavour)
*Add 2-3g more milk if you want a runnier custard, less if you want it firmer.
Steps:
1. Dissolve salt in warm milk. Add custard powder and stir for a couple of minutes until smooth and slightly thickened. Add vanilla and mix well.
2. Add salted egg yolk puree in a few batches and mix well after each addition.
3. Refrigerate the custard with cling wrap touching the surface. Proceed to make the ganache.
Recipe for salted egg yolk ganache
Ingredients:
42g white chocolate, chopped
21g unsalted butter
21g vegetable shortening
26g heavy cream
1/16 tsp fine sea salt
1/2 tsp vanilla extract
24g salted egg yolk puree (use more for a stronger flavour, up to double the amount here)
Steps:
1. Place white chocolate, butter and vegetable shortening in a microwave-safe bowl. Heat for 20 seconds at medium power. Stir with a spatula. Repeat until mixture is smooth.
2. Place cream in a small saucepan. Heat until it starts to bubble. Pour the cream into the white chocolate mixture. Stir in one direction until smooth.
3. Add salt and vanilla and mix well. Freeze for 2 minutes and mix well with spatula. Repeat freezing and beating the mixture with spatula (or electric mixer at low speed for larger quantities) until mixture is smooth and creamy and able to hold a stiff peak. Don't worry if the mixture appears to separate in the beginning. It will come together in the end.
3. Add salted egg yolk puree in a few batches and mix well.

Assembly
1. Transfer the custard and ganache into separate piping bags. Place the hemispherical shells in cakepop mould that was used to pipe the batter on.
2. Pipe ganache into hemispherical shell such that it coats the entire inner surface (first picture below).
3. Add the lava custard. (Second picture)
4. Pipe a layer of ganache to completely seal the runny custard. (Third picture)
5. Refrigerate for a few minutes to firm up the ganache. Pipe some ganache on the bottom shell. Sandwich the top and bottom shells together.
6. Refrigerate for at least 24h before serving. Do be patient as the macarons seriously taste better after maturing.

My kids love the 流沙 version of macarons! Something you get only in steamed buns which I have made on a number of occassions for my little ones before I was swamped with baking requests. Here's a peek at the yummy lava insides!

Pardon the pale colour as the camera didn't pick up the actual colour well. The taste is definitely unmistakably salted egg yolk custard!
Hubby had his cute portion too!

If you are a fan of anything lava salted egg yolk custard, do give this a try ;).
With lots of love,
Phay Shing
Read More »

Guess what's the filling inside?

Runny salted egg yolk custard! Yums!
My last recent experiment with 3D shells by making ondeh-ondeh macarons and a cute turtle was so successful that I was game to try it again! I mentioned in that blog post that I was keen to try other trendy runny/lava fillings. I made runny salted egg yolk custard fillings before some time last year and the feedback was that it's really yummy so I thought why not make it again. The difference is, instead of using buttercream as the barrier layer between the shells and runny custard, I used whipped white chocolate ganache as the base.
I used the reduced sugar recipe for the macaron shells here. Both regular and reduced sugar recipes can be found here. You may refer to my Creative Baking: Macarons book for a systematic presentation of the basics and complex shaped macarons. You may refer to my video tutorials for macaron basics and piping of complex shapes on the blog too.
Piping on a hemispherical surface is a little tricky as the batter flows down the sides of the silicone cakepop mould due to gravity. The watermelon was the trickiest and it was my first attempt at piping tapered alternating stripes on a curved surface. Use a toothpick to pull the batter where necessary. Please refer to my first 3D macaron shell post for some notes on creating these odd shaped shells where I will highlight some difficulties you may face and how to overcome them.
For this experiment, I just piped hemispheres and a corresponding plain circle shell for each macaron...And decide what to make out of them after the bake. By this time I was exhausted from piping and baking the whole day already!

I reused the Pokeball template that I was using for one of the requests.
Other than the watermelon, I was not wondering what to turn each coloured macaron into. Since it's still the Chinese New Year period, I thought why not make more roosters. And so I started to decorate the yellow and white shells with stiff royal icing...

Add more icing sugar to the royal icing recipe until you get the right piping consistency where the icing is able to hold a stiff peak.
Here's a peek at the under side of a hemispherical shell. As you can see, it's quite a challenge to get the batter to flow evenly down the sides of the hemisphere.

I can't help but smile when I see these cute, cheerful creatures!

I tweaked the runny salted egg yolk recipe from the original post to make it slightly less runny here as it would be messy to eat. It's more like a thick lava consistency here. Keep in mind that the consistency of the custard should be the desired one at refrigerated temperatures.
I chose to use ganache instead of buttercream as it is easier to make and it stays firmer longer at room temperature in hot Singapore. I adapted the ganache from the low sugar version used in my ondeh-ondeh macarons.
The recipe for the salted egg yolk ganache and custard is just nice for 7 such hemispherical shells.
Begin by preparing the salted egg yolk puree. Steam 2 salted egg yolks for 9 minutes and mash while hot. Add 15g (1 tbs) of milk and mix well. Press the mixture through a sieve to remove the lumps. Divide the puree into two equal portions (about 24g each). Do add more salted egg yolks (and increase the milk correspondingly) if you would like a stronger flavour. I ran out of salted eggs at home at this point in time and didn't want to waste food for an experiment.
Recipe for lava salted egg yolk custard
Ingredients:
30g fresh milk (slightly warm)*
6g instant custard powder
1/4 tsp vanilla extract
1/16 tsp fine sea salt
24g salted egg yolk puree (or 1 egg yolk mashed with 7-8g milk. Use 2 salted egg yolks mashed with 15g milk for stronger flavour)
*Add 2-3g more milk if you want a runnier custard, less if you want it firmer.
Steps:
1. Dissolve salt in warm milk. Add custard powder and stir for a couple of minutes until smooth and slightly thickened. Add vanilla and mix well.
2. Add salted egg yolk puree in a few batches and mix well after each addition.
3. Refrigerate the custard with cling wrap touching the surface. Proceed to make the ganache.
Recipe for salted egg yolk ganache
Ingredients:
42g white chocolate, chopped
21g unsalted butter
21g vegetable shortening
26g heavy cream
1/16 tsp fine sea salt
1/2 tsp vanilla extract
24g salted egg yolk puree (use more for a stronger flavour, up to double the amount here)
Steps:
1. Place white chocolate, butter and vegetable shortening in a microwave-safe bowl. Heat for 20 seconds at medium power. Stir with a spatula. Repeat until mixture is smooth.
2. Place cream in a small saucepan. Heat until it starts to bubble. Pour the cream into the white chocolate mixture. Stir in one direction until smooth.
3. Add salt and vanilla and mix well. Freeze for 2 minutes and mix well with spatula. Repeat freezing and beating the mixture with spatula (or electric mixer at low speed for larger quantities) until mixture is smooth and creamy and able to hold a stiff peak. Don't worry if the mixture appears to separate in the beginning. It will come together in the end.
3. Add salted egg yolk puree in a few batches and mix well.
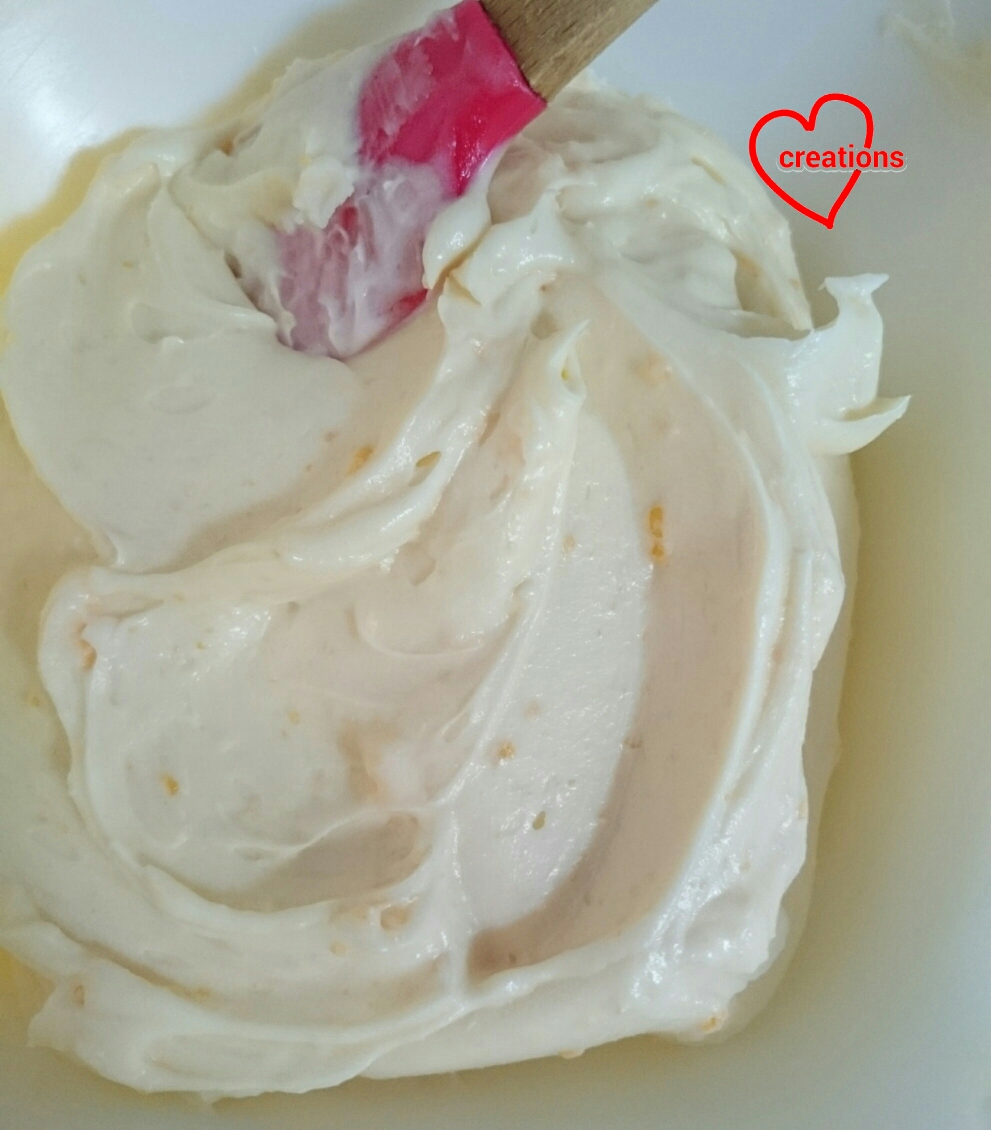
See the salted egg yolk bits?
Assembly
1. Transfer the custard and ganache into separate piping bags. Place the hemispherical shells in cakepop mould that was used to pipe the batter on.
2. Pipe ganache into hemispherical shell such that it coats the entire inner surface (first picture below).
3. Add the lava custard. (Second picture)
4. Pipe a layer of ganache to completely seal the runny custard. (Third picture)
5. Refrigerate for a few minutes to firm up the ganache. Pipe some ganache on the bottom shell. Sandwich the top and bottom shells together.
6. Refrigerate for at least 24h before serving. Do be patient as the macarons seriously taste better after maturing.

My kids love the 流沙 version of macarons! Something you get only in steamed buns which I have made on a number of occassions for my little ones before I was swamped with baking requests. Here's a peek at the yummy lava insides!

Pardon the pale colour as the camera didn't pick up the actual colour well. The taste is definitely unmistakably salted egg yolk custard!
Hubby had his cute portion too!

Nicer picture showing texture of the lava salted egg yolk custard
If you are a fan of anything lava salted egg yolk custard, do give this a try ;).
With lots of love,
Phay Shing


