Showing posts with label Heart. Show all posts

Thursday, 6 February 2025

Heart Macarons with Wet-On-Wet Designs

 I dressed up simple heart macarons with more little hearts for Valentine's Day!


Check out the awesome feet from the side view!


These macarons were filled with dairy-free dark chocolate ganache and dairy-free mixed berry (strawberry and raspberry) ganache. Both are temperature stable enough for gifting in tropical Singapore.

Find out how I created the patterns from this tutorial:

https://www.instagram.com/reel/DFchON3zyy-/?igsh=eDMwajlrd3hjejBt

Technical tips to take note of are in the captions of the reel.


with love,

Phay Shing

Read More »

Friday, 9 February 2024

Vanilla Black Tea & Strawberry Valentine's Day Bear Marshmallows

 This is a class material for Valentine's Day that I didn't get to share earlier. These cuddly squishy bears have moveable arms that can hug a strawberry marshmallow heart! The bears are naturally coloured and flavoured with black tea.


Watch how the flappy arms work over here:


I made them again recently with shorter body and chubbier cheeks, and packed the strawberry hearts with more freeze dried strawberry powder and less bottled strawberry emulco.


Watch the squish and marshmallow heart piping video over here:


with love,
Phay Shing
Read More »

Sunday, 4 February 2024

Heart Langue De Chat without using molds (Part 2: Pink Berry Ombre Cookies)

 After showing you how to make assorted heart shaped cookies without using a heart mold, I will show you how to make things a little more interesting by making it sweet ombre pink!


Recipe makes about twelve-thirteen 2" heart sandwich cookies (adapted from siZning's YouTube)

Strawberry Langue De Chat cookie:
50g unsalted butter, slightly softened
45g icing sugar
1/16 tsp salt
25g egg whites
1/4 tsp soy lecithin (optional)
3/4 tsp vanilla extract
1/8 tsp strawberry emulsion
50g cake flour, sifted
White & pink gel colouring 

Berry filling:
45g white chocolate 
3g freeze dried raspberry or strawberry powder
1/8 tsp strawberry emulsion

1. Beat softened butter briefly with electric mixer/hand whisk/spatula

2. Add sugar. Beat until well combined

3. Add egg whites in 2-3 additions. Beat until smooth. Add soy lecithin if you wish to help with emulsification.

4. Add vanilla & strawberry emulsion. Mix until combined

5. Add flour. Fold with a spatula until combined

6. Divide into 3 equal portions. Add white or pink gel colouring to achieve desired shades to 2 portions.

7. Transfer into a piping bag with #5 tip. Pipe as shown in the video tutorial link below.

Piped batter

8. Bake at 150-160C for 10-11 min. Bake at 110C for another 5-10 min to dry it out

9. Prepare filling while cooling the cookies. Melt chocolate & add the rest of the ingredients in. Mix well. Fill & assemble sandwich cookies


You may see the piping video tutorial over here:
Please see part 1 for important notes on basic baking tips to ensure success

- Let the batter fall from the piping tip like you would when piping the border on cookies iced with royal icing. Pipe slowly to have better control of the shape. Video is sped up by 7x. To do so, you don't have to apply a lot of pressure on the piping bag but instead, let gravity do most of the work

- Using a skewer to gently nudge the boundary between colours will make the slight indent/crack between colours invisible. It's ok to omit this step if you don't mind the appearance of the indent at the boundaries.

- I added white gel colouring to make the browning less obvious but you may colour it anyway you like!

- Use a metal file used for bakes only or a fine zester to gently file off bits that make the cookie look out-of-shape (see part 1 reel) but you may skip this step if your cookies are in a nice heart shape. Most of the heart shapes in this larger batch turned out fine even though I piped on parchment so I didn't need to file down as many pieces as the smaller hearts in part 1


with love,
Phay Shing
Read More »

Tuesday, 30 January 2024

Sugar-Free Pineapple Tarts

 This was a bake (bakes actually) that came a little unplanned. It all started because I had leftover pineapple puree from my Lunar New Year themed marshmallow class and I thought of making pineapple tarts that some of my family members can eat without being afraid of spiking their blood sugar levels as much as regular pineapple tarts.

After some trials, I finally came up with something that I am satisfied with. I challenged myself to make pineapple tarts sugar-free without it tasting weird and while minimizing the use of sugar replacements because that's what makes bakes taste weird in general. Those that don't taste that bad aren't zero GI or impart a strong flavour of their own like maltitol (not zero GI) and maple or agave syrup (imparts their own flavour). I made both open-faced and "golf ball" types!


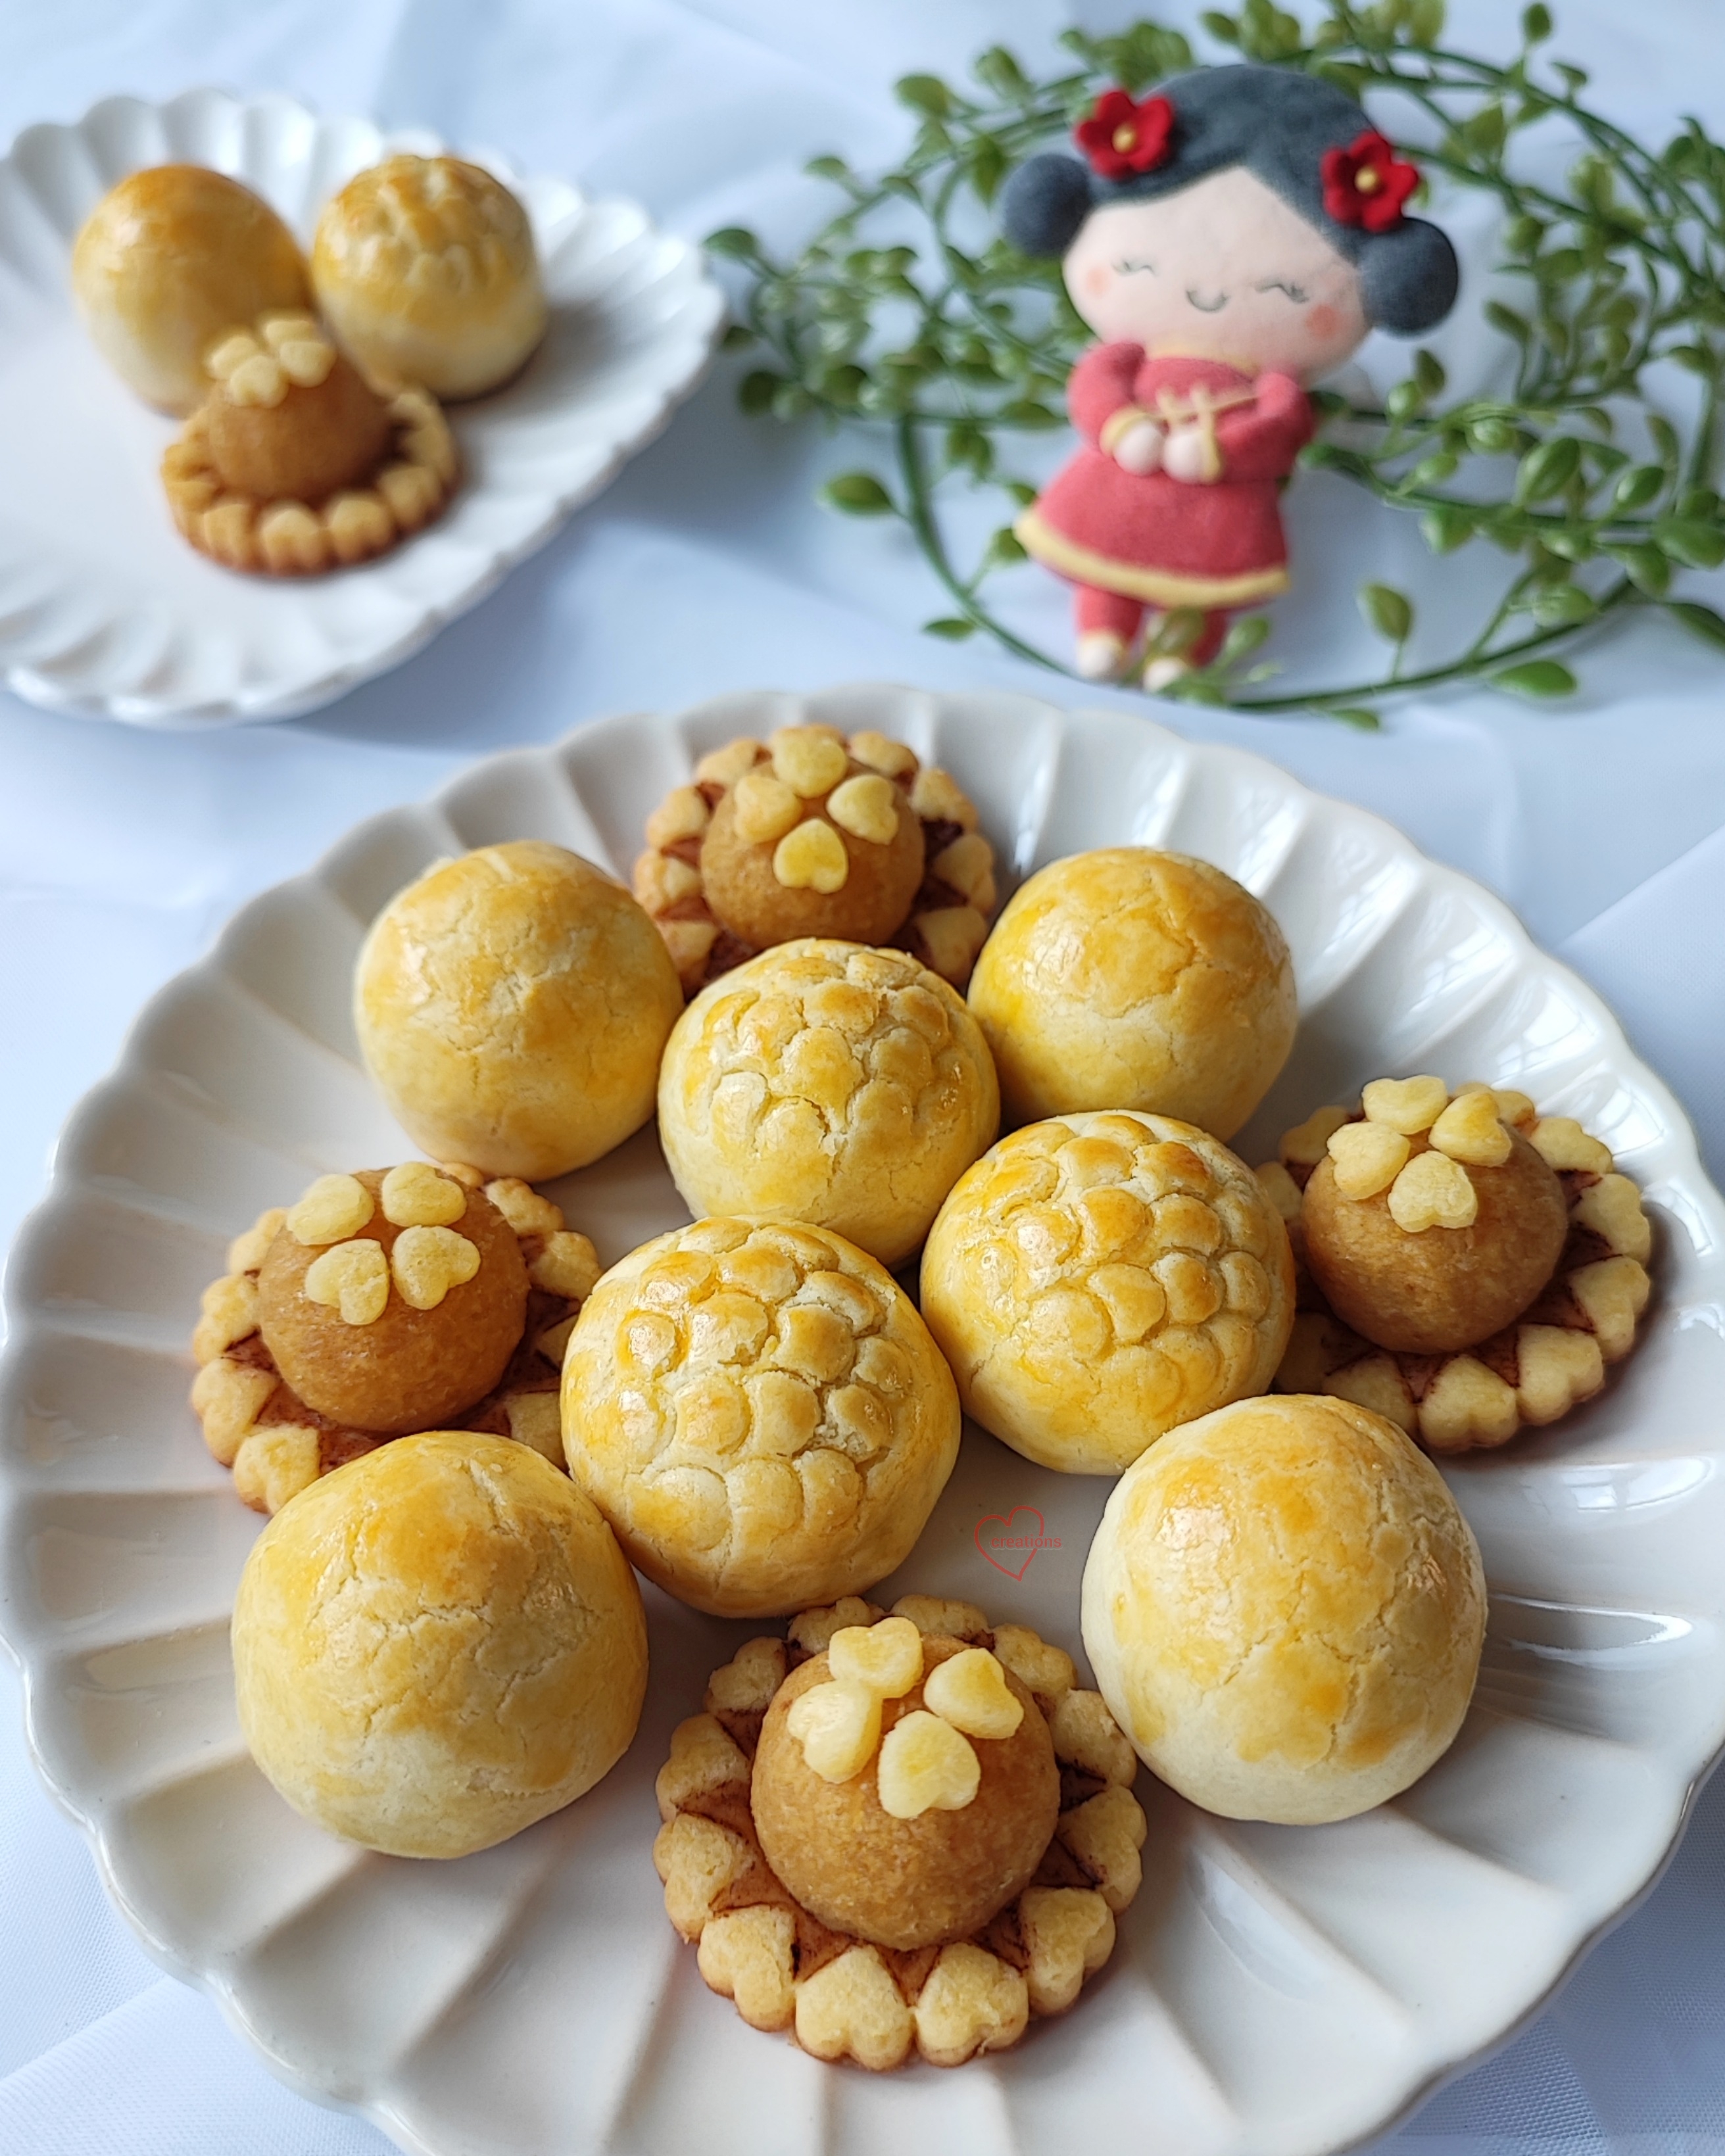
Since the Lunar New Year is so close to Valentine's Day this year, I made the open-faced tart with a little Vday vibes. It also gave me a reason to use a tart mold I have had for years but never used. I added some dragon scale pattern to some of the golf ball tarts since this year is the Year of the Dragon.

Take a look at the cross sections after I took a bite!


Sugar-Free Pineapple Jam
I made the jam without any real or artificial sugar at all. You won't miss it! Adding sugar replacements simply adulterate the taste of the jam when it isn't actually necessary. I tried. It tastes awful to me 🙈. What's the secret ingredient then? Apple! I have seen some people make the jam out of pineapples alone. Adding the right type of apple helps to regulate the level of sweetness/tartness to your preference. Apple is relatively neutral flavour wise and contains lots of natural pectin so it is used in creating homemade sugar-free jams by people who want to omit processed sugar in their diet. Use Granny Smith (sour green apples) if your pineapple is very sweet or you prefer a more sour jam. Use Golden Delicious apples or Gala if you prefer sweeter jam or if your pineapple is very sour. The approximate ratio I use is 1:5 for apple : pineapple by weight. Feel free to upsize your recipe as this is a small batch.

Ingredients (makes enough filling for about 20 tarts):
500g pineapple chunks (about 1 large pineapples)
100-110g apple chunks (about 1 apple)
1 tsp lemon juice (more if you prefer it more sour)
Pinches of salt
1 Cinnamon stick
Cloves and star anise if you wish

Steps:
1. Blend apple and pineapples chunks together with salt. 

2. Add fruit puree and all other ingredients into large frying pan. Cook over medium heat and stir frequently. Reduce heat when the liquid has dried up. Continue cooking until total weight of ingredients is about 30% of original weight. Your jam should be dry. It took me about 20-25 minutes to get there. I used the largest frying pan I have to maximize surface area of the jam to the heat to speed things up. Some bakers use the oven to dry out the puree without having to stand at the stove for some time. To do this, line your largest baking tray with a few layers of foil. Bake the puree with spices at 90C for a few hours or until dry, stirring gently every 1-2 hours. Of course if you have Thermomix, use it😊!

3. Let the jam cool. Spread the jam in a thin layer on a plate/bowl/tray and refrigerate overnight uncovered. This will help excess moisture to evaporate.

4. Portion into 8g balls. Refrigerate until ready to assemble.

8g balls of pineapple jam


Egg wash
Ingredients:
1 egg yolk
1-2 tsp water or milk
A few drops of oil 

Steps:
1. Mix everything together and sieve. Refrigerate covered until needed.

Sugar-Free Open-Faced Tart Pastry
I adapted my recipe by chef Anup Kumar in a Straits Times article written by Hedy Khoo. You may read all about it here.

I highly recommend replacing the almond flour with cake flour as we would be more used to the wheat flour only version. Adding almond flour makes the texture a lot sturdier and the tart base tastes more like almond pate sucree used in classical French pastries. Using cake flour instead of plain flour is fine as I don't find the structure of the pastry compromised and it's overall still sturdy enough to be molded with a plunger mold. I went for the lower end of the suggested sugar amount and find that the sugar replacement aftertaste is hardly detectable at all so it tastes pretty good when eaten together with the jam! But if you are looking at a healthier tart pastry, replacing 12% of the cake/plain flour with almond flour is the way to go.

Feel free to upsize the portion as I made only a small quantity. 

Ingredients (makes about 20 open-faced tarts):
76g cake flour 
15g powdered erythritol (or icing sugar for non sugar-free)
1/4 tsp fine salt
40g cold unsalted butter, cubed
1 egg yolk
1/4 tsp vanilla extract

Steps:
1. Sift together all dry ingredients.

2. Use finger tips to rub cold butter into flour mix until it resembles fine breadcrumbs.

3. Add egg yolk and vanilla. Form a ball of dough with spatula. Flatten into a disc.

4. Wrap dough with cling wrap and refrigerate for 30 min.

5. Roll the dough flat between two sheets of parchment paper to thickness of about 5mm. 

6. Lightly dust the surface of the dough with cornstarch or flour to prevent the dough from sticking to the mold.

7. Press out the dough with the mold and place on baking tray lined with parchment paper about 3cm apart.

8. Apply egg wash with a soft brush. You don't have to make it fancy like I did. I coloured part of it dark brown with chocolate emulco mixed into the egg wash.

9. Place pineapple jam in the middle and press it down lightly. 


10. Decorate with leftover pastry on top of the jam if you wish. 

11. Bake in preheated oven at 170C for 15-20 min or until pastry is lightly browned.

Here's a picture of the plunger mold I took with the freshly baked tarts.


Sugar-Free Golf Ball Tart Pastry
Tart pastry for this type of tarts doesn't need to be as sturdy as the open-faced version. I think this is the more popular version in Singapore because of it's delicate crumbly texture. I adapted the recipe from Celia over here. Feel free to upsize as I made a small portion.

Ingredients (makes about 20 golf ball tarts):
120g cake flour
15g cornflour
15-20g powdered erythritol (or icing sugar for non sugar-free)
20g full fat milk powder
1/4 tsp salt
100g cold unsalted butter, cubed
1 egg yolk 
1/4 tsp vanilla extract

Steps:
1. Follow steps 1-4 in open-faced tart pastry.

2. Divide dough into 10g portions. Wrap the pineapple filling. 

3. Place 3cm apart on lined baking tray. Use a straw cut lengthwise in half to create dragon scale imprints if you wish. Chill for 10-15 min

I left some of them plain without the imprints


4. Preheat oven to 150C. Apply egg wash. Bake for 18-20min or until golden brown. You may take the tray out halfway to reapply egg wash if you wish.

Celia mentions that little bit of cracks is fine as it will reduce in appearance after cooling down.

Cool both types of tarts completely before storing in airtight condition. It can keep well for up to a week at cool room temperature. For longer storage, please refrigerate or freeze after wrapping it airtight. Toast before consuming.

Here's the video of the process:

Update:
My parents tried eating the pineapple tarts cold from the fridge (because they didn't want the hassle of toasting it) after more than two weeks of storage and loved it! They said the tarts were still very good! I also have data from home that eating these in moderation doesn't spike the blood sugar levels!


with lots of love,
Phay Shing


Read More »

Wednesday, 24 January 2024

Heart Langue De Chat without using molds (Part 1: Assorted cookies)

Langue De Chat means cat's tongue in French but they are thin crispy butter cookies. Sometimes they are made as sandwich cookies filled with chocolate and these are usually made using molds. The Japanese popularized the sandwich cookie version and you may have seen it sold in pretty gift boxes. If you have not heard of langue de chat, you may be familiar with the names Shiroi Koibito or 白色恋人饼. While the popular Japanese versions are usually square in shape, I made them in heart shapes for Valentine's Day!

If you don't wish to increase the clutter at home with yet another mold, here's how you can make them. I made mango, mixed berry, matcha and dark chocolate flavours. You can make them in any flavour you like but I feel this combination has such pleasing colours and adding sour mango to the filing makes the cookie overall less sweet. Feel free to stick with the classic white chocolate only if you don't mind a sweet cookie!

Recipe makes about twenty-eight 1.5" heart sandwich cookies.

Butter base:
100g unsalted butter, slightly softened
90g icing sugar
1/8 tsp salt
50g egg whites
1/2 tsp soy lecithin (optional)
1 tsp vanilla extract

Flour & flavouring:
Mango: 25g cake flour
Mixed berry: 25g cake flour + 1/16 tsp strawberry emulsion
Matcha: 23g cake flour + 2g matcha powder
Dark chocolate: 22g cake flour + 3g cocoa powder

Filling:
Mango: 45g white chocolate + 3g freeze dried mango powder
Mixed berry: 45g white chocolate + 3g freeze dried raspberry powder + 1/8 tsp strawberry emulsion
Matcha: 45g white chocolate + 3g matcha
Dark chocolate: 45g dark chocolate + 3g light corn syrup or any invert sugar

Steps:
1. Beat softened butter briefly with electric mixer/hand whisk/spatula

2. Add sugar. Beat until well combined

3. Add egg whites in 2-3 additions. Beat until smooth. Add soy lecithin if you wish to help with emulsification.

4. Add vanilla. Mix until combined.

5. Divide into 4 equal portions. Add the respective flour & flavouring to each portion. Fold with spatula until combined

6. Transfer into piping bag with #5 tip. Pipe as shown

7. Bake in preheated oven at 150-160C for 10 min or until slightly browned at edges. Bake at 110C for another 5-10 min to dry it out

Freshly baked cookies!


8. Prepare filling while cooling the cookies. Melt chocolate & add the respective flavourings. Fill & assemble sandwich cookies

You may watch my reel for the process:


Important Baker's Notes:
- Use room temperature egg whites. Cold eggs will cause the mixture to split

- Add the egg whites a little at a time to prevent mixture from splitting

- Adding an emulsifier like soy lecithin helps to prevent & remedy a split mixture. Some recipes use whole eggs but I prefer it without egg yolk inside for a lighter crispier cookie although egg yolks can help to bring the emulsion together 

- The extra baking time at low temperature is to ensure that your cookie remains crisp. Although the cookies are crisp freshly baked, without the longer drying out time, it won't stay crisp for long especially when exposed to humid air

- Using a scribe tool/skewer to nudge the batter edges & middle (shown in reel) is optional if you wish to have the border visible

- Use teflon sheet/silicone mat to help with better shape retention after baking. Parchment paper may result in the baked cookie going "out of shape"

- Use a dedicated metal nail file or a very fine zester to gently file off "out of shape" cookies (shown in reel)

Stay tuned for part 2 on how to create a sweet ombre version of the cookies!

with love,
Phay Shing
Read More »

Tuesday, 9 May 2023

Heart-shaped Roll Cake


Heart-shaped ❤️ Roll Cake Tutorial! 

I was inspired to shape a swissroll into a heart shape for mother's day. Hope you enjoy it too!🥰 

Recipe (10" cake) 
3 egg yolks 
15g castor sugar 
30g oil 
30g milk 
1 tsp vanilla extract 
45g cake flour, sifted 

Whisk all ingredients above till smooth. Add pink food coloring. 

3 egg whites 
40g castor sugar 
1/4 tsp cream of tartar 

Whip egg whites till firm peaks. Gently fold in egg yolk batter above. Bake at 170C for 22 min. Slice the cake into two. 
Fill the cake with fresh whipped cream and heart-shaped strawberries. Shaping technique in my IG video 💕 

With love, 

Susanne 


Read More »

Sunday, 1 November 2020

My Melody and Little Twin Stars Anniversary Chiffon


My Melody and Little Twin Stars Anniversary Chiffon Online Class is here!💖💖

Celebrating My Melody and Little Twin Stars 45th anniversary this year together, with this special mix characters chiffon class with a delicious cream cheese filling and hearts surprise within the same bake!

Sign up for the class here!🙂💕

These are official licensed Sanrio baking classes in collaboration with Sanrio =).

**A special FREE gift! In addition to the main My Melody and Little Twin Stars Anniversary Chiffon template, a free repeated characters template is included as a bonus!!

Baking kits with cream cheese filling, patterning batter, all food colouring and equipment for this cake are also available (for delivery within SG)!

With lots of love,
Susanne
Read More »

Thursday, 25 June 2020

Bunny, Hot-Air Balloon and Hearts Chocolate Salted Caramel Macarons

During the circuit breaker period, celebrations tend to be a cosy and small affair so my projects are mainly involve small quantities. This is actually for 2 separate requests, with some plain pink hearts not in the picture.

For Heidi who loves hot-air balloons and bunnies! 

The design of the bunny is partly done with the help of my elder kid for a teacup macaron class in the future. I converted it to a full body version.

I used the Swiss meringue method to make the macaron shells.

Piped batter. The hot-air balloon was really tedious and tricky! I piped on some royal icing to improve the definition of the hot-air balloon after baking

You may refer to this post for the dark chocolate ganache recipe and this post for the salted caramel recipe.


I hope these bunnies, hot-air balloons and hearts brought some cheer during this gloomy time!

With love,
Phay Shing
Read More »

Thursday, 30 January 2020

All You Need To Know About Heart Macarons (Templates and Video included)

Hot on the heels of Chinese New Year is Valentine's Day so many macaron bakers are looking at making heart macarons for sale. I am part of a wonderful Facebook group called All Things Macarons and I know from there that there are some things that bakers would love to know about making heart shaped macarons. I happen to be teaching this for Culinary Arts Ministry in church so I have decided to do a detailed documentation of making heart shaped macarons. (Update: this event is cancelled due to the coronavirus spread. But I hope this post will be helpful to bakers. Stay safe everyone! Practice sensible hygiene and trust God to take care of us!) Although I have a rather comprehensive post done about 3 years ago over here, I have revised the French method recipe to one that dries faster and is so "failproof" that I use it for Junior chef classes. Many bakers also want to know how to get that beautiful deep shade of red so I am introducing a colouring which I use now that is better than the standard Americolor or Wilton ones. Presenting my humble raspberry dark chocolate heart macarons!

The colour of these hearts are not as deep because I made these concurrently with other macarons and so I didn't use the awesome red powder colouring here. I made these for the event ad much earlier. 

Here are the templates for hearts of different sizes. For Culinary Arts Ministry, I will be using the template with smaller hearts as we have limited time and oven spaces. Each template can be scaled to an A4 size paper.

Regular sized hearts

Mini hearts

I used to need to add many drops of gel food colouring in order to achieve a deep shade of red. But now that I discovered what "Ah Ma" (grandmother in the Chinese Hokkien dialect) used to colour things like red eggs or ang ku kueh works many times better than Wilton or Americolor, I am going to stick with it. All I needed to add was 1/4 tsp of the red powder per egg white worth of recipe for macaron batter to achieve a super deep and bright red!

You can find this at supermarkets like Sheng Shiong in Singapore or perhaps Chinese or Asian grocery stores in other countries 

I will share the French method recipe here although you can use your preferred method.

Recipe for red macaron batter (French method, makes about 20 small heart macarons (40 shells) or 12 regular hearts (24 shells) ) 
Ingredients:
Meringue
35g egg whites
1/8 tsp cream of tartar (optional, for stabilising egg whites)
32g icing sugar (with cornflour added)
1/2tsp cornflour
1/8tsp fine salt (optional)

Dry ingredients
48g icing sugar
40g superfine almond flour
1/8 tsp cornflour
1/2 tsp freeze-dried raspberry powder
1/8 tsp cocoa powder
1/4 tsp bright red powder colouring.

Notes:
I added cornflour to stabilize the meringue as well as help the shells dry faster and be sturdier. Do note that this will cause the shells to be chewier in texture as well so give the filling at least 3 to 4 days to mature with the shells in the fridge before consuming, or brush the bottoms of baked shells with unwhipped heavy cream before filling to speed up maturing process.

Raspberry powder and cocoa powder are added for dulling the bright red colour a little as well as to temper the sweetness level of the macaron shells.

I am introducing oven drying here but you may choose to rest the piped batter in the open or in aircon room.

Steps:
1. Preheat oven to 65°C, top and bottom heat only. Set rack to second lowest position. Line baking tray with template and parchment paper.

2. Sift together all the dry ingredients. You may want to weigh out about 3g extra almond as some grains may have difficulty passing through the sifter. Do not press the mix hard through the sieve as it will cause oils from the almond to come out and ruin your macarons (you get fragile, splotchy shells). Set aside.

3. In a small bowl, whisk together icing sugar and cornflour for the meringue

4. In a clean metal (or glass) mixing bowl, beat egg whites with cream of tartar until foamy. Add about a third of icing sugar/cornflour mix and whisk until sugar is absorbed then beat for a few seconds using elecreic mixer. Add another third of the sugar and repeat whisking and beating. Add the rest of the sugar and whisk until it is absorbed into the egg whites. Turn up mixer speed to medium high and beat until meringue reaches stiff peaks. Scrape down sides of the bowl with clean spatula. Beat the meringue again for about half a minute. Scrape down the sides and test if the meringue is ready. If the meringue balls up inside the whisk, it is stiff enough. But some whisks of mixers are unable to do this so another test I use is to create little peaks all over the meringue in the bowl. If all the peaks stand up straight without curling over, meringue is ready.

5. Scatter half of the dry ingredients over the meringue. Gently fold in using a spatula until no trace of dry ingredients is seen. Scatter the other half of dry ingredients and gently fold until just incorporated. The batter is underfolded at this point. Press the batter against the side of the mixing bowl to deflate some air from the batter. Test consistency again. Repeat this until batter is smooth, shiny and able to fall of spatula in an almost continuous manner. Alternatively, you can test consistency by creating little peaks of batter in your bowl and tap the bottom of the bowl. If the peaks sink back in, your batter is ready. You may find it helpful to watch this video tutorial I did for the basic french method to have a better idea of batter consistency and folding technique.

6. Transfer batter into piping bag fitted with a wilton #8 tip for small hearts and #10 for regular hearts. Pipe the hearts on the tray like this:

I made this video 3 years ago and didn't bother making another one because I think it is clear enough 🤣

You may use a toothpick to nudge the batter into place as necessary, or to pop air bubbles. Bang the tray a few times to pop trapped air bubbles.

Piped batter

7. Place tray into oven for 10 min. Let it rest at room temperature free from draft while you preheat the oven to 170°C for 10 min. If you happen to have access to two ovens, you may preheat one to 65°C and the other to 170°C right from the start and just pop the tray of piped batter from the low temperature oven to the high temperature oven straight away after 15 min in low temperature oven. The purpose of oven drying is to speed up the process of forming a sturdy membrane on the surface of the shell before baking.

Once the tray is in the oven at 170 °C, reduce the temperature to 140°C. Bake for 18-20min for small hearts and 22-25min for regular hearts. Please note that the suggested temperature and time is a reference only as each oven works differently. Adjust your baking temperature and time accordingly, including the initial oven drying temperature and time. 

Let the shells cool completely on baking tray before carefully removing the parchment away from the shells (not the other way round).

Freshly baked hearts! 

Another view! I love this view! 

Raspberry dark chocolate ganache
Ingredients:
65g dark chocolate couverture
6g unsalted butter
18g heavy cream
1/8tsp sea salt
1/2 tsp vanilla bean paste
1/2 tsp coffee liqueur
8g freeze-dried raspberry powder

Steps :
1. Place all ingredients except raspberry powder in microwave-safe bowl. Heat on medium power for 20 sec and mix well. Repeat heating and mixing as necessary until smooth and melted.

2. Add freeze-dried raspberry powder and mix well.

3. Let the ganache firm up until toothpaste consistency before transferring into piping bag. You may choose to whip the ganache for a lighter texture if you wish.

You may fill the macarons with any filling of your choice but I love the raspberry dark chocolate combo as it compliments the sweetness of the macarons well so overall the confectionery is an explosion of flavours without being too sweet. Remember to be patient and only consume the macarons after a few days of maturing! Let the macarons sit at room temperature for 15 min before eating or the ganache might be too firm. The ganache recipe I share is suitable for hot climates like Singapore so feel free to increase the amount of cream if you want a softer ganache.

With the cancellation of the church event, I rushed out some hearts to give away instead! We need to spread more love during this trying time and not panic.


With love,
Phay Shing
Read More »

Thursday, 2 January 2020

Valentine's Day Heart Macaron Bouquet Class

If you are clueless about macarons but want to make something that looks impressive and tastes great (not too sweet), why not join me for this macaron class to make a heart macaron bouquet!


I will cover the simplest method, the French method, as well as some calligraphy tips and bouquet assembly tips. Heart shaped macarons are not just suitable for Valentine's Day, but also for other occasions like Mother's day, teacher's day or any day you want to show your loved ones how much you appreciate them 😊. The fillings I am teaching are dark chocolate ganache and raspberry white chocolate ganache.

Registration link and details of the class can be found here.

With love,
Phay Shing
Read More »

Wednesday, 13 February 2019

'Winnie the Pooh' in Heart Shaped Choux Pastries

I have begun taking step by step photos for my Deco Choux Pastries book! It's only been three days but I am exhausted 😅. I have planned 5 weeks of work and on the 6th week, it's when the photoshoot with the Marshall Cavendish team will happen. Although I didn't plan to blog about this, I thought I might as well. Just in time for Valentine's Day!

Winnie the Pooh peeking out from heart shaped choux pastry!

I was taking step by step photos for these heart shapes and thought I might as well have a little fun and fill one of the cases since I baked extras. I was in a rush so I just used instant pudding to make Pooh and filled the rest of the case with nutella.

Did you know that you can easily make fancy shaped pastries? They don't need to be round all the time although round is great!


Making heart shaped choux pastries is fairly easy and I will show you how in the upcoming recipe book! I will be slowing down with blog posts for real until a little while after the photoshoot. Unless I suddenly have the bandwidth and my hands itch to make something 😆.

Happy Valentine's Day!

With love,
Phay Shing
Read More »

Monday, 11 February 2019

Hello Kitty & Pooh Valentine's Day Macaron Teacups

I get all excited about coming up with original and cute overloaded creations. This is one of them! It's for a boyfriend who wanted to surprise his girlfriend for Valentine's Day. I am sure you can tell she's a Hello Kitty and Winnie the Pooh fan!

The whole teacup setup is made of macarons, with the exception of the stick for the heart balloon

I made this concurrently with my "Heart in a Teacup" macarons so you may refer to that post for more details on making the macaron teacup. I used reduced-sugar Swiss method for the teacups.

I made Hello Kitty, Pooh and the teeny hearts on a separate day along with a few other unicorn heads and some random characters. And because the quantity is so small, I chose to use the French method for these. You may refer to this post for a cornflour-stabilized French method recipe that I used for this bake.

Piping the tiny shells! I mainly used Wilton #3 and #5 piping tips for these

Decorating the shells with fine black edible marker was a challenge too! Thank God I made extra shells!

I filled the tiny macarons with dark chocolate ganache


Special gifts for your loved ones need not happen on special days like Valentine's Day. Do something special for your loved ones on random days. That's more special 😉.

With love,
Phay Shing

Read More »

Wednesday, 6 February 2019

'Heart in a Teacup' Lavender Earl Grey and Dark Chocolate Macarons

When my friend saw the macaron teaset I made last year, she quickly booked me for Valentine's Day order, four months in advance! She already had a cute and visually simple design in mind and I was ready to go with it 😊

Presenting my "heart in a teacup" Valentine's Day bake!


I used the regular Swiss method recipe for the hearts and the reduced-sugar version for the teacups. I had extra red batter left from making display pieces for my boy and girl CNY macaron class so I decided to bake the red hearts in advance and froze the shells.

Dainty red hearts! The little "tail" at the bottom piece is to help the macaron sit nicely in the filling inside the teacup.

You may refer to this post for more details on how to make the macaron teacups. Here are some photos of the process...

I added 1.5tsp of freeze-dried raspberry powder into the almond paste.

Note the dull colour. Natural sources of food colouring are usually dull.

After adding some pink gel colouring. I added a little too much pink so I added a little white gel during the macaronage stage.

I love the final soft dusty rose pink colour!

The teacups are made of a few components that need to be piped out.

The saucer

The handles

Teacup body

Piping the cup base when a sticky membrane has formed on the base shell.

Freshly baked macaron shells!

I decorated the teacup with royal icing made using lemon juice instead of water to make it less sweet. I filled the handles with white chocolate. I couldn't help taking a photo of this whimsical setup!

I filled the hearts with whipped dark chocolate ganache


Both flavours of fillings are relatively firm so they are suitable for filling macarons that are to be given away as gifts in tropical Singapore, such as these teacups. If you are living in a colder climate, you may adjust the filling recipe to reduce the chocolate to cream ratio for a softer filling.

Store filled macarons in airtight condition in the fridge for at least 24h before serving. Leave the teacups out at room temperature for 15-20 minutes before opening the container to serve.

If you need more comprehensive and detailed information about the basics and various techniques of macaron making, you may refer to my Creative Baking: Macarons or Creative Baking: Macaron Basics books.


With love,
Phay Shing

Read More »