Showing posts with label Mickey mouse. Show all posts

Thursday, 23 January 2020

Mickey Mouse Kueh Lapis


Mickey Mouse cake to usher in the Year of the Rat! Can you guess what cake this is?


And more slices! My family said it was really sad to cut up the cute Mickey =p


Yes it is kueh lapis! Great when we have extra egg yolks! =)

The character kueh lapis was rather experimental, and I didn't think it would work. I actually made a few more other kueh lapis with the kids! Everyone loves it (it's a lot sweeter and richer than the usual chiffon cake haha).

Here's the recipe of the kueh lapis experiment for those who are interested.

Cartoon Kueh Lapis (makes 1 6-inch cake)
Egg Yolks 
10 egg yolks (from large eggs)
60g castor sugar

Butter Batter
250g butter, at room temperature, cut into small cubes
100 g condensed milk
1 tbsp rum (or 1/2 tbsp vanilla if you prefer non-alcoholic version)
17g corn flour
58g all-purpose flour
½ tsp mixed spice (I used ground cinnamon, nutmeg, cloves and cardamon)
1/8 tsp salt (a pinch)
Charcoal powder
Beetroot powder

Egg Whites 
5 egg whites
¼ tsp cream of tartar
40g castor sugar

For greasing: 1 tbsp unsalted butter, melted

1. Preheat the oven to 180°C, using only top heat. Place your cake mold into the oven to warm up while you prepare the batter.

2. Egg Yolks: Beat egg yolks with castor sugar (for egg yolks) using an electric mixer on high speed until the egg yolks are pale and thick (ribbon stage). Set aside.

3. Butter Batter: Place the butter, condensed milk and rum (or vanilla extract) in another bowl and beat on high speed until the mixture is light and fluffy. Add in corn flour, plain flour, spice and salt, reduce the speed to low and mix till well incorporated. Lastly, add in your whisked egg yolks and mix and low speed till well incorporated.

4. Divide the batter 2/3 and 1/3. To 1/3 of the batter, add in 1 tsp charcoal powder, and then bit by bit more and mix well till desired shade of black. From the 2/3 plain batter, spoon out 1 tsp and add ¼ tsp beetroot powder and mix well for the pink batter.

5. Egg Whites: Place the egg whites in a new clean, dry and oil-free bowl. Beat on low speed with cream of tartar until soft peaks formed. Add in castor sugar (for egg whites) gradually and are glossy and stiff peaks formed.

6. Fold ⅓ of the egg whites into the butter batter to lighten the mixture. Fold in the rest of the egg whites gently until fully incorporated.

7. Remove cake pan from oven, and brush the base with melted butter to grease the part you are adding batter. Start with the nose (charcoal batter), and bake for 5 mins, or until the top is golden brown in colour. For the next layer, grease the face, spoon plain batter into a thin layer around the nose and bake another 5 min, or until the top is golden brown in colour. Gradually build up layer by layer, spooning or piping charcoal batter onto the black parts, and likewise plain batter for the face. Repeat this until you have reached the top of the cake mold.

8. For the pink batter, you can either pipe it onto the cake mold at the tongue area, or bake it separately in a cupcake liner,as what I have done and stick it onto the cake later.

9. Allow the cake to cool completely before unmoulding the cake by popping it out of the greased mold.

10. Pipe on the eyes using some melted chocolate.


Hope you enjoyed this creation!

Happy Chinese New Year in advance!

With lots of love,
Susanne

Read More »

Sunday, 27 May 2018

Donald Duck Ufufy Chiffon Cake


I realized I have a "thing" for things that are round! =D I find them sooo adorable! So my characters are getting rounder and fatter hehe =p.

This is a Donald duck Ufufy Chiffon Cake for my friend's adorable 2 year old (who is so adorable as well!!). This recipe used is similar to my previous Marie Cat Ufufy Chiffon Cake that I made for my own daughter. It uses the Reduced Egg yolk Angel Cottony Cake recipe that naturally produces whiter chiffon cakes without use of coloring, which I also used my Cloud Chiffon Cake in Deco Chiffon Cake Basics.

Don't you just want to hug the cake?? My friend shared it was so difficult for her to cut the cake hehe.

On another note, school holidays are here, so will be very busy for me again *nightmare* lol. Wishing everyone a blessed week and holidays (for those going oversease)!

With lots of love,
Susanne

                  3rd book (Basics techniques)      2nd book (Deco)           1st book (Rainbow)


Updates:
Deco Chiffon Cake Basics now on Book depository with free shipping worldwide (and on discount)!


Read More »

Friday, 25 May 2018

Space Themed Brown Sugar Cookies

My friend requested for some space themed and Mickey and Minnie mouse cookies for her son's birthday.


This is a way overdue post that I couldn't find an opportunity to post earlier due to more pressing bakes to post first. I made a more "grown-up” version of the planets and sun for my elder kid's birthday end of last year. This cute version was actually made months before that 😅.

You may refer to this post for the brown sugar cookie and royal icing recipe.

Just to share a couple of works in progress pictures...

Icing the cookies


Thank God these were so well received that they were all finished during the party along with the cupcakes that my friend baked for her boy, much as mummy wanted to reserve some after the party.

With love,
Phay Shing

Read More »

Tuesday, 23 June 2015

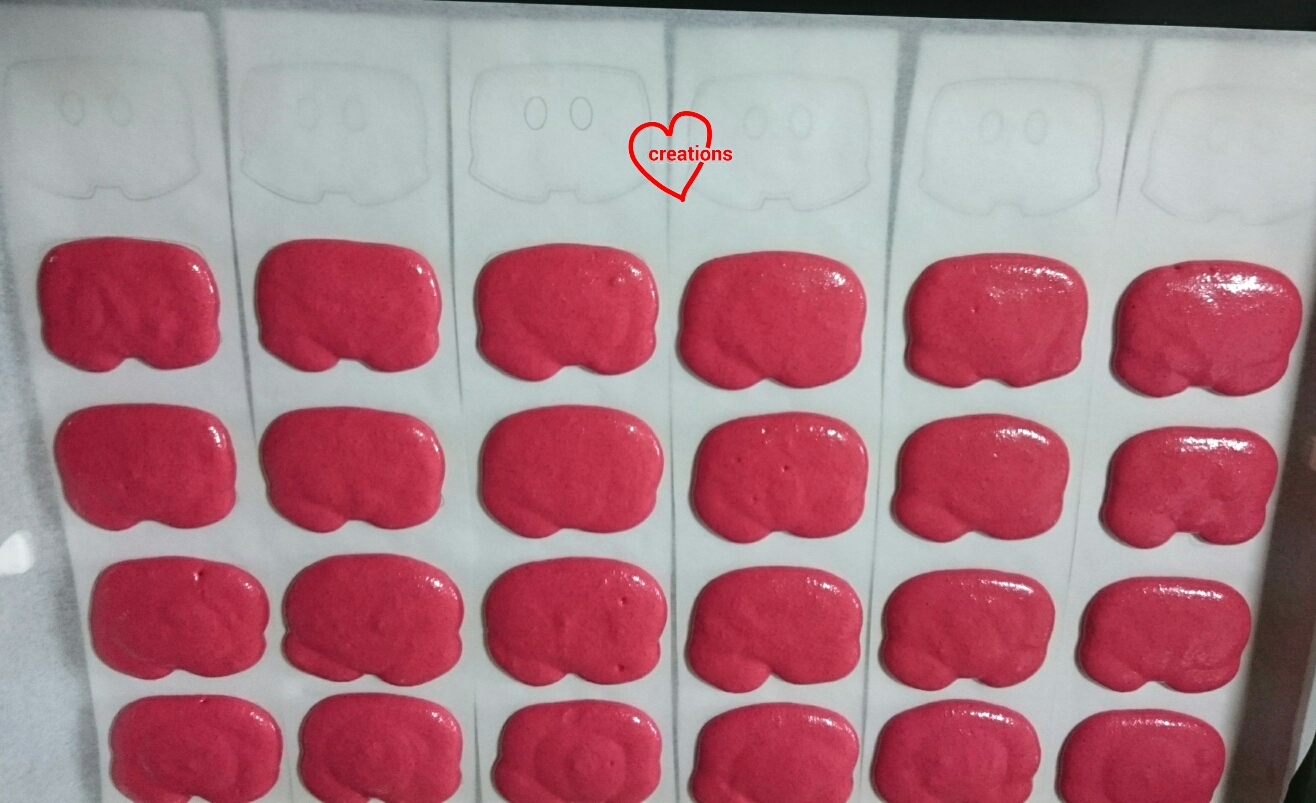
Mickey Mouse Gloves and Pants Macarons

I have a request for Mickey Mouse gloves and pants macarons along with Mickey and Minnie Mouse cookiepops. Here they are :)

Salted caramel (gloves) and strawberry (pants) flavoured!

I was told that these were promptly snatched up at the party! Thank God they were well received :).

Recipe for strawberry and caramel shells
Ingredients (makes about 20 macaron pants and 25 macaron gloves. I only made 15 of each and played with leftover batter):
200g ground almond (extra fine)
200g icing sugar
200g caster sugar
75ml water
160g egg whites, preferably aged, divide into one 80g and two 40g portions

5g red yeast powder*
2g beetroot powder*
1/8 tsp red powder food colouring*
1/8 tsp strawberry emulco
A few drops red gel food colouring
1/2 tsp white powder food colouring*
1/8 tsp caramel essence*

*Ingredients for food colouring/flavouring that can be omitted. Just use gel food colouring if you are unable to obtain red yeast and beetroot powder

Steps:
1. Sift together ground almond and icing sugar. Divide into two portions. Place glove and pants templates on baking tray and line with baking sheet. If the sheet does not lie flat on the tray, use a bit of Italian meringue to stick it down.

2. Dissolve beetroot powder in one 40g portion of egg whites. Add sifted red yeast and red powder colouring to one portion of ground almond mixture. Add egg white with beetroot into the almond mixture. Add strawberry emulco and mix well until a mass forms. Add drops of red gel colouring until desired dark shade of red is achieved.

3. Add sifted white powdered coloring to the other almond mixture. Add 40g of egg whites and caramel essence and mix well until a mass forms. You may use white gel colouring or omit the use of colouring.

4. Make the Italian meringue. Heat caster sugar and water in a small saucepan without stirring once the water boils. At the same time, beat 80g of egg whites at medium low speed with electric mixer until foamy. Do not beat the egg whites beyond soft peak stage. Reduce mixer speed if necessary. Boil syrup until temperature reaches 115°C. Remove from heat. Increase mixer speed to high and slowly pour syrup into the egg whites, avoiding the beaters. Keep beating on high speed for 10-12 minutes until meringue is cool, stiff and glossy. Divide the meringue into two equal portions.

5. Fold the meringue into the mass in two additions, leaving about 2 tbs of meringue unused for each batter. First addition is about 1/3 of the meringue to lighten up the batter before adding the rest. Work on one coloured batter and complete piping out before folding the meringue into the other mass. The consistency should be such that the batter flows in a slightly discontinuous manner off the spatula, I.e. under folded. Checkout my video tutorials for the macaronage process.

The masses and macaron batter

6. Transfer the batter into piping bag. I used a Wilton #12 round tip to pipe out the pants.


I used a Wilton #10 round tip to pipe the main part of the gloves, air-dry for 15 minutes before piping the base of the glove with #5 round tip.


Tap the tray hard on the table to release any trapped air bubbles after piping.

7. Dry the shells for 2 hours or until the surface is no longer sticky to touch in an air con room.

8. Bake the pants at 130-140°C for 17-22 minutes with the rack at second lowest position in the oven. Rotate the tray halfway through baking. Let the shells cool on the tray before attempting to remove them. The shells should lift off easily from baking sheet. If it is still stuck, it's under baked. Bake for another 5 minutes at 120-130°C before checking again. Repeat if necessary.

Freshly baked pants! Sounds funny, I know :p

Bake the gloves at 120-130°C for 17-22 minutes with the rack at the lowest position.

Freshly baked gloves!

9. Decorate the shells with edible black marker and yellow royal icing.


10. Fill the shells with strawberry swiss meringue buttercream (smbc)...

I doubled the amount of strawberry emulco used

... And salted caramel smbc with salted caramel at the center...

I omitted the earl grey.

Keep the assembled macarons in airtight container and refrigerated for at least 24 h before consuming.

All packed and ready to party!

I made cute Molang with some leftover white macaron batter. Do check out those! I made something else with leftover red batter to freeze for another party since macaron shells freeze well. Will post about that when the time comes!

With love,
Phay Shing


Read More »

Thursday, 18 June 2015

Mickey & Minnie Mouse Sugar Cookiepops

I have a request for Mickey and Minnie mouse sugar cookiepops and here they are!


I usually use shortbread to make this pair of mice as I like to use natural colouring (charcoal and strawberry paste) and make the cookies relatively icing-free. Since the requester wanted it in sugar cookie form with iced features and mounted on sticks, I made it differently from my preferred style.

The recipe for sugar cookie is adapted from the rolled cutout butter cookie dough in "Crazy about cookies" by Krystina Castella that I bought recently. I couldn't resist buying this book because there are so many wonderful recipes and creative ideas in this book! I would have chosen my good ol' brown sugar cookie recipe that my recipients rave about but the reference picture I was given was of a regular sugar cookie base. Doing things differently this time meant that I get to challenge myself and learn something new :).

Ingredients (makes about 36 Mickey/Minnie cookiepops):
227g unsalted butter, softened
225g caster sugar
1 large egg yolk
1 large egg
1/2 + 1/8 tsp salt
2 tsp vanilla extract
438g plain flour

Steps:
1. Cream butter and sugar until pale and fluffy. I was feeling really tired and for the first time, I used an electric mixer to do the creaming *gasp*. I usually get a good workout creaming by hand.

2. Gradually add in lightly beaten egg and egg yolk, mixing well with each addition. The mixture will separate if you add too much egg at once. Add in vanilla extract and mix until well combined.

3. Add sifted flour and salt in a few additions, mixing the flour in with a spatula until just combined.

4. Chill the dough in fridge for 30 minutes before dividing into 3 portions and rolling them to 1/4" thick between 2 baking sheets. It's easier to work with 3 smaller batches of dough than one large portion of dough.

5. Chill the rolled dough in fridge or freezer until firm. At least 30 minutes.

6. Prepare a Mickey head outline template on paper with the head the same size as a 5cm diameter round cookie cutter. The ears are cut from round cutter slightly smaller than 3cm. Place a small piece of baking sheet over template and cut out the Mickey shape as shown below. Carefully insert a wooden stick into the head. Place the whole assembly, including the baking sheet, onto a baking tray. Remember to lightly press the dough at the boundary of the ears and head such that the dough sticks together. I used a reusable freezer pack as my work surface to keep the dough chilled for a longer time. Dust with a bit of plain flour if the dough is sticky.


7. Preheat oven to 170°C. Chill the tray of cutouts in the freezer/fridge until firm (at least 15 minutes). Bake at 170°C for 13-15 minutes or until edges are lightly browned. Cool on tray for 5-10minutes before transferring to cooling rack to cool.


8. Decorate with royal icing when completely cooled. It is advisable to let the cookies rest overnight before icing but I was in a hurry to finish so I started to do part of the icing on the same day that I baked the cookies. I used cocoa powder and charcoal to colour black, and strawberry paste with a bit of red and burgundy gel food colouring to colour red. The result is a fragrant cookie with Neapolitan flavour :). Vanilla cookie base and chocolate - strawberry icing.


Be sure to let the base icing dry completely before adding on the white dots and bows! I dried mine overnight before adding the bows and dots.


I secured the stick with some royal icing at the back of the cookie as I had difficulty inserting the sticks until the dough completely covers them. You may make two thin round cutouts for the head to sandwich the wooden stick like I used to do for my previous cookiepops but I was trying out this faster method of inserting the stick into the side of the dough cutout for this bake.

Individually wrapped with red ribbons was requested...

Looking sweet :).

All packed!

It was a good learning experience for me :). Glad the cookies turned out well!

With love,
Phay Shing


Read More »

Thursday, 7 May 2015

Mickey and Minnie Mouse Macarons with Whipped Caramel Filling (plus short notes on how to age egg whites)

I have a request for Mickey and Minnie macarons again! They seem rather popular.


They look similar to my previous attempts here and here but the flavour is different. As caramel flavour was requested, there's no cocoa powder added to the shells and I had to make the caramel instead of Oreo cookies and cream buttercream for the filling.

I realized I haven't posted how I age my egg whites in any of my macaron posts. Here's how I do it. I place egg whites in a bowl and cover with paper towel secured with a rubber band. Finally, cover the bowl with cling wrap (no need to be tight) and place in the fridge until you want to use it. The paper towel absorbs any moisture that the egg whites release during storage without dripping back into the bowl. That way your egg whites will slowly lose moisture over the few days of aging in the fridge. Remember to let the egg whites come to room temperature before using.


Recipe for Mickey macaron shells
Ingredients (makes about 90-94 shells, 45-47 macarons):
200g superfine almond meal/ground almond
200g icing sugar
20g charcoal powder
Black gel food colouring
1/4tsp vanilla extract (optional)
1/4tsp caramel extract (optional)
200g caster sugar
75ml water
160g egg whites, preferably aged and divided into 2 equal portions

Steps:
1. Sift together almond meal, icing sugar and charcoal powder. Add 80g of egg whites to form the mass. Add a few drops of black gel food colouring and the extracts. Mix well.

2. Prepare the Italian meringue. Heat the caster sugar and water in a small saucepan. Do not stir once all the sugar has dissolved to prevent crystalization. At the same time, beat the other portion of egg whites using an electric mixer. Do not beat it beyond soft peak stage. Reduce mixer speed if necessary but keep moving the egg whites. When syrup reaches 115°C, take it off the heat, turn up mixer speed to high and slowly pour the syrup in, taking care to avoid the beaters. Continue beating on high speed for 10-12 minutes until the meringue cools and is glossy and forms firm/stiff peaks.

3. Fold the meringue into the mass in 2 batches. Fold in 1/3 for the first batch. Use a fold and press motion. I left about 1/4 cup of meringue unused. When the batter is able to fall off the spatula in an almost continuous manner, it is ready. Do watch a video demo for a good gauge of the right consistency.

4. Transfer the batter into piping bag fitted with a 5-6mm round tip. Pipe out the shells onto trays lined with baking sheet. Place the Mickey template under the baking sheet. Tap the tray to release trapped air bubbles. Don't be shy to tap hard. It helps to flatten any "nipples" on the shells too.


5. Let the shells dry in an air con room for about 2 hours. When the shells are no longer sticky to touch, they are ready to be baked. I didn't use oven drying as I had another batch of macarons to make at the same time.

6. Bake at 130-140°C for 17-22 minutes at second lower rack. Rotate the tray halfway though baking if your oven heat distribution is uneven. Let the shells cool for 5 minutes before attempting to remove from tray.

Freshly baked! The template shifted after I tapped the tray so the shells look displaced :p

When the shells have cooled, ice them with royal icing.

All red was requested this time

Instead of using the recipe I used previously for salted caramel macarons, I decided to try whipped caramel. This eliminates the need to prepare swiss meringue buttercream separately while still retaining a lighter-textured filling.

Recipe for whipped salted caramel (adapted from The Tough Cookie)
Ingredients:
210g caster sugar
72ml water
139g heavy whipping cream
1 tsp vanilla extract
210g unsalted butter, cut into tablespoon sized pieces
Sea salt to taste (I added about 1/2 tsp. You may add more for a more salty taste. Requester wanted me to go easy on the salt.)

1. Heat up the whipping cream until it starts to bubble a bit and set aside. At the same time, heat the sugar and water in a heavy-based saucepan, preferably light coloured. You may stir the mixture to help the sugar to dissolve but stop once all sugar has dissolved. Carefully watch the colour of the syrup. Once it has turned golden in colour, take it off the heat.

2. Gradually add the cream and stir quickly with a long wooden spoon. Be careful as the mixture will bubble violently. Just keep stirring and it will calm down after a while. A deep saucepan is helpful here.

3. Add in half of the butter one piece at a time and mix well. Cool the base of the saucepan in a bowl of tap water while adding in the rest of the butter a piece at a time until well incorporated. Add in the vanilla extract and sea salt. Mix well.

Freshly made caramel

4. Pour the caramel into a mixing bowl and chill it in the fridge until it firms up (about an hour or more). Whip it with an electric mixer until light and fluffy.

Freshly whipped caramel

Pipe the whipped caramel onto the shells.

Filling the shells

Refrigerate the assembled macarons for at least 24 hours before serving.

All packed!

With love,
Phay Shing


Read More »

Wednesday, 8 April 2015

Minnie Mouse 2-Tier Strawberry-Vanilla Chiffon Cake


This is a sweet 2-tier Minnie Mouse Chiffon Cake that is strawberry-vanilla flavoured for baby Rainie’s full month celebration! It’s somewhat a big sister version of my previous Minnie Mouse Strawberry Chiffon Cake. Here, I added a vanilla chiffon cake tier on top decorated with pink polka dots. I also felt more confident to tie a bow using chiffon cake for her hair compared to last time. I'm a little late in blogging this cake to wish the baby full month :p. Hope she is growing well! Thankful cake was well-received.

Made with lots of love,
Susanne

Read More »

Monday, 9 February 2015

Mickey & Minnie Cookies and Cream Macarons (updated version)

Someone requested for some Mickey and Minnie mouse macarons with cookies and cream as the flavour. But this time, Minnie is dressed in pink and adorned with more polka dots!


I made some slight modifications to the recipe for the shells and filling from my first attempt. I increased the amount of charcoal and cocoa to make use of more natural colouring and flavour. The addition of vanilla bean paste is to enhance the flavour too! Many thanks to Susanne for this gift otherwise I will not have vanilla bean paste in my possession. I have to confess that I had to junk my batch of French buttercream (buttercream that uses egg yolks like in my previous Mickey macs attempt. I tried a different French buttercream recipe.) Much as it is nice to be able to use up all that excess egg yolks from making macaron shells, French buttercream is just a little too tricky for me. The cream separated and I couldn't salvage it so it's back to good old foolproof swiss meringue buttercream!

Beside a change in recipe, I used a mix of oven drying and aircon drying of the shells to get the optimal drying time for fit my routine as aircon drying takes way too long and oven drying tends to result in shells that are too dry. Since I have 5 trays to dry, I can't dry them in the oven all at once. By the time the last tray of shells are dry, the first tray would have been sitting out for quite a while. My panda and Peppa Pig macarons have feet that are not as beautiful due to this reason. Check out the feet from this batch of macs!


Please refer to my previous macaron shell recipe for the detailed steps. I will highlight the changes here.

Macaron shells
Ingredients:
200g almond powder/meal (preferably superfine)
200g icing sugar
2 tsp cocoa powder
15g charcoal powder
1/2 tsp vanilla bean paste (optional)
Black gel food colouring
200g caster sugar
75ml water
160g egg whites, divide into two equal portions (preferably aged)

Prepare the mass and Italian meringue. As usual, be careful not to overfold the batter during macaronage.

Macaron batter just before transfer into piping bag

Pipe batter onto baking sheet with template under.


I dried each tray of shells in the oven at 60°C fan mode for 10-15 minutes before aircon drying until it is time to bake. Total drying time for each tray is about an hour. If you can fit all your trays in the oven, by all means oven dry them in one round and just ramp up the oven temperature when they are dry.


Royal icing
Ingredients:
126g icing sugar
9g meringue powder
24g water
Gel food colouring

Pardon me for not using more natural colouring this time :p. I am really busy and needed to speed things up by making the icing in one batch. I have found the optimal whisking time for royal icing, which is around 5-6 minutes of continuous hand whisking. You may use the electric mixer if you don't like the hand exercise. Do adjust the consistency by adding more water or icing sugar. Any peaks in the icing should disappear in 10 seconds.

Freshly iced!

Cookies and cream smbc
Ingredients:
250g smbc
70g crushed Oreo cookies (cream removed)

(I actually used 268g of smbc and 80g of crushed oreos because that was a convenient proportion for me)

Please refer to this recipe for the basic smbc. Just omit the Horlicks and water in the recipe. Beat in crushed oreos until well combined. Transfer to piping/ziplock bag and pipe the filling onto the bottom shells. Place the top shell on and refrigerate until it is time to serve. Keep the macs in airtight container. They can keep for a week plus in the fridge.


I have some extra batter (didn't use all up for these mice) which I made full use of to create two other designs of cute macarons. Check out my cute bumblebee and Badtz Maru macarons!


All packed!

I am submitting this post to Best Recipes for Everyone Jan & Feb 2015 Event Theme: My Homemade Cookies organized by Fion of XuanHom’s Mom and co-hosted by Victoria Bakes.

With love,
Phay Shing


For the first time, we are joining 16 fabulous cooking bloggers to bring you the chance to start the Year of the Ram in the best way - by winning an ang pow! Leave a comment in the Combined CNY Giveaway Post for a chance to win!


Read More »