Showing posts with label Lavendar. Show all posts

Wednesday, 10 February 2021

'Puppy in a Mug' Valentine's Day special

I was going to start working on new Youtube content again but inspiration strikes! Since Valentine's Day is just around the corner, I decided to make something VDay themed, as well as take the chance to prepare some new class content. Presenting some adorable choux pastry puppies! 

"I give you some luv💕💕" 

The puppies, hearts and mugs are all made of choux pastry! You may refer to my book Deco Choux Pastries on how to make the choux au craquelin hearts as it is one of the entries there. The puppies aren't in the book but you can find the technique for making them in the book as I have similar animal designs to the puppy. The mugs were made by baking cylindrical choux cases in a metal mould lined with perforated mat, a technique similar to how I made the choo choo choux train. For the basic choux pastry batter and craquelin recipe, you may refer to this post. 

I made some puppies holding heart sprinkles and sitting in cupcake cases for April class material with Tottstore as this would be less challenging given the time constraint. 

I decided on lavender vanilla honey diplomat cream as the filling! 

And because it is VDay themed, my good friend said to me "You know the doggie with both eyes closed, it is just asking for a cupid's arrow to be in its head". And so, I decided to follow her suggestion and had a good laugh 🤣


Lovestruck 😍... Literally 😂... Ouch! 🤣


I hope these cute puppies put a smile on your face! Happy Valentine's Day in advance! 


With love,

Phay Shing

Read More »

Monday, 19 December 2016

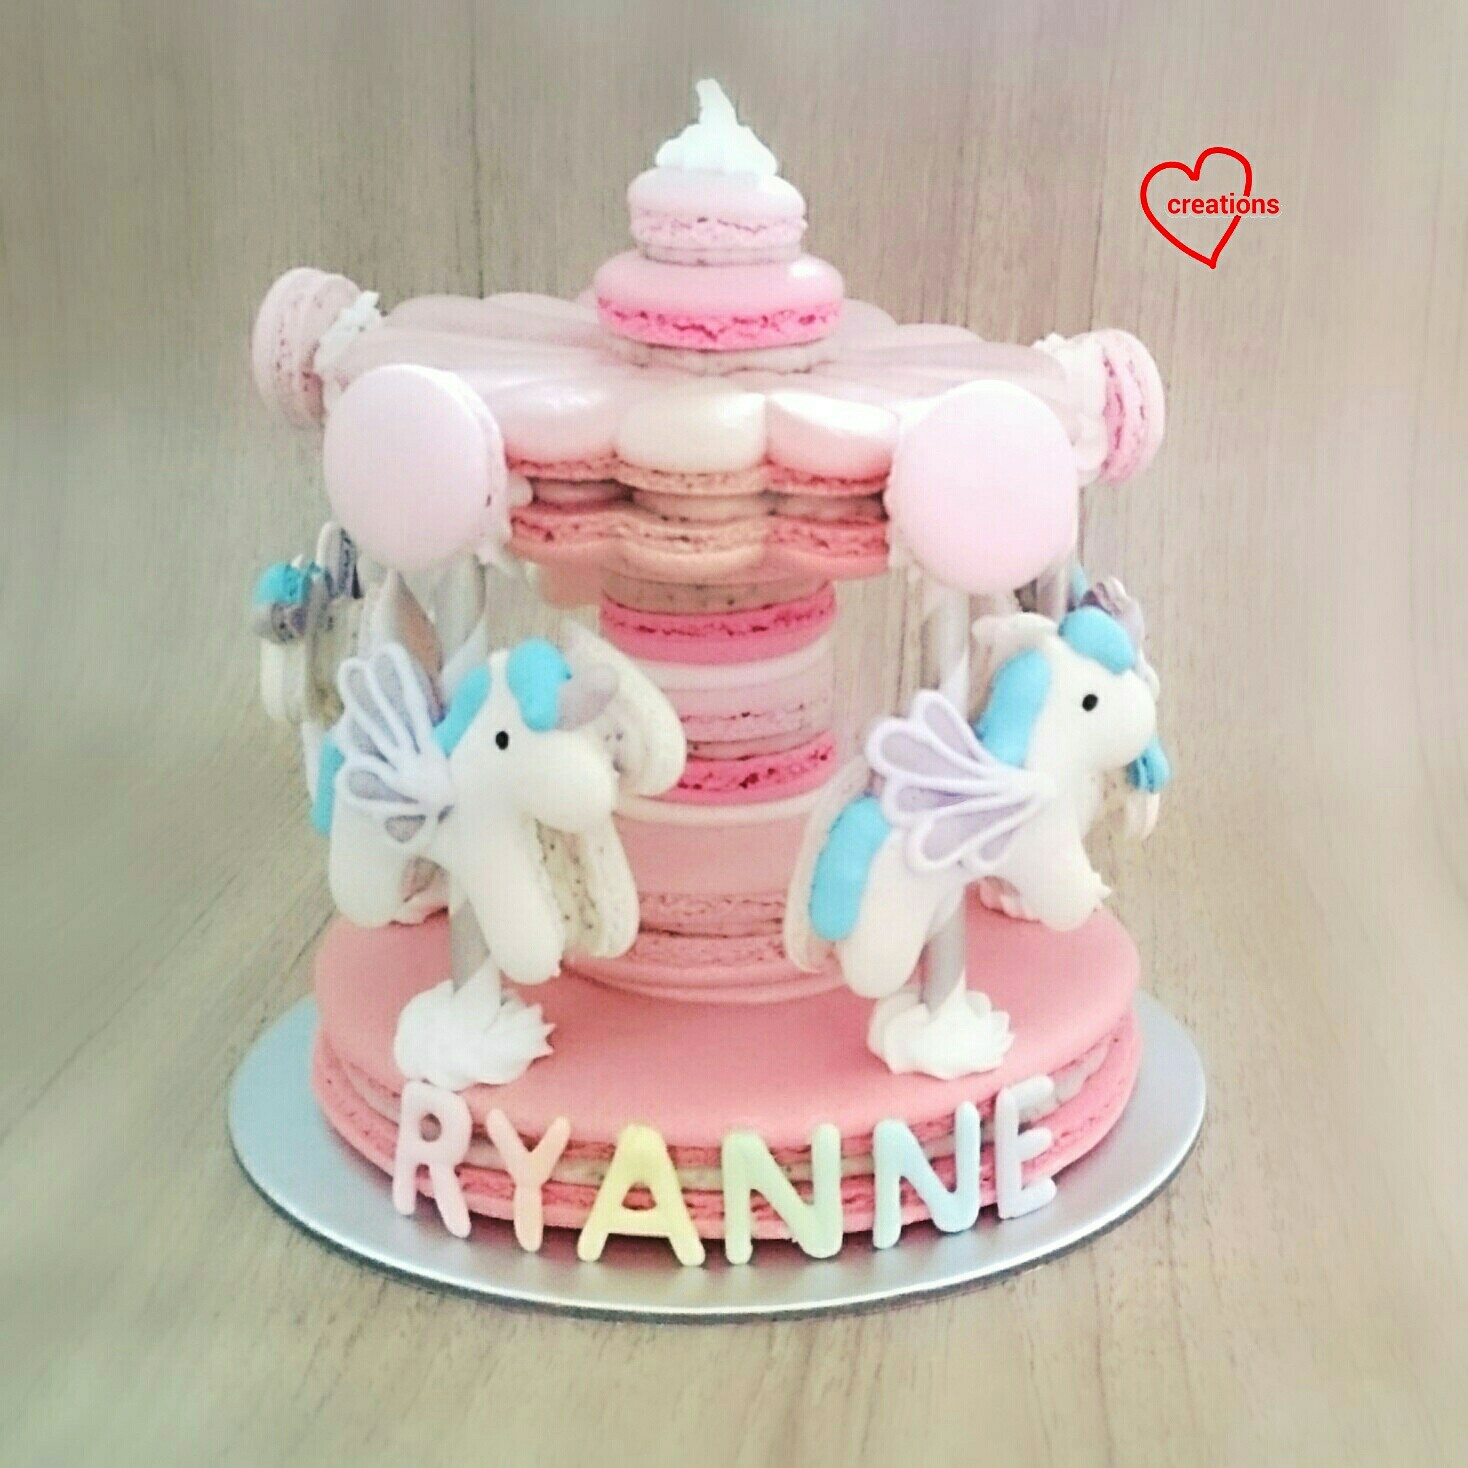
Pink Unicorn Macaron Carousels

I have so many requests for unicorn macaron carousels that I have decided not to post some of them as separate blog posts because the designs are more or less the same 😅. But this particular one got an extra "Awww..." reaction from me because of the sweet pastel rainbow letterings of the birthday girl's name on it.


It looks so sweet I thought I have to share it :). I filled it the same way as this pink carousel, with lavendar and Earl grey white chocolate filling. Creating the name with royal icing took a much longer time since I have to make 6 different colours of royal icing. Simply pipe the letters on baking sheet and dry thoroughly before peeling off carefully and sticking them onto the carousel with a small dab of royal icing.

Here's one sweet pink unicorn carousel with strawberry white chocolate filling that didn't get posted earlier but I will just include it in this same post so it gets showcased before the year ends.


And here's the last unicorn carousel that I am assembling for the year.. yes it's another pink one! But this is the first carousel where I incorporated 3 different flavours. Salted caramel for the unicorns and lavendar Earl Grey for the carousel structure.


I tried incorporating homemade salted caramel into the white chocolate-vegetable shortening filling base but it wasn't firm enough so the unicorns kept slipping down the pole. I had to make an "artificial" version by adding more sea salt and caramel flavouring to create the salted caramel taste. Glad that I managed to pull it off!

You may refer to this post for details of baking the various sizes of shells and this post for assembly instructions of the carousel.

I used the reduced sugar macaron shell recipe for the carousels. Both regular and reduced sugar recipes can be found here. You may refer to my Creative Baking: Macarons book for a systematic presentation of the basics and complex shaped macarons. You may refer to my video tutorials for macaron basics and piping of complex shapes on the blog too.

With love,
Phay Shing


Read More »

Wednesday, 14 December 2016

Tea and Neapolitan Iced Gem Biscuits (updated Earl Grey Salted Caramel gems recipe)

It's been some time since I had a request for iced gems so I am glad to take a break from macarons to make these :). Earl Grey salted caramel, Neapolitan and Lavender flavours were requested.


You may find the recipe for Neapolitan iced gems from here and Lavendar iced gems from here. The old Earl Grey salted caramel gems recipe can be found together with the Neapolitan one. Ever since I discovered Earl Grey tea powder, I have been using it for a range of bakes but have yet to use it for iced gems. I decided to incorporate it here so I will just provide the updated recipe for this flavour. I use homemade salted caramel and the recipe can be found here.

Just to share some photos of the process...

Infusing hot milk with dried Lavender flowers. Yes I use the real stuff!

Top: fresh milk, Bottom left: lavendar infused milk, bottom right: Earl grey milk tea with salted caramel. All have vanilla extract added in.

The biscuit dough for the respective flavours.

I tried using an oval scalloped cookie cutter for some of the biscuit bases. I think I prefer simple 2cm round cookie cutter.

Icing Lavender gems! Remember to pipe some icing onto baking sheet to test for royal icing doneness during drying in the oven.

Neapolitan royal icing! Looks pretty from this angle coming out from the piping tip too!

I use a combination of Earl Grey tea powder and dried tea leaves from the teabag for the royal icing.

The icing firms up and lightens in colour after whipping. I used a spatula to whip by hand all 5 different flavours in this batch!

Icing Earl grey salted caramel gems!

Recipe for Earl Grey salted caramel biscuit
Ingredients:
(Makes about 96 biscuits)
30g hot milk
1.25tsp Earl grey tea powder
25g salted caramel
1/4 tsp caramel essence/flavouring (optional)
1/4 tsp vanilla extract
105g plain flour
1/16 tsp fine sea salt
1.5 tsp baking powder
36g vegetable shortening

Steps:
1. Dissolve tea powder, salted caramel, caramel flavouring and vanilla in hot milk.

2. Sift together flour, baking powder and salt in a large bowl.

3. Rub in shortening into the flour mixture until it resembles breadcrumbs.

4. Gradually add the milk mixture to the flour and shortening mix and knead into a ball of dough. You may not need all the milk. Once a ball of dough is formed without breaking apart, you can stop adding the milk.

5. Roll to 3-4mm thick and cut out circles with cookie cutter (I usually use a 2cm round cutter). Place the cut-out on baking tray lined with baking sheet.

6. Bake in preheated oven using the fan mode at 170°C for 13-15 minutes or until brown. Cool completely before icing.

Earl Grey caramel royal icing
Ingredients:
112g icing sugar
8g meringue powder
20-24g hot water
1.5 tsp Earl grey tea powder
1 teabag worth of Earl grey tea leaves
1/2 tsp caramel essence
1/16 tsp salt

Steps:
1. Sift icing sugar, meringue powder and salt together in a grease-free mixing bowl.

2. Dissolve tea powder in hot water. Add caramel essence (if you have) to the tea.

3. Add tea into the sugar mixture and use a whisk until well combined. Add the tea leaves from the tea bag and mix well. Use a whisk or spatula to whip by hand for about 6-7 minutes continuously until icing is stiff and able to hold a stiff peak. If that is too much muscle work for you, you may use the electric mixer and medium low speed for a few minutes.

4. Transfer royal icing into piping bag fitted with a star tip.

5. Pipe some icing onto the baking sheet as well for testing of doneness of the icing. Dry the iced biscuits in the oven at 60°C using the fan mode for an hour or until the royal icing is able to be lifted off the baking sheet easily and it's totally dry. Taste test a biscuit too to check that it's crisp. If it has turned a little soft due to the icing, dry the gems longer and taste test again.

6. Cool the dried biscuits completely before storing in airtight container.

With love,
Phay Shing
Read More »

Wednesday, 19 October 2016

'Owls on a Stump' Gula Melaka Sponge & Pudding Cake

This is a cake made with lots of love last minute for my grandma's and aunt's combined birthday celebration :)

Mother and daughter owl macarons on a Gula Melaka sponge and pudding stump cake!

This is one of those die-die must try cakes because cake lovers and haters, young and old all loved it. This cake is rich and full of flavour yet refreshing at the same time. The texture also feels good in the mouth with alternating layers of soft chiffon sponge and refreshing pudding.

This was made last minute because my planned bake had to move a week earlier. It was a challenge to reshuffle my schedule but thank God for helping me to make it in time!

I made the owls along with my purple unicorn macaron carousel so it was easier to squeeze in time for making cake deco.

Just to share some photos of the process...

Piping the owl macaron shells.

I used the regular recipe for the macaron shells. Both regular and reduced sugar recipes can be found here. You may refer to my Creative Baking: Macarons book for a systematic presentation of the basics and complex shaped macarons. You may refer to my video tutorials for macaron basics and piping of complex shapes on the blog too.

Do note that larger shells need longer baking time. About 30-35 minutes and at lower temperature of 115°C at second half of baking time.

Filling the shells with lavendar Earl grey white chocolate ganache that I have in store at home.

Owl macaron cake toppers!

You may refer to my first gula melaka stump cake that I made for my dad's birthday a month ago. It was so lovely that my parents wanted me to make it again for my grandma's birthday. Recipe and assembly is exactly the same so I shall not type it out here again.

Freshly cut layers or gula melaka chiffon sponge cake.

Sponge and pudding stump cake that I just finished assembling!

Remember to pack the macaron deco and sponge and pudding cake in separate airtight boxes/containers or the cake toppers will turn soggy. Assemble macaron deco just before serving.

I forgot to take photos of a slice of the cake. It was very well received and there were no leftovers! Grandma told me it's delicious! It's hard to please her palate at her age so I was really glad that she loved it. My uncle who doesn't eat cake with cream also said it's delicious and finished his portion.

ith lots of love,
Phay Shing

Read More »

Tuesday, 4 October 2016

Pikachu and Pokeball Macarons (Children's Day Special)

I have been really busy so pardon the short posts without detailed steps and recipe. Just to share what I made for my younger kid to share with classmates for Children's Day...

Pikachu and Pokeball macarons filled with dark chocolate ganache!

I had extra macaron shells so I filled some with more adult-friendly filling for my friends - lavendar Earl grey white chocolate ganache.

I used the reduced-sugar macaron shell recipe. You may refer to my Pokemon macarons post on how the Pikachu shells were done.

You may refer to this post for a detailed write-up about the reduced sugar macaron shell recipe, my Creative Baking: Macarons book for a systematic approach of presenting the basics to fancy shaped macarons, this post for video tutorials of macaron basics and this post for video tutorials of piping complex shaped objects.

Although the Pokeball looks simple, it's actually not that easy to get neat borders for every single macaron shell. Pikachu head is easier to pipe. Here's how I pipe the top shells...

Pipe white batter followed by red batter. Use a toothpick to nudge the edges such that each colour form a semicircle.

Don't worry if the line in the middle is not perfectly straight. The black line in the middle will hide it. Remember to bang the tray on the table.

Whole tray of shells!

Decorate the Pokeball shells either with royal icing or melted chocolate if you wish. I used royal icing

Some of the extra macarons were meant for my friends and I filled them with lavendar Earl grey white chocolate ganache.

Instead of making my own dried lavendar flower powder to flavour the filling, I simply infused the cream for making the ganache with lots of lavendar flowers.


You may refer to this post for the recipe for Earl grey white chocolate ganache.

Filling with lavendar Earl grey white chocolate ganache

Filling with dark chocolate ganache

All packed!

These fillings can withstand room temperature storage for 2-3 days so they are perfect as gifts.

What did I make for my elder kid's class, you may ask. He requested for some simple scones that I made twice for his class last year and everyone loved it so much that he is requesting for it again!

Simple fresh cream scones made without egg or butter.


With lots of love,
Phay Shing

Read More »

Friday, 12 August 2016

Lavendar Earl Grey Pink Unicorn Macaron Carousel III

Ever since the unicorn macaron carousels gain publicity through Instagram and other media sources, I have been getting lots of request for them. Due to family commitments, I had to reject many of them as I limit myself to one major request or two simpler ones per week. I am not in favour of making the same thing over and over again too frequently because I prefer variety. Nonetheless, these unicorns along with the carousel structure they are set in never fail to exude an air of magical quality about them :). I suppose that's why this carousel is so popular.


Earl grey filling was requested but the brown hue of the filling does not match the sweet pink colour theme of the carousel. I took the liberty of including a layer of lavender filling encasing the Earl grey filling in order to have a filling that is visible but matches the colour of the carousel and requested flavour of filling.

You may find my other unicorn carousels over here and here.

I used the reduced-sugar macaron shell recipe. Both regular and reduced sugar recipes can be found here. You may refer to my Creative Baking: Macarons book for a systematic presentation of the basics and complex shaped macarons. You may refer to my video tutorials for macaron basics and piping of complex shapes on the blog too. You may refer to this post for the dimensions of the shells required to make the carousel and the respective baking times. I piped a scalloped roof like the one similar to the sheep macaron carousel as I think it's really pretty and it is very helpful for positioning the paper straws during the assembly. Checkout the sheep carousel post for detailed steps of assembly.

Here's the scalloped roof piped...

I pipe extra shells just in case some fail

Piping the unicorns...


Freshly baked shells...


In order to make lavendar flavoured white chocolate filling, I toasted about a tablespoon worth of dried lavendar flowers at 100°C for 10 minutes before using mortar and pestle to grind them. I sifted the powder to get it really fine, and discard whatever didn't pass through the fine meshed sieve.


Recipe for Lavendar/ Earl grey white chocolate filling
Ingredients:
80g white chocolate, chopped
20g vegetable shortening
1/8 tsp fine sea salt
1 tsp finely ground dried lavendar flowers
OR
2 and 1/4 tsp instant Earl grey tea powder

Steps:
1. Place white chocolate and shortening in a microwave-safe bowl. Heat at medium power for 20 seconds and mix well with spatula. Repeat until mixture is smooth. Alternatively you may use the double-boiling method to melt the white chocolate and shortening.

2. Add lavendar or Earl Grey. Mix well. Add salt and mix well.

Transfer the two types of flavoured white chocolate into piping bags. Pipe onto the macaron shells.

Day 1 of assembly...

Pipe a ring of lavendar white chocolate and fill the middle with Earl Grey white chocolate

Filling the unicorns with lavendar white chocolate

Done with Day 1 assembly!

I used royal icing to create the name. The piped letters were dried thoroughly in the oven with the fan on at 60°C for a couple of hours. Carefully peel the baking paper away from the letters.


Day 2 of assembly involves assembling the central pillar structure, attaching the unicorns onto the frame and adding the letters for the name of the birthday girl. Stiff royal icing was used for attaching the former two. Stiff royal icing can be made by adding more icing sugar to the royal icing mix that I prepared earlier, until the icing is able to hold a stiff peak.

Finally all done!

Store the carousel at cool room temperature in a dry place away from sunlight.

With love,
Phay Shing

Read More »

Monday, 25 May 2015

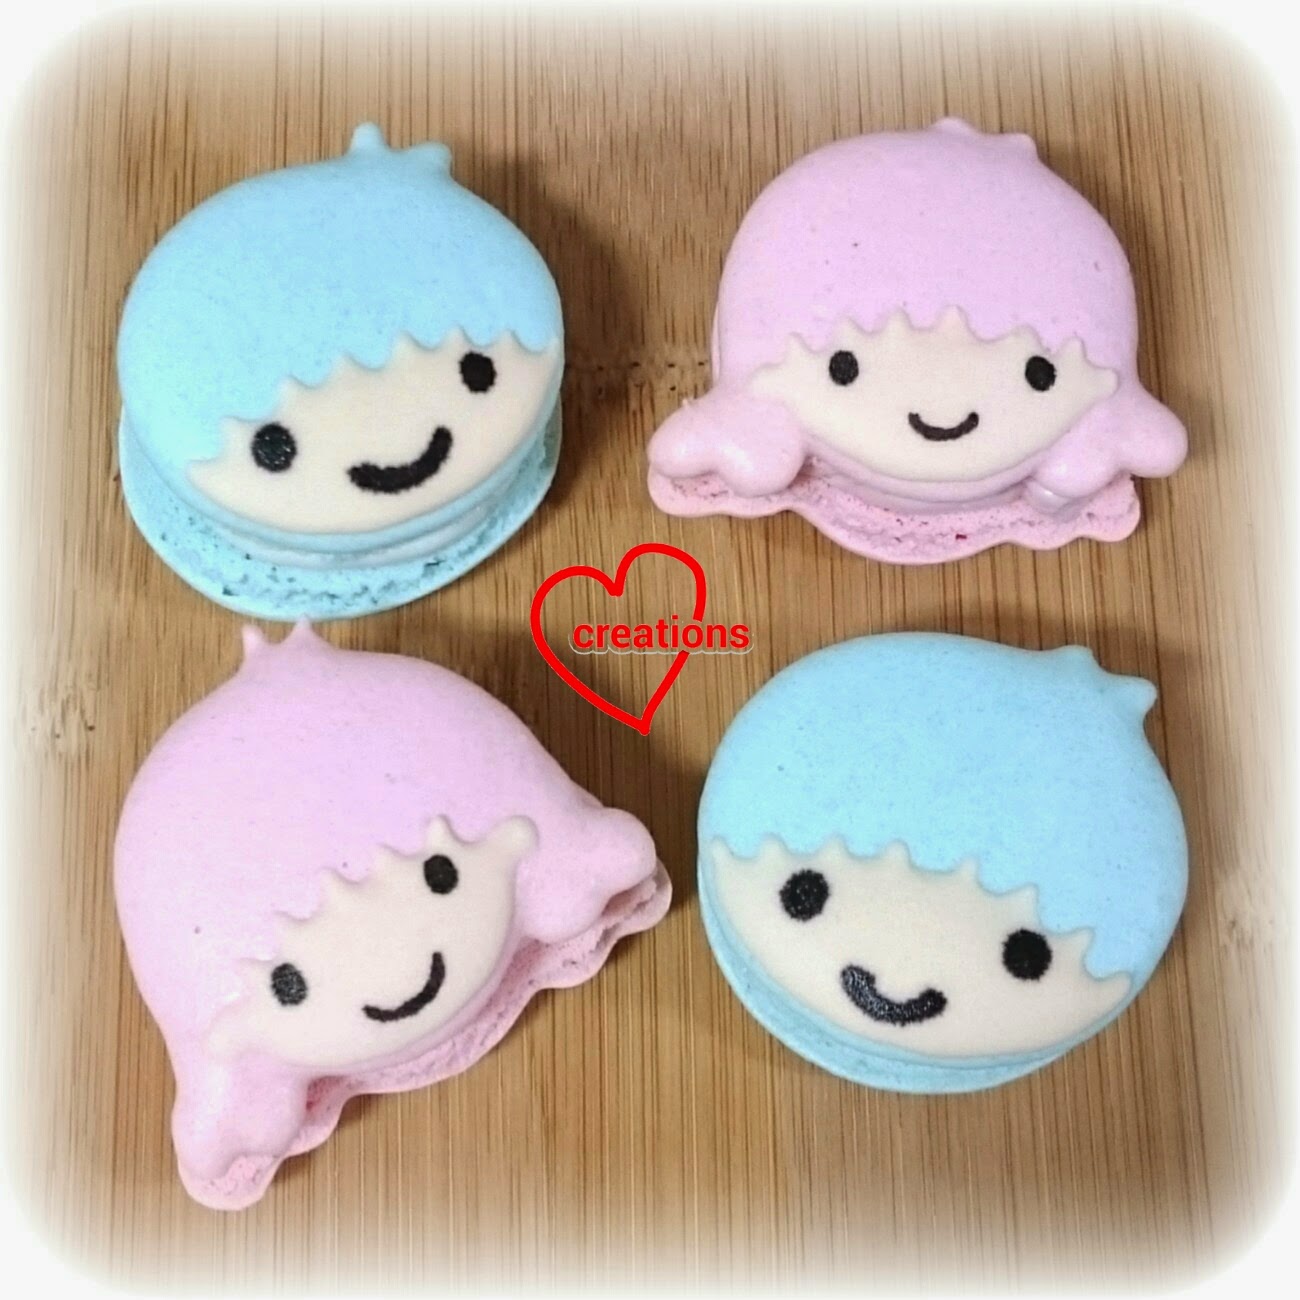
Little Twin Stars Rose and Lavendar Macarons (notes about using edible markers on macaron shells)

These rose and lavendar Little Twin Stars are a product of leftover batter from my killer heels macaron bake :).

Looking sweet :)

Please refer to the killer heels bake for the shell and filling recipe. Just to share some pictures and important note about using edible markers for macarons.

Piping out the batter

I piped out the batter using Wilton #10 tip for the boy and a combination of #8 and #10 for the girl. I used a toothpick to pull the batter for the hair sticking out.

Leave out the hair detail for bottom shells.

Freshly baked and paired

Using flesh coloured royal icing for the face. 

Dry the flesh coloured icing completely, preferably overnight before adding in the eyes and mouth using charcoal/ black gel coloured royal icing.


I made a mistake of not drying the icing overnight, and then using edible marker on the icing. While edible markers do well directly on macaron shells, they tend to run when used on icing after storing in the fridge due to condensation on the icing.

Filling with rose swiss meringue buttercream

Filling with lavendar smbc

Slightly smudged look on the boy as the marker drawings started to run after assembly and storage

The marker drawings smudged and ran even more with time (too ugly to post here :p) so please do use royal icing to add any details on iced parts!

With love,
Phay Shing


Read More »

Wednesday, 20 May 2015

Pink & Blue Care Bears Rose and Lavendar Macarons

These overly-chubby Care Bears are a product of leftover macaron batter from my killer heels bake!

Rose and lavendar flavoured

Hubby always griped about the lack of cheeks on Care Bears nowadays, as compared to the original ones back in the '80s when we were kids. With that in mind, I accidentally gave these beary macarons too much cheek!

Please refer to the recipe from my killer heels bake for these macarons (shells and filling). I used a combination of Wilton #8 and #10 tip to pipe the bear face, and toothpick to pull out the hair strands. Omit the hair for the bottom shell.

Freshly piped!

Freshly baked and paired!

Freshly iced/drawn on features with royal icing and edible marker.

Filling up with rose swiss meringue buttercream

Filling up with lavendar smbc

Hubby wanted one blue bear reserved for him as it's one of his childhood favorites and is more than happy to have a pink one too :). He finds them so irresistibly cute!

With lots of love,
Phay Shing


Read More »