Showing posts with label Gula Melaka. Show all posts

Monday, 5 May 2025

Gula Melaka Pandan Kaya Painted Swiss Roll (new technique!)

 I am really excited to share a new game-changing technique that will make painted cakes much easier for beginners without much artistic or baking skills! This is a bake to test the proof of concept and I am very pleased with the results!


Some of you may recognise the style of artwork is Nagomi art. Why the choice of nagomi art style? It's because my mum took up a nagomi art class recently and I was inspired to turn one of her paintings into her birthday cake design. This tulip design is taken off the internet (FortuneArtDream from Pinterest) for my practice run. The choice of cake flavour is because Mum took up a Peranakan cooking course last year and has been practicing making kueh kosui on and off. I thought this flavour profile is reminiscent of the kueh.

Cake composition:
- Pandan gula melaka chiffon sponge cakes for the tulip centers and white sponge canvas for the painting
- Gula melaka pandan kaya pudding in green and brown colours as the roll cake filling

If you have followed me long enough and are familiar with patterned chiffon cakes and swiss rolls, you will know that the standard method is to use a patterning batter that is baked together with the base sponge batter as the cake designs or as guides to mark out areas where additional details are painted in post-baking. Working with patterned batter can result in many challenges where things can go wrong, such as:
1. Cracks along boundaries between pattern and base sponge
2. Pattern stuck to Teflon sheet/parchment paper instead of base sponge
3. Patterning batter turning runny/deflating before piping finish the pattern
4. Difficulty in optimizing oven settings to bake the cake

What I have done in this new technique is to do away with the patterning batter and we start with a blank canvas in the form of a solid coloured sponge (usually white). Baking a single-coloured sheet cake is way easier and faster!

How do we get the pattern on then? By tracing a mirror imaged picture onto parchment paper and printing it onto the cake! I was inspired to try this when I saw reels shared by qeleg_cake (Instagram account) on printing faint outlines onto sponge cake before painting. What I did differently was to use edible marker instead of cake paint, and parchment paper instead of transfer paper.

Here's some pictures of the painted cake halfway through and upon completion.


You may refer to the reel below for the recipe of the cake (see the captions and pinned comments of the reel) and printing technique. Do note that although I made this cake using prebiotic fibres, a sugar replacement and gula melaka, the recipe I shared only uses regular white sugar and gula melaka as the sugar-free version with prebiotics is class material.

https://www.instagram.com/reel/DJRIsoGpLPN/?igsh=MWxkMWRoa3o3dWo4Ng==


with love,

Phay Shing

Read More »

Wednesday, 23 April 2025

"Green Eggs and Ham" Kid's Baking Class

 If you are familiar with Dr Seuss' stories, you will definitely be familiar with one of his classics, Green Eggs and Ham. This is my version of it and the whole thing is actually sweet instead of savoury, complete with runny "yolk" that can burst when you poke at it!


This will be a fun-filled class combining Science, Art and Culinary experience in a single session.

What's on the menu?
- Coconut gula melaka strawberry crepes as "ham"
- Coconut panna cotta as "egg whites"
- Spherified pandan gula melaka yoghurt as "green yolks"
 
Watch this reel to see the texture, the jiggles and oozy action!


Please click on this link to register.


with love,

Phay Shing


Read More »

Thursday, 13 March 2025

(Almost) Sugar-Free Pandan Gula Melaka Chiffon Cake

 Of course I had to try one of the most classic flavours for sugar-free chiffon with prebiotic fibres added --- Pandan!


I added a little gula melaka to boost the flavour so it's not entirely sugar-free but it's definitely white sugar-free. Check out the texture!


I couldn't resist making a simple cutie..


As with all intentional pandan cake bakes, I use homemade pandan juice concentrate which takes some work and patience to prepare.


You may see the process in the reel. Unfortunately I am not able to share my sugar-free chiffon recipe with the prebiotic fibres as I intend to use it for class. But I shared my default pandan chiffon recipe with gula melaka added in the captions of the reel so do check it out. It's tried and tested over the years.


https://www.instagram.com/reel/DGxfat2pJSY/?igsh=MXU1eHF5Mmd0czIxcw==


with love,

Phay Shing

Read More »

Saturday, 14 September 2024

'Capybara in Teacup' Macaron

 I needed to make some blue hemispherical macaron shells for an epic project so I took the chance to play around with this for fun!


We have a teacup plush toy and one of the capybara plushies we have fit so nicely in it I simply had to make a mini macaron version of it! The capybara is a hand-shapeable filling. I made it gula melaka coconut flavoured with a pandan gula melaka coconut surprise inside. Here's what it looks like when you take a bite of it!


I couldn't bear to do the cut of the capybara so I made a plain round version of it to do the cut scene. Here's a peek at how I piped the hemispherical shell and how I made the capybara filling! 

https://www.instagram.com/reel/C_HIjKlSuhb/?igsh=MTlsanlvamkxbWtkdg==

I shared the coconut filling recipe in the captions of the reel. I can't share this low fat low sugar hand shapeable filling as of yet as I only discovered it recently and am using it as a class material. It's texture is similar to Orh Nee or Mont Blanc dessert and it's relatively neutral tasting so it can take on many flavours. It's temperature stable too so it won't melt in Singapore's tropical heat.


Stay tuned for the epic project that made use of the blue hemispheres! 


with love,

Phay Shing

Read More »

Saturday, 6 August 2022

Betty Boop Avocado Gula Melaka Pecan Chiffon Cake

Finally making the actual cake for this unique flavour request! Betty Boop avocado cake!

Reference from fanart drawing by Christina Kulzer

Take a peek at the layers!


I decided to include the element of gula melaka and toasted pecans in this cake as avocado alone is rather bland in taste. A little yuzu juice (or you may use lemon juice) was added to prevent oxidation of the avocado puree so it as a slight tang as well. This is a rather healthy cake as it doesn't use oil or butter but instead, avocadoes and plain yoghurt as fat sources! Very much more moist than typical chiffons!

The recipe for the cake and cream is shared in this post but I have made certain tweaks for it to be suitable for a large layered cake instead of a mini swiss roll so that it is easier to handle during assembly instead of breaking apart. I also increased the proportion of avocado in the filling.

I made two plain avocado sheet cakes and one patterned sheet cake.

Avocado chiffon cake recipe
Ingredients (makes one 25 x 30cm sheet cake):
Egg yolk batter
4 yolks
100g avocado puree*
1 tsp vanilla
1/8 tsp salt
8g gula melaka, finely chopped
1 tiny drop of pandan paste (optional)
80g cake flour

Meringue
4 whites
1/2 tsp cream of tartar
70g caster sugar

*Avocado puree
200g avocado puree
10g yuzu juice concentrate (or lemon juice)
150g plain yoghurt (I use Meiji's Bulgaria yoghurt)

Note: I made enough avocado puree for almost three portions of the sheet cake so please scale it down if need be.

Steps:
Please follow this post, except that baking time should change due to increase in volume.

Preheat oven to 180C bake 10min. Reduce to 160C bake for another 20 min.

Cool the cakes to room temperature. Cut to size you want (Mine is cut to 19x24cm). Cling wrap and freeze cakes. This will help with ease of handling during assembly. They are still super moist and soft despite reducing the liquid to flour ratio from my test bake!

Freshly baked sheet cake!

For the patterning, I used the method by Keem (see keempossible_2 Instagram account). I am not able to share recipe and method as I bought her video tutorial and you may contact her for it too 😊.

Remember to make a mirror image of the original when making patterns!

The pattern is subsequently covered with avocado cake batter but scaled down to 3 egg yolk portion

I used black edible marker to do the outlines as I find it has better control than painting. But this is just a personal preference. Betty's lips were added on post-baking with extra cake made from extra coloured batter. I always pipe out the excess coloured batter to bake for colour testing of paint during outlining/adding in of details post-baking so I just cut out the lips and white highlight and stick it onto the main cake with a little cake glue (you may use melted marshmallow too). 

Avocado mousse
Ingredients:
150g whip topping (may replace with heavy cream but add sugar or increase amount of gula melaka)
180g whipping cream/ heavy cream (at least 35% fat)
5-6 gelatin sheets (about 10-12g), bloomed
120g chopped gula melaka/ coconut palm sugar (or to taste)
1//4 tsp kosher salt (1/8 tsp regular table salt)
2 small drops of pandan paste (optional)
100g plain yoghurt
300g avocado puree
15g 100% yuzu juice concentrate (or lemon juice)

Note: Prepare this only when you are ready to assemble with the cut sheet cakes, toasted chopped pecans, cakeboard and the assembly mould ready.

Steps:
1. Melt gula melaka and salt in heavy cream. Cool to room temperature, cling wrap and refrigerate overnight or at least 4 hours.

2. Prepare avocado puree by blending avocado with yuzu juice concentrate. Add yoghurt and blend briefly. Pass through fine sieve.

3. Bloom gelatin sheets in ice water. Squeeze put excess water. Melt bloomed gelatin using microwave or double-boiler. Set aside.

4. Whip cold gula melaka cream with whip topping (if using) until soft peaks form and you can start to see well defined lines in the cream as you whisk. 

5. Add avocado puree (room temperature)  to melted gelatin a little at a time and whisk together. 

6. Add pandan paste to avocado puree gelatin mix. 

7. Fold in avocado mix to whipped gula melaka cream in a few additions. 

Assembly
1. Set rectangle mould frame over cakeboard. (I set the adjustable metal frame to be about 19x24cm) Line the insides of the frame with teflon sheet. Use a little oil to attach the teflon sheet to the frame but don't use coconut oil as it is a relatively high freezing point.

2. Place a frozen avocado sheet cake at the base of the frame.

3. Scoop some avocado mousse over the sponge cake and smoothen it out with a spatula or back of spoon. 

4. Scatter some toasted chopped pecans. I didn't measure so up to personal preference. Omit if you don't like nuts. 


5. Spoon a little mousse over the nuts and smoothen it out again.

6. Carefully place another frozen sheet cake over and press it in. Repeat steps 3-6.

After assembling the top patterned sponge

7. Chill in fridge for at least 3 hours or overnight for mousse to set. Carefully release the frame and peel off the teflon sheet.

8. Carefully slice off the four sides a little to reveal neat layers. Use a long serrated knife for this and it is important to make sure the mousse is completely set before you attempt to do this.

Just a little short video I made for fun of the process!


with love,

Phay Shing

Read More »

Friday, 1 April 2022

Bunny Pandan Coconut Gula Melaka Swiss Roll

This project has been on my waiting list for a while after I made the corgi swiss roll based on my 3D corgi design. Presenting my bunny swiss roll based on my 3D teacup bunny macarons and 3D bunny macaron designs!


Pandan coconut gula melaka chiffon sponge with the same flavour of diplomat cream and coconut agar jelly in the middle. 

To be honest, I had trouble taking photos of the roll cake together with the macarons because which ever angle you choose, something will aways look odd😅. I did a poll on Instagram and chose the one that was more popular as the cover photo.

I begin the project by making the templates for cookie cutter and patterned roll. I made my own cookie cutter based on the template design.

Coconut agar jelly

Ingredients (fills two 7x7" trays to about 2cm height):
500g coconut milk
500g coconut water (may replace with coconut milk if prefer richer jelly)
12g agar powder
pinch of salt
3 pandan leaves, knotted or cut into short strips
30g sugar (or to taste. Mine is considered very low sugar)

Steps:
1. Put coconut milk, coconut water, salt and sugar in saucepan. Scatter agar powder over and let it bloom for about 5 minutes. Try not to let the agar powder clump together.

2. Add pandan leaves and bring to a boil while stirring.

3. Once the coconut milk boils, keep boiling for another two minutes while stirring to ensure all agar powder is dissolved. 

4. Pour into trays and cool before refrigerating for at least 2hours or overnight. I lined my trays with teflon sheets but it isnt necessary.

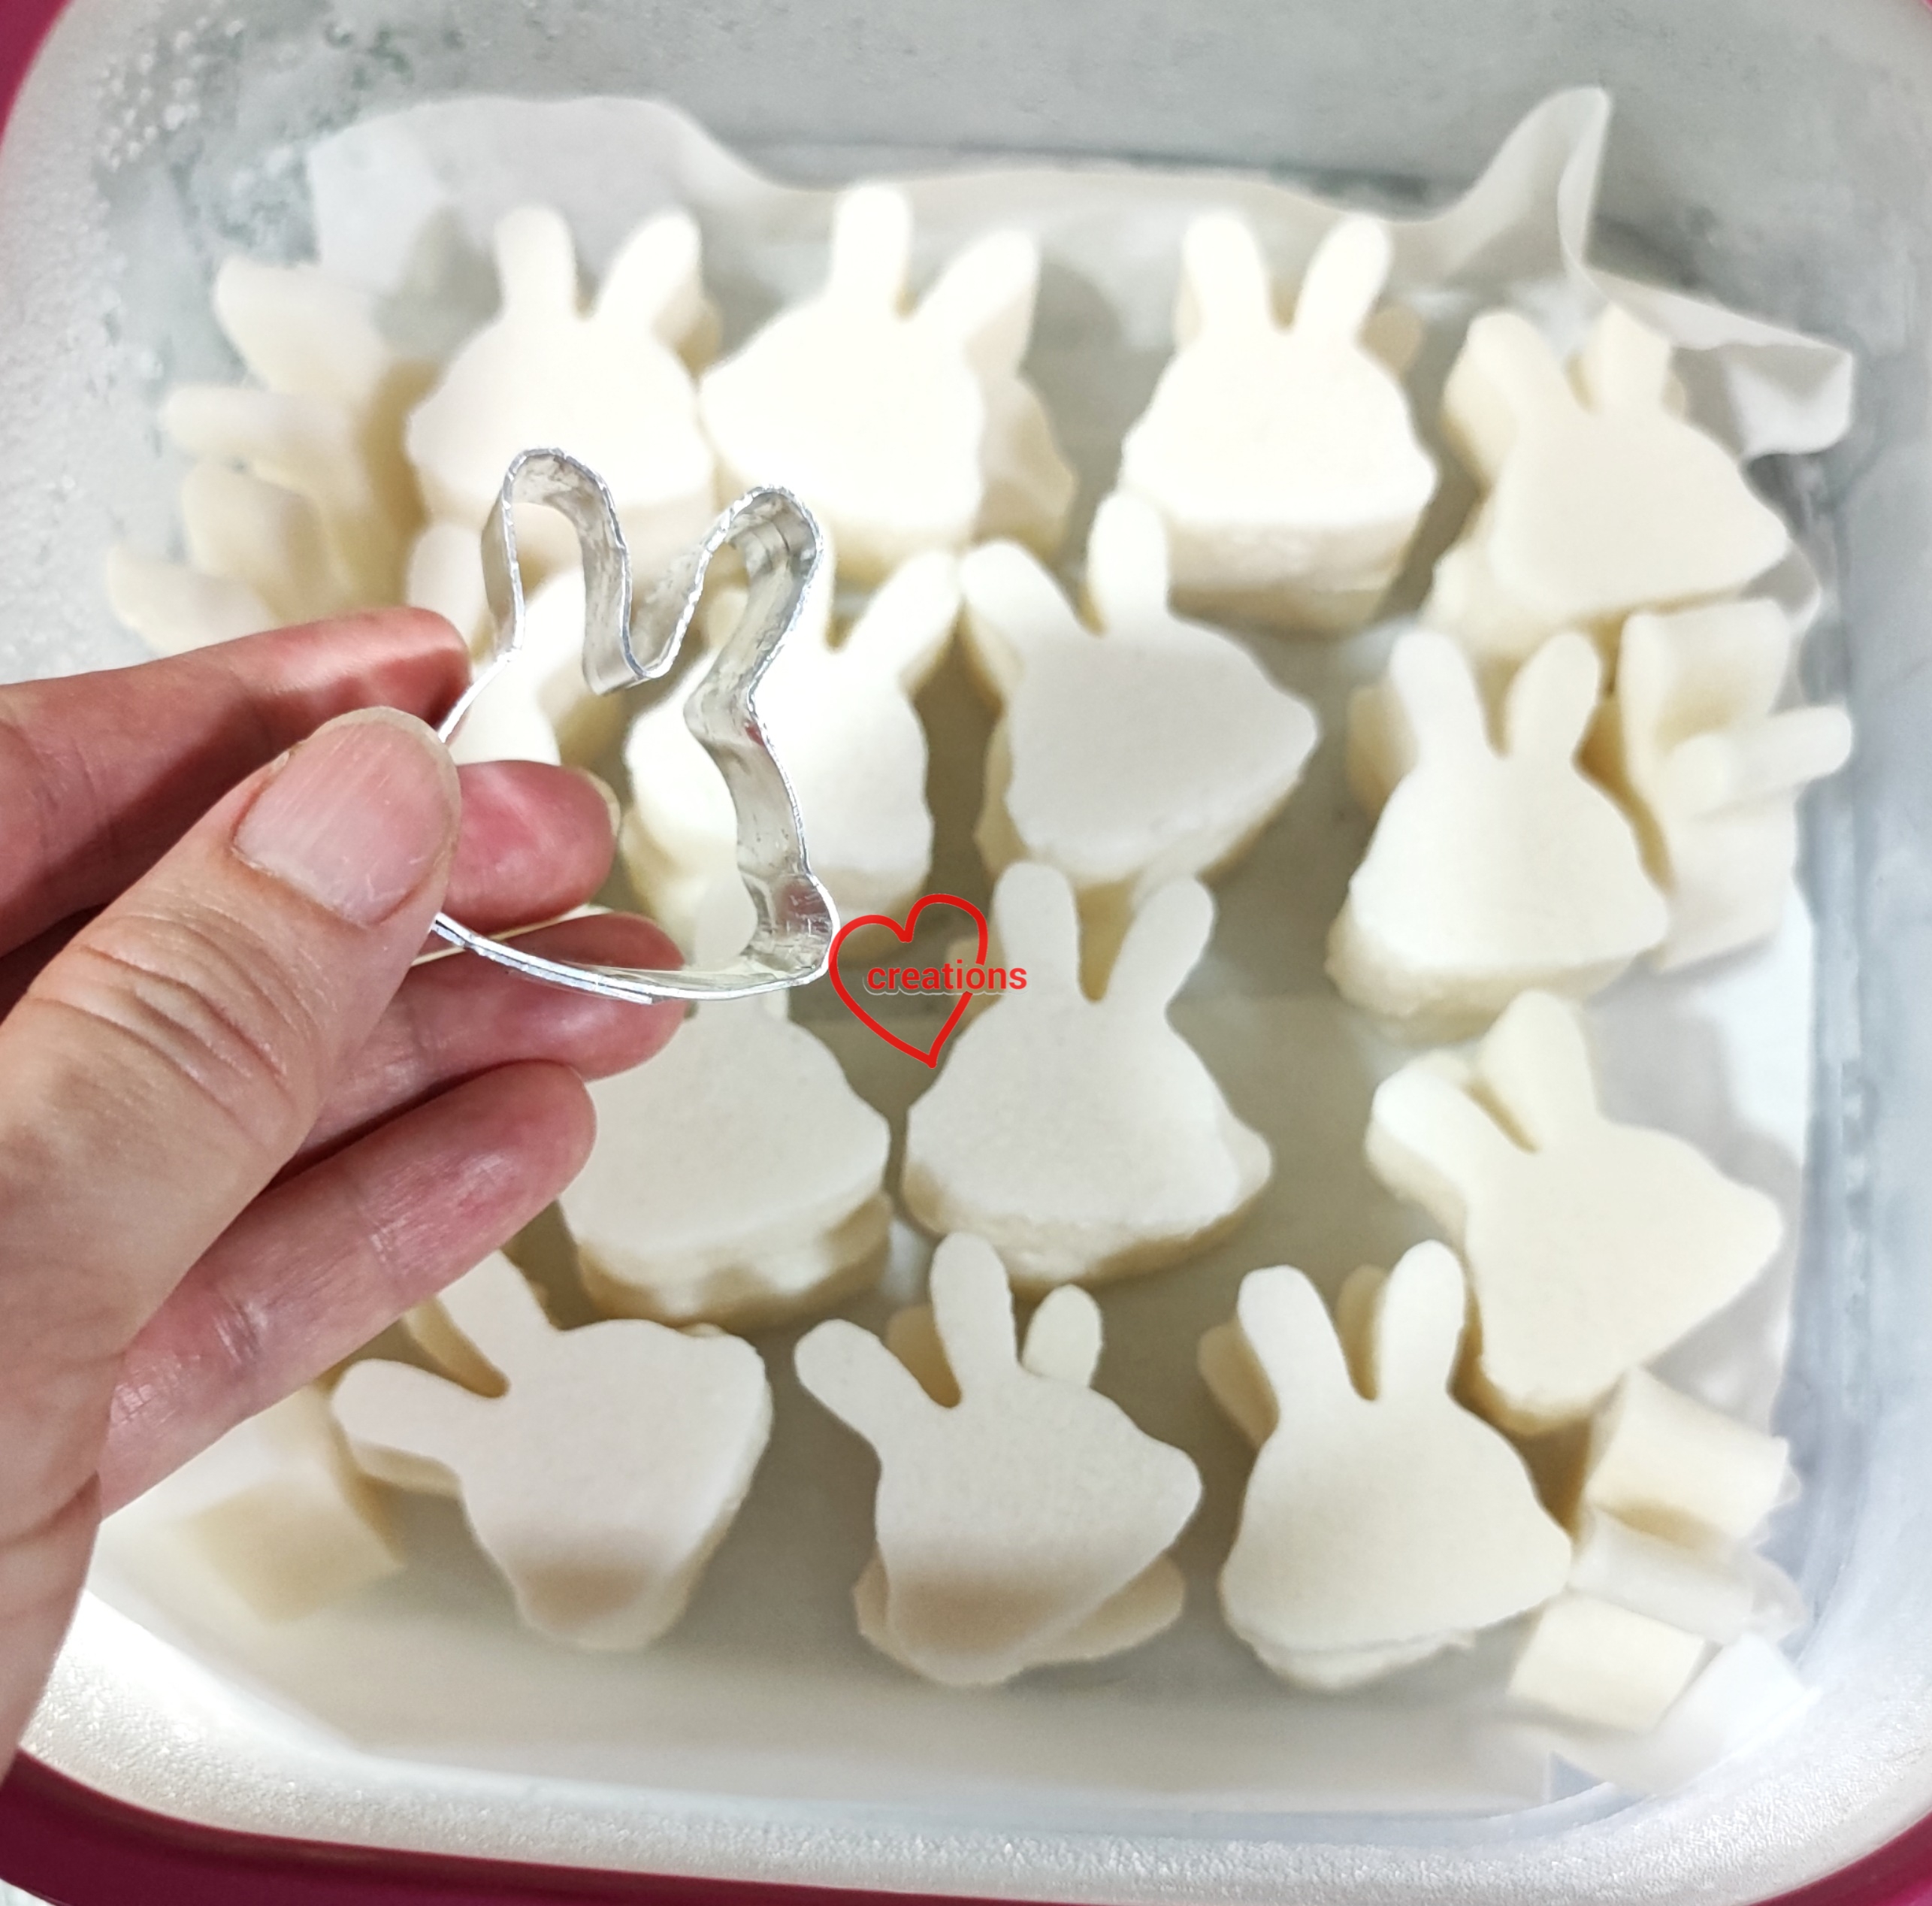
5. Unmould and use cookie cutter to cut out bunny head shape. Store cutouts in airtight container until ready to assemble.

Note that this portion or agar is more than what you need so feel free to halve the recipe. 


Pandan coconut diplomat cream

Ingredients:
200g coconut milk
10g pandan juice concentrate*
40g gula melaka, finely chopped
1/8 tsp salt
20g cornflour
2 egg yolks
15g unsalted butter
3/4 tsp pandan paste
70g whipping cream (you may use dairy, non-dairy or a combination of both. You may need to stabilize dairy cream with gelatin in hot weather. You may use more cream if you prefer lighter taste and texture.)

* This needs to be prepared in advance. Omit and use 1-1.5 tsp pandan paste instead if you do not want to use pandan juice concentrate. Blend pandan leaves with a little water. Squeeze out the pulp and sieve the extracted juice. Let it settle in fridge in a container/bowl for three days before using the dark green layer that settled to the bottom of the container/bowl.

Steps: 
1. Heat coconut milk, pandan juice concentrate, gula melaka, salt and pandan paste in a saucepan
until steaming hot (not boiling). In the mean time, whisk together egg yolks and cornflour in a heavy bowl or measuring jug.

2. Once coconut milk is hot, remove from heat and pour in a thin stream into egg yolk mixture while whisking the egg yolk mixture continuously. Pour everything back into saucepan. 

3. Cook the custard over medium-low heat while whisking continuously. Once it thickens, remove from heat and keep whisking until smooth. Place back on heat and cook until it thickens further, about another few minutes. Be careful not to use too high heat or it will become scrambled eggs. 

4. Remove from heat and add butter. Whisk until well combined. Transfer into mixing bowl. Press cling wrap on surface of pastry cream. Refrigerate for at least an hour or overnight.

5. When ready to assemble with sponge, lighten the pastry cream by whisking it briefly. Whip the whipping cream until stiff and fold into pastry cream to make diplomat cream. Transfer into piping bag.


I can't disclose the recipe for the chiffon sponge as I bought it from Keem Ooi. You may purchase it from her by dropping her a DM on Instagram (account name is keempossible_2). I tweaked her original recipe to include gula melaka, coconut milk and pandan juice concentrate.

Here's a peek at my pattern piping and the pattern reveal after baking!


Roll up the baked sponge while warm to cool completely before filling.


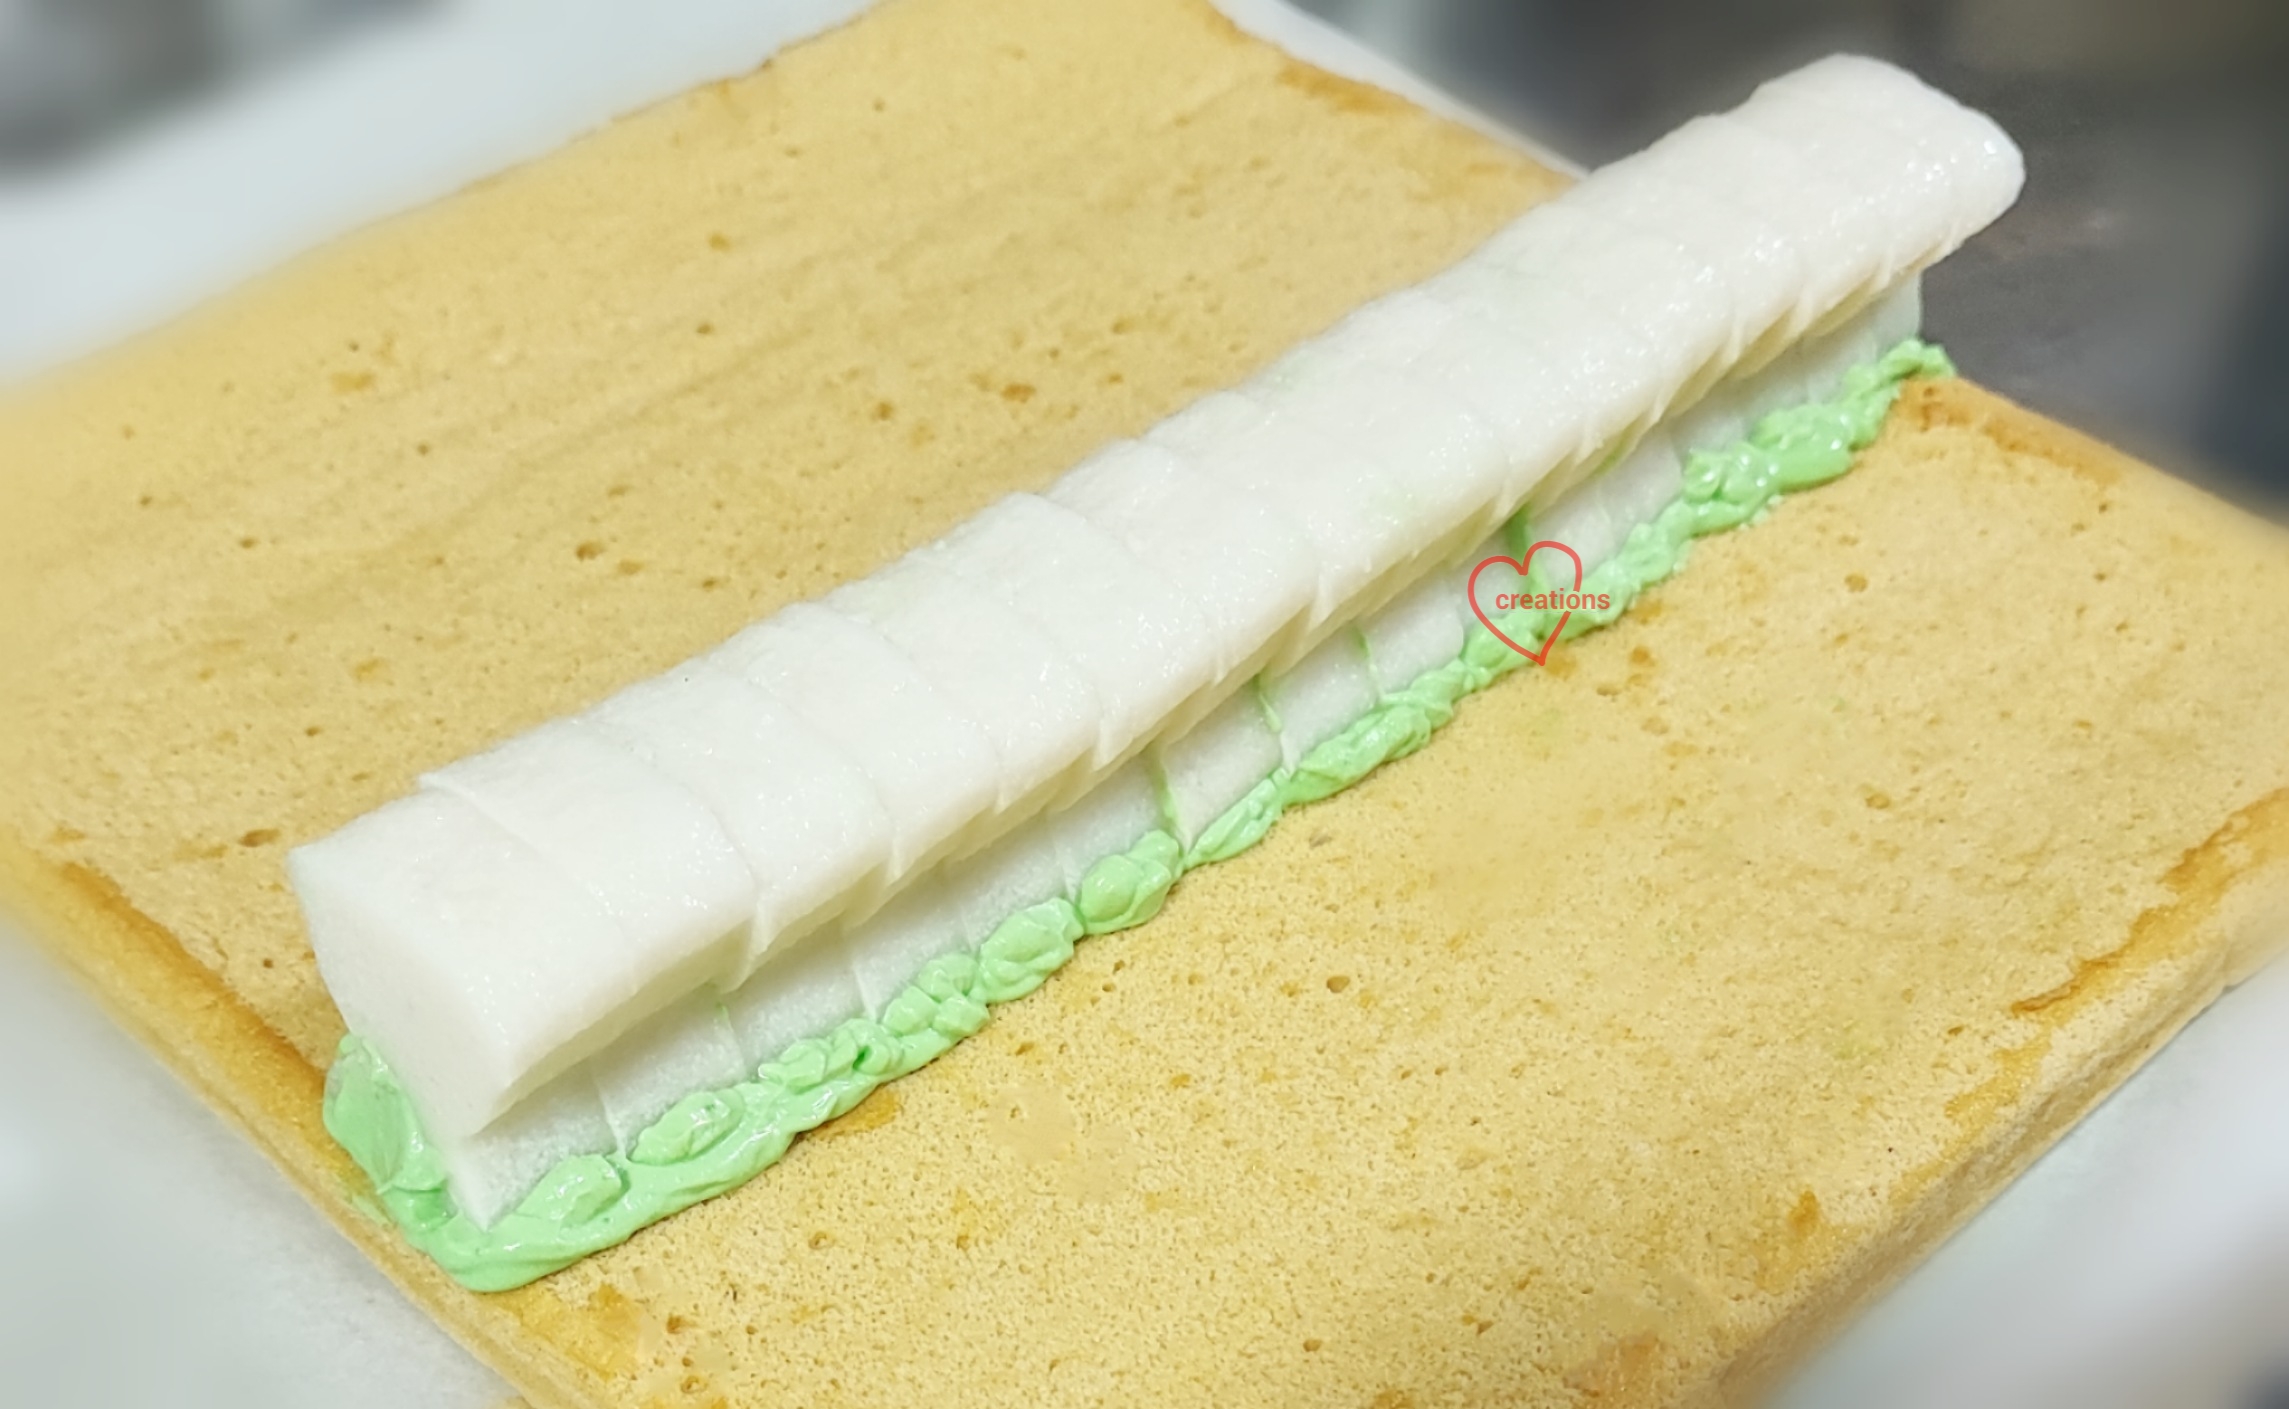
Apply the cream and line the bunny agar cutouts about 12cm from the start of the roll. 


Cover the agar cutouts with more cream and coat the sponge with a thin layer of cream before rolling. Refrigerate for at least an hour or overnight before adding in the details with edible paint. You can make the paint by using gel food colouring diluted with a little water.


Works in progress! I cover the portions I am not working on with cling wrap to minimize drying out of the sponge. This picture shows it all covered because I took a short break. 

I made this bunny swiss roll in time for Easter and a cute spring collaboration on Instagram too! Follow me on Instagram at phay_shing as I am most active there and not all my bakes will be featured in the blog in a timely manner.

with love,
Phay Shing
Read More »

Monday, 19 April 2021

'Resting Cat' Coconut Pandan Gula Melaka Choux Pastry Class

I love cats so I have decided to make this choux pastry design that showcases one of the things cats love to do...

... Sleeping a lot! 

They can sleep in all sorts of weird positions but perhaps the most common is this curled up cosy position. 

I had a request to incorporate some Asian flavours for choux pastry class so this time round I will be teaching coconut pandan gula melaka diplomat cream. It's a smooth, silky coconut pandan gula melaka cream with pockets of gula melaka goodness. Made without refined white sugar so overall GI is lower, and it is almost dairy-free. 

Another look at the kitties! 

In this class, I will focus on techniques for making choux au craquelin that is crunchy, puffy and hollow inside, like this:


Of course you will also learn how to make, assemble and decorate this cat design. 

If you are interested to attend this class, please click on this link. I will have two runs of this class in July, one on a weekday and another on a weekend. I will also update this blog post with the registration page once it is up. 

With love,

Phay Shing


Read More »

Wednesday, 2 December 2020

Pandan Coconut Gula Melaka Woodland Choux Pastries

It is not often that I get requests for choux pastry bakes because somehow it doesn't seem as widely known in Singapore as macarons or cakes. So I took every chance to make this woodland themed birthday bake a magical one! 

Bunny, dog, raccoon and bear on top of a tree stump. Everything except the grass is made of choux pastry! 

Pandan coconut gula melaka flavoured filling was requested so I made a diplomat cream with this flavour. I even flavoured the royal icing grass with pandan paste to complement the whole set. The tree stump is a large pastry covered with gula melaka white chocolate frosting. 

The critters are so adorable I couldn't resist taking a shot of them as loose pieces before mounting them on the choux stump! 


I finally bought some tree stump display plates for photography from Daiso! 

I had to take a shot of one with cross-section cut to show the yummy filling. I made sure there are bits of gula melaka interspersed in the diplomat cream for that extra burst of flavour. 


If this woodland themed design looks somewhat familiar to you, it is because I made something similar for an entry in my Deco Choux Pastries book. 

Detailed recipe for the craquelin and choux pastry batter can be found in this blog post. I will share the detailed recipe for the stump frosting and new pandan coconut gula melaka diplomat cream. 

Just to share some photos of the process... 

Craquelin cutouts for the animals and mushroom caps


Choux batter with craquelin before and after baking

Piped batter for the ears and arms of the animals

Freshly baked small parts! 

Notice that I use perforated mat for the larger pieces and parchment paper for the smaller pieces. Perforated mat with the holes help to anchor the pastry cases in place, helping it to retain its shape better. 

Piping a large pastry case for the stump. This needs to bake for a long time, about an hour, and then cut open to bake some more at lower temperature of 130C to thoroughly dry it out.

The large pastry case is still moist inside even after baking for an hour. It needs to be cut open for a more thorough bake 

I like to bake my cases till totally dry as they have a longer shelf life that way. You can bake these in advance, up to a week and store in airtight container at room temperature. If you prefer softer pastries, simply fill then in advance to soften before consuming. I prefer mine crispy. 

The stump is frosted with white chocolate base thar has a milk gula melaka caramel flavour. 


Stump frosting

Ingredients:

90g white chocolate

10g bitter dark chocolate

20g shortening

1/8 tsp salt

1/8 tsp caramel flavouring

10g gula melaka melted in a little water, cooled to room temperature

Steps:

1. Place all ingredients in a microwave-safe bowl and melt the contents together using 10 second bursts of heating at low power and stirring after each round of heating. Alternatively, you may use double-boiling method. 

2. Let the melted chocolate mixture sit at room temperature to firm up to toothpaste consistency. 

3. Use a spatula to coat the sides of the pastry case with the frosting. Use a fork to draw lines on the stump resembling tree bark patterns. 


Pandan coconut gula melaka diplomat cream

Ingredients:

3 egg yolks

60g gula melaka finely chopped

1/3 tsp salt

30g cornflour 

2 tsp pandan paste

300g coconut milk

25g unsalted butter

80g non-dairy whipping cream*

20g heavy cream*

40g gula melaka, coarsely chopped


Steps:

1. Heat coconut milk with pandan paste and 60g finely chopped gula melaka in a saucepan over medium-low heat until steaming but not boiling. Stir now and then to help the gula melaka dissolve. 

2. In the mean time, whisk egg yolks with salt and cornflour until a smooth thick paste forms in a glass measuring jug or heavy bowl. 

3. Pour heated coconut milk mixture in a thin stream slowly while whisking the egg yolk mixture. Pour everything back into saucepan. Cook over medium-low heat while whisking continuously until mixture starts to thicken. Take it off the heat and whisk until smooth. Put it back on heat and whisk until custard is cooked to desired consistency. Some prefer it thicker and some prefer it runnier. For thicker consistency, cook longer. 

4. Once desired consistency is reached, remove from heat and add butter. Whisk until smooth. Press cling wrap onto surface of pastry cream and refrogerate for at least an hour iuntil firm. You may prepare this a day in advance. 


5. Whip whipping cream until firm peaks form. I use a mixture of dairy and non-dairy cream. You may use either or use a different ratio for both. Keeping in mind that dairy doesnt hold up well in hot climate but non-dairy doesn't taste as good and comes pre-sweetened. 

6. Briefly beat chilled pastry cream with spatula to lighten texture. Fold whipped cream into pastry cream. 

7. Fold in coarsely chopped gula melaka. You may add more if you prefer. Transfer into piping bag to fill the pastry cases. 


I recommend filling choux pastries just before or shortly before you eat so that you can enjoy it crisp. I cut a hole at the base of the cases about 10 or 20 cent coin in size so that it is easy to fill the cases. 

Thank God it was very well received in terms of looks and taste! 

With love, 

Phay Shing
Read More »

Saturday, 15 August 2020

Vegan Pandan Kaya Gula Melaka Cakelets

My friend requested for a vegan cake for her daughter's birthday. I gave some thought to select a flavour that is still yummy despite not using eggs or dairy. It is quite a new challenge for me as my favourite type of cake is leavened by meringues in the form of chiffon cakes. I decided to experiment and take the plunge, even though I was skeptical about the taste and texture of any sponge not leavened by meringues or loaded with butter or eggs. There was a happy accident along the way which I will elaborate later, and the resulting cake tastes beyond my expectations! Full of flavour and wonderful aroma, this is my bite sized version of a vegan pandan kaya cake that uses gula melaka as part of the sugar! 

And what was the happy accident? The sponge layers as you can see, is totally brown. When I prepared the batter, it was in a lovely shade of jade green from homemade pandan juice. The oven temperature went wonky a few minutes into baking and went into a high overshoot, toasting the coconut milk in the batter in the process although I did manage to bring down the temperature after about 13-15min into baking time. As the cake is a thin sheet cake, the cake became brown throughout. Is it dry you may ask. The cake is surprisingly moist and soft although it doesn't have the spongey nature of chiffons. The texture is more like a soft and moist muffin. I chose an easy reference recipe that involves mixing wet and dry ingredients, much like making a simple muffin. 

The pandan gula melaka pudding is more or less a variation of the same default recipe I use for my regular pandan kaya cake, which is vegan anyway. But I will share it here in detail for your convenience. 

Recipe for vegan pandan gula melaka sponge

Ingredients:

110g cake flour (plain flour in original recipe) 

1/2 tsp baking soda

1/8 tsp salt (1/4 tsp in original) 

40g caster sugar (75g in original) 

25g gula melaka, chopped (not in original) 

70g coconut milk 

50g pandan juice (blend as many pandan leaves as you want in some water and strain out the juice) 

1/2 tbs apple cider vinegar 

45g vegetable oil

1/2tsp vanilla extract


Steps:

1. Preheat oven to 160C (180C in original recipe) and line an 8x8" square tray with parchment. 

2. Melt gula melaka in coconut milk, set aside to cool. 

3. Sift flour, baking soda, white sugar and salt into mixing bowl. Whisk until combined. 

4. Add vinegar into coconut milk, set aside for 5 min. Add oil, pandan juice, vanilla and mix well. 

5. Pour wet into dry ingredients. Whisk until just combined. 

6. Pour into prepared baking tray and bake until golden brown. 

Now here is the thing. I didn't follow the baking temperature and time of the original recipe, which was 180C for 30 min. This step would vary from oven to oven as each oven behaves differently. I was baking pandan gula melaka chiffon sponge just before baking this so I had a tray of water at the base of the oven so mine is a steam bake instead of the original dry bake. I preheated to 180C on the temperature dial but actual temperature was about 150-160C for the first 5 min. Nothing appeared to be happening so I turned up the temperature dial by a little (my oven is an analog one) at the 5 min mark and went away for 5 min to have a quick bite. When I came back, the oven thermometer read 190C! I quickly turned the dial down and opened the oven door a little for a few seconds. It took a few minutes for the temperature to drop to 160-170C. I continued baking until total bake time was 25min instead of the suggested 30min because by then, the crust looked really browned. If you aren't sure what time and temperature profile to use, I would suggest following the original reference recipe but do keep an eye on your oven and how browned your cake appears. Even if the coconut milk didn't get toasted in the process, the cake will still be yummy! Just less aromatic. 

As you can see in the picture below, the batter is green but the sponge is browned throughout! But the aroma is really intense from the toasting of the coconut milk and sugars! 

Cut the sponge into squares or use round cookie cutters to cut out rounds, depending on how you want to assemble. A simple way is to use cupcake cases. I decided to do a fancier one using my silicone mould. 


Recipe for pandan gula melaka pudding

Ingredients:

A) 

240g coconut milk

120g pandan water (boil some pandan leaves in water) 

30g gula melaka, chopped 

30g caster sugar (may replace with gula melaka if you wish) 

1/4 tsp vanilla extract 

1/8 tsp pandan paste 

1/8 tsp salt

1/4 tsp liquid green food colouring 

1/8 tsp caramel essence (optional) 

1 tsp agar powder


B) 

26g cornflour 

130g pandan water


Steps :

1. Combine ingredients in B) in a jug and stir until cornflour is suspended in water. Set aside. 

2. Place all ingredients in A) in a saucepan and bring to a boil while stirring all the time. Keep stirring for another 1 min once the mixture is boiling. This is to ensure agar is totally dissolved. 

3. Bring heat to medium low. Stir B) again and pour in a continuous slow stream into the saucepan while stirring the saucepan continously. 

4. Keep stirring and bring the mixture to a boil using medium low heat. Continue stirring and boiling for a minute. 

5. Sieve the mixture to remove any large gula melaka bits or undissolved agar. The pudding is now ready to assemble with the sponge. Stir the pudding in the bowl now and then to prevent it from setting in the bowl. 


Assembly

There isn't  a fixed way to do this. Simply alternate layers of sponge and pudding and then refrigerate for a few hours. If you assembled in cupcake cases, you can leave it as it is. If you used moulds, you can carefully unmould at this point. I rolled the unmoulded cakelets in dessicated coconut for that extra texture when you bite into it.

The fancy silicone truncated cone mould is rather small so I used the smallest round cookie cutter I have to cut out the sponge. And this wasn't enough so I had to halve each round cutout horizontally so the sponge layer isn't too thick so it looks proportionate in the tiny mould. Needless to say, it was a challenge to work neatly and quickly 🤣

Messy assembly! 


My kids did a taste test and gave thumbs up for it! You don't miss the egg at all because it is so full of flavour and aroma! If you want an easy vegan cake that is yummy as well, give this a try! No electric mixer required! 


With love, 

Phay Shing


Read More »

Thursday, 21 November 2019

'McDull in Animal Suit' Pandan Kaya Cake

I first came across McDull about a little more than 10 years ago, watching the original cartoon in Cantonese. It is not as widely known to younger kids nowadays probably because of the origin of this character, which epitomises how some kids grow up in Hong Kong. But anyway, I am glad to have a chance to make this lesser known character 😊

McDull donning various animal suits! 

My university classmate was the one who requested for this bake. Although peppermint dark chocolate was requested for the filling, the cake requested was pandan kaya cake.

I used this french method recipe for making the macaron shells as this is a small quantity bake and the batter is stable enough for dividing into so many colours. Just to share some photos of the process...

Piping McDull. Be sure to use piping tips that are of the right size for better shape retention. For really small parts like the eye patch and black panda parts, you may just cut a small hole in the piping bag 

Freshly baked shells. Check out the feet! 

I filled the macarons with firm peppermint dark chocolate ganache as some of tbem are going on a mini tower

Recipe for firm peppermint dark chocolate ganache
Ingredients:
90g 73.5% bitter dark chocolate couverture
10g unsalted butter
24g heavy cream
1/8tsp salt
1/2 tsp vanilla extract (optional)
1/2 tsp Kahlua coffee liqueur (optional)
1 tbs peppermint extract

Steps :
1. Place all ingredients except extracts and liqueur in a microwave safe bowl. Melt on mdium low power for 20 seconds and stir. Repeat as necessary until smooth and melted.

2. I like to whip my ganache to lighter consistency so I chill the ganache in freezer for 1 to 2 min and then whip with spatula. I repeat chilling and whipping until texture resembles buttercream.

3. Gradually add extracts and liqueur and mix well after each addition. Transfer into piping bag and fill the shells. Store assembled macarons in airtight container in the fridge for at least 24 h before consuming. This type of stiff ganache filled macarons can keep in fridge for two weeks.

I assembled the mini tower with extra pieces of round macaron shells and stiff royal icing 

The recipe I use for the pandan kaya cake is same as the one I used for my mum's birthday except that I used regular caster sugar instead of Stevia. I also used a 6 inch pan without the central tube to bake the 6 inch chiffon cake. The pandan kaya cake recipe can be found here.

Freshly baked 6" pandan chiffon cake slightly more earthy hue due to the gula melaka used. 

I added the words "Happy Birthday" using a separate gula melaka chiffon sponge with some cocoa powder added for a deeper brown colour.

Remember always store macaron cake toppers separately from the cake to prevent the cake from turning the macarons soggy.

With love,
Phay Shing
Read More »