Showing posts with label Valentine's day. Show all posts

Thursday, 6 February 2025

Heart Macarons with Wet-On-Wet Designs

 I dressed up simple heart macarons with more little hearts for Valentine's Day!


Check out the awesome feet from the side view!


These macarons were filled with dairy-free dark chocolate ganache and dairy-free mixed berry (strawberry and raspberry) ganache. Both are temperature stable enough for gifting in tropical Singapore.

Find out how I created the patterns from this tutorial:

https://www.instagram.com/reel/DFchON3zyy-/?igsh=eDMwajlrd3hjejBt

Technical tips to take note of are in the captions of the reel.


with love,

Phay Shing

Read More »

Thursday, 30 January 2025

Pompompurin's Valentine's Day Marshmallows

 I couldn't resist making these after making pineapple tart marshmallows for class display!


I used reduced fresh pineapple juice to make these reduced sugar marshmallows so they smell and taste heavenly! I used meringue powder instead of fresh egg whites too so the batter overall was less robust and prone to breaking down faster than fresh egg white and full sugar versions. I mentioned earlier that using meringue powder instead of fresh egg whites doesn't make a difference when making character marshmallows. After using meringue powder for a longer time, I find that this is true for water, tea and coffee based marshmallows. When using fruit puree, using fresh egg whites will yield a more stable batter that doesn't deflate too quickly when melted gelatin is added so I will likely stick with fresh egg whites when fruit puree is used. Nonetheless, this method still works if you are able to work quickly and the characters are 2D.

I melted some red marshmallows in storage, set them in a tray and cut out little red hearts for Pompompurin to hug. As I wanted this to be an interactive type of marshmallow where the heart is removable and the arms can flap around a little, the arms are piped on a separate tray and stuck onto the main body.

Piped Pompompurins without the arms

You may see the process of piping these in the reel:

https://www.instagram.com/reel/DE4eGq4S_Eu/?igsh=N3kwaWlydDFoemY3


with love,

Phay Shing

Read More »

Tuesday, 20 February 2024

Puppy Heart Chiffon Cakes


These are puppy chiffon cakes modelled after maltipoo and bichon which I love. These were made for Valentine's day and also in collab with Tastemade. Watch the making on my IG here. The recipe is also in the caption. 
Hope you like it and that it made you smile too!  
With love, 
Susanne 

Read More »

Friday, 9 February 2024

Vanilla Black Tea & Strawberry Valentine's Day Bear Marshmallows

 This is a class material for Valentine's Day that I didn't get to share earlier. These cuddly squishy bears have moveable arms that can hug a strawberry marshmallow heart! The bears are naturally coloured and flavoured with black tea.


Watch how the flappy arms work over here:


I made them again recently with shorter body and chubbier cheeks, and packed the strawberry hearts with more freeze dried strawberry powder and less bottled strawberry emulco.


Watch the squish and marshmallow heart piping video over here:


with love,
Phay Shing
Read More »

Sunday, 4 February 2024

Heart Langue De Chat without using molds (Part 2: Pink Berry Ombre Cookies)

 After showing you how to make assorted heart shaped cookies without using a heart mold, I will show you how to make things a little more interesting by making it sweet ombre pink!


Recipe makes about twelve-thirteen 2" heart sandwich cookies (adapted from siZning's YouTube)

Strawberry Langue De Chat cookie:
50g unsalted butter, slightly softened
45g icing sugar
1/16 tsp salt
25g egg whites
1/4 tsp soy lecithin (optional)
3/4 tsp vanilla extract
1/8 tsp strawberry emulsion
50g cake flour, sifted
White & pink gel colouring 

Berry filling:
45g white chocolate 
3g freeze dried raspberry or strawberry powder
1/8 tsp strawberry emulsion

1. Beat softened butter briefly with electric mixer/hand whisk/spatula

2. Add sugar. Beat until well combined

3. Add egg whites in 2-3 additions. Beat until smooth. Add soy lecithin if you wish to help with emulsification.

4. Add vanilla & strawberry emulsion. Mix until combined

5. Add flour. Fold with a spatula until combined

6. Divide into 3 equal portions. Add white or pink gel colouring to achieve desired shades to 2 portions.

7. Transfer into a piping bag with #5 tip. Pipe as shown in the video tutorial link below.

Piped batter

8. Bake at 150-160C for 10-11 min. Bake at 110C for another 5-10 min to dry it out

9. Prepare filling while cooling the cookies. Melt chocolate & add the rest of the ingredients in. Mix well. Fill & assemble sandwich cookies


You may see the piping video tutorial over here:
Please see part 1 for important notes on basic baking tips to ensure success

- Let the batter fall from the piping tip like you would when piping the border on cookies iced with royal icing. Pipe slowly to have better control of the shape. Video is sped up by 7x. To do so, you don't have to apply a lot of pressure on the piping bag but instead, let gravity do most of the work

- Using a skewer to gently nudge the boundary between colours will make the slight indent/crack between colours invisible. It's ok to omit this step if you don't mind the appearance of the indent at the boundaries.

- I added white gel colouring to make the browning less obvious but you may colour it anyway you like!

- Use a metal file used for bakes only or a fine zester to gently file off bits that make the cookie look out-of-shape (see part 1 reel) but you may skip this step if your cookies are in a nice heart shape. Most of the heart shapes in this larger batch turned out fine even though I piped on parchment so I didn't need to file down as many pieces as the smaller hearts in part 1


with love,
Phay Shing
Read More »

Tuesday, 30 January 2024

Sugar-Free Pineapple Tarts

 This was a bake (bakes actually) that came a little unplanned. It all started because I had leftover pineapple puree from my Lunar New Year themed marshmallow class and I thought of making pineapple tarts that some of my family members can eat without being afraid of spiking their blood sugar levels as much as regular pineapple tarts.

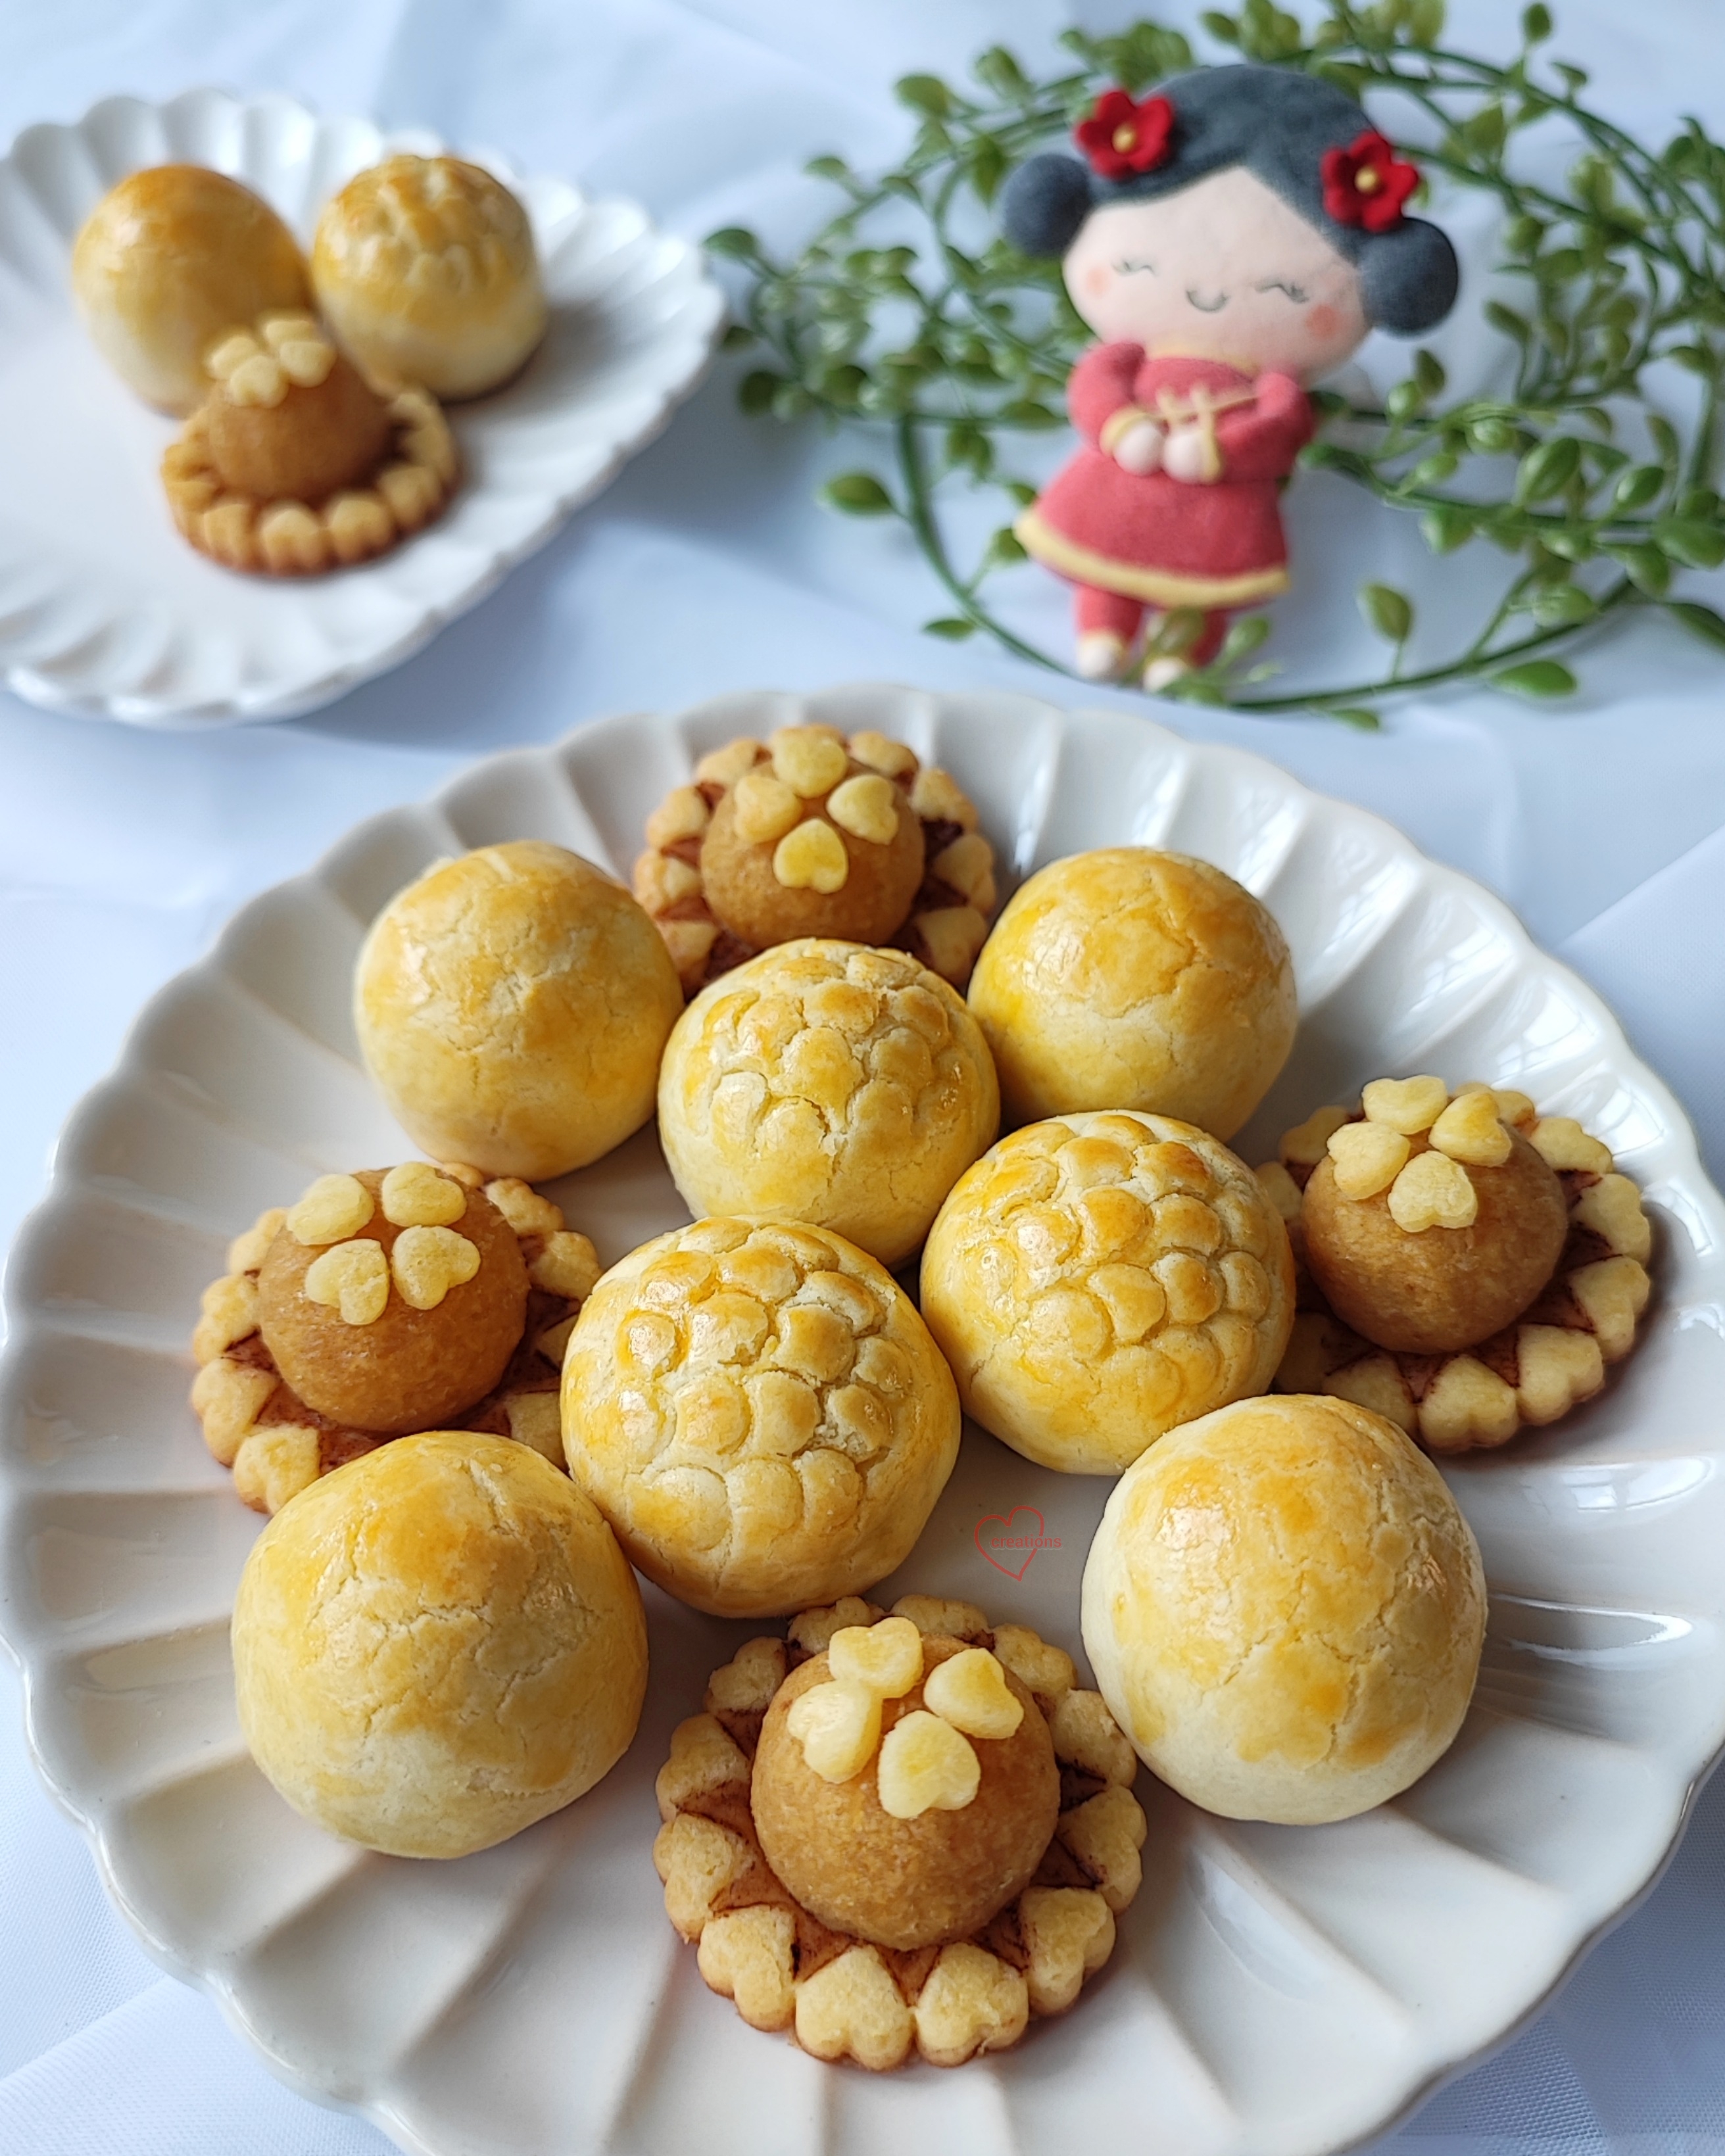
After some trials, I finally came up with something that I am satisfied with. I challenged myself to make pineapple tarts sugar-free without it tasting weird and while minimizing the use of sugar replacements because that's what makes bakes taste weird in general. Those that don't taste that bad aren't zero GI or impart a strong flavour of their own like maltitol (not zero GI) and maple or agave syrup (imparts their own flavour). I made both open-faced and "golf ball" types!


Since the Lunar New Year is so close to Valentine's Day this year, I made the open-faced tart with a little Vday vibes. It also gave me a reason to use a tart mold I have had for years but never used. I added some dragon scale pattern to some of the golf ball tarts since this year is the Year of the Dragon.

Take a look at the cross sections after I took a bite!


Sugar-Free Pineapple Jam
I made the jam without any real or artificial sugar at all. You won't miss it! Adding sugar replacements simply adulterate the taste of the jam when it isn't actually necessary. I tried. It tastes awful to me 🙈. What's the secret ingredient then? Apple! I have seen some people make the jam out of pineapples alone. Adding the right type of apple helps to regulate the level of sweetness/tartness to your preference. Apple is relatively neutral flavour wise and contains lots of natural pectin so it is used in creating homemade sugar-free jams by people who want to omit processed sugar in their diet. Use Granny Smith (sour green apples) if your pineapple is very sweet or you prefer a more sour jam. Use Golden Delicious apples or Gala if you prefer sweeter jam or if your pineapple is very sour. The approximate ratio I use is 1:5 for apple : pineapple by weight. Feel free to upsize your recipe as this is a small batch.

Ingredients (makes enough filling for about 20 tarts):
500g pineapple chunks (about 1 large pineapples)
100-110g apple chunks (about 1 apple)
1 tsp lemon juice (more if you prefer it more sour)
Pinches of salt
1 Cinnamon stick
Cloves and star anise if you wish

Steps:
1. Blend apple and pineapples chunks together with salt. 

2. Add fruit puree and all other ingredients into large frying pan. Cook over medium heat and stir frequently. Reduce heat when the liquid has dried up. Continue cooking until total weight of ingredients is about 30% of original weight. Your jam should be dry. It took me about 20-25 minutes to get there. I used the largest frying pan I have to maximize surface area of the jam to the heat to speed things up. Some bakers use the oven to dry out the puree without having to stand at the stove for some time. To do this, line your largest baking tray with a few layers of foil. Bake the puree with spices at 90C for a few hours or until dry, stirring gently every 1-2 hours. Of course if you have Thermomix, use it😊!

3. Let the jam cool. Spread the jam in a thin layer on a plate/bowl/tray and refrigerate overnight uncovered. This will help excess moisture to evaporate.

4. Portion into 8g balls. Refrigerate until ready to assemble.

8g balls of pineapple jam


Egg wash
Ingredients:
1 egg yolk
1-2 tsp water or milk
A few drops of oil 

Steps:
1. Mix everything together and sieve. Refrigerate covered until needed.

Sugar-Free Open-Faced Tart Pastry
I adapted my recipe by chef Anup Kumar in a Straits Times article written by Hedy Khoo. You may read all about it here.

I highly recommend replacing the almond flour with cake flour as we would be more used to the wheat flour only version. Adding almond flour makes the texture a lot sturdier and the tart base tastes more like almond pate sucree used in classical French pastries. Using cake flour instead of plain flour is fine as I don't find the structure of the pastry compromised and it's overall still sturdy enough to be molded with a plunger mold. I went for the lower end of the suggested sugar amount and find that the sugar replacement aftertaste is hardly detectable at all so it tastes pretty good when eaten together with the jam! But if you are looking at a healthier tart pastry, replacing 12% of the cake/plain flour with almond flour is the way to go.

Feel free to upsize the portion as I made only a small quantity. 

Ingredients (makes about 20 open-faced tarts):
76g cake flour 
15g powdered erythritol (or icing sugar for non sugar-free)
1/4 tsp fine salt
40g cold unsalted butter, cubed
1 egg yolk
1/4 tsp vanilla extract

Steps:
1. Sift together all dry ingredients.

2. Use finger tips to rub cold butter into flour mix until it resembles fine breadcrumbs.

3. Add egg yolk and vanilla. Form a ball of dough with spatula. Flatten into a disc.

4. Wrap dough with cling wrap and refrigerate for 30 min.

5. Roll the dough flat between two sheets of parchment paper to thickness of about 5mm. 

6. Lightly dust the surface of the dough with cornstarch or flour to prevent the dough from sticking to the mold.

7. Press out the dough with the mold and place on baking tray lined with parchment paper about 3cm apart.

8. Apply egg wash with a soft brush. You don't have to make it fancy like I did. I coloured part of it dark brown with chocolate emulco mixed into the egg wash.

9. Place pineapple jam in the middle and press it down lightly. 


10. Decorate with leftover pastry on top of the jam if you wish. 

11. Bake in preheated oven at 170C for 15-20 min or until pastry is lightly browned.

Here's a picture of the plunger mold I took with the freshly baked tarts.


Sugar-Free Golf Ball Tart Pastry
Tart pastry for this type of tarts doesn't need to be as sturdy as the open-faced version. I think this is the more popular version in Singapore because of it's delicate crumbly texture. I adapted the recipe from Celia over here. Feel free to upsize as I made a small portion.

Ingredients (makes about 20 golf ball tarts):
120g cake flour
15g cornflour
15-20g powdered erythritol (or icing sugar for non sugar-free)
20g full fat milk powder
1/4 tsp salt
100g cold unsalted butter, cubed
1 egg yolk 
1/4 tsp vanilla extract

Steps:
1. Follow steps 1-4 in open-faced tart pastry.

2. Divide dough into 10g portions. Wrap the pineapple filling. 

3. Place 3cm apart on lined baking tray. Use a straw cut lengthwise in half to create dragon scale imprints if you wish. Chill for 10-15 min

I left some of them plain without the imprints


4. Preheat oven to 150C. Apply egg wash. Bake for 18-20min or until golden brown. You may take the tray out halfway to reapply egg wash if you wish.

Celia mentions that little bit of cracks is fine as it will reduce in appearance after cooling down.

Cool both types of tarts completely before storing in airtight condition. It can keep well for up to a week at cool room temperature. For longer storage, please refrigerate or freeze after wrapping it airtight. Toast before consuming.

Here's the video of the process:

Update:
My parents tried eating the pineapple tarts cold from the fridge (because they didn't want the hassle of toasting it) after more than two weeks of storage and loved it! They said the tarts were still very good! I also have data from home that eating these in moderation doesn't spike the blood sugar levels!


with lots of love,
Phay Shing


Read More »

Wednesday, 24 January 2024

Heart Langue De Chat without using molds (Part 1: Assorted cookies)

Langue De Chat means cat's tongue in French but they are thin crispy butter cookies. Sometimes they are made as sandwich cookies filled with chocolate and these are usually made using molds. The Japanese popularized the sandwich cookie version and you may have seen it sold in pretty gift boxes. If you have not heard of langue de chat, you may be familiar with the names Shiroi Koibito or 白色恋人饼. While the popular Japanese versions are usually square in shape, I made them in heart shapes for Valentine's Day!

If you don't wish to increase the clutter at home with yet another mold, here's how you can make them. I made mango, mixed berry, matcha and dark chocolate flavours. You can make them in any flavour you like but I feel this combination has such pleasing colours and adding sour mango to the filing makes the cookie overall less sweet. Feel free to stick with the classic white chocolate only if you don't mind a sweet cookie!

Recipe makes about twenty-eight 1.5" heart sandwich cookies.

Butter base:
100g unsalted butter, slightly softened
90g icing sugar
1/8 tsp salt
50g egg whites
1/2 tsp soy lecithin (optional)
1 tsp vanilla extract

Flour & flavouring:
Mango: 25g cake flour
Mixed berry: 25g cake flour + 1/16 tsp strawberry emulsion
Matcha: 23g cake flour + 2g matcha powder
Dark chocolate: 22g cake flour + 3g cocoa powder

Filling:
Mango: 45g white chocolate + 3g freeze dried mango powder
Mixed berry: 45g white chocolate + 3g freeze dried raspberry powder + 1/8 tsp strawberry emulsion
Matcha: 45g white chocolate + 3g matcha
Dark chocolate: 45g dark chocolate + 3g light corn syrup or any invert sugar

Steps:
1. Beat softened butter briefly with electric mixer/hand whisk/spatula

2. Add sugar. Beat until well combined

3. Add egg whites in 2-3 additions. Beat until smooth. Add soy lecithin if you wish to help with emulsification.

4. Add vanilla. Mix until combined.

5. Divide into 4 equal portions. Add the respective flour & flavouring to each portion. Fold with spatula until combined

6. Transfer into piping bag with #5 tip. Pipe as shown

7. Bake in preheated oven at 150-160C for 10 min or until slightly browned at edges. Bake at 110C for another 5-10 min to dry it out

Freshly baked cookies!


8. Prepare filling while cooling the cookies. Melt chocolate & add the respective flavourings. Fill & assemble sandwich cookies

You may watch my reel for the process:


Important Baker's Notes:
- Use room temperature egg whites. Cold eggs will cause the mixture to split

- Add the egg whites a little at a time to prevent mixture from splitting

- Adding an emulsifier like soy lecithin helps to prevent & remedy a split mixture. Some recipes use whole eggs but I prefer it without egg yolk inside for a lighter crispier cookie although egg yolks can help to bring the emulsion together 

- The extra baking time at low temperature is to ensure that your cookie remains crisp. Although the cookies are crisp freshly baked, without the longer drying out time, it won't stay crisp for long especially when exposed to humid air

- Using a scribe tool/skewer to nudge the batter edges & middle (shown in reel) is optional if you wish to have the border visible

- Use teflon sheet/silicone mat to help with better shape retention after baking. Parchment paper may result in the baked cookie going "out of shape"

- Use a dedicated metal nail file or a very fine zester to gently file off "out of shape" cookies (shown in reel)

Stay tuned for part 2 on how to create a sweet ombre version of the cookies!

with love,
Phay Shing
Read More »

Monday, 7 February 2022

Hidden Message Chiffon Cake


The best way to say I ❤️ you this Valentine's day? With cake of course!🥰 


Teaching this Hidden Message Chiffon Cake live on Howtocakeit this Sat morning 12th Feb 9am, SGT (or 8pm US time).  

Video tutorial will be available for unlimited streaming after that too, with access to workbook and private FB group for discussion! 

Link to join here

With love, 
Susanne

Read More »

Tuesday, 16 February 2021

'I Love You' Surprise Valentine's Bear Chiffon Cake

A Valentine's Day Forever Friends Bear Hearts Chiffon Cake with a special "I Love You" surprise! 

I realized that we don't say these words often enough. In the 5 love languages, words of affirmation is one of them, so let us not forget to say them =). I made this special creation to thank my friends/loved ones who have supported all these years. Blessed Valentine's Day and thank you!

Here's a video to show cutting of the surprise!


May it be "Valentine's Day" for us everyday!

With lots of love,
Susanne


Read More »

Wednesday, 10 February 2021

'Puppy in a Mug' Valentine's Day special

I was going to start working on new Youtube content again but inspiration strikes! Since Valentine's Day is just around the corner, I decided to make something VDay themed, as well as take the chance to prepare some new class content. Presenting some adorable choux pastry puppies! 

"I give you some luv💕💕" 

The puppies, hearts and mugs are all made of choux pastry! You may refer to my book Deco Choux Pastries on how to make the choux au craquelin hearts as it is one of the entries there. The puppies aren't in the book but you can find the technique for making them in the book as I have similar animal designs to the puppy. The mugs were made by baking cylindrical choux cases in a metal mould lined with perforated mat, a technique similar to how I made the choo choo choux train. For the basic choux pastry batter and craquelin recipe, you may refer to this post. 

I made some puppies holding heart sprinkles and sitting in cupcake cases for April class material with Tottstore as this would be less challenging given the time constraint. 

I decided on lavender vanilla honey diplomat cream as the filling! 

And because it is VDay themed, my good friend said to me "You know the doggie with both eyes closed, it is just asking for a cupid's arrow to be in its head". And so, I decided to follow her suggestion and had a good laugh 🤣


Lovestruck 😍... Literally 😂... Ouch! 🤣


I hope these cute puppies put a smile on your face! Happy Valentine's Day in advance! 


With love,

Phay Shing

Read More »

Sunday, 24 January 2021

Valentine's Day Cute Ox Surprise Chiffon Cake


What is the most moo-ving surprise you have received for Valentine's day?💖💖

Hope my surprise hearts ombre chiffon cake moo-ved you to smile! 🥰


And here is the Valentine's Ombre hearts chiffon cake! I made ombre layers both at the sides and the top of the chiffon cake! See my previous ombre hearts creations here.


Hope the cute cake made you smile lots!

With lots of love,
Susanne


Read More »

Saturday, 9 January 2021

Macaron Teacup Bouquet (Online class)

 This was a last minute decision but I am glad we made it! I am supposed to teach the Chinese New Year themed macaron teacups with an auspicious Chinese character "吉" on it in a week's time. But because the class looks set to be small and there was interest in an online class for macaron teacups, we decided to do a video of the physical class to create an online class.

Most of my followers on Instagram and people from the macaron Facebook group aren't Chinese so I thought something that is more Valentine's Day themed might be more suitable. So it was a last minute decision to include a bonus design for transforming the red macaron teacups into one suitable for Valentine's Day.

Instead of giving your loved one a bouquet of flowers, why not give edible bouquets in macaron teacups instead!


As a friend rightly pointed out, this is suitable for Mother's Day as well! I decided to keep this bonus design simple with simple hearts as teacup decorations, and simple rosettes and leaves piped using buttercream. If you have a mini Russian tip for piping roses, those will work great too! 

In this class, I will demo how to decorate the teacups with hearts, and pipe the buttercream bouquet, in addition to showing how to make the Chinese New Year teacups below. 


If you are interested in this online class, please contact Sharon at whatsapp +65 96882777.  Alternatively, click on this link for more details of this class. There is no closing date for registering for the online class but please do so soon if you would like to learn how to make these before Valentine's Day. 


With love, 

Phay Shing


Read More »

Monday, 17 February 2020

6-sector Rainbow Hearts Chiffon Cake


6-sector Rainbow Hearts Chiffon Cake... which is your favorite? Pink or White?

Revisited this cake over Valentine's day to encourage a friend and also some healthcare workers.

Watch a video of the Hearts Roulette spinning!


I have shared recipe for the cake in Creative baking: Chiffon Cakes (book cover below), and also shared a video tutorial of the cake on Youtube.

Many on Instagram shared they prefer the newer pink version! Which do you like?


Pink

White

With lots of love,
Susanne


Read More »

Wednesday, 12 February 2020

Valentine's day Pusheen Chiffon Cake


Happy Valentine's Day!

Will you be my Valentine? <3

Chiffon cake inspired by Valentine's day Pusheen with a Giant heart candy! It was love at first sight when I first saw it!

Sending some love and hugs to everyone in the midst of this difficult time.. and truly we are very thankful for all the brave healthcare workers on the frontline. A big thank you..

With lots of love, XOXO,
Susanne


Read More »

Thursday, 2 January 2020

Valentine's Day Heart Macaron Bouquet Class

If you are clueless about macarons but want to make something that looks impressive and tastes great (not too sweet), why not join me for this macaron class to make a heart macaron bouquet!


I will cover the simplest method, the French method, as well as some calligraphy tips and bouquet assembly tips. Heart shaped macarons are not just suitable for Valentine's Day, but also for other occasions like Mother's day, teacher's day or any day you want to show your loved ones how much you appreciate them 😊. The fillings I am teaching are dark chocolate ganache and raspberry white chocolate ganache.

Registration link and details of the class can be found here.

With love,
Phay Shing
Read More »

Thursday, 14 February 2019

Valentine's Bear Chiffon Cake


Giving you a BEARY BIG HEART with lots of love! Here's my Bear chiffon cake, Valentine's version. This bear is made similar to my previous Pusheen snowman! Wishing everyone a Blessed Valentine's Day with your loved ones tomorrow! <3

With lots of love,
Susanne =) xoxo


Read More »

Monday, 11 February 2019

Hello Kitty & Pooh Valentine's Day Macaron Teacups

I get all excited about coming up with original and cute overloaded creations. This is one of them! It's for a boyfriend who wanted to surprise his girlfriend for Valentine's Day. I am sure you can tell she's a Hello Kitty and Winnie the Pooh fan!

The whole teacup setup is made of macarons, with the exception of the stick for the heart balloon

I made this concurrently with my "Heart in a Teacup" macarons so you may refer to that post for more details on making the macaron teacup. I used reduced-sugar Swiss method for the teacups.

I made Hello Kitty, Pooh and the teeny hearts on a separate day along with a few other unicorn heads and some random characters. And because the quantity is so small, I chose to use the French method for these. You may refer to this post for a cornflour-stabilized French method recipe that I used for this bake.

Piping the tiny shells! I mainly used Wilton #3 and #5 piping tips for these

Decorating the shells with fine black edible marker was a challenge too! Thank God I made extra shells!

I filled the tiny macarons with dark chocolate ganache


Special gifts for your loved ones need not happen on special days like Valentine's Day. Do something special for your loved ones on random days. That's more special 😉.

With love,
Phay Shing

Read More »

Wednesday, 6 February 2019

'Heart in a Teacup' Lavender Earl Grey and Dark Chocolate Macarons

When my friend saw the macaron teaset I made last year, she quickly booked me for Valentine's Day order, four months in advance! She already had a cute and visually simple design in mind and I was ready to go with it 😊

Presenting my "heart in a teacup" Valentine's Day bake!


I used the regular Swiss method recipe for the hearts and the reduced-sugar version for the teacups. I had extra red batter left from making display pieces for my boy and girl CNY macaron class so I decided to bake the red hearts in advance and froze the shells.

Dainty red hearts! The little "tail" at the bottom piece is to help the macaron sit nicely in the filling inside the teacup.

You may refer to this post for more details on how to make the macaron teacups. Here are some photos of the process...

I added 1.5tsp of freeze-dried raspberry powder into the almond paste.

Note the dull colour. Natural sources of food colouring are usually dull.

After adding some pink gel colouring. I added a little too much pink so I added a little white gel during the macaronage stage.

I love the final soft dusty rose pink colour!

The teacups are made of a few components that need to be piped out.

The saucer

The handles

Teacup body

Piping the cup base when a sticky membrane has formed on the base shell.

Freshly baked macaron shells!

I decorated the teacup with royal icing made using lemon juice instead of water to make it less sweet. I filled the handles with white chocolate. I couldn't help taking a photo of this whimsical setup!

I filled the hearts with whipped dark chocolate ganache


Both flavours of fillings are relatively firm so they are suitable for filling macarons that are to be given away as gifts in tropical Singapore, such as these teacups. If you are living in a colder climate, you may adjust the filling recipe to reduce the chocolate to cream ratio for a softer filling.

Store filled macarons in airtight condition in the fridge for at least 24h before serving. Leave the teacups out at room temperature for 15-20 minutes before opening the container to serve.

If you need more comprehensive and detailed information about the basics and various techniques of macaron making, you may refer to my Creative Baking: Macarons or Creative Baking: Macaron Basics books.


With love,
Phay Shing

Read More »