Showing posts with label Baking with kids. Show all posts

Wednesday, 23 April 2025

"Green Eggs and Ham" Kid's Baking Class

 If you are familiar with Dr Seuss' stories, you will definitely be familiar with one of his classics, Green Eggs and Ham. This is my version of it and the whole thing is actually sweet instead of savoury, complete with runny "yolk" that can burst when you poke at it!


This will be a fun-filled class combining Science, Art and Culinary experience in a single session.

What's on the menu?
- Coconut gula melaka strawberry crepes as "ham"
- Coconut panna cotta as "egg whites"
- Spherified pandan gula melaka yoghurt as "green yolks"
 
Watch this reel to see the texture, the jiggles and oozy action!


Please click on this link to register.


with love,

Phay Shing


Read More »

Wednesday, 12 June 2024

"Egg on Toast" Cake (Kids baking class)

 I didn't get around to sharing this creation earlier. Oops! This "egg on toast" cake was planned as a fun June school holiday baking class for kids that combines Science and Culinary experience. 

I took the chance to make a Gudetama version as well!


More pictures to show that the "egg yolk" is really more than it seems!


The "yolk" is actually spherified mango sauce, the "egg white" is vanilla panna cotta and the "toast" is vanilla yoghurt cake. I made this creation simple enough that younger kids can handle too as for the most part, this creation involves pouring and mixing.

Watch both versions in action!

Gudetama version:

https://www.instagram.com/reel/C4tpMJQypBG/?igsh=MWl4eXAxZDFncWU1eg==

Smiley egg version:

https://www.instagram.com/reel/C50kb7wSy4T/?igsh=ZXN1d2ZyNzM1eGho


You may have noticed that the consistencies of the yolks appear different. That's because I tweaked the recipe when I made Gudetama to make it more mango-y. It's less bouncy but yummier. That's the version I will be using for the class.

You are still in time to sign up for this class if you see this post before 19 June 2024. It will be a fun and relaxing bonding time with your child! Please click on the link below for more information or to register:

https://www.bakersgym.com/service-page/kids-class-egg-on-toast-cake?referral=service_list_widget


with love,

Phay Shing

Read More »

Saturday, 12 August 2023

Ice-Cream Cone Marshmallow Surprises (Class)

 This is the first marshmallow class I planned after finishing my work with Deco Marshmallows: Ice-cream cone marshmallow surprises!


I intend to share a few kid-friendly flavour combinations in this Junior chef class. Participants are of course free to mix-and-match whichever way they prefer!

Just look at the yummy surprises inside!


Strawberry marshmallows with homemade strawberry jam centers. The cones are coated with strawberry white chocolate inside. I use a combination of freeze-dried strawberries and strawberry paste to impart the flavour and colour to the marshmallow.

Biscoff and vanilla marshmallow with crunchy Biscoff surprise inside! The cones are coated with dark chocolate.

Strawberry and vanilla swirl marshmallows with cookies n cream marshmallow and Ferrero Rocher surprise inside. Cones are coated with dark chocolate.

Here's a reel of piping the swirls, squishing and cutting open the cones!

https://www.instagram.com/reel/CuO-W8lgtC4/?igshid=MzRlODBiNWFlZA==

If you are interested to join this class with your child, please click on this link for more details or to register.


with love,

Phay Shing

Read More »

Monday, 15 March 2021

Two-Ingredient Edible Rocks

Not all "bakes" with a wow factor are difficult, expensive and/or time consuming to make. Here is one quick and simple creation that only needs 2 ingredients and can be made in a matter of a few minutes! These realistic looking but edible rocks are presented by the hosts of my Youtube channel. 


My kids said the rocks look so much like the ones they pick up on our reservoir walks 😂. 

I did a video tutorial to show you how this is done! But for easy reference, let me type it out here as well. 

Ingredients :

30g compound white chocolate chips 
6g Oreo cookie crumbs (without cream) 

Steps:

1. Place chocolate chips on a sheet of cling film. Knead it using the film and your hands. The heat and pressure from your hands will melt the chips into one lump. 

2. Scatter some Oreo crumbs in a few additions, kneading until well combined with each addition. Don't worry about making it homogeneous as it looks more natural that way. 

3. Divide the lump of Oreo white chocolate into rocks of various sizes. Use a fresh cling film, gloved fingers or the back of a metal teaspoon to shape the rocks and smooth out the surfaces. 

4. Leave in a cool place to set. 

Youtube video tutorial can be found here. Feel free to scale the recipe up or down. Just keep in mind to use the same ratio of Oreo crumbs : white chocolate = 1:5.

Have fun! 


With love,

Phay Shing

Read More »

Wednesday, 29 July 2020

Hello Kitty Popsicle Celebration (Online Class)


Here is the second class which I am launching with Sanrio!

Titled Hello Kitty Popsicle Celebration, Hello Kitty dressed in red and white and getting ready to celebrate SG National day with us! =)

These yummy chiffon cake popsicles are vanilla-strawberry flavoured. This item is easier to bake and fun to make for the whole family. We hope that these online classes will promote bonding as we celebrate National day at home. Sign-up link for the class is here.

There are also options to add on baking kits with popsicle mold, ice cream sticks, and ingredients pre-weighed!

Hope these cheerful Hello Kitty popsicles made you smile!

With lots of love,
Susanne


Read More »

Friday, 17 July 2020

Polar Bear and Panda Choux Pastries (parent-child baking class)

Want to learn how to make these cute and simple choux pastries with your child? Come and join me for this class happening in September!


I will teach you how to make the basic choux au craquelin, which is just a fancy name for cream puffs with cookie dough on top for that extra crispy crunch, and how to transform a simple whipped white chocolate ganache into these cute bears. There is no artificial colouring used too! I will cover the techniques for creating puffy and crispy choux pastry cases which are so good you can eat it on its own. The whipped ganache is a simple filling that can remain stable in Singapore's hot climate so this may be an option for serving at parties. I can assure you that both you and your child will have fun with this, especially when decorating your work!

Please click on this link for more details and registration.

With love,
Phay Shing

Read More »

Tuesday, 1 October 2019

Dark Muscovado Blondies with Salted Caramel Chips (50% less sugar)

Children's Day is just around the corner and I have been busy with a number of things. But this will be the last Children's Day that my elder kid is celebrating (how time flies!) so I am making it a point to squeeze in time to make something for my kids to share with their classmates and friends. What can a mama come up with that can be done in a single day (bake, pack and wash up) for approximately 80 kids that will likely be a hit for majority of kids? And bear in mind, doing this on top of cooking and housework and making sure hubby has my attention too.


I could have gone back to making fresh cream scones like I did for three consecutive years but then I remembered a baking experiment that hubby did a few months ago. He isn't a baker but had the urge to bake something simple and yummy to snack on so he made some blondies. I remember reaching for them when I was hungry because they are irresistible. If you don't know what Blondies are, they are similar to Brownies except that it's the non chocolate version.

Another reason why I settled on Blondies is because it is non chocolatey (some kids can't take chocolate or don't like chocolate, like my younger kid) and nuts are an optional item in it (nut allergy concerns for some kids) . It is strong in flavour and I make it a point to make it not too sweet as well. The original recipe that hubby adapted from contained double the amount of sugar that we used. You may refer to this blog post for the original recipe that I adapted from.

Due to the significant reduction in sugar, I baked the blondies in a smaller pan than what was recommended in the original recipe. I also baked the blondies in three 7x7" baking trays in three rounds of baking to produce 81 5x5cm squares of goodness. Some math is involved in determining exactly how many pans, rounds of baking and ingredients I need, which was why I set my planning for this bake as a math question for my younger kid to help me out.

This recipe is very much scalable and you can increase it based on number of eggs. A 1 egg portion yields 9 blondies for a 7x7" baking tray.

Recipe for blondies
Ingredients (makes nine 5-5.5cm blondies) :
110g dark muscovado sugar (or any brown sugar but the richer the sugar flavour, the more flavour your baked goods will have)
112g unsalted butter, melted
1 egg, lightly beaten
1 tsp vanilla extract
1/4 tsp caramel essence (optional but adds to the fragrance and flavour)
128g plain flour (use cake flour if you prefer a more tender bite)
1/2 tsp baking powder
1/8 tsp baking soda
1/8 tsp salt
30-50g salted caramel chips *

* you may replace with butterscotch chips, chocolate chips, peanut butter chips, walnuts, pecans, or a combination of the above according to your preference.

Steps:
1. Preheat oven to 175°C, set oven rack to middle position. Line the baking tray with parchment paper at the base and sides.

2. Whisk together sugar, salt and melted butter.

3. Add egg, vanilla extract and caramel essence. Whisk until a thick homogenous mixture is formed.

4. Sift together flour, baking powder and baking soda. Fold into wet mixture in a few additions using a spatula until just combined.

5. Fold in salted caramel chips or other goodies of your choice.

6. Pour into prepared tray and bake for 20-30min or until skewer comes out clean. Cool completely on cooling rack before slicing.

I needed to weigh out each portion to bake since I bake three 7x7" trays at a time in my oven. 

I trimmed off the sides of the freshly baked blondie before slicing into 5-5.5cm slices

My elder kid couldn't resist helping me with the mixing of ingredients because "Ma, that looks fun".... Compared to studying for the last paper for his exams 😂.

And because it is Children's day, I decided to add some colour to the bake by using a glaze and rainbow sprinkles. Here is the recipe for the glaze. You may scale up or down easily. Original recipe that is shared on multiple websites use water but you may use milk or in my case, I used some lemon juice. I also added caramel essence to it. This glaze hardens and dries pretty quickly when exposed to air. You can add as little or as much glaze as you like, or omit it all together. I just drizzled a little glaze on the sliced blondies and scattered rainbow sprinkles on top before letting it air dry for about 20 min.

Recipe for sugar glaze
Ingredients:
1 cup confectioners sugar (icing sugar with some cornstarch/cornflour already added)
1 tbs light corn syrup
1 tbs water
1 tbs lemon juice
1 tsp vanilla extract
1/2 tsp caramel essence

Steps:
Combine all of the above together and whisk until sugar is completely dissolved. Cover mixing bowl with cling wrap if not using it immediately. Stir again just before use.

Store baked goods in airtight condition at cool room temperature for a few days. You may freeze it for longer storage and toast it before serving.

Blessed Children's Day to all the kids!

With lots of love,
Phay Shing
Read More »

Thursday, 30 May 2019

Naturally Coloured No-Bake Galaxy Tarts (Junior chef class)

I was helping my younger kid with some experiment using homemade universal indicator recently and it inspired me to come up with this class. Why not conduct a class that incorporates some fun science fact as well! Presenting my version of naturally coloured galaxy tarts!


This is another "baking" class for kids that I am planning to conduct with the theme of natural food colouring. I mention "baking" because this is actually a no-bake tart! Did you know that you can create an edible galaxy design by using natural ingredients and changing the pH of the mixture? Come and join me for this fun class suitable even for older preschool children (5-6 yo) as I teach a little bit of Science along with basic kitchen skills that little hands can manage such as crushing, mixing, pouring and simple decoration techniques such as creating nebula swirls and the splatter of stars on the galaxy canvas.

Please click on this link for more information and to register.

With love,
Phay Shing
Read More »

Thursday, 2 May 2019

Naturally Coloured Salted Caramel Chick Macarons (Junior chef class)

If you would like to learn how to make macarons in a cute and simple design with your child, why not join me for this chick macaron class 😊. This chick design is adapted from the one in my Macaron Basics book. Health conscious parents will be pleased to know that the yellow and orange colouring used to colour the macaron shells are totally natural. I use turmeric and pumpkin (or carrot) to add the colours.


The filling I chose is a flavour that is popular with kids -- salted caramel.  We fill the macaron shells with salted caramel cream cheese in a ring, followed by yummy gooey salted caramel in the middle. I will be teaching the French method of making the macarons. French method is the simplest method logistically out of the three methods that I use.

As macarons are quite technical, I don't recommend kids that are too young to join. Preferably age 8-15. The older they are, the more hands on they are able to be 😊. But parents with younger kids don't fret. I promise there will be another junior chef class coming shortly after this class in early July that is suitable for younger kids, also with the theme of natural food colouring and it will be fun!

Please click on this link for more information and to register.

With love,
Phay Shing
Read More »

Thursday, 8 November 2018

Pandan Coconut Christmas Tree Macarons (class for kids!)

If you are thinking of learning how to make macarons together with your child, why not join me for a class to learn how to make these Christmas trees :)

I finally found the courage to conduct a macaron class for kids because finally there is a design that is simple but cute enough for that to happen 😆. You will learn how to make the basic round macaron shells using the French method, learn how to make pandan coconut whipped ganache and I am sure the kids will have lots of fun assembling and decorating the trees! The macaron shells are flavoured too. My kids taste tested the macaron shells without filling independently and both gave me the same verdict "Ma, it tastes like kaya!"

Although I try to keep the recipe as simple as possible so that kids can do quite a fair share of the hands-on, this class will benefit kids ages 8 and above more than younger ones as macarons afterall is still a fairly technical bake and instructions should be followed closely. That doesn't mean that those of you with younger ones are banned from the class, it just means that the accompanying adult will have to do more of the work. If you are interested in this class, please click on this link for more details and to register.

With love,
Phay Shing

Read More »

Wednesday, 5 September 2018

Cute Animals Cream Puffs (class for kids!)

Want to have some fun making a cute and yummy treat with your child on Children's Day? Why not join me for a Choux pastry class making these adorable animal cream puffs!


Click on this link for more details of what you will learn in the class and to register. I can assure you that it will be fun! You will never see the humble cream puff the same way again!

With love,
Phay Shing

Read More »

Wednesday, 27 June 2018

Japanese Milk Bun Bears with Kaya Filling


School has just reopened, so I made these simple Japanese Milk Bread Buns with kaya filling for my kids' snack break. It's an easy bake, using a similar recipe to the previous Chocolate Bear-in-a-cone, but without cocoa powder.

Milk Bun Bears (With Kaya filling)
(A)
100g Prima bread flour
2 tbsp sugar
1 tsp instant dry yeast
130g warm milk (~37°C, I microwaved for 20 secs)

(B)
100g Prima bread flour
20g unsalted butter
1/3 tsp salt

Black/pink food marker for decoration

1. In the stand mixer bowl, add all the dry ingredients in (A). Then add in the warm milk and mix vigorously using the dough hook for a few minutes. This helps to activate the yeast. Stop when you see little tiny bubbles popping when you stop stirring.

2. Add in the rest of (B) ingredients into the bowl. and mix using the dough hook until window pane stage (around 20 min, using speed 3). *Check for window pane after kneading for 20 min

3. Cover with cling wrap. Let it proof for 40 min for 1st fermentation. The dough will increase in size to about 1.5-2 times.

4. Do the finger test for the bread dough (leave an indent). Once the 1st fermentation is ok, remove the dough from the mixing bowl and degas the dough.

5. Divide the dough into 6 equal parts. Shape into balls and cover for 10mins (bench time).

6. After 10 min, flatten the dough and section out 2 small parts for the bear’s ears, and 2 smaller parts for bear's hands.

7. Flatten the larger dough into a circle. Place a 2 tsp ball of kaya (or whatever filling desired) in the center. Pinch to seal and roll into a round ball. Place the ball with pinched ends facing down on the prepared baking tray.

8. Repeat for the rest of the bread dough. Attach the ears and hands onto the bread. I used pasta sticks to prevent ears from dropping after proofing. I didn't need to use for the hands as they were small.

9. Cover gently with cling wrap. Let it rest for 30 min for 2nd fermentation.

10. Preheat oven to 180°C. Place the buns into the oven then lower to 150°C. Bake at 150°C for 30 min.

11. Cool the buns completely on a wire rack.

12. Draw on features using food marker.

Hope you like the simple, easy and cute bread buns!

With lots of love,
Susanne


Read More »

Thursday, 22 June 2017

Dessert Themed Shortbread Cookies

I love it when requesters give me relatively free rein for the design of bakes :). Someone requested for ice-cream and cupcake shortbread cookies that I made last year but I expanded the selection of desserts!


You may refer to this post for a detailed write-up of recipe and shaping steps for making the ice-cream cone and cupcake cookies using homemade templates. I will briefly describe what I did for this batch. Please refer to this post on how to shape the lollipop cookie.

I try to use as little artificial colouring as possible, relying on flavouring to colour the cookie dough instead.

Ingredients (makes about 25-30 cookies):
60g icing sugar
120g unsalted butter, slightly softened
165g plain flour
15g cornflour*
1/4 tsp salt
1/4-1/2 tsp strawberry emulco
1/2 tsp lemon paste
1/8-1/4 tsp cocoa powder (I use Dutch processed but regular will do)
A drop of blue and red gel food colouring

* You may replace with plain flour for a firmer, less melt in your mouth cookie.

Steps:
1. Beat butter with icing sugar and salt until light and fluffy. You may beat by hand or use an electric mixer.

2. Add sifted cornflour and plain flour. Fold in with a spatula until a ball of dough forms.

3. Divide dough into 72g for brown, blue and pink dough, 140g for yellow dough and 5g for red dough. You may divide the colours equally too if that's your preference.

4. Roll the dough between two baking sheets to desired thickness (4-6mm). Use homemade cookie templates to cut out desired shapes or simply shape using your fingers. The lollipops for example, don't require templates. I made each lollipop using 7g of coloured dough for each colour.

5. Place cookie dough cutouts in baking tray lined with baking sheets. Chill in refrigerator until firm.


Cookie dough cutouts! I made a few bee cookies as well for another request.

6. Bake in preheated oven at 150℃ for 15-17 min or until done. Use the middle rack. Keep an eye on the cookies to make sure they don't turn brown.

7. Let the cookies cool completely on the tray before decorating or storing in airtight container.

Freshly baked cookies!

Decorate with royal icing or melted dark/milk chocolate and sprinkles as you wish. Store the decorated cookies in airtight container after the icing/chocolate has dried. These cookies can keep for about 1.5 months in airtight, cool room temperature.

My kids had some leftover dough to play with. It's been some time since I had time and energy to let them meddle with leftovers from my bakes. They didn't have the benefit of working with chilled dough and couldn't resist using up all the leftover sprinkles :p. Here's their handiwork...

You can tell which one was done by me as a demo piece!

My kids thought their creation was yummy ;).

With love,
Phay Shing

Read More »

Monday, 27 June 2016

'Smiley Poo' Chocolate German Cookies

Requests can get quite bizarre...like this one! Poo cookies!

You must agree you can't help but smile when you see them!

My elder kid laughed when he saw the smiley piles of turd. My little one said "mama, these poo look and smell good!" Hubby smiled when he saw rows of them in the box when he came home from work. How not to laugh or at least smile :p.

This is a really easy bake so my kids were involved. I wanted a more melt-in-your-mouth texture for the cookies so I chose a German cookie base.

The recipe is adapted from Small Small Baker 
Chocolate German Cookies
Ingredients (makes about 10 poo cookies):
63g unsalted butter
20g icing sugar
63g potato starch
40g plain flour
1 tbs (8g) cocoa powder (I used dutch processed but regular cocoa powder will do too)
1/4 tsp fine sea salt

Steps:
1. Beat butter, sugar and salt until light and fluffy. You may use the electric mixer or by hand. I used to cream butter and sugar by hand but I am getting lazy :p.


2. Sift together potato starch, plain flour and cocoa powder.

3. Gradually add flour mixture into creamed butter and mix well until a dough forms using a spatula.

4. Divide into 10 portions, about 18-19g each.

5. Roll into a log of about 18-20cm long with one end tapered.


6. You could prepare a template with 4cm diameter circles to help you make each pile of poo roughly the same size (optional). I used a macaron template for this under the baking sheet. Carefully roll the log into a spiral, using the circle as a reference for the base. The dough is very soft and may break while you are doing this. It takes a bit of practice to get a nice spiral so it's ok if you keep needing to redo the shaping. The cookie won't toughen up that soon!


My kids had fun playing with the dough too! They found the poo shape a little too hard to make so they made bars of chocolate instead using their fingers and a toothpick.


6. Chill the tray of shaped cookies in fridge while preheating oven to 170°C. Bake for 15-18 minutes at middle rack until the surface of the cookies appear dry.

Freshly baked!


Cool completely before adding on royal icing features.

You may use store-bought googly eyes candies or make from scratch like I did. I piped the eyes on a separate tray lined with baking sheet and oven dried using the fan mode for about an hour. Peel the eyes off the baking sheet and stick them on with some royal icing. Pipe a big smile using royal icing.

Let the icing dry thoroughly.

Store in airtight container at room temperature.


With love,
Phay Shing


Read More »

Wednesday, 18 March 2015

'Frozen' Ombre Snowflake Butter Cookies (coloured with blue pea flower and icing-free!)

I have a request for Frozen themed cookies again but instead of the shortbread, no icing version I made last year, I decided to try something different but icing-free too!

Ombre blue snowflakes! Coloured mainly with blue pea flowers! Coated with glitter! OK the phone camera can't seem to pick up the glitter well...

A better glimpse of the glitter but still doesn't do the actual cookies justice *hmph*. Actual cookies are more shimmery than what you see.

I really love blue pea flowers! Check out the colours below... All unedited but so beautiful!

Top: 45g of boiled milk with 1tbs dried blue pea flowers
Bottom: after soaking the flowers for half an hour

I added a mere 2 drops if blue gel colouring to the strained blue milk just as an insurance against any browning that might occur during baking. Colour of milk didn't change much. That's all the artificial colouring I used!

The recipe for these blue ombre cookies is adapted from my earlier rendition of Mickey and Minnie cookies. The recipe contains milk so it is perfect for infusion of flavours/colours that would be difficult to achieve for shortbread.

Ingredients (makes about twenty 7cm snowflake cookies plus leftover dough):
186g unsalted butter, softened
110g caster sugar
40g milk*
35g blue pea flower milk* (see above for preparation instructions)
1/2 tsp salt
1.5 tsp vanilla extract
400g plain flour**
20g corn flour**

* You won't need all the milk
** Mix the flours and sift together. Divide into 5 equal portions. You may use all plain flour for a firmer cookie. Cornflour gives the cookie a more crumbly, melt in your mouth texture. Not advisable to add too much as cookies will be too fragile.

Note: If you are making one big batch of dough then dividing it up to colour with gel food colouring, use 54g of milk.

Steps:
1. Cream butter and sugar in a large bowl. You may use electric mixer or cream by hand like what I did. If creaming by hand, do take about several minutes to do so until mixture is light and creamy.


2. Add vanilla and salt to the mixture and mix well.

3. Divide the mixture into 5 equal portions. To each portion, gradually beat in milk in the following proportions:
Dark blue: 9g blue milk, 2g plain milk
Medium blue: 5g blue milk, 6g plain milk
Light blue: 2g blue milk, 9g plain milk
Very pale blue: 1g blue milk, 10g plain milk
White: 11g plain milk

4. Gradually fold in flours and form a ball of dough.
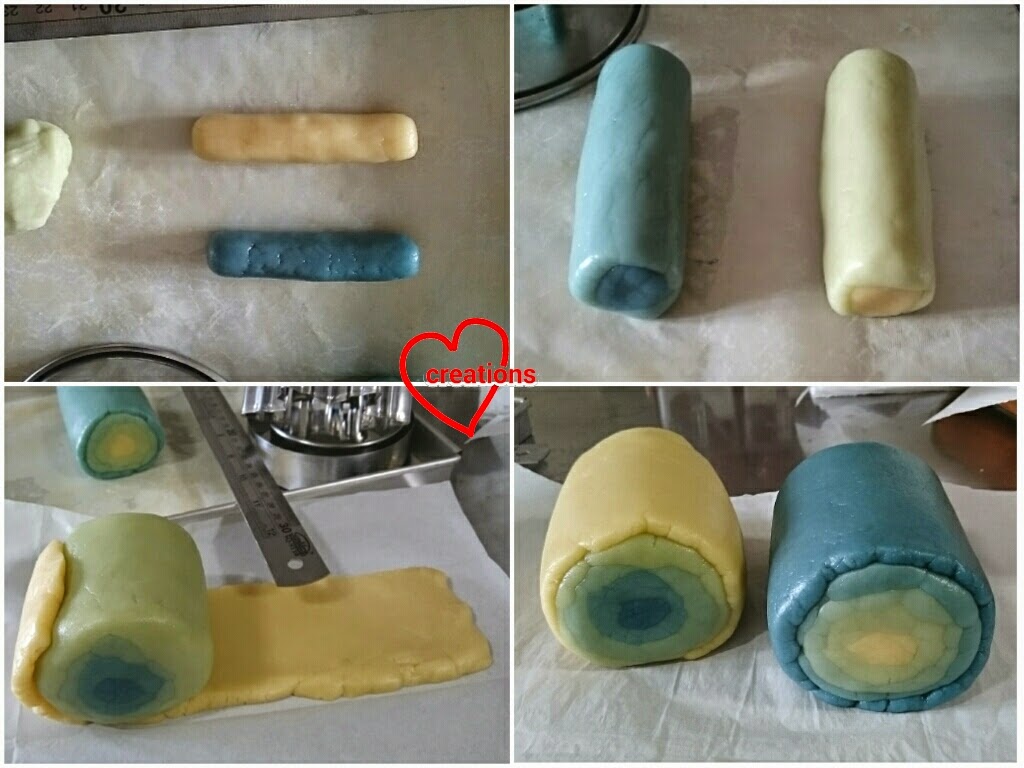
Ombre dough!

5. Divide each coloured dough into two portions in the following approximate weights:
Dark blue and plain: 16g and 144g
Medium blue and very pale blue: 48g and 112g
Light blue: 80g x2

6. Form 2 rolls of ombre blue logs, one with dark blue in center and one with plain dough in center. Wrap the logs in the following manner making sure not to mix up the ombre colours!


7. Chill the logs until slightly firm but not rock hard. Either extreme (too soft or too firm) and it's tough to cut the logs. About 10 minutes in the fridge.
Cut each log into 10 equal portions. Roll each slice until about 6-8mm thick with a rolling pin between baking sheets. You may choose to bake these ombre circles or cut out snowflake shapes.

Freshly cut dough!

8. You may chill the dough and bake at this point but if you choose to work really hard like me, use a toothpick/knife to make snowflake imprints on the dough. Or if you happen to have a snowflake pattern stamp, please use it! That would be a lot faster!

Painstakingly imprinting each line...

Finally done! *seeing stars*

9. Chill the dough for 15 minutes while preheating the oven to 160°C. Bake for 13-16 minutes or until very slightly browned at the base. Keep an eye on the cookies or the colours won't be nice! Let the cookies cool on the tray for 5 minutes before transferring to cooling rack to cool completely.

Freshly baked snowflakes!

Cooling cookies!

You may leave the cookies as they are or brush on some glitter dust with a dry brush to add on some sparkle to the plain cookies. You may choose to ice the cookies or add silver pearls but I prefer to let the ombre colours shine :). This ombre cookie technique can be applied to other colours too. I can just imagine beautiful pink or purple ombre flowers!

Store the cookies in airtight container. Like shortbread cookies, these can keep for a month.

So what did I do with the leftover dough? Let the kids play with it!

They are happy to have some leftovers to have fun with and to eat :)

Do eat the cookies about a week or two after baking if you can wait. They taste better after maturing :).

With love,
Phay Shing


Read More »

Wednesday, 25 February 2015

Keroppi Pandan Salted Egg Custard Steamed Buns (very runny naturally coloured 流沙包!!)

My kids are requesting for baos again! After a hiatus of a few months, I finally have time to return to my first love in the "baking" arena. In my quest to find the right balance of soft fluffy bao skin and really runny salted egg custard filling, I have tweaked the recipe or preparation conditions quite a few times. I usually succeed in getting fluffy and soft baos but the filling is rather thick and not as runny as the ones you get at restaurants although the taste is pretty close. I am glad to say that I think I have found the right balance this time and the kids agree that this is the best batch of liu sha baos I have made so far!


Here's a closer look at the awesome runniness and fluffiness...

And it remains runny even after freezing and resteaming!

All the colouring you see are from natural ingredients. Since the filling contains coconut milk, pandan flavoured bao skin compliments it very well.

My kids helped with preparing the pandan juice :)


Prepare pandan juice by blending about 20-25 pandan leaves in 100ml of water and squeezing out the juice from the pulp wrapped in a cloth coffee filter. Cutting the leaves, blending and squeezing out the juice is so simple that kids can help. You may choose to let the juice settle overnight and use the dark green portion that settled at the bottom but it is not absolutely necessary.

Recipe for liu sha filling
I mentioned in my previous liu sha bao post that I will attempt liu sha baos again with an increase in liquid content and decrease in solidifying agent to make the filling more runny.

Ingredients (makes 9 baos):
2 (or 3) salted egg yolks, cooked and mashed with fork
40g unsalted butter, softened
32g icing sugar
10g custard powder
30g milk powder
32g coconut milk

Steps:
1. Mix butter and sugar together until well combined. Add all other ingredients and mix well. Sieve the mixture to break up the big lumps of salted egg yolk as well as removing any bits that can't be broken up.

3. Chill in the fridge until firm, about 1h or overnight. Portion into individually cling wrapped balls of 17g and freeze it. This can be prepared a day ahead of time.

My kids sampled the leftover filling in the bowl and gave it a thumbs up!

Recipe for bao skin and assembly
The recipe for bao skin is similar to the one I have always used with a slight difference in proportion of dry and wet ingredients.

Ingredients:
160g Hong Kong bao flour
20g cornflour
25g caster sugar
A pinch of salt
1 tsp instant dry yeast
1/6 tsp baking powder dissolved in 1/2 tsp of water/pandan juice
1/16 tsp ammonia bicarbonate (optional)
90g pandan juice/water
11g vegetable shortening (You may replace with vegetable oil or butter. But I find the skin drier with vegetable oil and butter lends a noticeable flavour to the bao skin. If you prefer buttery skin, do use butter :)).
Any other required food colouring

*Use one-fifth to one-quarter of the recipe to make the dough for Keroppi's features. Or if you are lazy, simply colour some green dough white/pink/black with gel food colouring for the features.

Steps:
1. Mix the first 5 ingredients in a bowl. Add pandan juice (or water if you are making plain dough for Keroppi features) and mix with a wooden spoon until a dry dough forms.

2. Dissolve baking powder and ammonium bicarbonate in 1/2 tsp of water/pandan juice.

See how it bubbles!

Gradually add the baking powder mixture into the dough by kneading it in.

3. Pour the dough onto a non-stick mat and gradually knead in the shortening. Continue kneading for 15-20minutes or until the dough is smooth and elastic and passes the windowpane test. You may let a stand mixer or breadmaker help you with the kneading but I prefer doing it by hand as I can feel the dough taking shape.

4. Proof the dough in a large bowl/measuring jug covered with cling wrap until almost doubled in size. About 25-30 minutes in hot Singapore or about 3 hours in the fridge. Punch down the dough and knead a few times to expel the trapped air.

5. Portion out the dough and add any food colouring at this point. I prepared the pandan and plain dough separately. I found some powdered food colouring from plant sources. All natural!

Available at Cold Storage in Malaysia but sadly not seen in Singapore.

I used the pink powder to colour the dough for Keroppi's cheeks.
Portion out the dough in this manner:
Green dough: 30g each bao
White dough: 3g for each eye
Pink dough: 7g for all the cheeks
Black dough: 12-15g for all eyes and mouth

I actually didn't prepare the black dough but did the lazy way of painting on the black parts with charcoal powder dissolved in water after the baos were steamed. This is fine provided you don't accidentally smudge it. I have painted on black features in the middle of steaming the baos before using charcoal dissolved in egg yolk but this method may not be suitable for liu sha baos which are temperature and time sensitive during the steaming process.

Important note: keep any resting portions of dough wrapped in the fridge to avoid over-proofing as you are portioning, colouring and assembling.

I love the natural green hue!

6. Lightly flour your work surface with bao flour. Take a ball of green dough and flatten it. Place a frozen ball of filling in the middle and wrap it, pinch sealing the dough. Place the assembly seam side down on a piece of baking paper. Add on the features. In order to stick on the cheeks, pinch out a bit of pink dough and stick onto the bao. With a lightly floured finger, gently flatten the pink balls onto the bao surface as shown below.


7. Proof for about 35 minutes at room temperature (about 28°C in the kitchen in Singapore) before steaming at high heat for 6 minutes. Make sure that the water is at a roiling boil. Turn off the heat and let the baos rest in the covered wok/ steamer for 3 minutes before opening the cover. Do not over steam the baos as they may explode or the filling will not be as runny.

Baos are best eaten freshly steamed. If you are not consuming immediately, freeze the baos in ziplock bags after they have cooled completely. Resteam for 11-12 minutes without defrosting before consuming.

Not exactly the prettiest looking but we are yummy!

My kids had much fun eating these! Because the filling was so drippy, they pulled off the eyeballs and dipped in the filling to eat!

With lots of love,
Phay Shing


Read More »