Wednesday, 17 December 2014

'Christmas Mistletoe Ring' Rainbow Chiffon Cake (and Cupcakes)


This is another fun pretty variant of the rainbow chiffon cake with green colour at the top, inspired by the Christmas mistletoe rings (or Christmas wreaths) that adorn houses during Christmas time to celebrate the birth of Christ. The donut shape of the chiffon cake is really ideal for making the Christmas ring. It was something that I had wanted to try last year for the school Christmas party but was ditched last minute in favour of the Christmas trees Pandan-Strawberry Chiffon Pops which the kids loved as well.

The same recipe for the Pastel Rainbow Chiffon Cake (in 'Creative baking: Chiffon Cakes' now) is used here, except that the order for scooping in the batter is changed as follows: green, yellow, orange, pink, purple and blue, so that green would be on top once the cake is inverted.

The mistletoe and leaves were cut from strawberry and pandan chiffon cakes baked in 9-inch trays. The red mistletoe is cut using a bubble tea straw. I used some charcoal powder in addition to pandan paste to colour the leaves darker green than the chiffon cake. As I didn’t have a leaf cutter for the green leaves, the jagged leaves were cut by using the straw to make 6 inverted cuts around the shape of the leaf.

Here’s a more top view of the Christmas Mistletoe Ring!


A newer version of Christmas Mistletoe Ring with picture tutorial is now in 'Deco Chiffon Cakes' book.

I also made some more Christmas cupcakes along with the cake. You can refer to Snowman Tiered Chiffon Cake and Christmas cupcakes (at the bottom) for their recipe. I took the chance to experiment with more Christmas designs: mistletoe and stars in addition to snowflakes.


Packing them into boxes two by two as gifts!


Blessed Christmas to all!


With lots of love,
Susanne


Read More »

Tuesday, 16 December 2014

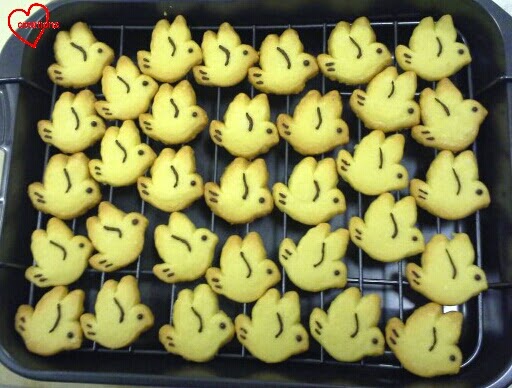
Dove and Poinsettia Melt-In-Your-Mouth Butter Cookies (high butter content)

I have a request for extra buttery Christmas themed butter cookies as gifts so I did a search and found a simple recipe from Nasi Lemak Lover for Chinese New Year cookies that is simple and requires few ingredients. Although the recipe calls for piping the soft dough into simple swirls or simply dropping a scoop of dough on baking sheet to bake, I took up the challenge of shaping the dough into poinsettias and doves!


This recipe is really simple but shaping it using cookie cutters requires some speed, working with small batches of frozen dough and constantly wetting/washing the cookie cutter. Due to the high butter content (1:1 ratio for butter:flour, as compared to 2:3 for shortbread) of the cookie dough, it tends so spread a little during baking even though I freeze/ chill the piped/cut-out cookies prior to baking. So something simple became a challenging bake :p.

I tweaked the original recipe a bit to accomodate the different way of handling the dough (lower corn flour content). I lowered the oven temperature to prevent the coloured cookies from turning brown. You may choose to bake at 180°C instead as the original recipe suggests if your cookies are not coloured.

Ingredients (makes about 50 doves OR 30-35 poinsettas, depending on size of flowers):
225g butter (I just used one block of SCS unsalted butter)
60g icing sugar
200 plain flour
25g corn flour
1/4 tsp salt (omit if using salted butter)
1/2 tsp vanilla extract (optional but I added)

Red yeast powder
Gel food colouring
Cocoa powder
Chocolate sprinkles

Steps:
1. Beat butter, sugar and salt until creamy.

2. Sift in the flours. Mix well to form a soft dough.

3. If you are making cookie cutter cut-out cookies, divide the dough into small batches and roll between two baking sheets until about 5-6mm thick. The dough should be about the size of your hand when rolled out. Freeze the dough until firm.

If you are making piped cookies, transfer the batter into piping bag fitted with a star tip or any tip you like.  If you don't have special tips for piping, check out this link for how to pipe flowers/ leaves using ziplock bag cut into specific shapes with scissors, which I did :). Divide the dough and colour with red yeast powder and/or gel food colouring if you are making the poinsettias. Ratio of red:green:yellow is approximately 6:3:1.

4. Cut out frozen dough with cookie cutter that is wet with iced water. Place the cut-outs on baking tray lined with baking sheet. Once the dough becomes soft and sticky, it is time to stop working on it and roll it out again and freeze. Add chocolate sprinkle for the eye of the dove.

Nice well-defined outlines!

5. Freeze the tray of cookies before baking in pre-heated oven at 160°C for 11-15 minutes or until edges are slightly browned. Keep an eye on them as every oven is different and your baking time may vary. Let the cookies cool on the tray for 5 minutes before transferring to cooling rack to cool completely.

Freshly baked. Not so well-defined outlines. 

If your cookies seem a bit less well-defined as you would like them to be, you can pipe the outline or draw in some features to rectify this. I piped chocolate paste made from cocoa powder dissolved in some water.

Looking slightly better!

6. If you are making poinsettias, you may wish to prepare a template to place under the baking sheet to help you with the piping but that is optional. Use a leaf tip to pipe out the leaves, followed by the six petals. Finally, pipe yellow dots in the center. Try not to make the flowers too big as they will tend to break more easily. About 3-3.5cm would be good.

Piped poinsettias! Looking pretty!

7. Freeze the tray of piped flowers while preheating the oven. Bake at 160°C for 13-17minutes. These are harder to tell if they are done due to the colouring. Safer to underbake first then send them back into the oven again to bake for another 3-4 minutes before checking again.

Not so well defined after baking! The super-big flower broke while being handled.

After the cookies have cooled, pack them in airtight containers. I packed them in glass jars decorated with glitzy christmasy tape.

With love,
Phay Shing


Read More »

Monday, 15 December 2014

Super Mario Chiffon Cake!


This is a Super Mario cake made purely out of vanilla and pandan chiffon cake for my dear Kaai Zenn who turned 5! Time really flies.. when I first met him he was just 2 and he has grown so much and so well! I missed those playdates very much. I really wasn't confident doing the Super Mario face so it was supposed to the Super Mario Mushroom cake until the Elmo chiffon cake came along when she asked again whether possible, and after having tried Elmo which also involves baking the nose in an egg, I finally thought to give it a try.

Faces are actually among the most difficult cakes and require the most work and attention to detail because even a slight shift in a feature may result in a different-looking person. The Super Mario face was carved and cut out from a vanilla chiffon cake baked in an oval glass bowl. Instead of piping the hat in like My Melody Chiffon Cake, this time round I tried cutting the Mario hat out from a separate cake (also baked in oval glass bowl) and then joining both together using melted marshmallows. The nose and ears were made from vanilla chiffon cake baked in two eggs: one for the nose, and two halves for each ear. His hair was cut from chiffon cake colored lightly with cocoa powder baked as a layer in a baking tray. His moustache and eye brows were colored with a combination of charcoal and cocoa powder similarly. The recipes for vanilla and cocoa chiffon cake can be found in my Super Mario Mushroom cake post (vanilla scale to 2 egg recipe and chocolate, 1 egg recipe). It may appear simple but is actually quite complicated to assemble. It took some trial and error to get the proportions right especially because it was 3D and I couldn't use a direct template to pipe.

The base is pandan chiffon cake colored naturally with pandan juice and pandan paste, and this is also a pinata cake in which I hid some surprises under the face!

Here's a side profile of the cake.. hope it can pass!


Happy birthday to dear KZ!!

With lots of love,
Susanne


Read More »

Saturday, 13 December 2014

Navitity Christmas Gingerbread Cookies

Christmas is a time to remember God's love for us through the birth of Jesus :). Joseph, Mary and the shepherds were there to witness this joyful event. Here's my simple Nativity scene created from gingerbread cookies!


There are more elaborate cookie Nativity scenes out there including angels, the stable and wise men (although technically the wise men met Jesus much later). But I have over a hundred star, snowflake and baby Jesus cookies to bake and ice so I decided not to be too ambitious and just choose a few characters. It's been a hectic time for me with lots of requests for christmas bakes and will continue to be so until Christmas. Praying that I can have time to reflect and not be swamped by all the busyness :).

The recipe for gingerbread cookies is the same as my previous bake, except that I used 5 times the quantity. I don't have any sheep or people cookie cutters so I made a template out of plastic sheet and cut the dough using that and a knife.

Ingredients:
Gingerbread cookies
435g plain flour
2 tsp ground ginger
1/4 tsp cinnamon powder
1/4 tsp allspice powder
1.25 tsp baking soda
1/2 tsp salt
140g unsalted butter (cool but softened)
185g light brown sugar
5 tbs golden syrup
1 large egg (about 60-65g)
2.5 tsp vanilla extract

Royal icing
210g icing sugar*
15g meringue powder
6 tbs water*
Gel food coloring
Cocoa powder (for colouring brown)

* Use more as necessary to get the right flooding consistency (like thickened cream. Peaks in the icing should disappear after 10 seconds). Only the icing for the hay should be able to hold peaks.

Steps:
1. Sift together the first 4 ingredients in a bowl.


Cut in the butter until mixture resembles bread crumbs. Stir in the brown sugar.


2. In a small bowl, mix together golden syrup, egg and vanilla extract. Add this to the mixture in step 1. Mix together until a dough forms.

3. Roll the dough between baking sheets until thickness of about 5-6mm. Refrigerate for 30 minutes or until firm. Cut out the cookies using cookie cutters or template and a small knife.

4. Place the cut-outs about 1" apart on a baking tray lined with baking sheet. Bake in preheated oven at 180°C for 8-10 minutes or until browned. Leave on the tray to cool for 5 minutes before transferring to cooling rack to cool. Store in air tight container when completely cooled. These cookies can keep for a few weeks.

5. Prepare the royal icing. Sift icing sugar and meringue powder together. Gradually add water and whisk until you get the right flooding consistency.  I whisked using a hand whisk this time although I normally use the electric mixer. Do take a few minutes to whisk vigorously if you are doing it by hand. This ensures that the icing does not separate when drying on the cookies. Add some sifted icing sugar to thicken the consistency of the icing for the hay.

6. Divide into the various colours. I used ziplock bags as piping bags without piping tips as icing quantity is small. Fitting on piping tips would waste a lot of icing. Just snip off a corner. Be sure to clean the tip often with damp paper towel as the icing may clog up the small opening.

Here's a picture summary for the steps to ice the various characters. I got my inspiration for them from here. You may refer to my previous gingerbread cookie post for steps on how to ice baby Jesus. I copied the design from here for baby Jesus cookie.


Steps:
1. Ice the faces of the people. On a separate baking sheet, ice the staff of the shepherd and leave to dry.
2. Ice the hair, beard and clothes that are of the same shade of brown. Ice the sheep body.
3. Ice the light blue part on Mary and light brown part on Joseph and the shepherd.
4. Ice the sheep's head and one leg, and the part of the shepherd's clothes that is grey.
5. Ice the rest of Joseph and Mary's clothes. Ice the other leg of the sheep when the previous one is dry.
6. Ice the wool on the sheep's head and whites of the eyes.
7. Draw in the eyes and sheep nostrils using cocoa powder or charcoal powder dissolved in water with a toothpick.
8. Place the staff on the shepherd. Ice the hands of the people. The icing should be able to hold the staff in place.

Finally all done! And this is only about a third of the cookies

Whenever you are icing over a layer of icing, just make sure that the bottom layer is dry. You may dry the cookies in the oven with fan mode on at 70-80°C to speed up the process.

Pretty snowflake close-up!

It was satisfying to see all the cookies completed much as it was really tiring :).

I am submitting this to "My Treasured Recipes #4 - Ho Ho Ho It's Christmas (Dec 2014)" hosted by Miss B of Everybody Eats Well in Flanders and co-hosted by Charmaine of Mimi Bakery House.

With love,
Phay Shing


Read More »

Wednesday, 10 December 2014

Snowman Tiered Vanilla Chiffon Cake and Christmas Cupcakes


This is my first big tiered chiffon cake and catering to a big group together with chiffon cupcakes (for about 70). It is Christmas-themed, for my lovely mummy friend’s boy’s first birthday and house warming. The chiffon cupcakes are all fondant-free and chiffon cake-based and so are less sweet and softer.

Snowman Tiered Cake
I fell in love with the idea of a snowman cake proposed by her and took to experiment with the first tiered chiffon cake. The tiered snowman is made up of two vanilla chiffon cakes, a 7-inch on a 9-inch with a 3-inch hat on top. I have provided the recipe for the 9-inch vanilla chiffon cake below. I have found that temperature control towards the end is important to prevent browning of the cake. For the 7-inch chiffon cake, just half the recipe and reduce the baking time by 16 min at the end.

Vanilla chiffon cake (9-inch chiffon tin)
2 egg yolks
40g sugar
78g corn/vegetable oil
82 ml water
10 ml vanilla extract
120g cake flour
Few drops of white coloring (optional)

Meringue:
8 egg whites
90g sugar
1/4 tsp cream of tartar

1. Preheat oven to 160°C. Prepare a tray of water at the bottom of the oven (I used the lowest rack to bake the cake). *You may omit steam baking; I like to use it to control my oven temperature rise.
2. Beat egg yolks with sugar with whisk till pale yellow before stirring in oil, water and vanilla extract.
3. Add in sieved flour and whisk till no trace of flour found.
4. Meringue: Beat the egg whites with ¼ tsp cream of tartar till stiff peak, mixing in caster sugar in 2 additions.
5. Fold in the meringue gently into the batter 1/3 at a time.
6. Pour the batter into the chiffon tin from a height.
7. Gently tap the tin on table 3x to remove air bubbles
8. Bake the chiffon cake for 15 min at 160°C and then at 150°C for 15 mins and 140°C for 15 min, then 130oC for 16 min.
9. Invert immediately once out of the oven to cool
10. Unmould by hand after the cake is cool. Gently pull the cake from the sides of the tin at each angle and push the removable base up to unmould the sides. To unmould the cake from the base, gently lift up the cake from the base using hands, repeating this at each angle before turning the base over.

The snowman hat was made from charcoal chiffon cake baked in a 3-inch cupcake liner and 6-inch circular tray with removable base (2 egg recipe). The rest of the charcoal batter can be poured into a square 6-inch tray lined with baking paper for cutting out the snowman eyes and buttons. The cute snowman 'carrot' nose is also chiffon cake! It is made from orange chiffon cake baked in a paper cone (1 egg recipe makes 4 cones). To unmould the cupcake and paper cones, just gently peel off the paper, leaving the chiffon cake intact. The nose and hat and other facial features were then attached onto the cake using a brush of melted marshmallows. The two arms are made from black meringue (leftover from baking) coated onto satay sticks and baked for 12 min at 150°C.

Tada! My happy snowman!


Christmas Chiffon Cupcakes


The chiffon-based cupcakes were quite a lot of work. The top circle covering each cupcake and the designs were cut out from chiffon cakes baked in layer trays. Though theoretically only three 9-inch layer cakes are required to cover 27 cupcakes, I found that I needed four at least as there is often wastage such as parts with wrinkled lines from the baking paper which I reject. I used an extra red strawberry layer cake to cut out the letters. So in total I used five layer cakes (I don’t have enough trays so I used a mixture of 9- and 10-inch). Each layer chiffon cake is a 2 egg recipe vanilla chiffon (white or plain colour), pandan chiffon (green using pandan paste) and strawberry chiffon (red using strawberry paste). Keep everything clingwrapped and airtight until use.


For the base, the 27 cupcakes were filled with vanilla chiffon cake using a 5 egg recipe.

Vanilla chiffon cake (27-28 cupcakes)
5 egg yolks
33g sugar
65g corn/vegetable oil
62 ml water
8 ml vanilla extract
100g cake flour

Meringue:
7 egg whites
75g sugar
1/4 tsp cream of tartar

1. Preheat oven to 150°C. Prepare the empty cupcake liners on big tray.
2. Beat egg yolks with sugar with whisk till pale yellow before stirring in oil, water and vanilla extract.
3. Add in sieved flour and whisk till no trace of flour found.
4. Meringue: Beat the egg whites with ¼ tsp cream of tartar till stiff peak, mixing in caster sugar in 2 additions.
5. Fold in the meringue gently into the batter 1/3 at a time.
6. Scoop in the chiffon cake batter into the cupcake liners (to 1 cm from the top). Gently tap the cups to remove bubbles.
7. Bake the cupcakes cake for 17-20 min at 150°C.
8. Allow to cool on a cooling rack.
9. Cut out circles (slightly bigger than each cupcake) from the layer chiffon cakes and attach it to the cupcake with a brush of melted marshmallows.


10. Cut out the designs (using a Christmas tree cutter or snowflake cutter) and decorate on the circle chiffon cake using a brush of melted marshmallows. Be sure to brush with a bit of syrup on top to prevent the small cake pieces from drying up.


Phew! Finally packed! And this is only 1/3 of the cupcakes.


Thank God my friend shared everyone loved the cake and the creativity =)


Happy first birthday to Xack and blessed Christmas!

I am submitting this to "My Treasured Recipes #4 - Ho Ho Ho It's Christmas (Dec 2014)" hosted by Miss B of Everybody Eats Well in Flanders and co-hosted by Charmaine of Mimi Bakery House.

With lots of love,
Susanne

Read More »

'Darth Vader' No-Bake Peppermint and Oreo Pie

Now and then hubby and I will watch The One Pot Chef YouTube videos together to get some ideas for easy recipes. During one of these sessions, we came across grasshopper pie and hubby found it really attractive. And so, my kids and I made this simple but yet delectable no-bake dessert for my hubby's birthday :).

Darth Vader for a Star-Wars fan!

There are so many possibilities to pretty up this simple cake/pie, such as making a rainbow, marbled or ombre version, decorating with buttercream/fresh cream and/or shaved chocolate. I chose to make use of coffee art drawing to create a character from my hubby's favourite show, using charcoal as a natural source of food colouring.

The recipe is of course adapted from The One Pot Chef. I left out dark chocolate as we have just recovered from cough. I used more melted butter and less Oreo cookie cream. I doubled the amount of peppermint essence and find that it is just nicely strong enough but not overwhelming. I found the proportion of milk too much in the original recipe and had to freeze the pie in order for the filling to set. I used one-third of the portion of the original recipe as only the few of us are eating it. But overall it was delicious! Very much like eating peppermint ice-cream (one of our favourite flavours!) on an Oreo cookie base :).

This grasshopper pie is so easy to make that young kids can be involved in this "bake". Baking with kids is a lot slower, messier and less professional looking but so much more fun!

Ingredients (makes two 4" round or one 6" round pan):
Base
100g Oreo cookies
30g dark chocolate (Optional. I left this out.)
40g unsalted butter, melted

Filling
50g white marshmallows
66g white chocolate
60ml milk (I used 80ml and the filling needed to be frozen to set.)
2/3 tsp peppermint essence (Add more or less according to preference)
200ml whipping cream
1/2 tsp liquid green food colouring
1/3 tsp charcoal powder

Steps:
1. Place the Oreo cookies and chocolate in a processor and grind until fine. Alternatively, you can do the manual way like me and get the kids to help to pound the cookies until they are powder-like. Scrape off the cream first if you are doing it the manual way.

Working hard!

2. Melt the butter and mix some or all of the Oreo cookie cream into the melted butter if you scraped it off earlier. Pour the melted butter onto the crushed cookies. My elder kid exclaimed "Mama, look! There's a heart-shape there! Quick take a photo!" This was totally unintentional and it brought smiles to our faces :).

Molten heart surrounded by Oreo sandy shore!

Mix well and spoon the mixture into the springform pans. You may want to line the base with baking sheet for easy removal. Press the crushed cookie mixture with a flat bottomed glass or a metal spoon. Chill for 30 minutes or until set.


3. Put milk, marshmallows and white chocolate into a saucepan.

Kids can help to measure and weigh ingredients

Melt over low heat while stirring constantly. Remove from heat and add in peppermint essence. Stir to mix it in. Set aside to cool to room temperature.


4. Use an electric mixer to whip whipping cream until soft peaks form.


Gradually add the cooled marshmellow mixture into the cream, folding in until well combined with each addition. Original recipe mentions folding the cream into the marshmallow mixture but I find it easier to incorporate the marshmellow mixture into the cream.

5. If you prefer the pie without artificial colouring, you may pour the mixture onto the cookie base and chill for 3-4 hours at this point before serving. I scooped out a bit of the filling mixture and coloured one portion black with charcoal powder (left another portion white). I added green food colouring to the remaining bulk of the filling mixture.

My little helper at work here

 I made use of a small spoon and toothpicks to create the drawing. You can choose to pipe but I didn't feel like wasting the batter on piping bags. Any mistakes can be corrected by adding a bit of "batter" of the right colour with a toothpick. This requires some patience but I had fun because this doesn't have to be done to perfection :).

Darth Vader coffee art style drawing!

All of us couldn't wait to try it!

Close-up view of a slice. Pardon the bad slicing. We were eager to eat :p.

All of us loved this simple dessert! Hope you can try this out too of you happen to love peppermint :).

With lots of love,
Phay Shing & the kids


Read More »

Sunday, 7 December 2014

Elmo Pandan Chiffon Cake


This is the song, la la la la, Elmo’s song!

Ah who can forget this super cute song and this favourite character from sesame street! It was my favorite character back when I was a little kid in kindergarten. Few decades later, it was such a dream I get to bake my childhood fave! My friend exclaimed that the elmo chiffon cake looked like a soft toy hehehe :).

It is not as easy to get the fluffy outline of the elmo face without using cream and or an elmo cake mold. So it was rather tedious to cut out the outline from a strawberry chiffon cake baked in an oval glass bowl. The rest of the facial features were baked in a variety of ‘containers’. The pop-up eyes from baking chiffon cake in my cake pop maker (top left pic in collage), the oval pop-out nose from an egg (top right pic in collage), and the mouth cut from charcoal chiffon cake baked in a 6-inch tray. The base cake is my all-time pandan chiffon cake coloured naturally with pandan juice and paste (bottom left pic in collage). For the recipes, you may like to go to my previous post Olaf in Summar Pandan Chiffon Cake which has details on how to bake the base pandan chiffon cake as well as the chiffon cake in the different 'containers'. And I hid some colourful marshmallows under the elmo face (bottom right pic) :).


I made the effort to use blue pea flowers to make the coloring for letters/numbers hence the blue color is less vibrant (please refer to my Blue Pea Flower Chiffon Cake), though I realized it’s a lot of work for a small detail :p. I used alphabet cutters to cut them out from chiffon cake baked as layers in 6-inch trays. You can then stick them on using melted marshmallows or cream.

La la la la, la la la la, Elmo's song! 


Thank God my friend shared the kids loved the cake and the birthday boy ate it! =)

With lots of love,
Susanne 

Read More »

Mickey and Minnie Mouse Shortbread Cookies (with minimal icing)

I have a request for some Mickey, Minnie and rainbow with clouds cookies so I thought it would be easier to use shortbread as the cookie base for all of them. So here's the couple but with Minnie dressed in pink :).


I made this pair using another butter-based recipe a couple of months ago, so this is my first attempt using shortbread dough to create Mickey and Minnie. Only the dots are made from royal icing. The rest of the cookie is shortbread so you don't end up eating too much sugar. Most decorated cookies you see have the whole cookie surface covered in icing.

I added cornflour to the recipe to give the cookies a softer bite but they are still nice and crunchy. Recipe is adapted from my rainbow with clouds shortbread cookies which makes use of a simple ratio of sugar:butter:flour that Guaishushu publicized in his blog. I try to use natural food colouring whenever I can.

Ingredients (makes 54 cookies, 27 pairs of Mickey and Minnie):
Black dough
104g icing sugar
208g unsalted butter, cut into small pieces
270g minus 2 tsp plain flour
42g corn flour (you may replace with plain flour)
3 tsp charcoal powder
1.5 tsp vanilla extract
Pinches of salt

Red/pink dough
26g icing sugar
52g unsalted butter
68g plain flour
10g corn flour
1/2 tsp strawberry paste
Red and pink gel food colouring

Royal icing
28g icing sugar
2g meringue powder
Warm water (added till flooding consistency is reached)

Steps:
1. Make the black dough. Sift together sugar, flours, charcoal powder and salt. Add unsalted butter into the flour mixture and rub in using finger tips until it resembles breadcrumbs. Knead to form a dough as you gradually add vanilla extract to the mixture.

2. Roll the dough between two baking sheets until 5-6mm thick. Refrigerate for half an hour or up to a few days. Just keep the dough cling wrapped or in ziplock bag for longer storage.

3. Make the red and pink dough. Same as step 1 and 2 except that you add strawberry essence instead of vanilla extract.  Divide the dough into two portions with the pink portion about 1.5x more than red dough. Colour the dough with gel food colouring. Roll the dough to thickness of 2-3mm.

4. Use Mickey mouse shaped cutters to cut the black dough and place on baking tray lined with baking sheet. Use a round cutter and a knife or bench scraper to cut the red/ pink semi circles. Stick the semi circles onto the black base. For Minnie mouse's bow, I used the smallest round cutter and heart shaped cutter that I have to create it. If the dough is too soft to handle, chill it in the fridge for 10 minutes before working on it. If the dough is too stiff and crumbly, let it sit out at room temperature for a few minutes first. I find it helpful to place the dough on top of reusable freezer packs as my work surface to keep the dough cool but pliable for a longer time, especially the thinner dough.


5. Preheat the oven to 160°C. Refrigerate the tray of assembled cookie dough for at least 15 minutes. Bake for 12-14 minutes until very slightly browned at the base. Be careful not to overbake or the colours will not appear vivid.

Freshly baked!

Let the cookies sit on the baking tray for 5 minutes before transferring to cooling rack to cool completely.

6. Prepare royal icing. Sift together icing sugar and meringue powder. Gradually add warm water and whisk for a few minutes until flooding consistency is reached (any peaks disappear in 20 seconds). Transfer to piping bag fitted with a small round tip (I used wilton #2 tip).

7. Pipe two buttons for Mickey and polka dots for Minnie. You may pipe a lot less dots for Minnie if you find it tedious to pipe so many like mine. Leave the icing to air dry or if you want to speed up the process like me, put the cookies back in the oven at 80°C fan mode for 15-20 minutes or until the icing is dry. Cool completely on cooling rack before storing in airtight container.

Freshly iced! 

With love,
Phay Shing


Read More »

Thursday, 4 December 2014

'Graduation Cap' Bamboo Charcoal Chiffon Cake


This is a loving creation for my dear friend's son's K2 graduation party. It was for such a special occasion so she requested for a cake looking like a graduation hat. As these were for children, only bamboo charcoal was used to color the chiffon cake. Bamboo charcoal is also know for its detoxification and cleansing properties and is a healthy ingredient in addition to being a great natural coloring. It also has very mild or no taste. This is actually my second try on the cake. In order to get the cake to rise like normal with the inclusion of sufficient charcoal powder, I found that I needed to add a bit of baking powder and reduce the cake flour (like cocoa recipes).

The graduation hat was assembled by using a 17 cm charcoal chiffon cake as base, and two 10-inch charcoal chiffon layer cakes to wrap around an 8-inch cake board to form the mortar board on top. I baked an extra orange chiffon layer cake to twirl into strings to make use of the bendy properties of the chiffon cake.

Recipe for the bamboo charcoal chiffon cake for the 17 cm chiffon tin is below. The 10-inch layer cake uses the same recipe but scaled down to 2 egg yolks (i.e. divide everything by 3 times 2). Recipe for orange chiffon cake can be found in my older posts.

Bamboo Charcoal Chiffon Cake (17 cm chiffon tin)
3 egg yolks
20g sugar
39g vegetable/corn oil
39 ml water
5 ml vanilla extract
Bamboo charcoal (~2+ tsp)
56g cake flour
1/4 tsp baking powder

Meringue:
4 egg whites
45g sugar
1/4 tsp cream of tartar

1. Preheat oven to 160°C (I used steam baking but it is optional).
2. Beat egg yolks with sugar with whisk till pale yellow before stirring in oil, water and vanilla extract.
3. Add in sieved flour and bamboo charcoal and whisk till no trace of flour found.
4. Meringue: Beat the egg whites with ¼ tsp cream of tartar till stiff peak, mixing in caster sugar in 2 additions.
5. Fold in the meringue gently into the batter 1/3 at a time.
6. Pour the batter into the chiffon tin from a height.
7. Gently tap the tin on table 3x to remove air bubbles
8. Bake the cake for 15 min at 160°C then 30-31 min at 140°C.
9. Invert immediately once out of the oven to cool
10. Unmould by hand (video in link) after the cake is cool. Gently pull the cake from the sides of the tin at each angle and push the removable base up to unmould the sides. To unmould the cake from the base, gently lift up the cake from the base using hands, repeating this at each angle before turning the base over.

Here's how the freshly unmoulded cake looks like! Love the sexy black that's all natural :)


Here's another look at the Graduation hat chiffon cake :).


Wishing the kids a bright new future in their new schools! I wonder how I will feel next year when my son leaves K2.

With lots of love,
Susanne

Read More »

Wednesday, 3 December 2014

'Yellow roses' Pandan Kaya Chiffon Cake (cooked dough method)

Someone tried my pandan kaya cake earlier this year and wanted it again so I made it with a simple design :).

Chiffon big rose with lil' rose buds!

Although I prefer non-cooked dough method of making chiffon (more bouncy), I thought it would be nice to make the same cake that the requester fell in love with. Cooked dough chiffon cakes are less bendy but they are really soft. The butter used in the recipe also adds some richness and fragrance to the pandan cake.

The recipe for cooked dough pandan chiffon cake and the pandan kaya fudge is the same as my previous bakes so I won't type it out here. I prepared 3/4 of the portion of pandan kaya fudge as mentioned to avoid wastage for this 10" square cake with 2 layers of pandan cake and 2 layers of fudge. Each layer of pandan cake uses the 2 egg yolk recipe in the link above.

As I am really busy with quite a few major bakes, I could only manage a simple design for this cake. The roses were made with leftover layer cakes from my Dino strawberries and cream chiffon bake. (Don't worry, I baked this pandan kaya cake around the time of my Dino bake but only decided to post this now. I won't use ancient cakes :p.) I used a round cutter to cut out semi-circles and rolled the overlapping semi-circles to make the big rose. Melted marshmellow with a bit of water was used as glue. You can check out another chiffon bake of mine for a picture tutorial of how to make the rose.

I apologise for the lack of photos as this was a bake a squeezed into my busy schedule.

Glad that the cake was well received and not too sweet!

With love,
Phay Shing
Read More »

Monday, 1 December 2014

Reduced-Sugar Chocolate Log Cake with Chocolate Swiss Meringue Buttercream

I made a chocolate log cake with chocolate Swiss meringue buttercream (smbc) for my extended family. Although this is a reduced-sugar recipe for both chiffon sponge and smbc, everyone gave a thumbs up for this cake! Hope you are not tired of seeing the same gingerbread cookie cake deco :p.


As mentioned in my earlier log cake post, this chocolate smbc is awesome! Chocolatey but not too rich or buttery. It uses half or less than half the amount of sugar in most smbc recipes. A big plus point for me! Smbc also doesn't melt at room temperature in hot and humid Singapore so it's the perfect cream to use if refrigeration is an issue. Like the Milo sponge, I used a lot less flour and a lot more cocoa powder to create a very soft but chocolatey sponge. The addition of a bit of coffee powder and kirsch just enhances the chocolate flavour but it is optional if you don't have them. The design of this log cake is the same as my peaches and cream log cake so I won't post the detailed step by step pictures here.

Here's a view of the log cake without decorations :).


The recipe for chocolate smbc is the same as my Horlicks smbc, except that you replace the Horlicks and water with 25g cocoa powder (use more cocoa powder if you prefer stronger chocolate flavour). Simply add sifted cocoa powder into the plain smbc and beat with a hand whisk or electric mixer until well combined and fluffy.


You may make the smbc ahead of time and store in the fridge for up to a week or in the freezer for up to a month.  Just be sure to keep it in airtight container or ziplock bag to prevent them from absorbing odours from the fridge. Leave it to soften at room temperature and re-whip until desired consistency before assembly.

Recipe for chocolate chiffon layer cake
Ingredients (9x12" pan):
3 egg yolks
15g caster sugar
42g canola oil
42g milk
1/4 tsp vanilla extract
1/4 tsp instant coffee powder (optional)
1-2 tsp kirsch (optional)
20g cocoa powder
40g cake flour
1/8 tsp salt
1/4 tsp baking powder
1/4 tsp baking soda

4 egg whites
1/4 tsp cream of tartar
40g caster sugar

Steps:
1. Preheat the oven to 160°C. Line the pan with baking sheet. Dissolve the coffee powder in milk. Add vanilla extract and kirsch to the coffee mixture.


2. Prepare egg yolk batter. Whisk egg yolks and sugar until pale and all sugar has dissolved. Add oil and whisk until thick like mayonnaise. Add coffee and milk mixture and whisk until well combined. Gradually add in sifted cocoa powder, flour, baking powder, baking soda and salt and whisk until no trace of flour is seen.

3. Prepare meringue. Beat egg whites with electric mixer until foamy. Add cream of tartar and beat until soft peaks form. Gradually add sugar and beat until stiff peaks form.


4. Fold the meringue into the egg yolk batter in three batches. Slowly pour the batter into the prepared pan. Gently drop the pan on the table a few times to release any trapped air bubbles.


5. Bake for 15 minutes. Immediately remove from pan and cool with the cake rolled up to prevent it from cracking.

6. When cake is cooled, unroll and brush some simple syrup (1:1 ratio of sugar and water) and apply smbc on the cake. Roll it up and refrigerate for 15 minutes. Or alternatively, freeze it for 5 minutes. Slice the two ends off and reserve them for the branches. Spread cream on the surface of the cake and stick the branches on. Apply some cream on the branches using a spatula.


You may cover the whole cake with cream or leave the cut surfaces exposed like I did. I piped some cream on the cut surface to make it look neater.

7. Freeze the cake for a 5 minutes. Use a fork to make bark patterns on the cream.  Dust some icing sugar if you wish and add on decorations. Refrigerate the cake to chill it. Let the cake stand at room temperature for 10 minutes for the smbc to soften a bit before serving if you prefer softer cream.

Update: I made another chocolate log cake for my brother's colleagues. They loved it too and wanted me to make more for them so this recipe is definitely good. Do give it a try if you would like to bake something for Christmas :).

I am submitting this to "My Treasured Recipes #4 - Ho Ho Ho It's Christmas (Dec 2014)" hosted by Miss B of Everybody Eats Well in Flanders and co-hosted by Charmaine of Mimi Bakery House.

With love,
Phay Shing

Read More »