Thursday, 30 January 2020

All You Need To Know About Heart Macarons (Templates and Video included)

Hot on the heels of Chinese New Year is Valentine's Day so many macaron bakers are looking at making heart macarons for sale. I am part of a wonderful Facebook group called All Things Macarons and I know from there that there are some things that bakers would love to know about making heart shaped macarons. I happen to be teaching this for Culinary Arts Ministry in church so I have decided to do a detailed documentation of making heart shaped macarons. (Update: this event is cancelled due to the coronavirus spread. But I hope this post will be helpful to bakers. Stay safe everyone! Practice sensible hygiene and trust God to take care of us!) Although I have a rather comprehensive post done about 3 years ago over here, I have revised the French method recipe to one that dries faster and is so "failproof" that I use it for Junior chef classes. Many bakers also want to know how to get that beautiful deep shade of red so I am introducing a colouring which I use now that is better than the standard Americolor or Wilton ones. Presenting my humble raspberry dark chocolate heart macarons!

The colour of these hearts are not as deep because I made these concurrently with other macarons and so I didn't use the awesome red powder colouring here. I made these for the event ad much earlier. 

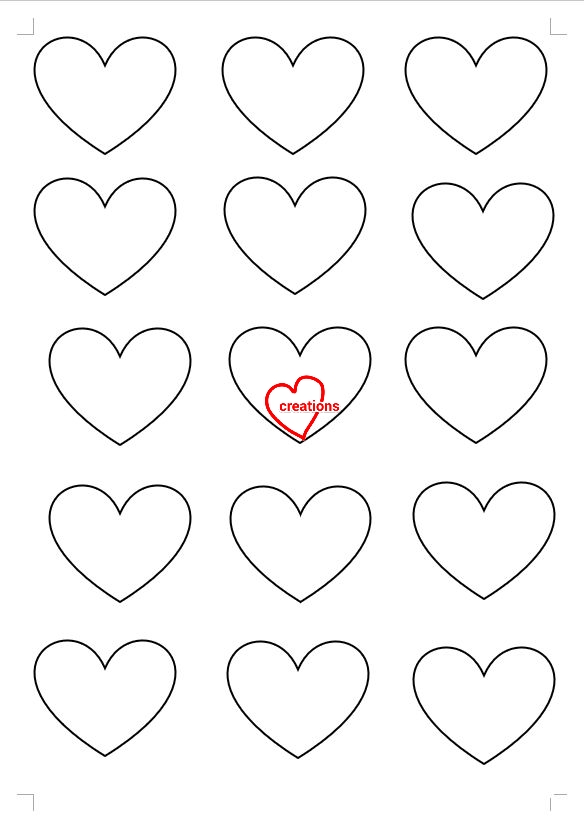
Here are the templates for hearts of different sizes. For Culinary Arts Ministry, I will be using the template with smaller hearts as we have limited time and oven spaces. Each template can be scaled to an A4 size paper.

Regular sized hearts

Mini hearts

I used to need to add many drops of gel food colouring in order to achieve a deep shade of red. But now that I discovered what "Ah Ma" (grandmother in the Chinese Hokkien dialect) used to colour things like red eggs or ang ku kueh works many times better than Wilton or Americolor, I am going to stick with it. All I needed to add was 1/4 tsp of the red powder per egg white worth of recipe for macaron batter to achieve a super deep and bright red!

You can find this at supermarkets like Sheng Shiong in Singapore or perhaps Chinese or Asian grocery stores in other countries 

I will share the French method recipe here although you can use your preferred method.

Recipe for red macaron batter (French method, makes about 20 small heart macarons (40 shells) or 12 regular hearts (24 shells) ) 
Ingredients:
Meringue
35g egg whites
1/8 tsp cream of tartar (optional, for stabilising egg whites)
32g icing sugar (with cornflour added)
1/2tsp cornflour
1/8tsp fine salt (optional)

Dry ingredients
48g icing sugar
40g superfine almond flour
1/8 tsp cornflour
1/2 tsp freeze-dried raspberry powder
1/8 tsp cocoa powder
1/4 tsp bright red powder colouring.

Notes:
I added cornflour to stabilize the meringue as well as help the shells dry faster and be sturdier. Do note that this will cause the shells to be chewier in texture as well so give the filling at least 3 to 4 days to mature with the shells in the fridge before consuming, or brush the bottoms of baked shells with unwhipped heavy cream before filling to speed up maturing process.

Raspberry powder and cocoa powder are added for dulling the bright red colour a little as well as to temper the sweetness level of the macaron shells.

I am introducing oven drying here but you may choose to rest the piped batter in the open or in aircon room.

Steps:
1. Preheat oven to 65°C, top and bottom heat only. Set rack to second lowest position. Line baking tray with template and parchment paper.

2. Sift together all the dry ingredients. You may want to weigh out about 3g extra almond as some grains may have difficulty passing through the sifter. Do not press the mix hard through the sieve as it will cause oils from the almond to come out and ruin your macarons (you get fragile, splotchy shells). Set aside.

3. In a small bowl, whisk together icing sugar and cornflour for the meringue

4. In a clean metal (or glass) mixing bowl, beat egg whites with cream of tartar until foamy. Add about a third of icing sugar/cornflour mix and whisk until sugar is absorbed then beat for a few seconds using elecreic mixer. Add another third of the sugar and repeat whisking and beating. Add the rest of the sugar and whisk until it is absorbed into the egg whites. Turn up mixer speed to medium high and beat until meringue reaches stiff peaks. Scrape down sides of the bowl with clean spatula. Beat the meringue again for about half a minute. Scrape down the sides and test if the meringue is ready. If the meringue balls up inside the whisk, it is stiff enough. But some whisks of mixers are unable to do this so another test I use is to create little peaks all over the meringue in the bowl. If all the peaks stand up straight without curling over, meringue is ready.

5. Scatter half of the dry ingredients over the meringue. Gently fold in using a spatula until no trace of dry ingredients is seen. Scatter the other half of dry ingredients and gently fold until just incorporated. The batter is underfolded at this point. Press the batter against the side of the mixing bowl to deflate some air from the batter. Test consistency again. Repeat this until batter is smooth, shiny and able to fall of spatula in an almost continuous manner. Alternatively, you can test consistency by creating little peaks of batter in your bowl and tap the bottom of the bowl. If the peaks sink back in, your batter is ready. You may find it helpful to watch this video tutorial I did for the basic french method to have a better idea of batter consistency and folding technique.

6. Transfer batter into piping bag fitted with a wilton #8 tip for small hearts and #10 for regular hearts. Pipe the hearts on the tray like this:

I made this video 3 years ago and didn't bother making another one because I think it is clear enough 🤣

You may use a toothpick to nudge the batter into place as necessary, or to pop air bubbles. Bang the tray a few times to pop trapped air bubbles.

Piped batter

7. Place tray into oven for 10 min. Let it rest at room temperature free from draft while you preheat the oven to 170°C for 10 min. If you happen to have access to two ovens, you may preheat one to 65°C and the other to 170°C right from the start and just pop the tray of piped batter from the low temperature oven to the high temperature oven straight away after 15 min in low temperature oven. The purpose of oven drying is to speed up the process of forming a sturdy membrane on the surface of the shell before baking.

Once the tray is in the oven at 170 °C, reduce the temperature to 140°C. Bake for 18-20min for small hearts and 22-25min for regular hearts. Please note that the suggested temperature and time is a reference only as each oven works differently. Adjust your baking temperature and time accordingly, including the initial oven drying temperature and time. 

Let the shells cool completely on baking tray before carefully removing the parchment away from the shells (not the other way round).

Freshly baked hearts! 

Another view! I love this view! 

Raspberry dark chocolate ganache
Ingredients:
65g dark chocolate couverture
6g unsalted butter
18g heavy cream
1/8tsp sea salt
1/2 tsp vanilla bean paste
1/2 tsp coffee liqueur
8g freeze-dried raspberry powder

Steps :
1. Place all ingredients except raspberry powder in microwave-safe bowl. Heat on medium power for 20 sec and mix well. Repeat heating and mixing as necessary until smooth and melted.

2. Add freeze-dried raspberry powder and mix well.

3. Let the ganache firm up until toothpaste consistency before transferring into piping bag. You may choose to whip the ganache for a lighter texture if you wish.

You may fill the macarons with any filling of your choice but I love the raspberry dark chocolate combo as it compliments the sweetness of the macarons well so overall the confectionery is an explosion of flavours without being too sweet. Remember to be patient and only consume the macarons after a few days of maturing! Let the macarons sit at room temperature for 15 min before eating or the ganache might be too firm. The ganache recipe I share is suitable for hot climates like Singapore so feel free to increase the amount of cream if you want a softer ganache.

With the cancellation of the church event, I rushed out some hearts to give away instead! We need to spread more love during this trying time and not panic.


With love,
Phay Shing
Read More »

Wednesday, 29 January 2020

'Year of the Rat' Chiffon Cakes


新年快乐! 祝你幸福鼠不完! 🥰🐭 

This is a belated blog post, as I was busy over CNY and forgot to post these cakes on the blog =p.

Here are my chiffon cake rats, inspired by 裕鼠鼠 and 乐鼠鼠 from Mediacorp wishing you a happy new year!

This year feels a bit different because of the Wuhan virus, but praying that it will soon be over.

Everyone take care!

With lots of love,
Susanne

Read More »

Tuesday, 28 January 2020

'Bear in Teacup' Earl Grey Lavender Macaron Class

Due to an overwhelming response to my teacup macaron class for chinese new year in January, I decided to conduct another macaron teacup class but with a different design!

Bears in teacups! 

Unlike the earlier teacup macaron class which focused on a variety of fillings (dark chocolate ganache, mandarin orange yuzu curd and mandarin orange yuzu swiss meringue buttercream), this class covers simple character macarons as well but only one type of filling is taught (Earl Grey lavender ganache).

Just to share another photo of this creation without the filling...

Looking sweet! 

This design is suitable for various occasions such as the upcoming Valentine's Day, Mother's Day, Father's Day, or any other day that you want to show appreciation for your loved ones!

Please click on this link to register for the class in June and for more details. There is an earlier class for this in April but it filled up fast too with only one seat left before I was able to advertise for it!

Update 29/01/20: Class on 6th June is full too! Please whatsapp Sharon Chew for a subsequent class. 

With love,
Phay Shing
Read More »

Thursday, 23 January 2020

Mickey Mouse Kueh Lapis


Mickey Mouse cake to usher in the Year of the Rat! Can you guess what cake this is?


And more slices! My family said it was really sad to cut up the cute Mickey =p


Yes it is kueh lapis! Great when we have extra egg yolks! =)

The character kueh lapis was rather experimental, and I didn't think it would work. I actually made a few more other kueh lapis with the kids! Everyone loves it (it's a lot sweeter and richer than the usual chiffon cake haha).

Here's the recipe of the kueh lapis experiment for those who are interested.

Cartoon Kueh Lapis (makes 1 6-inch cake)
Egg Yolks 
10 egg yolks (from large eggs)
60g castor sugar

Butter Batter
250g butter, at room temperature, cut into small cubes
100 g condensed milk
1 tbsp rum (or 1/2 tbsp vanilla if you prefer non-alcoholic version)
17g corn flour
58g all-purpose flour
½ tsp mixed spice (I used ground cinnamon, nutmeg, cloves and cardamon)
1/8 tsp salt (a pinch)
Charcoal powder
Beetroot powder

Egg Whites 
5 egg whites
¼ tsp cream of tartar
40g castor sugar

For greasing: 1 tbsp unsalted butter, melted

1. Preheat the oven to 180°C, using only top heat. Place your cake mold into the oven to warm up while you prepare the batter.

2. Egg Yolks: Beat egg yolks with castor sugar (for egg yolks) using an electric mixer on high speed until the egg yolks are pale and thick (ribbon stage). Set aside.

3. Butter Batter: Place the butter, condensed milk and rum (or vanilla extract) in another bowl and beat on high speed until the mixture is light and fluffy. Add in corn flour, plain flour, spice and salt, reduce the speed to low and mix till well incorporated. Lastly, add in your whisked egg yolks and mix and low speed till well incorporated.

4. Divide the batter 2/3 and 1/3. To 1/3 of the batter, add in 1 tsp charcoal powder, and then bit by bit more and mix well till desired shade of black. From the 2/3 plain batter, spoon out 1 tsp and add ¼ tsp beetroot powder and mix well for the pink batter.

5. Egg Whites: Place the egg whites in a new clean, dry and oil-free bowl. Beat on low speed with cream of tartar until soft peaks formed. Add in castor sugar (for egg whites) gradually and are glossy and stiff peaks formed.

6. Fold ⅓ of the egg whites into the butter batter to lighten the mixture. Fold in the rest of the egg whites gently until fully incorporated.

7. Remove cake pan from oven, and brush the base with melted butter to grease the part you are adding batter. Start with the nose (charcoal batter), and bake for 5 mins, or until the top is golden brown in colour. For the next layer, grease the face, spoon plain batter into a thin layer around the nose and bake another 5 min, or until the top is golden brown in colour. Gradually build up layer by layer, spooning or piping charcoal batter onto the black parts, and likewise plain batter for the face. Repeat this until you have reached the top of the cake mold.

8. For the pink batter, you can either pipe it onto the cake mold at the tongue area, or bake it separately in a cupcake liner,as what I have done and stick it onto the cake later.

9. Allow the cake to cool completely before unmoulding the cake by popping it out of the greased mold.

10. Pipe on the eyes using some melted chocolate.


Hope you enjoyed this creation!

Happy Chinese New Year in advance!

With lots of love,
Susanne

Read More »

Wednesday, 22 January 2020

Black Sesame 'Koala in Distress' Choux pastry

Bushfires are a common thing in Australia during summer. But the one that razed Australia end of last year went on at an unprecedented scale and is still not over to this date. Many homes and lives were lost and countless wildlife affected. I am sure you have seen in the news so I shall spare you the details.

Many years ago, my family visited Australia and I had the chance to carry a koala. I was smitten by how cute they are and was surprised by how solidly heavy they are too. It is really heart wrenching to see them lose their habitat, get injured or even killed, along with other animals. I decided to make a choux pastry creation to reflect the sad state of affairs.

Injured koala in a barren landscape. It looks so sad it makes me want to cry too 

I chose black sesame as the filling flavour and worked with what I have at home at the moment. I have some 100% black sesame powder with no sugar added. As I wanted something lighter to compliment the richness of black sesame, I used whipped cream as the base instead of pastry cream.

Choux pastry filled with black sesame whipped cream

You may refer to this post for details on how to create the choux pastry and the craquelin that goes on top of the grey pastry cases. I piped 2.5cm diameter circles for the koala head and body, and used a 3cm diameter craquelin. I used a 1cm diameter open star tip to pipe some slanted éclairs for the tree trunks. As for baking conditions, I preheated the oven to 210°C and reduced the tenperature immediately to 190°C once the tray is in. I baked for 10 min before reducing temperature to 180°C and bake for 10 min. Reduce temperature to 170°C and bake for another 10 min. Reduce temperature to 140°C and bake for 20 min with fan mode on to thoroughly dry the pastry cases.

Piped batter and with craquelin on grey cases

I piped the pastry pieces for the branches and koala ears, limbs and tail. These were baked at 170°C for 10-18min depending on the size of the pieces.

I used royal icing to decorate as well as join the parts together.

Recipe for black sesame whipped cream
Feel free to adjust or substitute the ingredients. You may use all whip topping or all dairy cream. You may scale the recipe up or down too. You may use black sesame paste instead of ground black sesame if that is your preference.

Ingredients:
120g whip topping (non dairy whipping cream)
30g double cream
Pinches of salt
60g black sesame powder (or according to taste)

Steps:
1. Place chilled whip topping and double cream in a mixing bowl and whip until firm peaks with electric mixer.

2. Add pinches of salt and mix well. Add black sesame and mix well.

3. Transfer into piping bag and keep it chilled until ready to eat. Choux pastry tastes best when eaten freshly filled to enjoy the crisp pastry and cold and creamy filling inside.

Do donate to Koalas In Care Inc., which is run by volunteers over here. Praying for restoration to happen soon.

With love,
Phay Shing
Read More »

Tuesday, 21 January 2020

'Mother and Baby Koala' Chiffon Cake


Mother and baby koala, inspired by a real photo of a Mother protecting a baby koala during the bushfire that went viral. 🐨💖 Thank God for the rain falls across parts of Australia! However, the recovery and rescue continues and the road ahead is long. Each life saved is special ❤

If you are interested to help, you can visit the Redcross link here.

Another link you might be interested to find out more is WIRES.

Thanks for your kind hearts!

With lots of love,
Susanne

Read More »

Wednesday, 15 January 2020

Teddy Bear Lychee Rose Choux Pastry Class

Quite a few people asked about character Deco Choux Pastry classes and this is what I intend to teach as the simplest but cute design for a full body character. Back to bascics - - - Teddy bear choux pastries!


Please don't ask me to teach trademarked characters because there are copyright issues involved 😂. Techniques learned at class can be applied to those characters and you can make them on your own once you know the techniques. 

This class is suitable for beginners as there isn't a need to be too concerned about browning in oven and the decoration is as minimalist as it can get. I am also sharing how to make a pastry filling that is refreshing and has no additional white sugar added - - lychee rose pastry cream lightened with whipped cream.

Click on this link for more information and to register. Although the March class is full, there is a repeat class in May so do contact Sharon Chew to book a place!

With love,
Phay Shing

Read More »

Monday, 13 January 2020

3D CNY Cartoon Rat Chiffon Cake (Round 2!)


老大,老二 和 老三 wish all of you 鼠年大吉!!

This is the winning caption from my Instagram post. As you know, I am not so good with words, so my friend suggested why not I get others to name the creation instead! hehe

I have shared the recipe in my previous post 3D Cartoon Rat Chiffon Cakes. Here, I added in some red accents to the creation.

I have more rat creations coming up! Hope you are not bored yet! =p

With lots of love,
Susanne

Read More »

招福猫 (Fortune Cat) Lychee Rose Choux Pastries (updated filling recipe!)

I love cats and had a pet cat once so of course I have to take the chance to create a choux pastry version of my favourite animal! Besides making rat choux pastries to welcome the new year, I made fortune cats to welcome the new year too!

There are variations to the name of this cat but I have always called them "招福猫" 

The typical fortune cat is a calico cat and has an arm that waves to 招 or welcome food fortune. I wanted to keep it as simple as possible so I chose to work with plain uncoloured, non chocolated coated versions of the cat (because it is impossible to get the pastries pure white, at most cream coloured) . I used uncoloured cookie dough (craquelin) to control the shape of the main pastry body

You may refer to this post on how to make and bake the basic craquelin and choux pastry batter but just omit the colouring. Baking temperature can be kept at a higher range as browning is not a concern here. For the smaller parts like ears and arms, preheat to 190°C and bake at 170°C until golden brown. For the main parts for head and body, preheat oven to 210°C, and bake at 180°C for 25-30 min, reduce temperature to 150-160°C and continue baking for another 15-20 min to thoroughly dry out the pastry cases. If the insides are still wet, you may cut a hole about 10 cent coin large at the base of the case, return it into the oven and bake at 130°C for 10-15min. Do note that baking temperature and time suggested here are for reference. You need to adjust according to your oven.

Craquelin on top of piped batter. I love using perforated mats for making larger cases for choux as it helps the pastry to rise more evenly in the oven. 

You may refer to this post with a video tutorial of how I assembled the penguin choux pastry to have an idea of how I assembled the cat. I used royal icing instead of melted chocolate as it is easier to work with for more intricate details.

A zester is really helpful for getting the parts of pastry fit together nicely! I used red sour candy for the collar. 

What's new that I would like to share here is my lychee rose lightened pastry cream recipe. I have shared it before in this post but I understand that ingredients like freeze-dried lychee powder is not easily available and homebakers prefer to work with ingredients that are easily available and they don't end up with huge amounts of something leftover that they don't use often. So my new version of the recipe omits the use of freeze-dried lychee powder while maintaining that strong lychee flavour out of a single can of lychees! You may be pleased to know that I also omit the use of castor sugar in the pastry cream because there are elements there that already contribute to the sweetness.

So here are the main flavouring ingredients I use commonly found in supermarkets

Canned lychee and rose syrup for making bandung (a milky rose syrup drink commonly served at coffeeshops in Singapore) 

I don't add a lot of rose syrup in there so not to worry that the pastry cream will be overpowered by floral notes and end up too sweet as well. You may omit the rose syrup and substitute with sugar, or add a bit more if that is your preference. I add only a bit to compliment the lychee flavour and provide  a hint of floral note because lychee is the star here.

Lychee rose pastry cream recipe 
Ingredients:
450-500g canned lychees of your preferred brand
6g rose syrup
50g milk
2 egg yolks
20g cornflour
Pinches of salt
15g unsalted butter
80g whip topping (or double cream or whipping cream)

Steps:
1. Divide the batch of whole lychees into two. Set aside one batch to puree with some syrup from the can and strain it. Weigh out 150g of the puree with syrup. If there is not enough, add more syrup from the can to make 150g in total. Cut the other batch of lychees into 5mm bits but remove the woody parts first. Store the chopped bits in refrigerator.

2. Sift cornflour into a heavy mixing bowl. Add egg yolks and whisk until a paste forms. Set aside.

3. Place lychee puree, milk, rose syrup and pinches of salt into a small saucepan and heat until steaming.

4. Pour hot liquid in a thin stream into egg yolk mixture while whisking continuously. Pour the mixture back into saucepan. Cook over medium low heat while whisking continuously. Once the mixture thickens, remove from heat and continue whisking until smooth. Return back to heat and continue whisking until custard thickens to your preferred consistency.

5. Remove from heat and whisk in the butter. Pour into a bowl and press cling wrap on the surface of the custard. Refrigerate until cool. At least an hour or overnight if you wish.

6. Fold in the chopped lychees.

7. Whip the whip topping until firm peaks form. Fold into the pastry cream.

Top is plain lychee rose pastry cream. Bottom left is chopped lychee and bottom right is whipped whip topping. 

This is how it looks like combining all three! 

Remember to fill the pastry cases jist before consuming if you want to enjoy the pastry crisp!

With love,
Phay Shing

Read More »

Wednesday, 8 January 2020

Rat Choux Pastry in Macaron Teacups

Continuing on from my previous blog post, I decided to have a creation that showcases three of the genres that I work with the most. Rat choux in macaron teacups with some mandarin orange chiffon "oranges" on the side!

The Chinese characters 鼠年大吉 means great fortune in the year of the rat

The choux pastry rats have little feet here (also made out of choux pastry) that aren't present in my previous post.

You may refer to my previous post for details on how to make this simple deco choux design to welcome the year of the rat. The mandarin orange pastry cream I shared is also refreshing and not too sweet. I filled the macaron teacups with earl grey ganache. You may refer to this post on how to create the teacup, including how to pipe hemispherical macaron shells. Details for recipe and how to shape the oranges can be found in this post.

I am still in the midst of adjusting to changes in the new year with the kids starting school again. But do stay tuned for some exciting macaron structure projects in the next month or two! Can't wait to challenge myself with those but also pacing myself so that I don't burnout with many things to juggle.

With love,
Phay Shing
Read More »

Tuesday, 7 January 2020

Rat 'Melt-in-the-mouth' Pineapple Tarts


Couldn't resist making melt-in-the-mouth Rat Pineapple Tarts! 🐭 Do you find them cute? =)

Here is the cross section after a bite!


Everyone has their to-go-to recipe. Here's mine below. This year I modified the recipe to add custard powder and corn flour for crispier and more crumbly texture. I added in instructions for shaping the rat too. Hope you like it!

Rat 'Melt-in-the-mouth' Pineapple Tarts (portion is enough to make 58-60 rat tarts)
500 grams Pineapple Jam

227g unsalted butter, cut into chunks, soften at room temperature (2 sticks butter)
60g icing sugar
2 egg yolks, lightly beaten
1 tsp vanilla extract
350g plain flour
42g corn flour
5g custard powder
1/2 tsp salt
cold water (few drops if needed)

1. Roll pineapple jam into 8g balls.

2. Using a kitchen mixer with paddle attachment or food processor, mix together plain flour, corn flour, icing sugar and salt. Mix or pulse for a few seconds.

3. Add cold butter cubes and beat on low speed or pulse in a food processor until mixture has the texture of coarse meal.

4. Add in egg yolks and vanilla extract beat until a dough is form. If your dough is too dry, add a few drops of cold water. Do not overbeat.

5. Remove dough from mixing bowl and shape into a ball. Wrap the dough with cling wrap and chill in the fridge for about 30mins.

6. Portion out two portions of 10g dough. Mix in charcoal powder (around ¼ tsp or more if needed) to one portion to make black dough for the eyes. Mix in beetroot powder (around 1/3 tsp of more if needed) to make pink dough for the nose.

7. Divide the dough into 11g balls (58 pieces). Leave the remaining dough for making the ears and tail.

8. Preheat oven to 150°C. Dust the work surface with corn flour.

9. To each 11g dough ball, flatten each dough into a small disc using a rolling pin and wrap with a pineapple jam. Roll the dough with filling into an oval ball, then roll one end between your palms to form a sharp end. Pinch 2 small balls from the remaining dough for the ears and stick on. Pinch another small piece of dough for the tails. Add in the eyes and nose using the black and pink coloured dough from #6.


10. Place the tarts on baking tray lined with parchment paper. Bake in preheated oven at 150°C for 28-30 mins (I used a lower temperature to minimize cracking). Leave to cool on baking tray completely before storing in air-tight containers.

My rat army!

With lots of love,
Susanne


Read More »

Thursday, 2 January 2020

Valentine's Day Heart Macaron Bouquet Class

If you are clueless about macarons but want to make something that looks impressive and tastes great (not too sweet), why not join me for this macaron class to make a heart macaron bouquet!


I will cover the simplest method, the French method, as well as some calligraphy tips and bouquet assembly tips. Heart shaped macarons are not just suitable for Valentine's Day, but also for other occasions like Mother's day, teacher's day or any day you want to show your loved ones how much you appreciate them 😊. The fillings I am teaching are dark chocolate ganache and raspberry white chocolate ganache.

Registration link and details of the class can be found here.

With love,
Phay Shing
Read More »

Monday, 30 December 2019

Rat Choux Pastries with Mandarin Orange Pastry Cream

As the year of the Rat is approaching soon, why not make these 😊

Rat choux au craquelin filled with lightened mandarin orange pastry cream! 

This also marks the 7th consecutive year I am making mandarin orange chiffon "oranges"! They have a special place in my heart as they were my first experiment to bake chiffon in glass bowls and one of the earliest deco chiffon creations ever, which was made for my mother-in-law. Details of how to make the mandarin orange chiffons can be found here.

I will share in detail how to make the rat choux and the pastry cream. You may refer to this post on how to make the craquelin and choux batter, but adapt it as follows. Use 1/8tsp charcoal and 1/8 tsp white gel colouring for the craquelin instead of orange gel colouring . Use 1/8 tsp charcoal powder and 1/4 tsp white gel colouring instead of orange gel colouring in the batter. Feel free to adjust the shade of grey to your liking. I piped the body of the rats using a wilton #12 tip. I piped 2.5cm and 2cm circles of batter and used 3cm and 2.5cm diameter of grey coloured craquelin respectively for the piped circles. You may choose to do just one size of rats although I did two different sizes. Preheat oven to 210°C before making the batter.

I highly recommend using perforated mats to bake if possible 

Once tray is in oven, immediately reduce temperature to 190°C and bake for 10 min. Reduce heat to 180°C and bake for another 10 min. Reduce heat to 160°C and bake for another 10 min. Reduce the heat once again to 140°C and bake for another 10 min. Do note that suggested baking temperature and time is a guideline and varies with different ovens. You need to experiment to see what temperature and time profile works best to give your pastry cases a good rise in the oven while not browning it too much. If you want the pastry cases to be baked until thoroughly dry, cut a hole at the bottom of the cases and bake for another 10 min at 130°C to dry out the insides.

For the ears, tail and (if you wish) feet, change the piping tip to wilton #5. Pipe the parts as shown below. I decided not to include the feet for this version of rat choux, but included for the ones sitting in my macaron teacups (will post that soon!). You may experiment with round or oblong shape for the feet. Bake these at 170°C for 12-15 min.

Piped ears, tails and feet

For the assembly, use a toothpick to pierce the pastry cases where the ears and tail are to be inserted. Then gently insert the ears and tail. You may use melted chocolate or royal icing to add in the details. I used royal icing for the ears and other facial features, except the rounded eyes where I used rolled black candy melts and cut out little circles using small round cutters. Feel free to be creative and decorate it the way you want to!

Mandarin orange pastry cream
Ingredients:
2 egg yolks
15g Castor sugar (you may replace with stevia for diabetic-friendly version)
A pinch of salt
20g cornflour
150g freshly squeezed mandarin orange juice
50g fresh milk
1/2 tsp orange emulco (optional)
Zest of 2 mandarin oranges
20g unsalted butter
60g whip topping (or double cream/heavy cream)
Some chopped dark chocolate (optional, I didn't add but you could to add another flavour dimension to break the monotony)

Steps:
1. Sift cornflour into a heavy mixing bowl. Add sugar and whisk together. Add egg yolks and whisk together until a smooth paste forms. Set aside.

2. Place juice, milk, orange emulco and salt in a small saucepan and heat until it just starts to bubble at the edges. Remove from heat.

3. Slowly pour the hot liquid mix into the egg yolk mixture while whisking continuously. Pour mixture back into saucepan.

4. Heat the mixture over low heat while whisking continuously until it starts to thicken. Remove from heat and whisk until smooth. Return to heat and continue cooking and whisking until your desired consistency. Remove from heat.

5. Add butter and whisk until smooth. Add orange zest and whisk it in. Transfer pastry cream into a bowl and press cling wrap on surface. Chill in fridge for at least an hour or until cool. You may prepare this a day in advance too.

6. Whip the whip topping until stiff peak. If using dairy cream, be careful not to over whip. Fold into chilled pastry cream. You may fold in chopped chocolate if you wish. Transfer into piping bag and keep it refrigerated.

Lightening up pastry cream with whip topping


I recommend filling the pastry cases just before serving so that you can enjoy the pastry while it is crisp on the outside but cold, smooth and creamy on the inside!

With love,
Phay Shing
Read More »

Friday, 27 December 2019

3D Cartoon Rat Chiffon Cakes (Chinese New year)


Are you looking forward to the year of the rat? 2020 is the Year of the Rat according to Chinese zodiac and the intelligent rat 🐭 is first of all zodiac animals in the race.

The little cute rats are made entirely from chiffon cake 🍰. Recipe for these cute rats are shared below:

3D Cartoon Rat Chiffon Cakes
(Makes 3)
Egg yolk batter
2 egg yolk
6g castor sugar
26g vegetable/corn oil
28g water
4g vanilla extract
40g cake flour
Natural food coloring/extracts

2 egg white
22g castor sugar
¼ tsp cream of tartar


1. Preheat oven to 140°C. Prepare egg shells by making a hole at the long side of the egg shells. Drain the egg and remove the membrane.


2. Prepare egg yolk batter:

a. Whisk egg yolk with sugar using hand whisk.

b. Add in oil, water, vanilla extract and mix well.

c. Whisk in sifted cake flour. Mix well. *Ensure no lumps are formed.

3. Divide the batter into 4 and add respective pink/yellow/brown natural food coloring or flavorings. *Some sources I have shared are here.
**You can also opt not to colour your rats or to have a single tone colour.

4. Prepare meringue:

a. In a grease-free, dry metal bowl, using electric mixer, whisk egg whites with cream of tartar till frothy.

b. Add in ½ castor sugar for meringue and whisk at high speed till soft peaks form.

c. Add in rest of the castor sugar for meringue and whisk till firm peaks form.

5. Divide the meringue into 4 and gently fold into each egg yolk batter 1/3 at a time. *Fold in unidirectional, gentle strokes and do not overfold.

6. Fill the egg shells till 2/3 full, according to the design of the rats. **You can also opt not to colour/pattern your rats.

7. Bake at 140°C for 35 min, or until skewer inserted into centre of cake comes out clean.

8. Bake the leftover batter as sheet cakes (either pour into small pan lined with baking paper or cupcake liners). 140°C for 20 min, or until skewer inserted comes out clean.

9. Allow to cool completely on wire rack.

10. Unmould the cake pops by gently cracking the egg shells.


11. Assemble the rat chiffon cake pops using melted marshmallow similar to Deco Chiffon Cake Basics (or you can refer to Pegasus Pusheen Chiffon Cake pops if you don’t have the book). This is made by popping some marshmallows with a sprinkle of water and microwaving on high for 30 seconds.

12. Stacking 2 cake pops together (like my 3D Snowman Workshops). Cut out small triangles and strips for the ears and arms from the sheet cakes. Pipe on the arms, feet and nose using melted chocolate. 

13. Decorate the facial features with charcoal sheet cake cut outs (refer to Deco Chiffon Cake Basics for picture tutorials of all the techniques), or pipe on using melted chocolate.


Hope you like these cute rat creations!

With lots of love,
Susanne


More picture tutorials are found in my cookbooks below, which are also available worldwide on Book depository:


Read More »

Thursday, 26 December 2019

'Leon in a Chocolate Bomb' Earl Grey Macarons

When I asked my elder kid what he wants for his birthday bake, he told me he wanted his favourite Brawl Stars character, Leon, in a pinata of sorts that can be cracked open like a pinata. He also wanted Leon to be made using macaron as the medium with Earl Grey filling. And what does Mama the baker come up with? I decided to make all the components edible as far as possible. And so I decided to hide Leon in chocolate bombs which are to be cracked open by a brown sugar cookie hammer!


I used French method to make the macarons since it is such a small quantity. You may refer to this post for the recipe. Just to share some photos of the process...

Piping Leon

Freshly baked shells

I decorated the shells with edible black marker, royal icing, and white coloured rice sprinkle for the lollipop stick

I filled the shells with Earl grey ganache. You may refer to this post for the recipe


I made the cookie hammer by using my fingers to mould a log shaped cookie dough and stuck the end of a wooden chopstick knto the dough. I wanted the cookie to be really hard so that the chocolate shell shatters instead of the cookie. To do that, I baked the cookie at a lower temperature of 145°C for 45 min but checking the progress of baking every 10 min. The brown sugar cookie recipe can be found here.

What was new in this bake and unfamiliar to me is making the chocolate bomb out of tempered chocolate. To be honest I was really nervous and out of my comfort zone but excited to try it out as well. Why nervous? Because the average ambient temperature that I work in is 28-32°C all year round. And humidity is high as well. Terrible conditions to work with chocolate but I don't have a choice. I chose dark chocolate as it is less tricky to work with than milk or white chocolate. (Although I did make the fuse of the bomb out of white chocolate). I studied two chocolate books that I bought recently on tempering chocolate and watched a few youtube videos on how to create chocolate spheres. So I am sharing my first experience properly working with chocoate in hot and humid home kitchen here.

I find that the most convenient method for me to temper dark chocolate was to use the double boiler and ice bath method. The seeding method didn't work so well since the kitchen was so warm. You need a candy thermometer as the temperature has to be very precise. I melted 270g of dark chocolate couverture over barely simmering water without the water touching base of bowl until temperature reaches 50°C. I quickly sit the bowl into another bowl with ice water and stir the chocolate with spatula while monitoring the temperature. I removed the mixing bowl out of the ice bath from time to time as the chocolate in contact with the bowl may solidify. Bring the temperature down to 28°C and put it back in double boiler. Stir and heat the melted chocolate until temperature is 31-32°C. I added a little oil based black food colouring to deepen the shade of the chocolate a little.

To create the chocolate sphere, I used a brush meant for food use to coat the insides of silicone hemisphere mould with a layer of tempered chocolate. I put it in the freezer for 3 min before adding another coat of chocolate. I repeated this so there are 3 layers. Freeze for 10 min for the last coat. Use a metal spatula or bench scraper to scrape off any bits of chocolate sticking out from the surface of the mould. This is harder to do cleanly if you are using a relatively soft silicone mould like me. But if you are using a rigid plastic mould for chocolate, this shouldn't be an issue. If the chocolate is properly tempered, it should come out of the mould easily and have a shiny appearance.

My first attempt! Happy with it! 

Do wear latex gloves when handling the unmoulded chocolate or you will risk melting it or leave smudges on the surface. Handling unmoulded chocolate was really a challenge for me since it is so warm here 😂. For the little knob on top of the sphere, I piped the tempered chocolate into a jumbo straw and let it set for 10 min in the fridge. I used a chopstick to push the hardened chocolate out of the straw. I heated a small knife over a flame and cut the unmoulded log of chocolate into short sections, cleaning the knife after each cut. I used the heat of my fingers to shape compound white chocolate chip into ropes.

Rule of thumb of gluing chocolate parts together is to place the joining surfaces on a warmed non stick frying pan to melt the chocolate surface a little, then quickly stick the melted surfaces together. Just place the pan on heat for a few seconds and turn off the heat. In instances where placing the chocolate on pan is not possible, I heat the end of a metal chopstick over a flame for a couple of seconds and use it to melt the chocolate surface.

Partially assembled bombs! I used stiff royal icing to stick the macarons down. 

After assembling the bombs, I glued some roasted ground peanuts onto the cakeboard for a "sandy" dessert scene.

Unfortunately Singapore is so warm you have to store this creation in the fridge or in ideal situation, a really cold aircon room at 16-18°C. Fridge storage does mar the appearance of the chocolate bomb but since this is for my kid, who cares 🤣! It's a fun creation nonetheless!

Finally the deed is done! 

I think I should have just done 2 layers of chocolate coating lol! Nonetheless it was still fun to crack the bomb open!


With lots of love,
Phay Shing


Read More »