Monday, 10 November 2014

'Three Little Pigs' Neopolitan Chiffon Cake


"Little pig, little fatty, let me come in."
"No, no, not by the hair on my chinny chin chin."
"Then I'll huff, and I'll puff, and I'll blow your house down!"

Didn't we all grow up with this well-loved tale, the "Three Little Pigs"? A big bad wolf is able to blow down the first two pigs' houses, made of straw and wood but is unable to destroy the third pig's house, made of bricks. This is a chiffon cake inspired by the "Three Little Pigs" story and depicts the third pig's brick house which saves the three pigs! 

It's made for a dear friend's daughter who loves this story. She's a really really sweet girl! This is probably my most challenging cake to date. I had great fun (and difficulty) making this cake as there were many components (the pigs, house, wolf) requiring cake cutting, carving and arranging all together as one into a story (and that's after the baking!). 

The cake is Neopolitan-flavored again, namely vanilla, strawberry and chocolate to make use of their natural coloring. The recipes for vanilla, strawberry and chocolate chiffon are from my Super mario mushroom neopolitan chiffon cake. The base of the house (cream color) is a vanilla chiffon cake baked in a 15 cm chiffon tin (same recipe for vanilla chiffon cake except scale to 2 egg yolks, i.e. double the amount). The top of the house (pinkish red) is strawberry chiffon cake baked in the same mixing bowl but halved the amount (2 egg yolks). The wolf's body and head, and doors were cut and carved out from chocolate chiffon cake baked in a paper cone, an oval bowl and a 6-inch tray. The pigs were also made from strawberry chiffon cake (with less strawberry paste, scaled to 1 egg yolk recipe) baked in my silicone cakepop maker (below) to make the roundish face. The nose and ears were also cut out from excess cakepop cakes.


I painted the eyes on with charcoal paste using a toothpick. Here's a closer look at the 3 pigs =(:). Oink!


I baked extra red, blue and brown layer cakes for some features like windows and bricks. These were glued on using melted marshmallows.


And the wolf here is hanging on the dear life! The pigs triumph cos hard work (brick house) saves the day!!! =)


Thank God the cake was well-received. Thanks to Connie for being so reassuring during the process! :)

Happy birthday to Aleia!!

With lots of love,
Susanne


Read More »

Sunday, 9 November 2014

Baby Jesus, Star & Snowflake Gingerbread Cookies

As Christmas approaches, bakers may be getting started with their Christmas bakes. Being a Christian means that this is a time to remember the birth of our Lord Jesus (not that we remember Him only this time of the year but every day). You will see a lot of Christmas trees, presents, Santa and reindeers during this season, none of which has anything to do with Jesus' birth. About as non- Christian themed as I get with these gingerbread cookies is the snowflake :p. I couldn't resist because snowflakes are such beautiful creations by God. So here's my simple Christmas gingerbread cookies!


I can't take credit for these designs as I was inspired by what I saw here. I only made slight modifications to the original design.

The recipe is almost the same as my brown sugar cookies except that ground ginger is added.

Ingredients:
Gingerbread cookies
87g plain flour
1/2 tsp ground ginger (you may replace some of it with cinnamon and/or allspice)
1/4 tsp baking soda
1/8 tsp salt
28g unsalted butter (cool but softened)
37g light brown sugar
1 tbs golden syrup
1/4 egg (about 12g)
1/2 tsp vanilla extract

Royal icing
70g icing sugar*
5g meringue powder
2 tbs water*
Gel food coloring

* Use more as necessary to get the right flooding consistency (like thickened cream. Peaks in the icing should disappear after 10 seconds). Only the icing for the hay should be able to hold peaks.

Steps:
1. Sift together the first 4 ingredients in a bowl. Cut in the butter until mixture resembles bread crumbs. Stir in the brown sugar.

2. In a small bowl, mix together golden syrup, egg and vanilla extract. Add this to the mixture in step 1. Mix together until a dough forms.

3. Roll the dough between baking sheets until thickness of about 5-6mm. Refrigerate for 30 minutes or until firm. Cut out the cookies using cookie cutters.


As I don't have a bean shaped cutter for baby Jesus, I made a template from baking sheet and cut using a small knife.

4. Place the cut-outs about 1" apart on a baking tray lined with baking sheet. Bake in preheated oven at 180°C for 8-10 minutes or until browned.


Leave on the tray to cool for 5 minutes before transferring to cooling rack to cool. Store in air tight container when completely cooled. These cookies can keep for a few weeks.

5. Prepare the royal icing. Sift icing sugar and meringue powder together. Gradually add water and whisk until you get the right flooding consistency.  I whisked using a hand whisk this time although I normally use the electric mixer. Do take a few minutes to whisk vigorously if you are doing it by hand. This ensures that the icing does not separate when drying on the cookies. Add some sifted icing sugar to thicken the consistency of the icing for the hay.

6. Divide into the various colours. I used ziplock bags as piping bags without piping tips as icing quantity is small. Fitting on piping tips would waste a lot of icing. Just snip off a corner. Be sure to clean the tip often with damp paper towel as the icing may clog up the small opening. Make sure that the icing is dry before adding on another layer where there is layering involved. Here's a picture summary of how I iced the cookies:

Baby Jesus in a manger :)

Star that led the wise men to Jesus :)

Snowflakes...not in the nativity scene I think :p

Pardon the poor photo quality as I did these in a hurry and at night. I sped up the drying process by placing iced cookies in the oven at 70°C with the fan mode on. Make sure that the cookies are cooled before storing in air tight container again.

Do take time to contemplate the true meaning of Christmas :). It's God's way of showing His love for us.

Update: Check out my later post on how to make some of the other characters in the nativity scene ;).


With love,
Phay Shing


Read More »

Wednesday, 5 November 2014

'Running man' Chocolate Chiffon Cake (Low Sugar)


This is a low sugar customized chocolate chiffon cake for a dear friend who wanted a healthy cake for her hubby who loves chocolate and loves to jog. The design is inspired by a silhouette of a man running across the evening sun freely against the skyline of buildings. I miss the days when I can jog freely myself (I loved jogging)! :)


 As she specifically requested for lower sugar, the amount of sugar in this chocolate chiffon recipe is about 66.7% compared to most recipes for the same amount of cocoa. The amount of flour and liquid is also slightly reduced compared to them. She shared that the chocolate chiffon was delicious, not overly sweet and oily like most chocolate cake. They liked it very much that the two of them finished everything! It's also less 'holey' than my older chocolate chiffon cakes. So I'll like to share it here. The trick is some baking soda (thanks to Peixin). The recipe is adapted from Ellena guan whose recipes I love :).

Chocolate Chiffon Cake (Low sugar, for 17 cm chiffon tin)
3 egg yolks
25g sugar
45g vegetable oil
50 ml boiled water
5 ml vanilla extract
60g cake flour
20g cocoa powder
1/3 tsp baking powder
¼ tsp baking soda
A pinch of salt

4 egg whites
45g sugar
1/4 tsp cream of tartar

1. Preheat oven to 160°C (I used steam baking but it's optional).
2. Beat egg yolks with sugar with whisk till pale yellow before stirring in oil, water and vanilla extract.
3. Add in sieved flour, cocoa and baking powder and soda, and whisk till no trace of flour found.
4. Meringue: Beat the egg whites with ¼ tsp cream of tartar till stiff peak, mixing in caster sugar in 2 additions.
5. Fold in the meringue gently into the batter 1/3 at a time.
6. Scoop the batter into the chiffon tin and gently tap the tin on table to remove air bubbles
7. Bake the cake for 15 min at 160°C then 15 min at 150°C and 15 min at 140°C.
8. Invert immediately once out of the oven and leave to cool on cooling rack.
9. Unmould after the cake is cool.

I rarely have pictures of the cut cake, so I got this picture thanks to her! They loved the surprise in the cake! Hehe ^_^


Happy belated birthday to Cheow Kian (and thank you Pei Ping)!

With love,
Susanne

Read More »

Fresh Berry Flavoured and Coloured Iced Gems

My friend requested for some pastel pink and purple iced gems for her friend. And I thought, why not colour them naturally with fresh berries that are full of antioxidants!


I extracted the juice from fresh raspberries for colouring the icing pink, and from fresh blueberries and blackberries for colouring the icing purple. I did this by cooking the berries in a bit of water using low heat without boiling. Once the berries were soft and mushy, I removed from heat and mashed the mixture through a fine sieve to obtain the juice.


You may freeze it in ice cube tray for future use. The black/blueberry juice is a redder shade of purple so you may want to include some blue pea flowers if you can get hold of some. If not, you can leave it as it is or add a teeny dip of toothpick in blue liquid food colouring.

The iced gem recipe is the same as my original one but I will include it here for your convenience.

Plain biscuit recipe (makes about 65 biscuits)
Ingredients:
70g plain flour
1 tsp baking powder
10g icing sugar
A pinch of salt
24g vegetable shortening
27g milk plus more as necessary
1/4 tsp vanilla extract

Berry royal icing*
Ingredients:
140g icing sugar plus more as necessary (divide into 2)
10g meringue powder (divide into 2)
1 tbs raspberry juice plus extra as necessary
1 tbs blackberry and blueberry juice plus extra as necessary
A tiny toothpick dip of blue liquid food colouring (optional)


* If you are unable to get hold of meringue powder, you may prepare royal icing using egg whites.  If you are concerned about using raw eggs, you may dry the iced biscuits in the oven at 90-100°C for half an hour to "cook" the egg whites as well as dry the icing.

Steps:
1. Preheat the oven to 170°C using the fan mode. Line baking tray with baking sheet.

2. Sift together flour, baking powder, icing sugar and salt. Rub in the shortening with your fingertips until the mixture resembles fine breadcrumbs. Add vanilla extract to the milk, then gradually add milk to the flour mixture. Use a spatula to stir until a dough forms.

3. Knead the dough in the bowl until smooth. Roll it out on a non-stick mat or lightly floured work surface until about 3mm thick. Use a round cutter (about 2 cm diameter) to cut out the biscuits.

4. Place the biscuits on baking tray, flatten the tops with your fingertip and bake for 12-15 minutes or until golden brown.


5. Let the biscuits cool on tray for 5 minutes before transferring to cooling rack to cool completely. Store in airtight container or proceed with icing.

6. Sift together icing sugar (70g) and meringue powder (5g). Use an electric mixer to mix well on low speed. Gradually add raspberry juice and increase the speed to medium-high, beat for 5-6 minutes or until stiff peaks form.  Transfer to piping bag fitted with a star stip. Pipe icing onto the biscuit base. Repeat for blue/blackberry flavour. If the icing is too runny at any point, just add more icing sugar.


7. Dry the iced gems in the oven at 80°C for 30 minutes or until dry. Pipe some excess icing onto the baking sheet before drying in the oven.  If it can be lifted off the sheet easily, the icing is dry. Cool completely before storing in airtight container.


My friend and her friend prefer this crunchy biscuit base to the softer, store-bought version. The flavours are pretty mild so if you prefer something stronger, you may have to add some artificial berry flavoured essence into the royal icing.

Update: check out my second attempt for black/blueberry iced gems with blue pea flower added to enhance the colour. The purple is deeper without having to add artificial colouring :).

With love,
Phay Shing


Read More »

Sunday, 2 November 2014

'Little Twin Stars' Rainbow Orange Chiffon Cake


This is a 'Little Twin Stars' Rainbow Chiffon Cake for a pair of siblings celebrating their birthday together! It was such a joy to bake for them =). This is my first big 23 cm rainbow chiffon cake and that which is orange flavored! I was rather apprehensive about baking the rainbow chiffon in a big tin at one go with so many eggs, despite myself having helped many others scale it up. Thankfully it came out fine and the cake was very well-received (thank God)! So I will like to share with you the scaled up rainbow chiffon cake recipe. Hopefully it will help those who have bigger tins and would like to try the recipe (I have also added a note on how to modify recipe for vanilla flavor). The earlier Rainbow Chiffon Cake for a smaller 17 cm tin is here.

Pastel Rainbow Orange Chiffon Cake
Ingredients (for 23 cm chiffon tin)
8 egg yolks (I used Chew's medium eggs)
53g sugar
106g vegetable oil
117g orange juice (or 105g water, 12g vanilla extract)
160g cake flour
Wilton colours

11 egg whites
120g sugar
1/4 tsp cream of tartar

1. Preheat oven to 160°C. Prepare a tray of water at the bottom of the oven (I used the lowest rack to bake the cake). *You may omit steam baking; I like to use it to control my oven temperature rise.
2. Beat egg yolks with sugar with whisk till pale yellow before stirring in oil and orange juice.
3. Next add in sieved flour and whisk till no trace of flour found.
4. Divide the batter into 6 (approx 17 tsp). Mix in respective rainbow wilton colours.
5. Meringue: Beat the egg whites with ¼ tsp cream of tartar till stiff peak, mixing in caster sugar in 2 additions.
6. Divide the meringue into 6. Gently but quickly fold in the meringue into the 6 colours batter. You need to work very fast for the meringue not to deflate.
7. Scoop the pink batter evenly into the chiffon tin. Then repeat with orange, yellow, green, blue and violet respectively. Gently tap the tin on the counter top 3x to remove air bubbles.
8. Bake the chiffon cake for 15 min at 160°C and then at 150°C for 15 mins and 140°C for 30-31 min.
9. Invert the chiffon cake once removed from oven.
10. Unmould the chiffon cake by hand (watch Video tutorial 'Hand Unmoulding Chiffon Cakes for a Clean Finishing'). Gently pull the cake from the sides of the tin at each angle and push the removable base up to unmould the sides. To unmould the cake from the base, gently lift up the cake from the base using hands, repeating this at each angle before turning the base over.

*If you would like vanilla flavor, replace the orange juice with 105 ml water and 12 ml vanilla extract.

*I had been staying away from orange flavor as long baking times often leads to browning. So here I have further reduced the temperature to 140°C and it helps. I have also omitted the orange zest for prettier layers, so the orange taste will be milder compared with zest.

Freshly unmoulded orange pastel rainbow chiffon cake! =) Tall and sweet!


Picture tutorials for the Rainbow Chiffon Cake are now in Creative baking: Chiffon Cakes book.


The 'Little Twin Stars' characters were all made of chiffon cake. The faces were piped on oval bowls similar to Hello Kitty chiffon cakes (replace the bow with pink or blue hair). Everything else was cut out from layer chiffon cakes and brushed on with melted marshmallows. A nice tip we learnt is to further brush the cakes on top with syrup to keep moist =).

Here's a top view of the birthday cake made with lots of heart! =)


Happy birthday to Ethan and Leona!

With lots of love,
Susanne


Read More »

'Cookie Jar' Honey Earl Grey Chiffon Cake (with biscuits inside!)

My friend requested for an earl grey chiffon cake and some earl grey iced gems, so I made an earl grey chiffon "cookie jar" with some earl grey gems inside :).


You may wonder, wouldn't the biscuits turn soft in no time since they are surrounded by a wall of cake? I came up with a fairly airtight homemade "container" that fits in the hole so now you can put other things in the hole, not just marshmellows :). The seal is so good that the biscuits were still crunchy after 4 days!

I adapted the recipe from Susanne's honey earl grey chiffon cake.

White and black layer cakes
Ingredients:
1 egg yolk
5g caster sugar
13g canola/ vegetable oil
14g boiled water
20g cake flour
A pinch of salt
1/2 tsp vanilla extract
1 tsp cocoa powder
1/4 tsp charcoal powder

1.5 egg whites
1/8 tsp cream of tartar
15g caster sugar

Steps:
1. Preheat the oven to 160°C and line two 6" square trays with baking sheet.

2. Make the egg yolk batter. Whisk egg yolk and sugar until pale and thick. Take a few minutes to do this. Add oil and whisk until the consistency is like mayonnaise. Add water and vanilla extract and whisk until well combined.  Gradually sift in flour and salt and whisk until no flour is seen. Separate the batter into two and add cocoa powder and charcoal to one. Add 1/4 tsp of water to thin out the black batter a bit.

3. Make the meringue. In a clean metal bowl, use an electric mixer to beat the egg whites until foamy.  Add cream of tartar and beat until soft peaks form. Gradually add sugar and beat until stiff peaks form. Note that the meringue should still be smooth and not grainy but you should be able to turn the bowl upside down without the meringue falling out.


4. Fold the meringue into the two egg yolk batters in three additions. Do this quickly but gently. Pour into the trays and tap the trays a few times on the table to release air bubbles.


5. Bake at 160°C for 12 minutes. Immediately remove from tray and gently peel the baking sheet off. Cool with another sheet over the cakes. Store in airtight container until ready to assemble.

Earl grey chiffon "cookie jar lid"
Ingredients:
1 egg yolk
5g sugar
13g canola oil
15g honey milk infused with tea*
20g cake flour
A pinch of salt
Tea leaves from 1 tea bag
1/4 tsp vanilla extract

1.5 egg whites
A pinch of cream of tartar
15g caster sugar

* Heat 55g of milk with 32g (1.5 tbs) of honey with low heat in a small saucepan. I used lavendar honey as lavendar goes well with bergamot. Stir until honey is dissolved and milk is hot. Pour hot honey milk into a bowl/ cup to steep 3 earl grey tea bags (or 4 if you prefer stronger earl grey flavour) for 5 minutes. Squeeze out as much milk as you can from the tea bags and set aside.

Steps:
1. Prepare a round silicone ice cube tray (for knob) , a metal or glass bowl (for lid) with flat bottom and a 6" square tray (I used a round pan. This is for the hearts decoration). Line the tray with baking sheet. Preheat the oven to 160°C. Set the rack to second lowest position.

2. Follow steps 2-4 in the above section, omitting the cocoa and charcoal but adding in tea leaves from a tea bag.


3. Place all three in the oven and bake for 15 minutes, but continue baking the metal bowl for another 8-10 minutes at 150°C. Invert ice cube tray and metal bowl after removing from oven to cool. Carefully unmould by hand when cooled. Remove and cool the flat layer cake in a similar way as the above section.

Earl grey chiffon cake (15cm chiffon tin)
Ingredients:
2 egg yolks
8g caster sugar
27g canola oil
29g honey milk tea
40g cake flour
A pinch of salt
Tea leaves from 2 teabags (or 3 bags if you prefer more intense earl grey flavour)
1/2 tsp vanilla extract

3 egg whites
1/8 tsp cream of tartar (less is used here because of the acidic nature of tea and honey)
28g caster sugar

Steps:
1. Preheat oven to 160°C. Prepare cake strips to wrap around the wall of the chiffon tin. I made mine from wet newspaper wrapped in aluminum foil. Oven rack should be at second lowest position.

2. Prepare the batter in a similar way as above.  Bake at 160°C for 15 minutes followed by 150°C for 30-35 minutes. Reduce baking time by 5-10 minutes if you are not using cake strips.

3. Immediately invert to cool. Carefully unmould by hand when cooled.

Nice and tall!

Assembly
Make the airtight chamber using clingwrap (not shown), stiff plastic sheet for wrapping around cakes (I bought from Phoon Huat) and a plastic screw cap of bottle (I have some lying around from health supplement bottles). Roll the plastic sheet into a cylinder that fits nicely in the hole of the cake and the screw cap. Use some tape to secure the cylinder. Cover the base of the cylinder with cling wrap and insert into the cake.

Place the biscuits in and cover with screw cap. Place the lid and knob on. You don't have to stick the lid on but use melted marshmellow to stick the knob on.


Use cookie cutters to cut out designs from the flat layer cakes and stick them on with melted marshmellows. I must confess that I was lazy and used marshmellow creme again. While it worked for smaller and thinner pieces of cake, it didn't work for the larger pieces and I used (gasp!) peanut butter! Lesson learnt. I will be hardworking and use melted marshmellows next time for really strong "glue". But hey, peanut butter works pretty well! And it was within reach.


My friend loved the look of the cake and couldn't bear to eat it :p. But when she finally did, she found the cake light and moist even after 4 days! I was a bit apprehensive that the bulk of the cake would be consumed after 4 days of storage in the fridge as chiffon cakes tend to dry out in the fridge. Keeping it cling wrapped and stored in a ziplock bag before refrigerating the cake seemed to help. I think the honey also helped to keep the cake moist.

With love,
Phay Shing


Read More »

Thursday, 30 October 2014

Animal Bus Rainbow Chiffon Cake

"The wheels on the bus goes round and round... round and round... round and round.." =)

This is a song loved by many children including mine. This animals bus rainbow chiffon cake is for a boy who's crazy over "the wheels on the bus" song with cute animals. The animals are peaking out of the windows of the happy school bus! Elephants, pigs, lambs and even pandas are going "all through the town"!


For those who are familiar with my work, you may recognize the rainbow chiffon cake and the school bus chiffon cake which are both creations that reappear in my bakes. My bus (and vehicles) always comes with a smile LOL!

For my details on the school bus, you may go to my previous post vanilla bus chiffon cake. The base chiffon is a 7-colour pastel rainbow chiffon cake which I have also shared previously. It it an adapted version of the original pastel rainbow chiffon cake with a final layer with blueberry juice. You can find the recipes in the previous links. The animals were all cut out from layer vanilla chiffon cakes (white, black, grey and pink) and glued on with melted marshmallows. Needless to say, they were quite a bit of work and I felt I had to take a long break after that :p. But I'm really thankful the kids loved the animals and the cake was well-received!

With lots of love,
Susanne


Read More »

Miffy and Hello Kitty Lotus Paste Steamed Buns (莲蓉包)

I still have some lotus paste leftover from Mid-Autumn Festival so I made a small batch of cutesy baos for my kids :). All naturally coloured!

Hello Miffy! Hello...Kitty! 

Check out the awesome fluffiness!


It's a challenge to make these with kids to take care of because of the proofing times and steps involved. I experimented with doing the first proofing in the fridge until I was free to deal with the dough. You should proof the dough in a warm place whenever possible but I was hard pressed for time. I didn't stick to the proper proofing times and roughly kept track of the second proofing time before rushing the baos into the steamer. So I was pleasantly surprised that the baos were very soft and fluffy and had no hint of alcoholic taste (an indicator of overproofing). It's a pity the mooncake filling as bao filling didn't taste so great :p. My kids would have preferred liu sha (salted egg custard) filling but they had so much fun eating the cute, soft and fluffy baos! So feel free to use any savoury or sweet filling that you like. Just remember not to be over-generous with the filling if you are making cute baos.

So here's the bao recipe for busy people!

Ingredients (makes 6-7 Miffy/ Hello Kitty baos):
Dry ingredients
110g Hong Kong bao flour plus extra for dusting
20g corn flour
20g icing sugar or caster sugar
A pinch of salt
1/10 tsp baking powder (double acting or regular is fine)
3/4 tsp instant yeast

Wet ingredients
70g water
8g vegetable shortening

Colouring/paint
1/4 tsp Tumeric powder (or yellow gel food colouring)
1/2 tsp Beetroot powder dissolved in a few drops of water (or red gel food colouring)
1 tsp egg yolk
1/8 tsp charcoal powder (or black gel food colouring)

90-100g lotus paste (divided into balls of 15-17g)

Steps:
1. Mix all dry ingredients except baking powder together in a bowl. Take 1/2 tsp of water from the 70g batch and dissolve the baking powder in it.

2. Make a well in the center of the dry ingredients and pour the water in. Stir with a spoon until a sticky dough forms.
 
3. Pour the dough onto a non stick mat and gradually knead in baking powder wth water. Gradually knead in shortening.  Continue kneading until dough is smooth and elastic and passes windowpane test. About 25 minutes total hand kneading time. You may choose to use an electric mixer to do the job but you will have to triple or quadruple the recipe.

4. If you have time, let the dough proof in a lightly greased bowl covered with cling wrap until double in size or about 30 minutes in hot Singapore. I placed my dough in a measuring cup with cling wrap and placed the dough in the fridge immediately to proof. This helps me to estimate how much more the dough needs to proof if necessary.


5. Punch down the dough and knead a few times to expel all the trapped air. My dough proofed to double its size in the fridge over 3 hours! So I didn't need to proof it further. Divide the dough in the following manner:
Miffy/ Kitty head: 28-30g
Miffy ears: 4g each
Red/pink dough: 12g
Yellow dough: 4g
Extra plain dough for Kitty ear supports: 5g

Colour the dough yellow with tumeric or gel food colouring. Colour the dough red with beetroot juice or gel food colouring. If you have to rush off somewhere again like me, you can colour the dough and chuck it back in the fridge after wrapping them up.


6. To make Miffy, simply wrap a ball of lotus paste with 30g of plain dough, placing seam side down onto a small piece of baking sheet. Lightly dust your work surface with flour. Roll out 2 long ears and place one edge slightly under the wrapped dough. Loosely cover with cling wrap and proof for 40 minutes.


7. To make Kitty, please refer to Fong's Kitchen for the lovely tutorial. I snipped Kitty's ears a little too high up on the ball of wrapped dough so the shape is a little wrong. Snip the ears slightly towards the back of the head instead. Remember to add a bit of plain dough to support the ears at the back. Add on the nose and ribbon and proof it in the same way as Miffy.


8. Steam on high heat for 6 minutes. Turn off the heat and let it sit in the steamer/ wok for 2 minutes before taking the baos out. Mix the charcoal into the egg yolk. Use a chopstick to print on the eyes, dragging it downwards a bit to create an oval imprint. Use toothpick to draw on Miffy's mouth and Kitty's whiskers.  Return to steam on high heat for another 1-2 minutes. Let it sit in the wok covered for another 2 minutes before taking the baos out.

Enjoy while it is hot! If you are not consuming immediately, keep them in airtight bag or container and freeze after they have cooled completely. Resteam for 15-20 minutes before eating. They will taste almost as good as freshly steamed.

With love,
Phay Shing

Read More »

Monday, 27 October 2014

Earl Grey Iced Gems

My friend who is a fan of anything Earl Grey flavoured requested for iced gems with this flavour. I made earl grey iced gems a while ago but this time, I left them in their natural colours and used more teabags for a stronger bergamot fragrance :).


The recipe and steps are about the same as my previous earl grey gems post but I will put it here for your convenience.

Plain biscuit recipe
Ingredients:
70g plain flour
1 tsp baking powder
10g icing sugar
A pinch of salt
24g vegetable shortening
27g milk tea plus extra as necessary (infuse 2 earl grey tea bags into 50ml of hot milk for 5 minutes.  Squeeze tea bags to extract as much flavour as possible.)
1/4 tsp vanilla extract

Earl grey royal icing recipe*
Ingredients:
140g icing sugar plus extra as necessary
10g meringue powder
2 tbs warm tea plus extra as necessary ( steep 2 earl grey teabags in 50ml of hot water for 5 minutes. Squeeze the teabags to extract as much tea as possible. Reserve one teabag.)
1 bag of earl grey tea leaves

* If you are unable to get hold of meringue powder, you may prepare royal icing using egg whites.  If you are concerned about using raw eggs, you may dry the iced biscuits in the oven at 90-100°C for half an hour to "cook" the egg whites as well as dry the icing.

Steps:
1. Add vanilla extract to the milk. Set aside to cool if milk is hot.

2. Preheat the oven to 170°C (fan mode).
Line baking tray with baking sheet.

3. Mix all dry ingredients together and sift into a large bowl. (You may double the recipe since this is a small batch). Rub in the shortening with your finger tips until it resembles fine breadcrumbs.

4. Gradually add in the milk until you can form a ball of dough. You won't need to use all 50ml of it. Roll it to thickness of about 3mm. Use a round cutter to cut out circles of about 2cm in diameter (or any size that you have).

5. Place the cut out dough on baking tray. They can be placed pretty close together as the dough will puff up and not expand much sideways. Press it down a little in the middle. Bake for 12-15 minutes or until lightly browned. Cool on tray for 5 minutes before transferring to cooling rack.


6. Prepare the royal icing. Sift icing sugar and meringue powder into the mixing bowl.  Use an electric mixer to mix on low speed for a minute. Gradually add warm tea and increase the speed to medium high, scraping the sides of the bowl when necessary. Add tea leaves from one tea bag and continue mixing for a total of 5-6 minutes or until stiff peaks can hold and the mixture turns pale.

7. Transfer the royal icing into  piping bag fitted with a star tip. Pipe the signature dollop of icing on each biscuit. Dry the iced biscuits in the oven at 70-80°C using the fan mode for half an hour or until the icing is dry. You may pipe extra icing onto the baking sheet beside the iced bicsuits on the same tray as a test to see if the icing is dry (as you can see, I tried to pipe some earl grey rosettes). If you can easily lift the icing off the baking sheet, it is dry. Let the biscuits cool completely before storing them in airtight container.

All snuggly packed!

So glad that my friend loved the biscuits! Feedback was the biscuit base is nice and crunchy and the icing is not too sweet. Earl grey fragrance is there without being overwhelming. But for earl grey fans, stronger earl grey flavour is always a welcome. If you would like to increase the earl grey flavour, add another teabag worth of tea leaves into the icing although the texture may be a bit more sandy.

Checkout a variation of these Earl grey gems with salted caramel!

With love,
Phay Shing

Read More »

Sunday, 26 October 2014

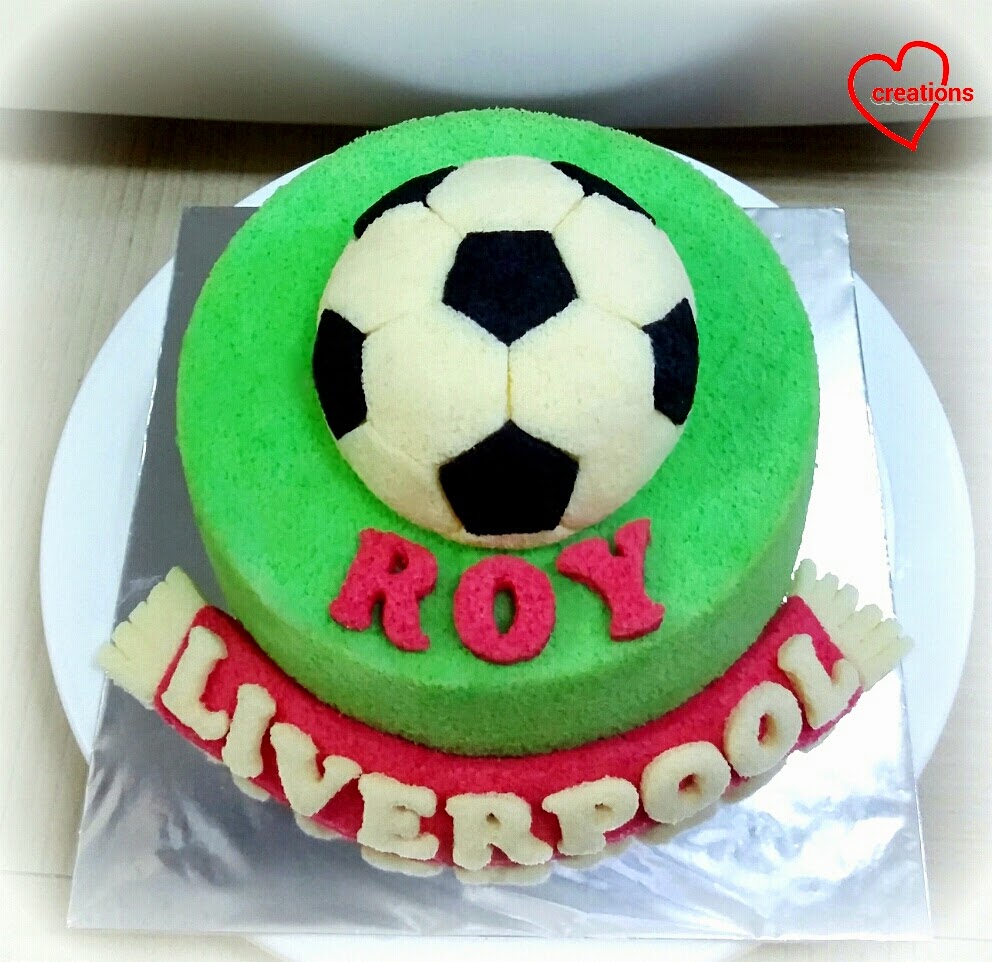
Liverpool Football Vanilla-Pandan Chiffon Cake


This is a Liverpool FC-themed chiffon cake for my friend's hubby who is a Liverpool fan! The colour theme is hence green and red like the club logo and decorated with a football on a green field with a Liverpool red scarf :).

I wasn't confident with painting balls so I decided to cut hexagons and pentagons from layer vanilla chiffon cakes (black and white) and paste it on a ball vanilla chiffon cake after studying how the footballs looked (using melted marshmallows). The scarf was also cut from a swissroll-type layer chiffon cake, with tapering at the ends. 

The green base is pandan chiffon cake similar to Olaf pandan chiffon cake (scroll to the bottom). I tried Bake King pandan paste this time (in addition to fresh pandan juice) and found the green colour a lot brighter than the Redman brand.

Thank God my friend shared her nieces and nephew all loved the cake!

Happy blessed birthday to Roy!

With love,
Susanne


Read More »

Friday, 24 October 2014

'寿' Chocolate Coffee Chiffon Cake with Mocha Cream

My friend requested for a small chocolate coffee cake for her mum's birthday with a longevity peach theme so I made this three-layered chocolate coffee cake with mocha cream and snowskin "fondant" decorations :).


Yes, there's a peach. A tiny one for the "点" :p. But I made lots of peach blossoms to accompany it.

I adapted the recipe for the sponge cake and cream from Joy of Baking.

Recipe for chocolate coffee cake (makes one 6" round cake and one 10" flat layer cake*)
Ingredients:
3 egg yolks
37g caster sugar
60g canola oil
90g cake flour
20g cocoa powder (I use Ghirardelli)
1 tsp baking powder
1/8 tsp baking soda
1/4 tsp salt
80ml coffee (I dissolved 1 tsp of UCC instant coffee powder in 80ml of hot water. Set aside to cool to room temperature.)
10g fresh milk
3/4 tsp vanilla extract
1 tsp kirsch (optional)

4 egg whites
1/4 tsp cream of tartar
68g caster sugar

Steps:
1. Preheat the oven to 160°C and place the rack at the second lowest position.  Line the square tray with baking sheet. If your 6" round tin has no removable base, line the base with baking sheet too. Mine was removable so I didn't line it. Wrap the 6" tin with cake strips if you wish. I wrapped mine with homemade cake strips made from wet newspaper wrapped in aluminum foil. If you don't use cake strips, reduce baking time by 5-10 minutes.  *Alternatively, you may bake three 6" round layer cakes if you have enough pans. Adjust baking time accordingly. 

2. Prepare the egg yolk batter. Whisk egg yolks and sugar until pale and all sugar has dissolved. Add oil and whisk until thick like mayonnaise. Add coffee, milk, vanilla extract and kirsch. Whisk until well combined. Gradually add in sifted flour, cocoa powder, salt, baking powder and baking soda.

3. Prepare the meringue. In a clean metal bowl, beat egg whites until foamy. Add cream of tartar and beat unil soft peaks form. Gradually add in sugar and beat until stiff peaks form.

4. Fold in the meringue into the egg yolk batter in three additions.


5. Scoop enough batter to line the base of the square tin and pour the rest slowly into the 6" round tin. Bake the thin layer cake for 10 minutes. Immediately remove from tray and carefully peel off the baking sheet. Cool completely with another sheet over it. Bake the 6" cake at 160°C for 15 minutes followed by 150°C for 25-30 minutes or until the cake springs back when lightly pressed. Remember to adjust baking time accordingly if you are not using cake strips. Leave to cool on cooling rack before unmoulding by hand or spatula.


Slice the cake carefully into three layers with a serrated knife. Double wrap each layer in cling wrap and freeze it. Rigid cakes are easier to assemble with cream.

6. Carefully cut the layer cake to form the "寿" character (it means longevity in Chinese). Double wrap it in cling wrap tightly and freeze it. It will be easier to place a thin rigid cake onto the assembled cake than a soft floppy one. You may brush some syrup on the cake to prevent it from being too dry. But since it's a decorative piece you may omit this step.


I couldn't resist eating the trimmed portions of the 6" cake (There was a small dome as it was a tall cake. Baking flat layer cakes won't have this issue.) and couldn't stop eating! And this is coming from me, a non-chocolate fanatic. The cake is so fragrant, flavorful, soft and fluffy!


Recipe for snowskin decorations
Ingredients:
36g kou fen (cooked glutinous rice flour)
36g icing sugar
12g vegetable shortening
60g water
1/4 tsp pandan flavouring
Cocoa powder
Pink and green food colouring (if you are using gel food coloring, dissolve it in a bit of water)


Steps:
1. Make the snowskin. Sift together sugar and kou fen into a bowl. Combine water, pandan flavouring and shortening in a small saucepan. Heat over low heat and stir until shortening melts. Pour into flour mixture and stir with a spatula until a dough forms. Leave it to rest for 15 minutes to cool. Knead until smooth. Divide the dough up for colouring.

2. Colour the pieces accordingly with food colouring. Tools I used are a flower cookie cutter, fine brush for painting the flowers, butter knife to make imprints on the flowers and for cutting the stems. Dust the dough with a bit of kou fen if it gets too sticky to work with.

3. Store the pieces in air tight container in the fridge until ready to assemble. You may make this a day in advance.


Recipe for mocha cream
Ingredients:
1/2 tsp vanilla extract
1/2 tsp kirsch (optional)
75g icing sugar
22g cocoa powder
3/4 tsp instant coffee powder
1.5 cups cold heavy whipping cream (I used a dairy cream with stabilizers added so it wasn't necessary to further stabilize with gelatin.)

Steps:
1. Add all ingredients except cream in a large mixing bowl. Add 3 tbs of cream and mix well with a spatula/ whisk. Gradually add the rest of the cream, mixing well with each addition.
2. Use an electric mixer to beat the chilled cream until just stiff peaks form. Place the mixing bowl in an ice bath to keep the cream cold.


Cake assembly
1. Place one frozen 6" layer on a cake board mounted on a turntable. Apply a layer of cream on top, letting some cream fall over the edge of the cake. Place another frozen cake to sandwich thr cream, pressing it down firmly and let any excess cream bleed out from the sides. Repeat until all three layers are assembled.

2. Place a large dollop of cream on top of the cake and use a large offset spatula to press the cream down. Cover the sides with cream. Many experts recommend crumb coating the cake first before applying another layer of cream.  I intended to do that but the first layer of coating stayed so well and the cream was so easy to work with that I just proceeded with creaming the whole cake!

3. Add on the snowskin fondant decorations carefully. I got a bit careless since it's my first time decorating a cake this way so I accidentally messed up bits of the cream. Oh well :p.


I had leftover layer cake and some cream so I made a "plank" cake!


Preliminary test for log cake :p.


Hubby and my parents sampled this and said the flavour of cake with cream is superb without being too sweet. My mum took the rest of the leftovers to share with my extended family and immediately booked me for a logcake with this flavour!

Update: My friend said everyone found the cake beautiful and her mum liked the taste of it. The cream was good. Opinion for the sponge cake was divided though with half of the family liking it and the other half not. I suspect that I didn't wrap the cakes tightly enough before freezing so the texture was affected, quite different from what it was freshly baked. I might also bake 3 separate thin layer cakes in the future instead of one tall cake sliced into three. Great learning experience for me :).

With love,
Phay Shing

Read More »