Wednesday, 9 March 2022

3D Bunny Mocha Macaron Class

I have made cat and corgi macarons in 3D form. I thought why not make some 3D bunnies too! 


This 3D bunny mocha macarons class is with Artz Baking and Culinary studio. Please click on this link for more details or to register. 

 
I decided to include more variations in the 3D design for different postures. 


Swiss meringue method will be taught including how to split the batter into 3 different colours, how to pipe characters and decorate with edible marker and royal icing. A simple mocha ganache will be taught. 

I hope these cheerful bunnies put a smile on your face as they did to mine 😊. 


With love, 

Phay Shing 

Read More »

Monday, 7 March 2022

Rainbow Angel Food Cake


(Recipe) Rainbow Angel food cake using natural coloring from @suncorefoods!
My first time trying out deco-angel food cake. Very glad it worked out! Texture is light and airy.

Rainbow Angel Food Cake
1 cup cake flour (120g)
¾ cup caster sugar (150g)
½ tsp (2g) salt

10 egg whites (360g)
1/3 cup caster sugar (150g)
1.5 tsp cream of tartar 96g)
2 tsp vanilla extract (10g)

@suncorefoods cerise prickly pear, yellow safflower, blue spirulina, jade matcha, ebony carrot for the rainbow colors

Pulse cake flour with ¾ cup caster sugar and salt till fine and powdery.
In a clean mixing bowl, whisk egg whites with cream of tartar till frothy. Add in ¾ cup caster sugar gradually and whisk till firm peaks. Beat in vanilla extract till just combined.
Fold the powdery dry mixture into the meringue in 3 additions. Before the mixture is completely folded, divide the mixture into 5 and fold in the rainbow color powders (I used blue and yellow to make green).

Pipe rainbow colored batter into a 6” square tube pan, as well as heart-shaped and round baking cups to make the ‘lollipops’. Bake the tube pan at 150C for 50+min and the cupcakes for 18min. Pour leftover yellow batter into cake pop molds to bake the ‘unicorn’ (18 mins).
Assemble the rainbow angel cake using marshmallow glue. Enjoy! =)

With love,
Susanne

Read More »

Tuesday, 1 March 2022

Animal S'mores Class

 I am finally venturing into having character marshmallows as class material! I have stayed away from making marshmallows because to me, they were nothing more than candies with single flavour and texture profile. But when it comes to marshmallows as part of S'mores, it is a different thing altogether! When eaten freshly toasted, S'mores are an explosion of flavours, textures and aroma! The lightly spiced sweet and salty soft Graham cracker, topped with rich chocolate, followed by sweet toasted marshmallows that are crisp and caramelised on the outside, soft and gooey on the inside.... Mmmm-Mmmm!! I am not a fan of sweets but this is really good and addictive!


The second picture shows before and after toasting the S'mores. The caramel flavour is more intense when it is this browned! 

We will be making all the components of S'mores from scratch. The cracker, chocolate layer and animal marshmallows. Marshmallows typically takes some time to set and require a bed of cornstarch and/or powdered sugar as base for piping and dusting. The marshmallows in this class will be piped directly on the chocolate covered cracker and on a bed of cornstarch. We won't be toasting the S'mores in class as it needs an overnight set before toasting. Enjoy it at home when you are ready to eat them! 

Here are more pictures of the animal S'mores that I made where the marshmallows have not been toasted yet.


Please click on this link for more information or to register for this class happening in April. 

Please click on this link for the re-run of this class on 7th May.


Wirh love, 

Phay Shing


Read More »

Monday, 28 February 2022

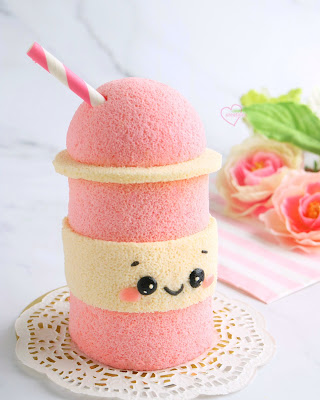
Strawberry Latte Chiffon Cake


I love you a Latte!! ❤🍓 
Does she make you smile? This creation was inspired by my favorite strawberry yakult hehe. Hope you like it too! 

Strawberry Latte Chiffon Cake 
Ingredients: 
2 egg yolks 
20g milk 
30g strawberries 
30g vegetable oil 
40g cake flour 
1/8 tsp strawberry flavor/emulco 
@suncorefoods cerise prickly pear for the color 

2 egg whites 
35g caster sugar 
¼ tsp lemon juice 

Blend strawberries with milk and sieve out the seeds. Combine egg yolks with oil, strawberry milk, flavor and mix well. Whisk in cake flour and pink color powder (ceries prickly pear) till well combined. 

In another mixing bowl, whisk egg whites with lemon juice and sugar till firm peaks. Fold the egg yolk batter into the meringue gently and bake in 2 baking cups and a dome mold at 140C for 30 mins.
Stack the pink cupcakes and dome mold and secure with marshmallow glue. Decorate with white sheet cake and chocolate. Insert a straw in and enjoy! =)💖 


With lots of love,
Susanne
Read More »

Thursday, 24 February 2022

3D Rainbow Cloud Macarons (video tutorial)

Some bakes come about unplanned and this was one of them! I had leftover batter from a bake and therefore a chance to try out a technique by Melinda of missmelindasmakery (Instagram account) to create these 3D rainbow cloud macarons! 


Usually a strip of rainbow sour candy is used for the rainbow. But I created this popular treat using macarons only! 

Years ago back in 2016, I explored piping macaron batter on non-flat surfaces and tried 2 things. 1. Piping on silicone hemisphere molds. 2. Piping on rolled up parchment paper. With the first option, I have since made a variety of things like teacups, various animals including a hedgehog that appeared in my Macaron Basics book, hot-air balloon, solar system just to name a few. But I couldn't see what good I could do with the second option so I didn't develop that area. Melinda took it further by piping batter on flat parchment paper surface and molded the batter on a pre-formed contoured surface before baking. This opens up many possibilities and I was excited to try once again but didn't have the opportunity until now. 

This bake looks deceptively complex but is actually very simple and you can make do without a template like me too although it would be neater to use a template for the clouds. I made a short video of the process of making these! 


Some tips for successful 3D rainbow-making: 

1. Use an underfolded batter to pipe if you wish so the batter doesn't pool at the foot of the rainbow when you place the parchment over the rolled up foil. 

2. If you are using regular macaron batter like me, wait a few minutes or until a very thin membrane forms at the surface of the piped batter before transferring the parchment on top of the foil. Don't wait too long or the piped batter will crack when you place the parchment over foil. Don't wait for too short a time either or the batter will start pooling at the foot of the rainbow. 

3. Wait until the batter is completely dry to touch before baking. 

4. Bake as you would regular macarons in terms of temperature and time. 

5. Cool completely and remove the rainbows by  gently pressing the parchment away from the base of the rainbow. Don't rush this process or you may break the rainbows by accident. If they are really stuck, bake longer in the oven at a low temperature that doesn't brown it further, about 110-130C.

I used my regular swiss meringue method recipe for the shells and made a simple but yummy lemon white chocolate ganache for filling which I will share here. 

Lemon white chocolate ganache 
Ingredients:
60g unsalted butter
80g white chocolate, finely chopped or use chips 
1 lemon zest
20-25g lemon juice (according to taste) 
A pinch of salt

Feel free to use more butter and a little bit more lemon juice according to taste and your climate. It is very warm in Singapore so the fillings I make tend to be firmer. 

Steps:
1. Place all ingredients except zest and juice in a heatproof bowl. Melt over hot saucepan of water slowly without the bottom of yhr bowl touching the water. Do not overheat. Do not panic either if the mixture splits. Just let it cool down at room temperature and whisk everything together. It will become smooth and silky again. 

2. Add lemon zest and mix well. 

3. Add lemom juice 1 tsp at a time and mix well with each addition. Add as much or as little juice as you like according to taste, but add it in a bit at a time. You should get a smooth and silky ganache. 

4. Transfer to piping bag and fill the macaron shells. Store in airtight condition for at least 24h before consuming. 

This timeless bake is suitable for a variety of occassions like St Patrick's Day, Easter and of course birthdays and weddings if you wish! 


Follow me on Instagram at phay_shing as I am more active there and post more stuff there than on the blog and Facebook.


With love, 

Phay Shing

Read More »

Tuesday, 22 February 2022

Cocomelon Chiffon Cake


Cocomelon chiffon cake! Made this cake sometime back but realized forgot to post here in the blog. I may be designing a class with watermelon soon so was looking for the pictures. 
I am a big fan of watermelons so many of my creations have been inspired by them. 
Have a blessed week! 
Love, 
Susanne


Read More »

Wednesday, 16 February 2022

Eeyore Plushie Marshmallows

I venture into the realm of homemade character marshmallows not because I planned to, but because there is a request for me to teach character marshmallows in a baking studio. I didn't plan to master marshmallows because to me, they are just nothing more than a candy that is one-dimensional in taste and texture. But when I discovered homemade S'mores from scratch, it is a different story altogether! 

And so for a practice run at home, I decided to try making something that I have been holding off for the longest time --- Eeyore plushie! This plushie (or rather plushies since we have a few of them) has been sitting on our bed for a long time and I have been toying with the idea of making it into a bake/food but haven't found the right medium for it until now. Presenting my squishy Eeyore marshmallows! 


See how squishy it is in this video! 


This isn't class material by the way. Just a practice run for me to challenge myself to create something slightly more complex. 

I have to thank two very talented bakers for sharing their experiences with me on making character marshmallows. Please check out these two Instagram accounts (Gloria of miscellaneousmao and Amy of cookingwithamyy) to see their amazing work! 

I have to stress that a lot of how the marshmallows turn out has to do with practice. I have the experience of working with gelatin, Italian meringues and piping meringue cookies and choux pastry characters. The skillset I gathered from all that can be applied here.

I did a quick survey of the internet and find that character marshmellows are best made using Italian meringue. There are marshmallows made without egg whites but those will be harder to work with especially when you have multiple colours and more complex shapes. 

Gloria kindly pointed me to Claire's blog post on making cute character marshmallows. Please click on this link to view her very helpful and detailed post! I converted to grams so I don't have extra washing to do from measuring cups🙈. 

I did minor tweaks to the recipe and it works well. A few tips I would like to share (without revealing too much of my class material and what the experts mentioned that they would like to keep to themselves for the time being) that you may find helpful:

1. Use only cornstarch for dusting if you live in humid environment like me. Some people use icing sugar or a mix of cornstarch and icing sugar. 

2. Don't use piping tips. That way you can safely microwave the piping bag of marshmallow if necessary when it becomes too firm to pipe nicely. 

3. Use cookie cutters to mark out the area that the character is supposed to cover in your tray of cornstarch. That way you have reference points to indicate how you should pipe when you don't have a template. Unlike macarons or choux pastries, piping character marshmallows require you to do it more or less by freehand. Having reference points really help a lot to keep your characters more or less the same size and shape. You can see my example below. I used a rectangular cutter to mark out the spaces to pipe. 


4. Be generous with the dusting below the marshmallow. All experts stress this and I have to agree. It's a pain to try to release marshmallow stuck to your piping surface. 

Any for tips specific to this Eeyore plushie? Yes! Use a damp toothpick to mark out the indent on his face after the marshmallow has set a little but before dusting. I tried painting a faint line along with an indent, just an indent and without a line down the face at all. See the examples below. 


I asked my kids and hubby for their opinions and they all agree that with the indent alone looks the best. Without the line down the face in whatever form just isn't Eeyore anymore. 

Most people float their marshmallows in hot chocolate but the only beverages I drink are water, unsweetened teas and soup. I prefer them as S'mores instead, which happens to be my class material for character marshmallows! Stay tuned for my next blog post on my character S'mores class! The combination of lightly spiced, sweet and savoury Graham cracker, rich chocolate layer, and soft gooey marshmallow on top that is toasted until caramelized and crisp at the top 😍😍😍. The flavour explosion and combination of textures is amazing!! Here is Eeyore before and after toasting! 


I placed a small bar of chocolate under Eeyore before toasting like regular S'mores. We have a good laugh whenever we toast an Eeyore on homemade Graham cracker 😂. My kids love them and have fun eating even though they are in their early teens now. I use my small and cheap home oven toaster so the browning is uneven but it still tastes yummy! You may use a blowtorch if you have one. 


Follow me on Instagram @phay_shing if you would like to see more of my work as I am more active there than on Facebook and I don't post all my work on the blog either. 


With love, 

Phay Shing

Read More »

Saturday, 12 February 2022

Caramelized Banana Cat Eclairs

Besides the sausage dog eclairs, you can also make eclair cats! 


These eclairs with crunchy craquelin come in one of the most delectable flavours I have had for choux pastries - - - caramelized banana diplomat cream! 


It may not show up in the picture but this is really super delicious! The aroma and taste of caramelized banana in cold and creamy diplomat cream, eaten along with crunchy choux pastry... Mmmm-mmm!!! 😍😍😍 Words fail me when I need to describe this! 

Come and join me for this class with Artz Baking and Culinary Studio in April. Click on this link for more details and to register. 

Do note that I focus on techniques of basic choux and especially how you should apply it to eclairs as eclairs have some things you should be more careful about than making regular choux buns. And of course I will cover how you can decorate and how you should store or serve such that you can enjoy it crisp on the outside, cold and creamy on the inside. 


With love, 

Phay Shing

Read More »

Monday, 7 February 2022

Hidden Message Chiffon Cake


The best way to say I ❤️ you this Valentine's day? With cake of course!🥰 


Teaching this Hidden Message Chiffon Cake live on Howtocakeit this Sat morning 12th Feb 9am, SGT (or 8pm US time).  

Video tutorial will be available for unlimited streaming after that too, with access to workbook and private FB group for discussion! 

Link to join here

With love, 
Susanne

Read More »

Saturday, 5 February 2022

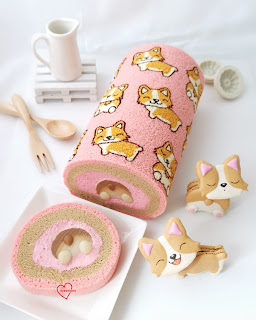
Corgi Earl Grey Strawberry Swiss Roll

I am trying to make time for other bakes this year, not just macarons and choux pastries. For a start, I decided to create a corgi swiss roll inspired by my 3D corgi macaron design! 


Everyone in my family said it looks like a corgi ran into the roll cake and got stuck😂. Once you see it, it is difficult to unsee! Here's a top view of the cake. 


I made it almost dairy-free as my friend's family cannot tolerate dairy. Trace amounts is ok so I used a little butter in the strawberry diplomat cream. 

This cake is made of Earl Grey strawberry vanilla chiffon sponge, strawberry diplomat cream made from lots of fresh strawberries (see the specks of red in the cream) and an Earl Grey vanilla honey oat milk agar agar jelly in the middle of the roll. 

This bake begins with making the strawberry pastry cream, the Earl grey agar and vanilla honey oat milk agar. You may refer to this recipe for the strawberry diplomat cream. For a dairy free version, use non-dairy whipping cream and use a plant-based milk. I used soy milk. I also added the whipped cream into the pastry cream just before assembling the cake. 

To make the corgi butt shaped jelly, I made my own customized cookie cutter from a DIY kit. You may use some condensed milk or evaporated milk if you wish. Adjust any sugar added according to type of milk you use and according to taste. The agar is quite a firm one as I wanted to be sure the jelly cutouts can keep the shape. You may reduce the amount of agar powder used if you prefer softer filling, or use fresh strawberries as the filling. You may use gelatin instead of agar but it has a softer bite than agar and melts more easily in hot Singapore so it will be more challenging to cut out shapes. 

Earl grey and Vanilla honey oat milk jelly

Ingredients (makes two 7x7" trays) :
Earl grey agar
500g oat milk (or any milk of preference) 
6 Earl grey teabags (adjust according to strength preference ) 
6g agar agar powder
Sugar (according to taste. I didn't add as oat milk is slightly sweet) 

Vanilla honey agar
440g oat milk
40g honey (or according to taste)
1 tsp vanilla extract
6g agar powder

Steps:
1. Boil 500g oat milk in saucepan and steep 6 teabags for 10 minutes. Squeeze all the tea out from the bags. Let it cool to room temperature before adding agar powder and sugar (if using). 

2. Bring all the contents in saucepan to roiling boil while stirring constantly. Keep it boiling for about 1min (continue stirring!) before removing from heat and pour into mould/tray lined with teflon sheet. I used 7x7" trays for setting the agar. You may reserve about one tablespoon for piping the corgi tails on a separate teflon sheet or parchment paper and let it set. 

3. Prepare the vanilla honey agar in a similar way. Transfer about 1.5 tbs into piping bag to pipe out the corgi feet. I used my macaron template for piping the agar corgi tail and feet. Store set tails and feet in airtight container in a single layer until ready to assemble. 

4. Set the two square trays of agar in fridge until firm, at least an hour. You can prepare this a day in advance. 

5. Make customized cookie cutter and cut out the corgi butt shape. I glued the different coloured jelly together using freshy made transparent (plain) agar as glue but with a lower powder to liquid ratio (1/4 tsp agar powder to 100g water). Keep all assembled pieces in a single layer in airtight condition in fridge while preparing the chiffon sponge. 

Cutting out the agar pieces with customized cutter

This is the second time I am using Keem Ooi's technique and recipe for patterned swiss roll. You may see my first attempt over here. Please check out her Instagram page (Keempossible_2) and drop her a DM if you are interested in purchasing her recipe. I just tweaked it to flavour the sponge layers with strawberry paste and earl grey to flavour and colour the cake without additional food colouring. I used a 10x12" pan instead of 9x11" as suggested by Keem.  I added about 1/2 tsp strawberry paste and used 2 earl grey teabags for the pink and brown sponge layers respectively. 

Freshly baked patterned chiffon sponge

Cooling the sponge in rolled up position helps to prevent it from cracking. 

Are there any additional tips I would like to highlight? Yes! Make sure the meringue for your patterning batter is whipped till really stiff but not broken. Take your time to build up your meringue slowly. These two tips will ensure you have a nice thick and smooth patterning batter that stays stable for a longer time as you pipe the design. 

Instead of painting, I used edible markers to outline the corgi and add on the details as they are really small and fine. You may use paint made by dissolving gel colouring in water like what Keem does. You may wish to brush the surface of the sponge with simple syrup if the sponge dries out while you work in the open to paint in the details.

Do follow me on Instagram @phay_shing as I am most active there if you would like to see more of my work. I don't most some of my work on Facebook and the blog. 

With love, 
Phay Shing


Read More »

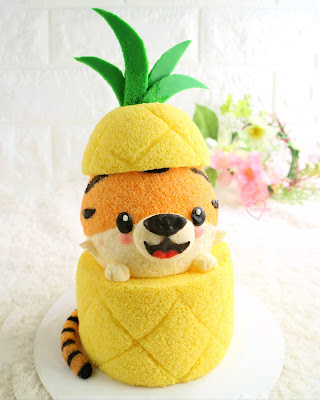
Tiger Pineapple Chiffon Cake

 
Pineapple creation inspired by the cutest @mediacorp Hu Tiger mascot!🐯😍

Have you wondered why pineapple tarts are so popular during CNY? Apparently it's to do with pineapple sounding like 'ong lai' in dialect hehe!🍍

I've been making the cny mascots every year to show my support! Missed seeing the plushies around the last 2 years. Hope that my 3D impression of the cute cartoon makes you smile too!😀💕

Hu tiger (from the pineapple) sending lots of love!❤❤🥰

Love,

Susanne


Read More »

Sunday, 30 January 2022

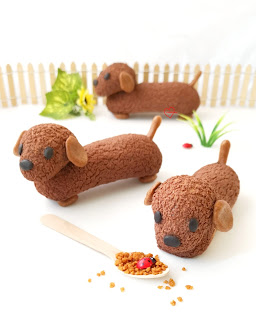
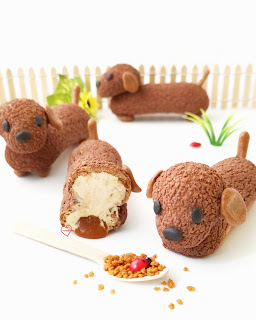
Chocolate Salted Caramel Biscoff Sausage Dog Eclairs

Did you know that just a few tweaks to your classic eclair can become something like this? 


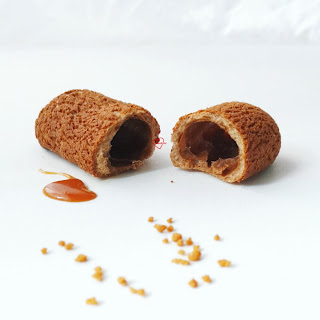
Chocolate daschund craquelin eclairs! Filled with delectable salted caramel biscoff diplomat cream with extra oozy salted caramel!. 


The basic techniques on how to create puffy, hollow eclairs will be covered, as well as the decorative techniques and yummy filling. 

Puffy chocolate craquelin eclairs! 

Please click on this link for more information or to register. 


With love, 

Phay Shing 

Read More »

Sunday, 23 January 2022

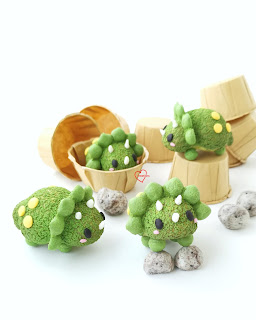
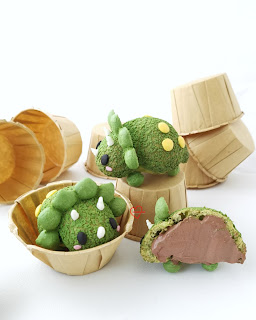
Triceratops Chocolate Choux Pastry (Video Tutorial)

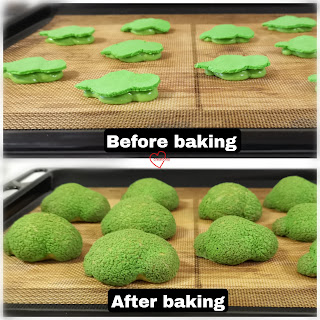
Making character choux pastries sometimes involves making Choux au Craquelin that aren't your regular round, oblong or even donut shapes. I made a video tutorial on how you can make any shape you like! Triceratops is used as an example but the same principles can be applied to all shapes.


Here's a view of the main body of the Triceratops before and after baking. 

 
The pastries are filled with chocolate diplomat cream. I adjusted the amount of cocoa powder and dark chocolate couverture so that it is less intense. 


For the full video tutorial, please click on this link


With love, 

Phay Shing

Read More »

Wednesday, 19 January 2022

Tiger Family Chiffon Cakes


My little Tiger family wishing everyone a Happy New Year!🐯💕 

Thank you for your love, friendship and support!❤ 

They are made from orange chiffon cake pops. 

May you be safe, healthy and blessed!😘 


With love,

Susanne


Read More »

Monday, 17 January 2022

'Ox Welcoming Tiger' Yuzu Mango Matcha Macarons

This was an unplanned bake that had to be made because it stuck in my head and I needed to get it out of my system😅. Last year I made an impromptu bake of "Rat welcoming the Year of the Ox" macarons. This year I thought of making something with similar theme but in 3D form. So here's my version of this year's "Ox welcoming the Year of the Tiger"! 


A closer look at the Ox without the cart. 

Of course I had to test out the cart to make sure it works... 


What was really stuck in my head was this that I had to get out of my system... 


I broke down the baking into 3 separate sessions since this was unplanned. The red macaron shells for the new year greeting was baked with batter for my teacup macaron class using Swiss meringue method. The cart was made using French method and the ox and tigers were made using swiss method. The cart and animal macaron shells are lightly mango flavoured and filled with a new flavour I was testing out: yuzu mango matcha! I was inspired by the full leaf yuzu green tea I drank and the mention of this flavour in one of the baking contest shows I watched. 

The quantities of each component can be tweaked according to preference. I needed something firmer and not too intensely green so I went easy on the matcha and used less wet ingredients. You may use more yuzu juice or mango compote instead of brewed green tea like I did. I was trying to get more tea flavour without the colour. Feel free to up size the portion as this is a small portion. 


Yuzu mango matcha ganache 

Ingredients:

60g White chocolate, finely chopped or use chips 

10g Concentrated brewed green tea (made from 35g hot water and 3 teabags steeped for 20min)

4g 100% yuzu juice concentrate

1/2 tsp freeze-dried mango powder

1/4 tsp matcha powder

6g unsalted butter 

Steps:

1. Place everything in microwave safe bowl. Use medium-low power to heat for 10 seconds and stir. Repeat heating and stirring until mixture is homogeneous and melted. Alternatively you may use the double boiling method. 

2. Leave it at aircon room temperature to set until toothpaste consistency. Whip it up to lighten texture if you wish. 

3. Transfer to piping bag and fill the macarons. Let thr macarons mature at room temperature or in fridge for at least 24h before consuming. 


With love, 

Phay Shing

Read More »

Sunday, 16 January 2022

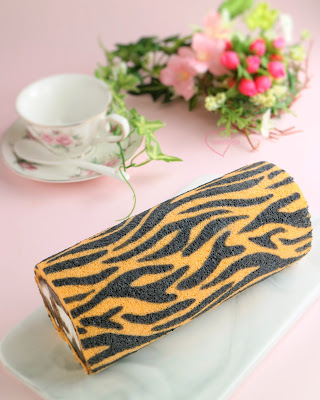
Tiger Roll Cake


This Tiger roll uses the same technique as orange chiffon recipe. Check out the previous post for the recipe.

For this roll cake, bake in a quarter sheet pan at 160C for 20-22 mins.

*Tip: If you are worried you may accidentally smudge the black stripes while piping the orange batter, you can bake the patterns for 2-3min at 160C before filling with orange cake batter to set the patterns first (optional but useful for first-timers)❤

I further tried to make Tiger stripes in the cream using chocolate and chantilly cream 🙈. Not sure what to make of it😆. 


Recipe for Chocolate-Chantilly Filling: Whip 1 cup cold heavy cream (240g) with 55g icing sugar and 1/2 tsp vanilla till firm peaks. Remove 1/3 cream and fold in cocoa paste (1 tsp cocoa powder/1 tsp cream).
Pipe humps of chocolate cream, fill the rest with chantilly cream and then roll up.

Have a great CNY in advance!
With love,
Susanne

Read More »

Monday, 10 January 2022

Pandan Kaya Chiffon Croissant Cereal

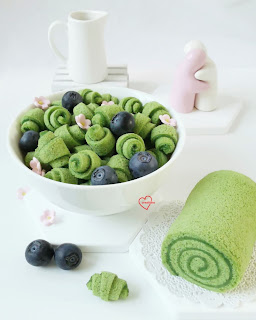
I don't usually follow trends but this idea in my head got me so excited I just had to try it out! Presenting my pandan kaya mini chiffon croissant cereal! 
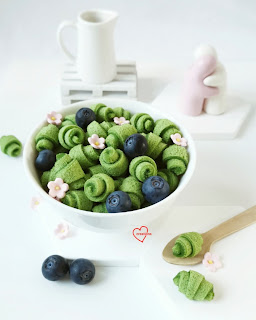
 
I was excited because it is a combination of traditional pandan kaya cake in croissant form and miniaturised as a cereal treat. There's a cereal trend several months ago but I didn't follow it until I have a reason to present my bakes that way. Not only is this visually cute, the form factor of it in bite size and eaten with fresh blueberries makes it a refreshingly good and new way of enjoying pandan kaya cake. Only thing is, it is rather time consuming to assemble a bowl of it😂! You could speed things up by making bigger croissants than I did. I made them tiny enough that you can fit a few in your mouth comfortably with a couple of blueberries. The actual baking and making of the pudding layers is very fast so feel free to assemble in a way that suits your patience level and time best. This can also be made into swiss roll form or layered cake. 

I took the chance to test out Scoop Wholefood's pandan powder for making pandan chiffon cake. Something I had been procrastinating for some time. You may make pandan juice concentrate the traditional way if you wish by blending fresh leaves with a little water, sieving and settling the juice for 3 days, and then using the concentrate that settled. 

Pandan chiffon thin layer cake
Ingredients (makes one 10 x 12" and one 7x7"cake):
Egg yolk batter
2 egg yolks 
21g pandan juice concentrate from 1tbs (heaped) pandan powder and 3tbs water*
18g coconut milk 
14g any vegetable oil
38g cake flour
A pinch of salt
1/8-1/4 tsp pandan paste
1/4 tsp vanilla extract 

Meringue
2 egg whites
15g caster sugar
15g granulated gula melaka 
1/8 tsp cream of tartar

*to make pandan juice concentrate from pandan powder with insoluble fibers, rehydrate the powder with water and let it sit for half an hour. Sieve out the liquid and weigh out 21g for baking. 

Steps: 
1. Preheat oven to 170C. Line baking trays with teflon sheet or parchment paper. 

2. Prepare egg yolk batter. Whisk together egg yolks until pale and thick. Add oil and whisk until well combined. Add coconut milk, pandan juice concentrate and flavourings and whisk until combined. Add sifted flour and salt and whisk until no trace of flour is seen. 

3. Prepare meringue. Use electric mixer to beat egg whites with cream of tartar until firm peak or just reach stiff peaks, adding sugar gradually once egg whites are foamy. Use low speed to whip egg whites for a more stable meringue with smaller air bubbles. 

4. Quickly but gently fold meringue into egg yolk batter in 3 additions. Scoop out the batter onto prepared trays and spread it out in a thin layer using an offset spatula or bench scraper. 


5. Place baking trays in oven and immediately lower to 150C and bake for 10-11min or until skewer comes out clean. Be careful not to overbake or you will have difficulty rolling the sponge without breaking it. 

6. Immediately remove from oven and flip onto fresh sheet of parchment. 


Roll the sponge into a tight roll to cool completely. In the meantime, prepare the pudding. 


Pandan kaya pudding 
A) 
100g coconut milk
5g pandan juice concentrate 
1/8 tsp pandan paste
1/8 tsp vanilla extract 
Pinch of salt
10g gula melaka
15g caster sugar (or to taste) 
75g Water
1/2 tsp agar powder

B) 
13g cornflour 
65g water

Steps:
1. Mix together ingredients in B) in a jug and set aside. 

2. Place all ingredients in A) in saucepan and bring to a boil while whisking. Make sure all agar powder is dissolved. Use medium heat. 

3. Stir contents in B) again. Pour into A) in a thin stream while whisking the contents in saucepan continuously. Continue cooking and whisking for a minute after it starts boiling again. Remove from heat. Do note that as the pudding cools, it will start to set so you will have to stir it now and then if you are not ready to assemble yet. 

Assembly
1. Unroll the cooled cakes. 

2. Spread a very thin layer of pudding on the cake and let it set for 20 min or until pudding is solid (doesn't stick onto your finger when you touch) but still soft before rolling. 


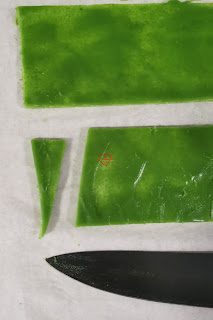
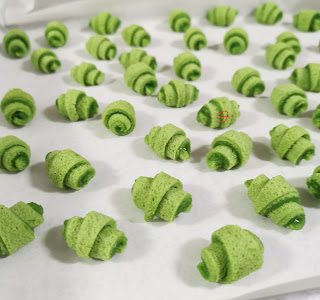
3. Cut triangles 2.5cm base by 7cm height or any preferred size. Layer cake and pudding really thin and use rolling pin gently roll flatter with pudding side down. 


Roll it up like a croissant by starting the roll from the base of the isosceles triangle, pudding side up. Leave it on a tray lined with parchment to set fully. 


You may have excess pudding. Just transfer into a jelly mould and refrigerate it. Enjoy it as a pudding treat. 

If you don't have the patience to make these minis, try cutting bigger triangles or simply make a swiss roll like the one I did below. 


The mini croissant cereal is really delicious when paired with juicy blueberries that are slightly sweet and tart, not too sour or strong tasting so that it doesn't overpower the pandan kaya flavour but rather, complements it.

Store the cake in fridge and consume within 3 days. 

Follow me on Instagram at phay_shing as I am more active there and post more stuff there than on Facebook and blog. 

With love, 

Phay Shing

Read More »

Friday, 7 January 2022

Tiger Chiffon Cake


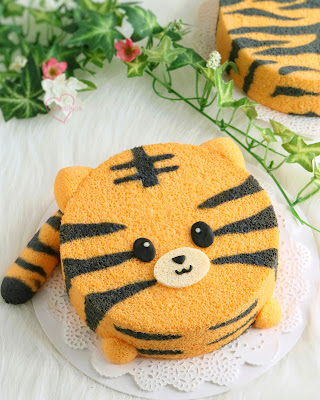
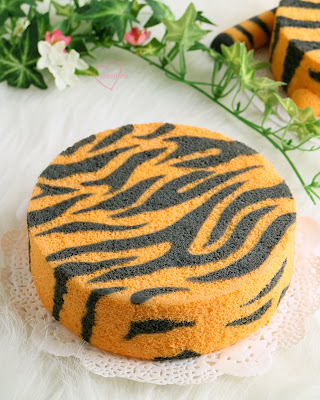
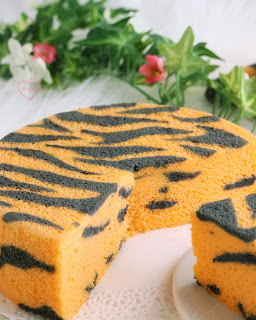
Which version do you prefer? Cute🐯 or Stripy🐅 (below)?

Some of you had DM-ed me about the Recipe for making orange-chocolate Tiger chiffon cake. So here goes! Hope you will find this helpful!🤗 

Orange Chocolate Tiger chiffon cake 
4 egg yolks 
20g castor sugar 
40g vegetable oil 
45g orange/mandarin orange juice 
60g cake flour, sifted 
Orange zest (1 orange) 
1 tsp black cocoa powder in 1 tsp hot water (cocoa paste) 
@suncorefoods vermillion annatto for the color (or orange food coloring) 

4 egg whites 
45g castor sugar 
1/4 tsp cream of tartar 

Whisk egg yolks with sugar, followed by oil and juice. Add in sifted flour and whisk till well combined. Divide the batter into 1/3 and 2/3. To 1st part: add cocoa paste. To the 2nd part, add orange zest and vermillion annatto powder and mix well. 

In another mixing bowl, whisk egg whites with sugar till firm peaks. Divide the meringue into 1/3 and 2/3 and fold into each colored batter. Pipe tiger stripes at the base and inside the cake using black batter, interspersed with orange batter. 

*Tip: use a toothpick to drag the tips of your piped black stripes to make tiger stripes. 

Bake in a 7” cake pan at 140C for 1hr, or until a bamboo skewer comes out dry. 

Enjoy baking!! Tag me if you try it! See cross section of the stripes in the cake! ➡️🥰 


More pictures here.

Love and stay healthy, 
Susanne


Read More »

Tuesday, 4 January 2022

Yuzu Tiger Macaron Class

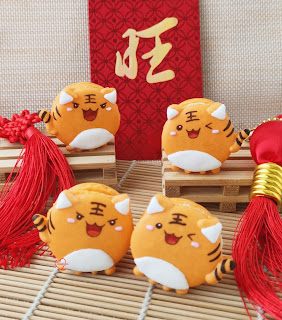
 Welcoming 2022 and the Year of the Tiger with these "旺旺虎” macarons!


This is the first time a group of people from the same company wants a class from me and they requested for some cute tiger macarons to welcome the Year of the Tiger. 

I will be teaching this class at Tottstore end January, just in time for Chinese New Year. Yuzu macarons where the shell is lightly yuzu flavoured and the filling is a yuzu ganache with chopped milk chocolate bits. As the group size maxed out the capacity, this class is not open for registration for others to join. Posting this here on the blog as I hope these cutely fierce tigers will put a smile on your face as we welcome 2022 and the Year of the Tiger! 


With love, 

Phay Shing 

Read More »

Monday, 3 January 2022

Tigger Chiffon Cake


Happy 2022 to everyone! Lunar new year is coming! So all the cute tigers are coming out to play, including Tigger! =)
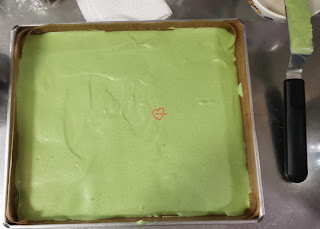
Tigger is made from my favorite orange chiffon cake. Will be sharing the orange chiffon recipe in an upcoming post!🥰
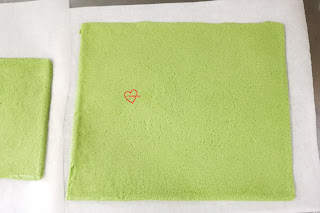
Does the cake look like a plushie?😛❤

With lots of love,
Susanne

Read More »