Saturday, 12 September 2020

Hello Kitty and Donutella in Hot-Air Balloon Macarons

Sometimes you don't know something can be done until you try it. This is one of those experimental bakes that turned out really well and I thank God for it ๐Ÿ˜Š. Presenting my version of Hello Kitty with Donutella on a hot-air balloon trip over the rainbow, all made using macarons! 

Ok the marshmellow clouds and the balloon ropes aren't made of macarons ๐Ÿ˜‚. 

Two things I experimented with using macaron batter 1) as a glue for macaron structures, and 2) creating a pastel striped pattern on hemispherical macaron shells. As I needed fairly good meringue stability over many hours, I used the swiss meringue method

Just to share some pictures and tips about the process... 


Piping the panels of the hot-air balloon basket and characters. You can see I had trouble with piping Donutella's ears ๐Ÿคฃ

I decorated the characters with black edible marker and royal icing

The panels of the basket were glued together using the same dark pink macaron batter (left in piping bag for many hours). I dried the assembled baskets at 65°C in the oven for 20 min until dry to touch, and then ramped up the temperature to 110 °C to bake for another 15-20min. This drying/baking temperature and time profile is to create a membrane on the piped batter surface as soon as possible, as well as to set the structure by baking without it developing feet. 

Ta-dah! I was so happy it worked! Are the macaron shells super hard due to extended baking? Not at all! I did a taste test. 


I bit into the trial basket and was pleasantly surprised the texture wasn't compromised at all. This is probably due to the low temperature used to bake the joints. The macaron shells are nicely full too! 

I wasn't confident the striped hemispheres would turn out pretty because of the pastel colours involved. Hemispheres generally need to be baked at a higher temperature for a longer time, especially since I used the largest silicone mould I have at home (diameter about 6cm). I added white powder food colouring and eyeballed the oven thermometer throughout baking to prevent browning from happening. Piping the stripes on a curved surface was challenging too. I had to scrape off some of the excess batter that flowed off too much and pooled at the base of the hemisphere. 

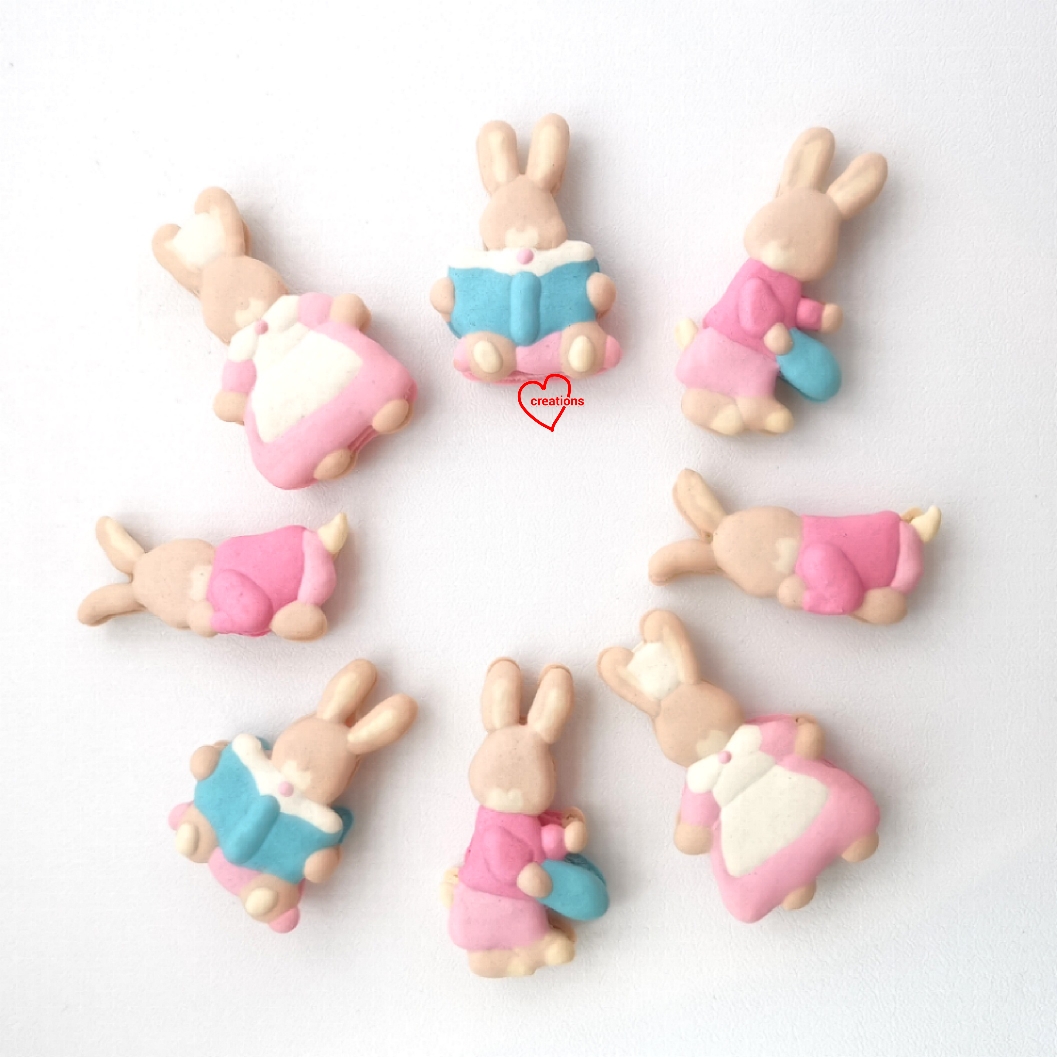
Piped batter on hemispherical silicone mould. 


Freshly baked shells! 

I filled the macaron shells with whipped raspberry strawberry white chocolate ganache. I piped a thin wall of melted white chocolate with a little vegetable shortening to provide some stability and firmness to the structure. 

Recipe for mixed berry ganache
Ingredients:
90g white chocolate couverture (I used Callebaut) 
25g unsalted butter
1/8 tsp salt
40g homemade mixed berry compote*
1 tsp freeze-dried raspberry powder
1 tsp freeze-dried strawberry powder

* I pureed equal amounts by weight of raspberry (pips sieved out) and strawberry, and added 10% by weight of sugar, a pinch of salt and a tsp of lemon juice. Cooked and reduced over low heat until about 60% of original total weight of ingredients. If you find this too troublesome, you may replace with whipping cream and double the amount of freeze-dried fruit powder or to taste. The compote can be kept in the fridge for up to a month in a sterilised glass jar. 

Steps: 
1. Place white chocolate, butter and dalt in a heatproof bowl and melt over a freshly boiled pot of water without the bowl touching the hot water. Alternatively, you may use microwave oven to melt chocolate and butter but be careful not to overheat. Chill in fridge for 5-10 min or until scoopable consistency. If the chocolate mix becomes hard, just let it sit at room temperature for a while. 

2. In the mean time, mix the compote and freeze-dried fruit powders together in a small bowl. Set aside. 

3. When the white chocolate mixture is firmed up (but not hard), whip it with a spatula until light and fluffy, like buttercream.

4. Add berry mix unto the whipped white chocolate, 1 tbs at a time, mixing until well combined before adding more. 

5. Transfer into piping bag and fill the macarons. 

Filling the rainbow

I didn't fill the hemispheres with the ganache as it would be too heavy to "float". I packed the extra filling instead for the recipient to fill when she wants to consume. I filled the balloons with marshmellows instead. 

A closer look at the hot-air balloons! 

I always make extra macarons, especially for characters, due to the high chance of breakage when handling it. The recipient plated the extras so nicely I just have to share it ๐Ÿ˜Š. 

The macaron creation at the party! 


Did this creation put a smile on your face as it did to the recipient? 


With love, 

Phay Shing 

Read More »

Friday, 11 September 2020

Giant Boba Brown Sugar Milk Tea Chiffon Cake


My imagination of what a cute Giant bubble tea would look like in chiffon cake!๐Ÿ’“

This time, in addition to baking the "pearls" in, I tried to make brown sugar swirls at the bottom and a slight two-tone (like in the bubble tea when the layers separate) as well! The two-tone didn't come up as obvious as I had hoped, but maybe it was cuter that way.

Anyway the brown sugar fragrance was really lovely and cake was delicious! I have shared the recipe previously. If you always wanted to see how my cut up cake slices look like, do click in to my previous post! I rarely get to slice them up unless it is for family celebration =).

Hope this cute cake made you smile!

With lots of love,
Susanne

Read More »

Saturday, 5 September 2020

Princess Crown and Shoes Raspberry and Earl Grey Macarons

I had a request for princess themed macarons. Since the stereotypical princess wears fancy shoes and tiaras, I made these macarons ๐Ÿ˜Š

Looks a little like a shop selling princessy paraphernalia ๐Ÿคฃ

I had to decide whether to go for easier time before baking or post-baking. I chose the latter to avoid using royal icing (which is added sugar) on the baked shells. So this is what the piped batter looks like...

Intricate details were done using macaron batter too

The glass slipper 

I used the Swiss meringue method for making the macaron shells and you may refer to the detailed recipe in this post.

I used edible marker to decorate the baked shells to make the features on the tiaras and shoes more well defined. I painted on some white stars to give the glass slipper a "bling bling" look by using paint made with white gel colouring dissolved in vodka.

Raspberry and earl grey flavours were requested. You may refer to this post for raspbery white chocolate ganache and this post for the Earl Grey ganache.

Filling with raspberry ganache

Filling with Earl Grey ganache. 

Did these princessy accessories charm you ๐Ÿ˜Š? 


With love,
Phay Shing
Read More »

Wednesday, 2 September 2020

Shopkins Rainbow Chiffon Cake


We all need Rainbows๐ŸŒˆ in these strange times of adjusting to the new normal!

Sending a huge, cheerful Rainbow, in the form of Shopkins Rainbow bite!๐ŸŒˆ๐Ÿ’•

You can also learn how to make the Chiffon cake Rainbow from my latest 2-in-1 LTS Rainbow online class (sign up link here).

And ending with my favorite quote: There is a Rainbow of hope๐ŸŒˆ at the end of every Storm!

Have a blessed week!๐Ÿ’“๐Ÿ’“๐Ÿ˜˜

With lots of love,
Susanne

Read More »

Sunday, 30 August 2020

'Peter Rabbit in Pink' Macaron Picnic Scene on Pandan Kaya Cake

My friend wanted something for her daughter's 21st birthday and booked me way in advance, a year in advance to be exact ๐Ÿคฃ. The details of what was to be included in the design was also finalised months before the celebration so a lot of planning went into this bake. The design was to include her favourite character, Peter Rabbit, doing various things that she likes --- reading, swings, baking, sleeping and frisbee. She loves giraffes too so it is in the picture. Presenting my version of Peter Rabbit in pink at a picnic, on top of a pandan kaya cake!

Can you guess the birthday girl's name? My friend also requested for another detail to be added in--a specific type of flower that she named her daughter after, which I made using royal icing. 

Did you guess Edelweiss?


That was not all I made for this birthday celebration. The birthday girl is a vegan so I made extra cake for her that is vegan friendly. Read about it in this blog post for a yummy vegan pandan kaya cake with gula melaka.  

The detailed recipe for pandan kaya cake (non vegan version) can be found in this blog post. You may substitute diabetic friendly sugar with regular caster sugar or more gula melaka (but note that this will turn the bake even more brown). I took the liberty of coating the whole cake with dessicated coconut that is soaked with gula melaka syrup and pandan paste to create a grassy effect as well as add texture and flavour to the cake. 

A cakeboard is placed on top of the cake as the picnic scene can't sit directly on the cake during storage. Pandan kaya cake gives off a lot of moisture during storage and the macarons will turn soggy if stored together. 

Here is a video of the swing in action! 

I used the swiss meringue method to make the macaron shells for the rabbits and french method for the giraffe and swing. I broke up the bake over 2 sessions as the rabbits alone took me 2h to pipe! 

This tray took me 2h to pipe! 

Freshly baked shells! 


Check out the feet on the shells! 

I used edible marker to add in the details, and a little white gel colouring to add in the highlights on the eyes. 

I filled the macarons with chocolate strawberry raspberry ganache. I wanted to match the colour of the filling as close as possible to the swing so I used a mix of white and dark chocolate for making the ganache. No whipping cream is used to make the ganache as I substituted it with homemade mixed berry compote. The compote was made by adding about 10-15% by weight of sugar to the berries used, and cooked over low heat until reduced to almost half the original weight. I added a pinch of salt and a squeeze of lemon juice as well. 

Mixed berry chocolate ganache
Ingredients:
130g white chocolate (use chips or finely chopped) 
30g dark chocolate couverture
30g mixed berry compote 
1/8 tsp salt
10g vegetable shortening (you may replace with butter. I use the filling for construction so it has to be firm) 

Steps:
1. Place all ingrefients in microwave safe bowl. Heat on medium power for 10 seconds. Mix well. Repeat heating and mixing until everything is melted. Alternatively, you may melt the chocolate using double boiling method. 

2. Let the ganache firm up by letting it sit covered at room temperature. You may choose to use it as it is or whip it up to lighten the texture before using. Feel free to adjust the compote to chocolate ratios depending on your climate, or replace the white with dark chocolate. I need this filling for construction in tropical Singapore so it has to be firm.

I used royal icing to glue the tray of mini macarons onto the chef rabbit. 

This is the second time I am constructing a macaron swing that works so at least it wasn't as nerve wrecking. You may see my first attempt over here.
This is how it looks like without the rabbit on the swing. I used stiff royal icing for constructing the swing.

I was seriously cute overloaded by this scene, how whimsical it is and how much it reminds me of the Sylvanian family figurines!
This whole project was really a labour of love! Thank God it was very well received!

With love,
Phay Shing
Read More »

Wednesday, 26 August 2020

Little Twin Stars Little Rainbow Chiffon


Little Twin Stars fans alert!!⭐⭐ The official Sanrio Little Twin Stars Online Baking Class is here!

Celebrate Little Twin Stars 45th Anniversary with us! Little Twin Stars Little Rainbow Chiffon – a 2-in-1 class where you can learn how to make Little Twin Stars chiffon⭐ and Rainbow chiffon๐ŸŒˆ as well!๐Ÿ’“๐Ÿ’“

Sign up class link here.

LTS character templates and downloadable recipe are provided, as well as special tips to create perfect features. A new flavour, yummy coconut chiffon ๐Ÿ˜‹ is also taught.

The online class is available to everyone, overseas as well! =)

Baking kits with molds and pans are also available for delivery to your doorstep (within Singapore region only)! ๐Ÿ’“

Hope you will enjoy it!

With lots of love,
Susanne


Read More »

Monday, 24 August 2020

Chihuahua Chocolate Choux Pastry (updated vanilla pastry cream recipe)

I usually don't take last minute requests but since this one requires only 3 pastries and it was riding on another bake I was working on, I thought why not. Presenting my attempt at making Chihuahua choux pastries! 


I have written a detailed recipe for making the choux au craquelin (creampuffs topped with crispy cookie dough layer on top) that the chihuahuas sit in in this post. These choux buns are just plain uncoloured batter, piped into 2.5cm rounds and topped with 3cm diameter cookie dough before baking. 

I made the chihuahuas out of pastry cream. Most of it is chocolate pastry cream except for the light parts of the chihuahua's face. I made vanilla pastry cream and portioned it for colouring various colours, most of which is chocolate flavoured. 

Updated vanilla pastry cream recipe

Ingredients:

2 egg yolks

20g cornflour

30g caster sugar (use up to 40g if you have a sweet tooth!) 

A pinch of salt

200g milk

1 tsp vanilla extract

15g unsalted butter 

30g dark chocolate couverture + 1tsp milk (optional, couverture and extra milk are for colouring and flavouring dark parts of the pastry cream) 


Steps:

1. Place milk and vanilla extract in a saucepan and heat until steaming but not boiling. 

2. In the mean time, whisk together cornflour, sugar, salt and egg yolks until a smooth paste is formed. It is helpful to put all these in a heavy glass measuring jug so that it is easy to pour and it is heavy enough so it won't spin when you whisk the contents with one hand. If you don't have a heavy glass jug, just use any heavy mixing bowl or put a damp towel under the bowl. 

3. While whisking the egg yolk mixture continuously, carefully pour the heated milk into the jug in a thin stream. This is to temper the egg yolks. Pour everything back into the saucepan 

4. Heat the mixture in saucepan over medium low heat while whisking continuously until the pastry cream thickens. The thickening will happen suddenly so be ready to take the pan off the heat to continue whisking for a while until smooth. Put the pan back onto medium low heat and continue cooking until the pastry cream is thick enough to form a firm peak. We are piping characters in pastry cases with this so it has to be cooked until firm enough. But if you are just filling it the regular way without fancy piping , then just cook the pastry cream until your preferred consistency. Some people prefer it softer, some prefer it firmer. It is important to cook it slowly and keep whisking to ensure the pastry cream remains silkily smooth. You don't want to end up with scrambled eggs

5. Remove saucepan from heat and whisk in the butter until smooth. 

6. If you aren't making the chihuahuas, just transfer the pastry cream into a bowl and press cling film on the surface of the cream. Chill in the fridge for at least an hour before whipping it briefly with a spatula to lighten the texture and using it to fill. If you are making the chihuahuas or colouring the pastry cream, quickly portion out into the various bowls and add whatever colouring you need to colour and press a cling film on the surface before chilling. For the brown and black parts of the chihuahua, I added 30g of dark chocolate with a little milk to the portioned out pastry cream while it is still hot enough to melt the chocolate. For black colour, I added some charcoal powder. For pink part of the ears, I added freeze-dried raspberry powder. I try to use natural food colouring whenever possible. 

I omitted adding whipping cream to lighten the pastry cream as I wanted the cream to remain firm and glossy enough for piping. If you prefer a lighter, less rich cream, you may add about 80-100g of whipped whipping cream to the chilled pastry cream.  Filled pastries need to be kept refrigerated and best eaten within 2 to 3 days. 

Choux pastries of this style where the decorative parts are made out of filling will have soft pastry cases instead of my usual crisp cases as the moisture from the filling will soften the pastry cases quickly. Even then, it is still delightful to eat. Thank God the birthday girl loved these! 


With love, 

Phay Shing

Read More »

Saturday, 22 August 2020

Anniversary Celebration Macaron Gift

Making my unique creations don't earn me a lot of money for the given effort put in. Many ask me then why do I do it? Because of the joy it brings the recipients. I get requests that mean something special to the recipients and I try my best to let my creations express that "specialness", like this one. 

A lady wanted to gift her friend a bake that commemorates her achievement that took her 15 years, something she worked long and hard for. I was given the 2D logo of MDRT and caricature of the two ladies, and thought why not make a 3D round table version of it out of macarons. 

The challenging part about this bake is the human figures. It is often nerve wrecking for me to draw human faces because the positioning of the strokes have to be extremely precise. A little off and it will look weird, or like someone else instead. I usually make an extra set and pick the one that looks better. Bakers with fine arts background probably have it easier here and I don't have this advantage. 

I used the Swiss meringue method to make the macaron shells. Here are some pictures of the piped batter. 


I decorated the macaron shells with edible marker and vodka to blend the colours in. A little white gel colouring with royal icing for the white parts of the eyes. 
Practising on a macaron shell made with extra batter first because i wasn't confident I would get it right on first try ๐Ÿคฃ

Decorated figures 

Here is a look at the side view. Look at the awesome feet! 

I filled the macarons with vanilla bean white chocolate ganache and dark chocolate ganache as requested. 


The recipe for dark chocolate ganache can be found here. I will share the vanilla bean white chocolate ganache that is firm, tastes really milky with vanilla fragrance and surprisingly not too sweet. If you live in a temperate climate, feel free to use more whipping cream. Over here in Singapore room temperature is 26-32°C all year round ๐Ÿ˜…. 

Vanilla bean white chocolate ganache
Ingredients:
60g white chocolate, finely chopped or use couverture 
15g unsalted butter
12g heavy cream (whipping cream) 
1 tsp vanilla bean paste (or vanilla extract) 
1/4 tsp salt

Steps: 
1. Place all ingredients in a heatproof bowl. Set it over freshly boiled water and make sure the water doesn't touch the base of the bowl. 

2. Use a spatula to mash the ingredients together until well combined and chocolate is melted.  Alternatively, you may melt using microwave oven. Be careful not to overheat. 

3. Chill the mixture in freezer for 2 min. Whip it with a spatula. Repeat chilling and whipping until buttercream-like texture. Alternatively, you may use an ice bath to chill and whip the chocolate mixture. 

Transfer to piping bag and fill the macarons. 

Always let the macarons to mature in the fridge for at least 24 hours before consuming. Store macarons in airtight condition. When ready to consume, leave the airtight container out at room temperature for 15-20min  before opening. This is to prevent condensation from forming on the surface of the macaron shells. 

With love, 
Phay Shing


Read More »

Wednesday, 19 August 2020

Crayon Shin Chan Chiffon Cake


Anyone recognizes this cheeky character? ๐Ÿ™ˆ Hands up!๐Ÿ˜„

Psst.. means you are in the same generation as me?๐Ÿ˜›

Have an awesome week ahead!❤

With love,
Susanne

Read More »

Saturday, 15 August 2020

Vegan Pandan Kaya Gula Melaka Cakelets

My friend requested for a vegan cake for her daughter's birthday. I gave some thought to select a flavour that is still yummy despite not using eggs or dairy. It is quite a new challenge for me as my favourite type of cake is leavened by meringues in the form of chiffon cakes. I decided to experiment and take the plunge, even though I was skeptical about the taste and texture of any sponge not leavened by meringues or loaded with butter or eggs. There was a happy accident along the way which I will elaborate later, and the resulting cake tastes beyond my expectations! Full of flavour and wonderful aroma, this is my bite sized version of a vegan pandan kaya cake that uses gula melaka as part of the sugar! 

And what was the happy accident? The sponge layers as you can see, is totally brown. When I prepared the batter, it was in a lovely shade of jade green from homemade pandan juice. The oven temperature went wonky a few minutes into baking and went into a high overshoot, toasting the coconut milk in the batter in the process although I did manage to bring down the temperature after about 13-15min into baking time. As the cake is a thin sheet cake, the cake became brown throughout. Is it dry you may ask. The cake is surprisingly moist and soft although it doesn't have the spongey nature of chiffons. The texture is more like a soft and moist muffin. I chose an easy reference recipe that involves mixing wet and dry ingredients, much like making a simple muffin. 

The pandan gula melaka pudding is more or less a variation of the same default recipe I use for my regular pandan kaya cake, which is vegan anyway. But I will share it here in detail for your convenience. 

Recipe for vegan pandan gula melaka sponge

Ingredients:

110g cake flour (plain flour in original recipe) 

1/2 tsp baking soda

1/8 tsp salt (1/4 tsp in original) 

40g caster sugar (75g in original) 

25g gula melaka, chopped (not in original) 

70g coconut milk 

50g pandan juice (blend as many pandan leaves as you want in some water and strain out the juice) 

1/2 tbs apple cider vinegar 

45g vegetable oil

1/2tsp vanilla extract


Steps:

1. Preheat oven to 160C (180C in original recipe) and line an 8x8" square tray with parchment. 

2. Melt gula melaka in coconut milk, set aside to cool. 

3. Sift flour, baking soda, white sugar and salt into mixing bowl. Whisk until combined. 

4. Add vinegar into coconut milk, set aside for 5 min. Add oil, pandan juice, vanilla and mix well. 

5. Pour wet into dry ingredients. Whisk until just combined. 

6. Pour into prepared baking tray and bake until golden brown. 

Now here is the thing. I didn't follow the baking temperature and time of the original recipe, which was 180C for 30 min. This step would vary from oven to oven as each oven behaves differently. I was baking pandan gula melaka chiffon sponge just before baking this so I had a tray of water at the base of the oven so mine is a steam bake instead of the original dry bake. I preheated to 180C on the temperature dial but actual temperature was about 150-160C for the first 5 min. Nothing appeared to be happening so I turned up the temperature dial by a little (my oven is an analog one) at the 5 min mark and went away for 5 min to have a quick bite. When I came back, the oven thermometer read 190C! I quickly turned the dial down and opened the oven door a little for a few seconds. It took a few minutes for the temperature to drop to 160-170C. I continued baking until total bake time was 25min instead of the suggested 30min because by then, the crust looked really browned. If you aren't sure what time and temperature profile to use, I would suggest following the original reference recipe but do keep an eye on your oven and how browned your cake appears. Even if the coconut milk didn't get toasted in the process, the cake will still be yummy! Just less aromatic. 

As you can see in the picture below, the batter is green but the sponge is browned throughout! But the aroma is really intense from the toasting of the coconut milk and sugars! 

Cut the sponge into squares or use round cookie cutters to cut out rounds, depending on how you want to assemble. A simple way is to use cupcake cases. I decided to do a fancier one using my silicone mould. 


Recipe for pandan gula melaka pudding

Ingredients:

A) 

240g coconut milk

120g pandan water (boil some pandan leaves in water) 

30g gula melaka, chopped 

30g caster sugar (may replace with gula melaka if you wish) 

1/4 tsp vanilla extract 

1/8 tsp pandan paste 

1/8 tsp salt

1/4 tsp liquid green food colouring 

1/8 tsp caramel essence (optional) 

1 tsp agar powder


B) 

26g cornflour 

130g pandan water


Steps :

1. Combine ingredients in B) in a jug and stir until cornflour is suspended in water. Set aside. 

2. Place all ingredients in A) in a saucepan and bring to a boil while stirring all the time. Keep stirring for another 1 min once the mixture is boiling. This is to ensure agar is totally dissolved. 

3. Bring heat to medium low. Stir B) again and pour in a continuous slow stream into the saucepan while stirring the saucepan continously. 

4. Keep stirring and bring the mixture to a boil using medium low heat. Continue stirring and boiling for a minute. 

5. Sieve the mixture to remove any large gula melaka bits or undissolved agar. The pudding is now ready to assemble with the sponge. Stir the pudding in the bowl now and then to prevent it from setting in the bowl. 


Assembly

There isn't  a fixed way to do this. Simply alternate layers of sponge and pudding and then refrigerate for a few hours. If you assembled in cupcake cases, you can leave it as it is. If you used moulds, you can carefully unmould at this point. I rolled the unmoulded cakelets in dessicated coconut for that extra texture when you bite into it.

The fancy silicone truncated cone mould is rather small so I used the smallest round cookie cutter I have to cut out the sponge. And this wasn't enough so I had to halve each round cutout horizontally so the sponge layer isn't too thick so it looks proportionate in the tiny mould. Needless to say, it was a challenge to work neatly and quickly ๐Ÿคฃ

Messy assembly! 


My kids did a taste test and gave thumbs up for it! You don't miss the egg at all because it is so full of flavour and aroma! If you want an easy vegan cake that is yummy as well, give this a try! No electric mixer required! 


With love, 

Phay Shing


Read More »

Wednesday, 12 August 2020

Matcha Dark Chocolate Macaron Mustard Tree

"He put another parable before them, saying, "The kingdom of heaven is like a grain of mustard seed that a man took and sowed in his field.  It is the smallest of all seeds, but when it has grown it is larger than all the garden plants and becomes a tree, so that the birds of the air come and make nests in its branches."" 
Matthew 13:31‭-‬32 ESV

These were the Bible verses that my friend told me she wanted to be portrayed in a birthday bake for her daughter, saying that her husband and herself hope that their little girl's faith will grow like a mustard seed, from something small to something big and beautiful. I know the context of these verses are about kingdom of God but you get the picture ๐Ÿ˜Š. Here was what I made out of macarons! 


Macaron tree with birds making their home in there! 

This isn't the first time I am making the macaron tree. I made it last year for a Totoro themed bake and you can take a look at it in this post. While I painted the foliage last year to create the ombre effect, I baked each folliage layer in a different shade of green this time round. I used the Swiss meringue method to bake the macaron shells, adding cocoa powder for the brown shells and matcha powder for the green shells. 

Piped batter

I decided to paint on the details of the birds so the macaron shell baked was just a plain white canvas. I used a mixture of royal icing, edible paint made by dissolving gel food colouring in vodka, and black edible marker to decorate the birds. The birds' nest was made out of stiff royal icing coloured naturally with cocoa powder and piped over a silicone hemisphere to create the shape. I also piped some loose pieces of twigs to add on later during assembly. 

Decorated birdies with some loose twigs in view

I filled the macarons with firm matcha white chocolate ganache and dark chocolate ganache, just like I did for my macaron tree last year. 

Filling the base shell

The little girl really loved this gift and almost couldn't bear to eat the birds ๐Ÿคฃ. 

May your faith grow over the years as your parents hope for you! 

With love,
Auntie Phay Shing
Read More »

Deer Squad Chiffon Cakes


Very excited to partner with Nickelodeon to share their brand new animation Deer Squad and to create chiffon cakes inspired by their characters! ๐Ÿ’–

Meet Nickelodeon's Deer Squad! Introducing Kai, Lola, Rammy and Bobbi — the 4 loveable deers who protect the world around them using their planet powers. Water! Sun! Earth! Wood! Planet Powers, fight for good!๐Ÿ’ช๐Ÿ’–

Watch Deer Squad on Nickelodeon, weekdays @ 2.15pm (SG), 3pm (WIB), 4pm (MY/PH)!

Head on over to facebook.com/nickasia to catch the trailer and get a FREE Deer Squad Starter Kit, where you can take a quiz to find your inner deer, make your own helmet and more!

My kids loved the cartoon and the kit! This was one of the more difficult projects of late. Thank God for providing!

Take care and stay safe!

With lots of love,
Susanne

Read More »

Friday, 7 August 2020

SG National Day Boba Milk Tea Chiffon Cake


This is a simple National day version of the Boba Brown Sugar Milk Tea cake.

The pearls are red and white to celebrate National day! I prepared this item for a demo for Bishan cc today.

We are so blessed to be in this safe, secure nation and so blessed that we can celebrate National day despite the COVID situation and all the challenges. Keeping the nation and leaders in prayers.

Happy National day!

With lots of love,
Susanne


Read More »

Matcha Milk Chocolate Dinosaur Macaron Class

If you are new to making macarons but would like to learn how to make simple character macarons, join me for this class happening in Sept 2020!


I prefer to colour and flavour my bakes using natural ingredients so I chose matcha as the primary flavour of these cute dinos. 

The filling is Matcha whipped white chocolate ganache with some chopped milk chocolate to break the monotony. 


You will learn the basics of french method and how to pipe, bake and decorate these dinos.


 I assure you it will be a fun class as with all my simple character macaron classes! Please click on this link for more details and to register 

With love, 
Phay Shing

Read More »

Monday, 3 August 2020

Sleeping Fox Choux Pastry Class

Having made the fox head design as an entry in my Deco Choux Pastries book and conducted a class for the woodland creatures last year, I thought why not make a full-body version of the fox this time for a choux pastry class!


The filling for this pastry is yuzu diplomat cream with chopped bits of dark chocolate. 

You will learn the basics of making choux au craquelin, as well as making small parts out of the basic choux batter, such as the fox's ears, tail and front leg. Tips on how to decorate and assemble will also be shared in the class. Lastly, I will demo how to make the yummy filling.

Please click on this link to register or for more information. 


With love, 
Phay Shing 

Read More »

Wednesday, 29 July 2020

Hello Kitty Popsicle Celebration (Online Class)


Here is the second class which I am launching with Sanrio!

Titled Hello Kitty Popsicle Celebration, Hello Kitty dressed in red and white and getting ready to celebrate SG National day with us! =)

These yummy chiffon cake popsicles are vanilla-strawberry flavoured. This item is easier to bake and fun to make for the whole family. We hope that these online classes will promote bonding as we celebrate National day at home. Sign-up link for the class is here.

There are also options to add on baking kits with popsicle mold, ice cream sticks, and ingredients pre-weighed!

Hope these cheerful Hello Kitty popsicles made you smile!

With lots of love,
Susanne


Read More »