Wednesday 31 July 2024

Deco Chiffon 3D Rolls (NEW COOKBOOK)


Excited to share my new cookbook Deco Chiffon 3D Rolls is finally hitting stores, both physical shelves and online! 

Last year, I had the sudden inspiration to shape/design roll cakes into cute 3D Characters with different fillings/surprises! 😋 There are cream-free options, downloadable templates, step pictures, video tutorials, and hard cover in this limited edition! There also also cute surprises inside the cakes and creative fillings like cheesecake, jelly, mousse etc. See video of the book on my Instagram here.

Book availability here:

Singapore: Kinokuniya, Amazon

Malaysia: Kinokuniya (Kinokuniya KLCC), Mph (The Exchange TRX)

Indonesia: Periplus

Other countries: Amazon.com and kindle in a few months

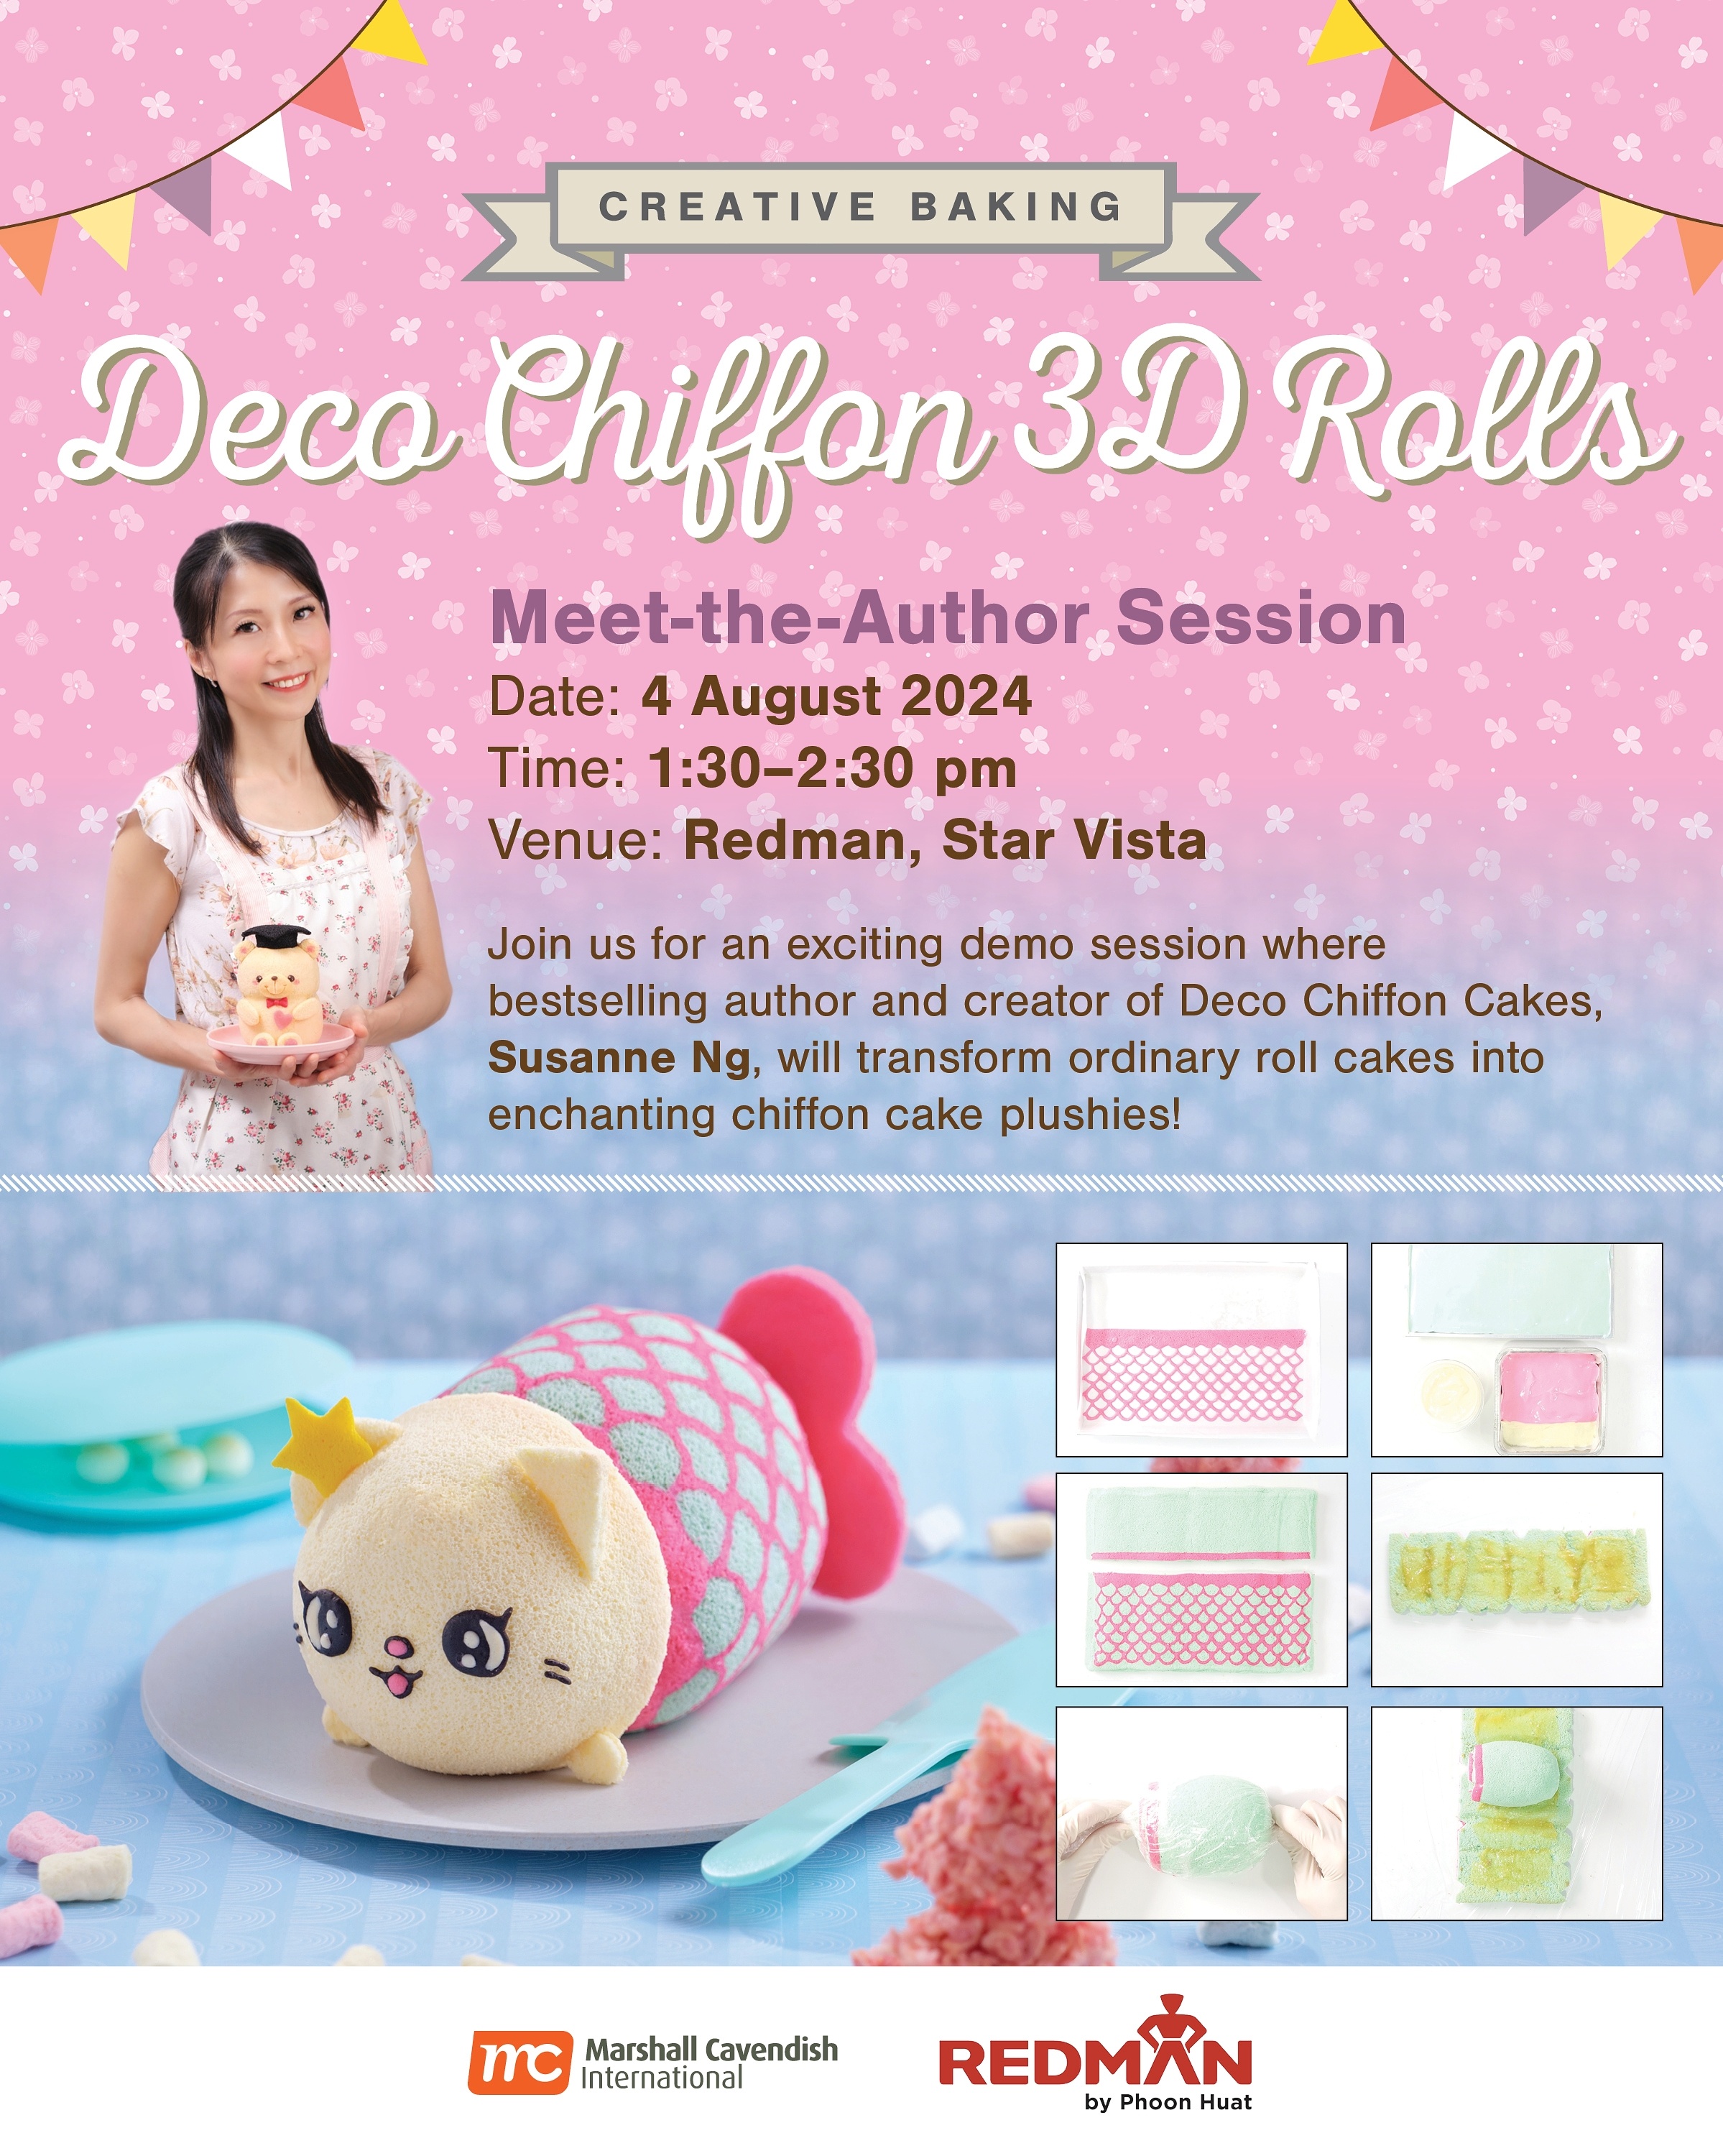
I will also be having a DEMO on how to assemble the Mermaid Roll cake and book signing this Sunday 4th Aug, 130pm at Start Vista Redman. My cookbooks will be on special offer during the demo and there will be shopping vouchers too!

Hope to see you there!

With lots of love,

Susanne


Read More »

Sunday 28 July 2024

Baby Shower Macarons

 Our friends welcomed a baby girl into their lives recently so these were made for them!


I used my default Swiss meringue method recipe to make the macaron shells. Here are some pictures of the piped batter:


I decorated the macaron shells with edible marker and royal icing. I filled the macarons with either Hojicha chocolate ganache or mixed berry ganache. Both of which are dairy-free to facilitate gifting people in hot tropical Singapore's weather.


You may refer to this post for the mixed berry ganache recipe. I can't share the hojicha chocolate ganache recipe as it's used for my hedgehog macaron class.

You may have a look at the reel for the tutorial of the process:

https://www.instagram.com/reel/C9Rzyqby3-F/?igsh=MW5hdTl2Z2RpZmxucw==


with love,

Phay Shing

Read More »

Sunday 21 July 2024

Jellycat Avocado, Egg & Toast Marshmallows (Using egg white powder)

 It's been some time since I made marshmallows. Honestly, I didn't feel motivated to make them again until I had the motivation to try using powdered egg whites instead of fresh egg whites. Presenting my avocado, egg and toast Jellycat marshmallows!


You may see my reel over here on how to use powdered egg whites for marshmallow making:


This experiment came about because in some countries, the use of raw fresh egg whites is against cottage laws.

Here's a picture of the piped batter:


Marshmallows taste the best toasted because of that caramelized crisp layer and soft gooey insides.


Paired with chocolate is great!


Here's a reel showing how squishy the marshmallows are and the piping video tutorial:


https://www.instagram.com/reel/C8-rDFlyBCe/?igsh=MTN0OWNwNTFtZzJ5Yw==


with love,

Phay Shing

Read More »

Sunday 14 July 2024

Pompompurin Lemon Bars

 This impromptu bake happened because I had extra egg yolks and lemons lying around!


I had exactly 4 extra yolks and 4 lemons to use up so it's about half the reference recipe I used from Serious Eats.
The only thing was I didn't want to end up having half an egg leftover from a bake that is trying to use up leftovers so I tweaked the ratios slightly to fit a pan size that happens to be slightly bigger than half the pan size in the reference recipe. So everything worked out well!

Although I made lemon bars before in the past over here for a sugar-free version, I prefer this recipe for two reasons. 1. The cookie crust remains crispy even after a few days due to icing sugar used instead of castor sugar. 2. There's no flour in the lemon layer so it's more like lemon custard.

Lemon Bars
Makes about 8 squares in 4x9" tray

Cookie base:
70g plain flour 
35g icing sugar
1/8 tsp salt
1 lemon zest
65g cold butter

🔸Blitz everything in blender until it resembles fine breadcrumbs
🔸Press into loaf pan lined with parchment paper overhanging off the edges for ease of lifting off the pan
🔸Bake at 180C for 22-25 min or until lightly browned

Lemon filling:
190g sugar
2 eggs
4 egg yolks
3 lemon zest
Pinch of salt
160g lemon juice (about 3.5-4 lemons)

🔸Whisk everything except lemon juice in a saucepan. Add lemon juice & whisk
🔸Whisk on low heat for 3 min till warm. Increase to med-low heat. Whisk until 77C & thickened
🔸Pour through a sieve onto baked cookie base
🔸Bake at 180C with foil covering tray. I used top heat only for 20min or until firm to avoid burning the cookie base
🔸Cool uncovered. Refrigerate covered for at least 1-2 hours before cutting into squares.
🔸Decorate with melted chocolate. I used my Pompompurin macaron template so I didn't have to pipe by freehand 🤭

Piping chocolate

I set the piped chocolate in the freezer for a few minutes before carefully using tweezers to place them on the bars.


The bars can be stored in the fridge for a few days.


with love,

Phay Shing

Read More »

Monday 8 July 2024

Capybara Chiffon Cakes


Capybara chiffon cake tutorial ₍ᐢ•(ܫ)•ᐢ₎ 💕 
Found those capybaras so cute! ❤️ Do they look like they are sitting around the campfire? 🥰 
And this capybara song is stuck in my head 😂 

Video tutorial here

With lots of love, 

Susanne 

Read More »

Sunday 7 July 2024

Capybara Yuzu Tea Steamed Buns

It's been a loooong while since I made cute steamed buns! I finally decided to play with dough again because I had some leftover yuzu tea from a kid's chiffon cake class.


Look at how fluffy it is!


The citrusy note was delightful too! These buns pair well with any sweet breakfast spread and they are nice as they are too. My kids love it!

I adapted the recipe from teacher Meiji's book and you can see the last time I tried character bun based on her book over here. Yes it's been a good 6+ years since then. That's why I am out of practice and struggled with working fast enough for smooth surface. I decided to knead the dough by hand as usual which wasn't such a good idea if I wanted the surface to be really smooth. That's despite using cold liquid. If you use a standmixer, please double the amount in the recipe as it is easier for the mixer to handle a larger volume of dough.

I shared the recipe in the caption of my reel but will copy and paste it in the blog for those of you who have difficulty reading captions on Instagram. Please watch the reel to have a view of the process.


Capybara Yuzu Tea Steamed Buns
Ingredients:
(Makes about 7 mini buns)
85g cold yuzu tea*
15g caster sugar
A pinch of salt
1/3 tsp (1g) instant yeast 
6g neutral flavoured oil
150g plain flour
1/4 tsp + 1/8 tsp cocoa powder
Extra water & flour as needed

* Blend 60g of yuzu jam with as much of the rind as you like with 60g hot water. Sieve through fine sieve. Reserve 85g & refrigerate for at least 2 hours before use.

Steps:
1. Whisk first 4 ingredients together. Add flour & 1/4 tsp cocoa powder

2. Knead until dough is smooth & elastic. I hand kneaded but it's better to use a standmixer to work faster for a smoother finishing. Double the recipe if using standmixer. Add water/flour if the dough is too dry/sticky

3. Divide the dough into six-seven portions 30-35g each. Add 1/8 tsp cocoa powder & a little water to the remaining dough to colour it darker brown. Keep any dough that is set aside loosely covered to prevent drying out 

4. Shape the head from the light coloured dough. Place on a piece of parchment. Add the snout & ears, sticking them on by brushing the surface of the dough with a little water

5. Set in a warm, moist enclosed place (35-40C) to proof the buns until they expand to 1.5x original size (about 40 min for me)

6. Steam for 15 min over medium heat. Turn off heat & rest for 5 min before opening the cover. I used wooden steaming baskets to prevent water from dripping onto the buns. You may wrap the lid with a towel if you don't have the baskets

Enjoy while hot! These citrusy buns can be paired with any sweet breakfast spread or eaten on their own. Keep leftovers in the freezer in airtight condition & steam from frozen until hot. They taste as good as fresh!


with love,

Phay Shing

Read More »