Monday, 6 June 2016

Charlie Brown and Snoopy Lemon Macarons

This request for Charlie Brown macarons came at a time when I was really busy but I managed to squeeze it in together with woodland creature and piano keyboard macarons!


I had leftover batter from making the keyboard so a few Snoopies were born!

Although I made only several of these macarons, I will type out the full recipe for baking half of them as Charlie Brown and half of them as Snoopy.

Please refer to this post for video tutorials of macaron basics, this post for video tutorials of piping complex shapes and my Creative Baking: Macarons book for more details and pointers. I will just briefly describe the process here.

Macaron shell recipe (makes about 40-50 macarons, 80-100 shells)
Ingredients:
Mass
200g superfine almond powder
200g icing sugar
80g egg whites
1/8 tsp salt (optional)
A pinch of Dutch processed cocoa powder
A drop of orange gel food colouring
A tiny dip of copper coloured gel food colouring
1 tsp Charcoal powder
Black gel food colouring
White powder / gel food colouring

Italian meringue
200g caster sugar
75ml water
80g egg whites
1/8 tsp cream of tartar (optional)


Steps:
1. Prepare baking tray with templates for Snoopy and Charlie Brown, and baking sheets.

2. Prepare mass. Combine sifted almond and  icing sugar in a large bowl. Add egg whites and mix well to form a paste. Divide the batter into ratio of 4:3:1 for beige:white:black. Colour the masses accordingly. Beige is created by adding  pinch of cocoa powder, a bit of orange and copper gel food colouring. The resulting mass should appear pale brownish orange. Add charcoal and black gel colouring for black mass. Add white colouring to colour white.

3. Prepare Italian meringue. Heat sugar and water in a small saucepan until 115°C. In the mean time, beat egg whites in clean metal bowl with electric mixer at medium low speed until soft peaks form. Reduce mixer speed if necessary. Once syrup is ready, increase mixer speed to medium high and carefully pour syrup into egg whites in a thin stream. Continue beating on high for 10 minutes or until meringue is stiff, glossy and cool. Divide meringue for the various colours according to the formula weight of meringue = 0.55 x weight of mass.

4. Fold meringue into mass in two additions  until it flows off the spatula in a slow-moving lava-like manner.

5. Transfer batter into piping bags fitted with the appropriate tip sizes. Pipe the characters onto the baking tray. Remember to bang the tray on the table after each stage of piping. Use a toothpick to pull the batter where necessary or to pop stubborn air bubbles.

Piping Charlie Brown

Piping Snoopy

6. Dry the piped shells in aircon room and/or under a fan until you are able to run a finger across the shells without feeling any stickiness. About 1-2 hours.

7. Bake in preheated oven at 140°C for 10 minutes with tray at lowest rack. Rotate the tray and bake for another 10 minutes at 130°C. If the feet still appear wet, bake for another 5 minutes at 120°C. Let the shells cool completely before removing from baking sheet.

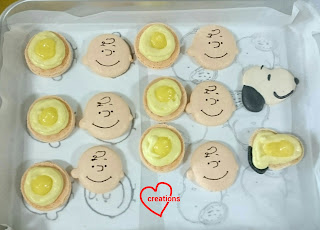
I used a fine edible marker to draw Charlie Brown's face by freehand. I guess after a year plus of making fancy macarons and cookies, I am more able to draw by freehand more confidently :p. You may use a template to trace the face on but I didn't feel like putting in the extra work which turned out unnecessary.

Decorated shells


I filled the shells with lemon white chocolate ganache and lemon curd as requested.

Recipe for lemon curd may be found here. Replace lime with lemon.

Lemon white chocolate ganache recipe
Ingredients (Fills about 12 macarons):
55g white chocolate, chopped
5g vegetable shortening
5g unsalted butter
6g lemon juice*
6g lemon curd*
6g heavy cream*
Zest of a lemon
1/8 tsp lemon paste (optional)
1/3 tsp fine sea salt

*you may use 9g lemon juice and 9g cream if you don't have lemon curd available or don't intend to use it.

Steps:
1. Place white chocolate, shortening and butter in a microwave-safe bowl. Heat using medium power for 10 seconds and stir. Repeat until all the chocolate is melted and smooth.

2. Place the rest of the ingredients in a small saucepan and heat over low heat until it starts to bubble. Pour over melted chocolate and stir until well combined.

3. Refrigerate for 10 minutes and beat the mixture with a spatula until creamy and homogenous. If it still appears runny, put back in the fridge for another 5 minutes and repeat beating the mixture until it is able to hold a stiff peak.

4. Transfer the ganache into piping bag and pipe a ring on the bottom shell.

See the bits of lemon zest in the ganache?

5. Fill another piping bag with lemon curd and pipe to fill the centers.

Filling up the center with lemon curd

Store in airtight container for at least 24h before serving.

These were very well received in terms of looks and taste! The birthday girl couldn't stop laughing when she saw the box of Charlie Brown's :D.


With love,
Phay Shing
Read More »

Thursday, 2 June 2016

Banana Macarons with Whipped Earl Grey White Chocolate Ganache

I had a request for some banana shaped macarons filled with Earl grey flavoured filling. Here they are :)


These bananas along with giant monkey and coconut tree macarons were meant to be cake topper decorations for a lychee rose sponge and pudding cake.

I had plans to slow down and take a break from baking for orders during the June school holidays as it's been really tiring juggling all the family demands and creating bakes that have to be fantastic in looks and taste. I only had one assignment planned for the last week of baking before my "sabbatical" so I took my time to enjoy the ride :). Therefore the realistic looking bananas! I went all out to have fun decorating them!

I made the macarons using the regular recipe without sugar reduction as the shapes involved are complex. I made minion macarons, giant monkey and coconut macarons along with these bananas in one baking session. The realistic highlights on the macaron shells were created by using edible marker and some gel food colouring dissolved in vodka. A fine brush was used to blend in the colours. I will type out the recipe for a full batch of banana macarons even though I made only 10.

Please refer to this post for video tutorials of macaron basics, this post for video tutorials of piping complex shapes and my Creative Baking: Macarons book for more details and pointers. I will just briefly describe the process here.

Macaron shell recipe (makes about 60 macarons, 120 shells)
Ingredients:
Mass
200g superfine almond powder
200g icing sugar
80g egg whites
1/8 tsp salt (optional)
5g Queen's natural yellow powder food colouring (omit if unavailable and replace with more yellow gel colouring )
2-3 drops of yellow gel food colouring
1/8 tsp Dutch processed cocoa powder

Italian meringue
200g caster sugar
75ml water
80g egg whites
1/8 tsp cream of tartar (optional)

Queen's natural yellow powder food colouring 

Steps:
1. Prepare baking tray with template and baking sheet.

2. Prepare mass. Combine sifted almond, yellow powder and  icing sugar in a large bowl. Add egg whites and mix well to form a paste. Add yellow gel until desired shade is obtained.

3. Prepare Italian meringue. Heat sugar and water in a small saucepan until 115°C. In the mean time, beat egg whites in clean metal bowl with electric mixer at medium low speed until soft peaks form. Reduce mixer speed if necessary. Once syrup is ready, increase mixer speed to medium high and carefully pour syrup into egg whites in a thin stream. Continue beating on high for 10 minutes or until meringue is stiff, glossy and cool.

4. Fold meringue into mass in two additions until just combined. Scoop out 1 tbs of batter and add cocoa powder to it. Continue folding batter until it flows off the spatula in a slow-moving lava-like manner. It's ok to overfold the brown batter a little.

5. Transfer yellow batter into piping bag fitted with #6 Wilton tip (about 4mm diameter). Transfer brown batter into piping bag fitted with #4 tip. Remember to bang the tray on the table after each stage of piping. Use a toothpick to pull the batter where necessary or to pop stubborn air bubbles. The 3D pop-up look of the bananas was created by piping the 1st and 3rd bananas in each bunch and letting them dry till a sticky membrane forms before piping the middle banana. Here's the sequence of piping...


6. Dry the shells in aircon room and/or under a fan until the surface is dry to touch. About 1-2 hours.

7. Bake in preheated oven at 140°C for 10 minutes on lowest rack, followed by 130°C for 7-8 minutes or until feet no longer appears wet. Cool completely before removing from baking sheet.

Freshly baked shells! I have started decorating one of them. Can you tell which one it is?


The next part involved decorating the shells. You may leave it as it is if you are happy with the look. If you want to venture on to create the realistic look, go ahead :).

I dissolved some green gel food colouring in vodka and painted it on near both ends of each banana to create a subtle green tinge.


Next, I applied very gentle pressure to create dotted lines along the length of the bananas and quickly applied some vodka wash gently with a brush to create a brown washed out effect along the length of the bananas.


I used brown edible marker to colour parts of the tips of the bananas to create darker brown shades and to create some rough texture look.

Everything is done subtly like makeup that makes a face look natural but beautiful so you may not see some of the colours very well in the photo.

Decorated macaron shells! Do they look real?

I filled the macarons with whipped Earl grey white chocolate ganache, a filling that is really good and stable at Singapore's room temperature (27°C), flavorful and not too sweet.


Thank God that they were very well received along with the cake. Everyone was impressed by how real the bananas looked :)

With love,
Phay Shing

Read More »

Monday, 30 May 2016

Strawberries n Cream Vanilla Chiffon Cake with Dark Chocolate Minion Macarons

My friend requested for a Minion strawberries and cream cake for her son's birthday. Here it is!

You can almost hear them shouting "Happy Birthday!"

The Minion cake toppers are macarons filled with dark chocolate ganache. You may refer to this post for the macarons. I gently inserted a toothpick into the filling of each macaron so that the macaron figures are able to stand on the cake.

As my friend prefers a less sweet cake, I have taken care to use less sugar in the cake for a light tasting version. If you have a sweet tooth, do increase the amount of sugar used.

I created a rectangular cake without the help of cake rings. I will show you how it is done in this post. The cake is mounted on a 6x9" cake board.

Vanilla chiffon sponge recipe
Ingredients:
Plain thick layer cake (10 x12" tray)
3 egg yolks
10g caster sugar
42g vegetable/canola oil
42g fresh milk
56g cake flour
1/16tsp salt
1 tsp vanilla extract

4 egg whites
1/4 tsp cream of tartar
40g caster sugar

Green thin layer cake (10x12" tray)
2 egg yolks
5g caster sugar
28g oil
28g milk
38g cake flour
A pinch of salt
1/2 tsp vanilla extract
Green and yellow gel food colouring

3 egg whites
1/5 tsp cream of tartar
30g caster sugar

Steps:
1. Line baking trays with baking paper. Set oven rack to second lowest position. Place a tray of water at the bottom of the oven (optional). This is to create steam. Preheat oven to 160°C.

2. Prepare egg yolk batter. Whisk together egg yolks and sugar until pale and thick. Add oil and whisk until combined. Add milk and vanilla extract. Whisk until combined. Gradually add in sifted flour and salt. Whisk until no trace of flour is seen. Add colouring and mix well.

3. Prepare meringue. With an electric mixer, beat egg whites with cream of tartar until firm peaks or just reaching stiff peaks, gradually adding sugar once the egg whites are foamy.

4. Quickly but gently fold the meringue into egg yolk batter in three additions. Pour into prepared trays. Tap the trays on table to release trapped air.

5. Bake for 13-18 minutes depending on thickness of layer. Use a toothpick to check for doneness.

6. Flip the cake onto another baking sheet and gently peel the baking sheet off from the cake. Cool with baking sheet over cake.


Vanilla cream
Ingredients:
250g dairy cream, chilled (I used Millac Gold with stabilizers added)
2tbs icing sugar
1/2 tsp vanilla extract

Steps:
1. Chill the mixing bowl or prepare an ice bath that can fit the mixing bowl.

2. Beat the cream with icing sugar until  firm peaks form.

3. Add vanilla and beat until stiff peaks form. If using pure dairy cream, be careful not to over whip or the cream will separate.


Assembly
1. Place cakeboard on a tray lined with baking sheet for easy removal and transport of the cake in between steps. Cut the base vanilla cake according to size of cakeboard with a long serrated knife. Do the same for top vanilla cake and thin green layer cake.


2. Apply a thin layer of cream with spatula. Place strawberries on. Cut the strawberries to roughly the same height to ensure the top layers of cake are level.


3. Pile up more cream to cover the strawberries.


4. Place plain vanilla sponge on top to sandwich the strawberries and cream. Apply a very thin layer of cream and place the green layer cake on top. Both pieces of cake are cut to roughly the size of the cakeboard.

5. Press the cake down firmly but gently to squeeze the cream into the crevices between the strawberries.


6. Freeze for 1h with cling wrap covering the whole assembly. Use a long serrated knife to cut the edges to reveal strawberries. Wipe knife cleanly after each cut.

Ta-dah! No need for cake rings, turntables or tricky frosting top and sides of cake with cream


Decoration is simple but cute enough. Simply use a daisy flower cookie cutter to cut out some green cake and half it with a knife to create some tufts of grass. Stick them on with a bit of cream. You may wish to brush a little syrup (dissolve 10g sugar in 20ml water) on the "grass" to keep it moist. As quite a few words are required for the birthday message, I decided to print out a banner instead of thinking about how to write it with food. The way the minions are posing is screaming for a banner to be over their heads!

Pack the macarons in a separate box and assemble them on the cake just before serving. Store both cake and macarons in the fridge. Best served the day after assembly!

Thank God everyone loved the cake and macarons!

With love,
Phay Shing

Read More »

Sunday, 29 May 2016

'Crab' Salted Egg yolk Chiffon with Salted egg yolk Lava


I made this 'Crab' Salted Egg yolk Chiffon with flowing Salted egg yolk lava for my dad's birthday, and also to try out for one of the cakes in the 2nd chiffon book, Deco Chiffon Cakes that I am working on right now. It's seriously good!! I make chiffon cakes day in and day out but I can tell you this is seriously good! I'm so in love with this flavour and the oozing custard, and also a big fan of the salted egg yolk lava croissant! My dear daddy loves crabs and salted egg yolk, so he inspired the design. The recipe/technique will be in the Deco Chiffon Cakes coming out soon this year though I really can't wait to share it with you.

And here's a sneak peak of the cute chiffon crab topper in the book! It crawled off my salted egg yolk chiffon onto my giant pineapple tart lol =p

With lots of love,
Susanne

Read More »

Thursday, 26 May 2016

Safari Animals Assorted Macarons

I made this a couple of months ago but finally deciding to post it because this post has been "collecting dust" sitting as a draft :p. I had a request for safari themed macarons but with a slightly different set this time compared to my first attempt last year :).


Instead of zebras, I made monkeys! Natural food colouring was used as far as possible. Carrot powder for orange, purple sweet potato powder for purple, Queen's natural sourced yellow powder for yellow and Dutch processed cocoa powder for brown.

Checkout my Creative Baking: Macarons book for a more systematic and detailed step by step writeup of macaron basics and pointers!


Ingredients:
200g almond powder/ground almond, preferably superfine
200g icing sugar
200g caster sugar
160g egg whites, divide into two equal portions
75 ml water
carrot powder (optional)*
Queen's natural sourced yellow food colouring powder (optional)*
Dutch processed cocoa powder*
Yellow, purple and orange gel food colouring

* add a few grams of natural powders per 100g of almond. For light brown, start off with a pinch first. Gradually add until a shade you like is obtained. Remember that the shade will lighten up significantly when meringue is added. Add a little yellow and orange gel food colouring to brown to make the shade warmer.

Here's a photo of the carrot powder my hubby bought from Akari at Anchorpoint!


Steps:
1. Make the mass. Sift together icing sugar and almond powder. Add 80g of egg white and mix well to form a thick paste.

2. Divide the mass into the ratio of 2:2:2:1:1 for orange:purple:yellow:light brown:dark brown. You may have excess of some colours but it's easier to divide this way.

3. Add sifted natural powder colouring to the respective masses and mix well. Add additional gel food colouring to get the desired shade. It is optional to use natural food colouring if you don't have but it helps to reduce the amount of artificial colouring needed. Here's how the orange mass looks like when coloured with just carrot powder...


4. Make the Italian meringue. Heat caster sugar and water in a small sauce pan without stirring until the syrup temperature reaches 115°C. In the mean time, beat 80g of egg whites in a clean metal bowl with electric mixer at medium-low speed until foamy and opaque. Do not beat past the soft peak stage. Turn the mixer speed down if necessary to keep egg whites moving. Once syrup reaches 115°C, remove from heat, turn mixer speed up to medium-high and slowly pour the syrup into the egg whites. Keep beating for 10 minutes until meringue is stiff, glossy and cool.

5. Divide the meringue into the ratio for the various colours, or follow this formula that I use for meringue: mass ratio by weight, I.e. weight of meringue/weight of mass=0.55. By following this formula, you will end up with a little meringue leftover, which can be used to stick the baking paper onto the tray. Fold the meringue into the masses in two additions, with the first addition using about a third of the portion. Do watch my video demo for the macaronage process and how to test if the batter is ready. Fold until batter moves in a slow-moving lava-like manner.

6. Transfer batter into piping bags fitted with a Wilton #10 tip for most of the piping, except for fine parts where you may want to transfer about 1-2 tbs of batter into piping bags fitted with a Wilton #5 tip. You may refer to the video tutorials here for piping simple shapes and here for piping complex shapes. Remember to bang the tray a few times on the table after piping.


I piped the hippo a little differently this time, with indented nostrils. I can't release the details here of how to make it as it will be in my upcoming Creative Baking: Macaron Basics book

Giraffe is the same as my previous safari bake. To pipe the monkey, start with the dark brown outline, then fill in the light brown part of the face.

Tiger is the same as my previous safari bake.

7. Dry the piped shells under a fan or in an aircon room for 1-2 hours or until the shell is dry to touch.

8. Bake in preheated oven at 135°C for 17-20 minuted with oven rack set at lowest position. Bake for a few minutes more at 120°C if the shells are still stuck to the baking sheet or the feet appear wet. Let the shells cool before removing from baking sheet. They should be able to come off the sheets easily if properly baked.

Use royal icing and edible marker to decorate the shells as desired.

I filled the macarons with spiced apple swiss meringue buttercream and salted caramel or dark chocolate ganache.


Enjoy these cute treats! I heard they were gone from the dessert table at the party really fast!

With love,
Phay Shing

Read More »

Monday, 23 May 2016

Woodland Creature Macarons with Salted Caramel or Coconut Ganache Filling

When I received the reference pictures of a set of woodland creatures to make into macarons, I was so charmed by them that I knew the final product would be gorgeous and enchanting! Here they are!

Don't they look like they popped out of a storybook? I can almost imagine them talking to each other!

I used the basic recipe without sugar reduction for these macarons as I was making other complex shaped macarons at the same time. Please refer to this post for video tutorials of macaron basics, this post for video tutorials of piping complex shapes and my Creative Baking: Macarons book for more details and pointers. I will just briefly describe the process here.

Macaron shell recipe
Ingredients:
Mass
200g superfine almond powder
200g icing sugar
80g egg whites
1/8 tsp salt (optional)
Yellow, orange, dusty rose, copper and black gel food colouring*
Dutch processed cocoa powder*
Charcoal powder*

Italian meringue
200g caster sugar
75ml water
80g egg whites
1/8 tsp cream of tartar (optional)

* These are the natural and artificial food colouring I used for the various colours. I didn't measure the exact amount but added a little at a time until I was satisfied with the shade of colour. I apologise for the imprecise colouring measurements here. It would have taken too long to work out the exact amounts so I played by ear. I made these along with the piano keyboard, Charlie Brown and Snoopy macarons.

Steps:
1. Prepare baking tray with template and baking sheet.

2. Prepare mass. Combine sifted almond and icing sugar in a large bowl. Add egg whites and mix well to form a paste. Divide mass into portions for different colours. Add respective colouring. Divide the mass according to estimated percentage of surface area that each colour covers.

3. Prepare Italian meringue. Heat sugar and water in a small saucepan until 115°C. In the mean time, beat egg whites in clean metal bowl with electric mixer at medium low speed until soft peaks form. Reduce mixer speed if necessary. Once syrup is ready, increase mixer speed to medium high and carefully pour syrup into egg whites in a thin stream. Continue beating on high for 10 minutes or until meringue is stiff, glossy and cool.

4. Divide meringue into portions for the different coloured batters according to formula weight of meringue = 0.55 x weight of mass. Fold meringue into mass in two additions until batter flows off the spatula in a slow-moving lava-like manner.

5. Transfer into piping bags fitted with round piping tips of appropriate sizes and pipe. Remember to bang the tray on the table after each stage of piping. Use a toothpick to pull the batter where necessary or to pop stubborn air bubbles.

Piping hedgehogs! Use a toothpick to create the prickles on the back 

Piping fox! Remember to dry the body before piping on the front legs for 3D effect 

Piping bear! 

Piping rabbit!

6. Dry the shells under the fan and/or in an air-conditioned room for 1-2 hours or until the shells are dry to touch. Preheat oven to 140°C towards end of drying time. Set rack to lowest position.

7. Bake for 10 minutes. Rotate tray and bake at 130°C for another 7-8 minutes before checking the feet of the shells to test for doneness. If the feet appear wet, place the macarons back in the oven and bake for another 5 minutes at 120°C. Cool completely before removing shells from baking paper.

I stored the shells like this overnight to work on them the next day. Simply put the whole tray of shells into a jumbo ziplock bag.

Add on the details with royal icing and edible marker.

Freshly decorated!

I filled half of the macarons with whipped coconut white chocolate ganache. This is a new flavour and so glad that the coconut aroma is strong!

Whipped coconut white chocolate ganache
Ingredients (fills about 25 macarons):
100g white chocolate chopped (I used 110g and found it slightly too sweet)
30g vegetable shortening
30g coconut oil (use a good brand for best results)
80g coconut cream (thick coconut milk)
1/4 tsp salt
1/8 tsp coconut flavouring (optional)

Steps :
1. Place white chocolate, shortening and oil into a microwave-safe bowl. Heat at medium power for 10-20 seconds and stir. Repeat until all the white chocolate is melted.

2. Place coconut cream in a small saucepan and heat at low heat until it bubbles. Pour into white chocolate mixture and stir in one direction until combined.

3. Add salt and coconut flavouring (if using) and stir with spatula until well combined.

4. Freeze for 2 minutes and stir with spatula until mixture is even. The mixture may separate if you store it longer in the fridge but that's ok. Just repeat until consistency thickens and becomes toothpaste-like. Switch to electric mixer and beat on medium low speed until smooth and creamy.  About a couple of minutes. You may need to repeat freezing the mixture for another minute before beating with electric mixer again if the cream is too runny and unable to hold a stiff peak. An ice bath may work too if you don't want to keep putting the mixture in and out of the freezer.

Creamy and smooth whipped coconut ganache! Very coconut-y too!

5. Transfer into piping bag and pipe onto shells. For best intense flavour, store in airtight container in fridge overnight or 24h before serving. After 2-3 days of storage, the intensity of the coconut flavour may
be reduced.


I filled the other half of the macarons with salted caramel swiss meringue buttercream with pure salted caramel at the center. You may refer to this post for the basic swiss meringue buttercream recipe and the salted caramel recipe. Make salted caramel swiss meringue buttercream by beating together 80g of salted caramel with every 100g of swiss meringue buttercream.


So glad these were very well received at the party!

With love,
Phay Shing


Read More »

Friday, 20 May 2016

Donald and Daisy Tsum Tsum Rainbow Stripes Chiffon Cake


I made this Donald and Daisy Tsum Tsum for an old school friend! It was one of my last cakes before my month long break to prepare for chiffon cakes for photoshoots for the new cookbook Deco Chiffon Cakes.

The recipe for the Rainbow Stripes Tiedye Vanilla Chiffon Cake is here.

Here I used a round 9-inch tube pan. So I scaled the recipe 'divided by 5 times 8'. Baking time as follows: 160°C for 15 min, 150°C for 10 min, 140°C for 20 min, then 130°C for 15+ min, or until skewer comes clean. The temperature gradient is to prevent browning.

The Tsum Tsum is made the same as as my Rainbow Pooh Piglet Tsum Tsum. I used two 4-inch Iwaki glass bowls (picture below) to sandwich a chiffon cake from a 4-inch tube pan (you know those super mini cute ones in baking shops). The beak was cut from cake pops and I baked a charcoal chiffon sheet cake to cut out the facial features. Rosy cheeks from Americolour pink food marker.


Thankful cake was well-received and the little girls were so happy and cute!

With lots of love,
Susanne

Read More »

Thursday, 19 May 2016

Minions and Monster Mike Macarons with Dark Chocolate Ganache

Here are some Minions and Mike macarons to brighten up your day :)


These macarons are actually for two different requests that came about the same time. The full-bodied minions are cake toppers for a strawberries and cream cake for my friend's son. The head-only version of the minions and Mike are for my cousin's fiance.

I used the basic recipe without sugar reduction for these macarons as I was making other complex shaped macarons at the same time. Please refer to this post for video tutorials of macaron basics, this post for video tutorials of piping complex shapes and my Creative Baking: Macarons book for more details and pointers. I will just briefly describe the process here.

Macaron shell recipe
Ingredients:
Mass
200g superfine almond powder
200g icing sugar
80g egg whites
1/8 tsp salt (optional)
Yellow, green, blue and black gel food colouring
Any other natural or powdered food colouring

Italian meringue
200g caster sugar
75ml water
80g egg whites
1/8 tsp cream of tartar (optional)

Steps:
1. Prepare baking tray with template and baking sheet.

2. Prepare mass. Combine sifted almond and icing sugar in a large bowl. Add egg whites and mix well to form a paste. Divide mass into portions for different colours. Add respective colouring. Divide the mass according to estimated surface area that each colour covers.

3. Prepare Italian meringue. Heat sugar and water in a small saucepan until 115°C. In the mean time, beat egg whites in clean metal bowl with electric mixer at medium low speed until soft peaks. Reduce mixer speed if necessary. Once syrup is ready, increase mixer speed to medium high and carefully pour syrup into egg whites in a thin stream. Continue beating on high for 10 minutes or until meringue is stiff, glossy and cool.

4. Divide meringue into portions for the different coloured batters according to formula weight of meringue = 0.55 x weight of mass. Fold meringue into mass in two additions until batter flows off the spatula in a slow-moving lava-like manner.

5. Transfer into piping bags fitted with round piping tips of aporopriate sizes and pipe. Remember to bang the tray on the table after each stage of piping. Use a toothpick to pull the batter where necessary or to pop stubborn air bubbles.

Piping minion heads and Mike

Piping full-bodied minions in stages.

6. Dry the shells under the fan and/or in an air-conditioned room for 1-2 hours or until the shells are dry to touch. Preheat oven to 140°C towards end of drying time. Set rack to lowest position.

7. Bake for 10 minutes. Rotate tray and bake at 130°C for another 7-8 minutes before checking the feet of the shells to test for doneness. If the feet appear wet, place the macarons back in the oven and bake for another 5 minutes at 120°C. Cool completely before removing shells from baking paper. Be extremely careful with the full-bodied minions as the arms are fragile and prone to breaking. I broke one arm off a minion while removing it from the baking sheet.

Freshly baked shells!

Add on the details with royal icing and edible marker for the mouth.


I filled the macarons with dark chocolate ganache. Refrigerate in airtight container for at least 24h before serving.


Here's a closer look at the awesome feet!


With love,
Phay Shing


Read More »

Monday, 16 May 2016

Sunflower Black Glutinous Rice Chiffon Sponge & Pudding Cake

I made this black glutinous rice sponge and pudding cake for my mum's birthday :)


It's my first humble attempt at making a mini tiered sponge and pudding cake. 4" cake on top of a 6" cake. You may refer to this post for the details on how to make the pulut chiffon sponge and pudding from the pulut hitam porridge itself. That post has a very detailed description so I will not go into details here. I have made black glutinous rice chiffon cakes before from black glutinous rice flour. However, this flour is not easily available in Singapore whereas packets of black glutinous rice grains are available in regular supermarkets. If you feel really lazy and don't want to go through the hassle of making the porridge, you may buy from your favourite dessert stall and make the cake with it. Adjust the amount of sugar added if you are using store bought porridge. My homemade version may be less sweet than what is sold outside.

This is a cake that came about much experimentation to get the right balance of strong pulut hitam flavour with complementary coconut milk, Pandan and gula melaka flavours. Victoria of Victoria Bakes tried out the pulut hitam porridge and chiffon sponge recipes with some minor adaptations and made a swiss roll. She highly recommends the recipe so do give it a try if you are a fan of pulut hitam.

The details on how to make the sunflowers can be found in our Creative Baking: Chiffon Cakes book so I will not type it out here. Instead of orange flavoured cakes, I used Pandan flavour. I made Pandan juice, let it settle in the fridge for a couple of days and used the clear liquid at the top for making yellow and dark brown sheet cakes, and the dark green portion for making the green sheet cake for the leaves.

Just to share some photos of the flower making process...


Thank God that the cake was very well received by both young and old. Grandma loves it because it is not too sweet. Brother loves it because it is not too light (yes not everyone loves the lightness of plain chiffon cakes). My elder kid who is not a fan of cakes in general had 3 helpings and my hubby with a picky palate says it's good.


With lots of love,
Phay Shing
Read More »