Susanne has been very kind to share the recipe with me and patiently answered the questions I bombarded her with for my first bake. Here's the original recipe for making strawberry yoghurt chiffon cake:
Ingredients:
Egg yolk batter
3 egg yolks
15g caster sugar
30g vegetable oil
1/5 tsp salt
3/4 tsp vanilla essence
60g strawberry yoghurt
60g cake flour
Meringue
3 egg whites
37g caster sugar
1/5 tsp cream of tartar
Steps:
1.Preheat the oven to 160 degrees Celsius.
2. Start with the egg yolk batter by pouring egg yolks and sugar in a bowl. Whisk with a hand whisk until sugar dissolves.
3. Add vegetable oil, salt, vanilla essence and strawberry yoghurt, and mix well.
4. Fold in sifted flour gradually and whisk until no trace of flour can be seen.
5. In another bowl, whisk egg whites until frothy with an electric mixer and add in cream of tartar. Add sugar gradually and beat until the meringue forms stiff peaks. A good test to see if you have reached the stiff peak stage is to turn your mixing bowl upside down and the meringue should not fall out.
6. Fold in one third of the meringue into the egg yolk batter until no trace of meringue can be seen. Quickly but gently fold in the remaining meringue in two batches until well combined.
7. Pour the batter into a 17 cm chiffon tin and bake in a preheated oven at 160 degrees Celsius for 40-45 minutes.
8. Immediately invert the chiffon tin onto a cooling rack/ an upturned cup/ bottle after removing it from the oven and leave to cool completely. When the cake is cooled, remove the cake from the tin. Susanne pointed me to this very helpful video demo of how to unmould chiffon cakes from the tin using bare hands. The result is much cleaner than running a spatula or a knife around the cake to release it from the tin.
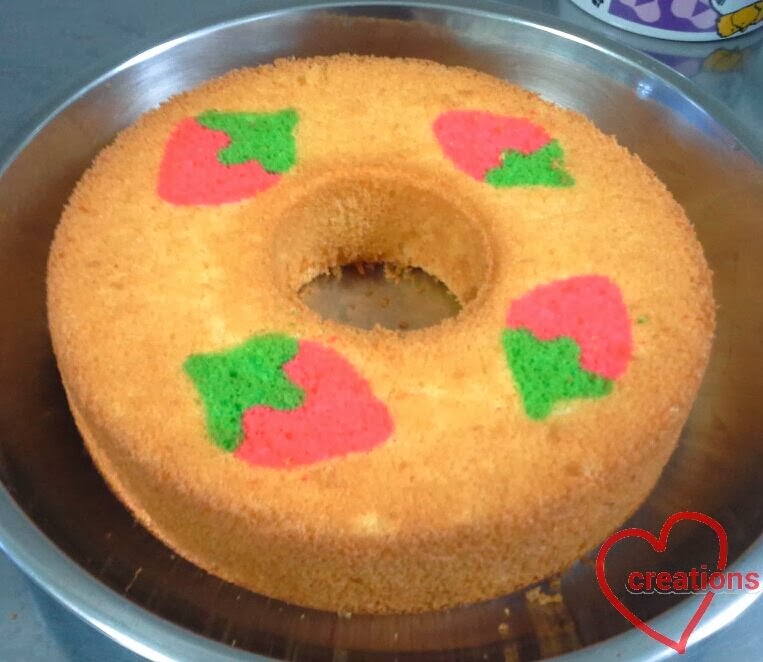
I have been playing with my kids' food for a few years now by making it look cute sometimes to entice the kids to eat. So I couldn't resist the opportunity to play around with patterning my first chiffon, risky as it sounds :P. I took about one heaped teaspoonful of egg yolk batter for each of the colors, red and green for patterning the cake. I added gel food coloring (Wilton) until a desired shade is reached. After getting all excited about making my chiffon look cute, I was stumped by how much meringue to add to the colored egg yolk batters. Having come so far, I decided to do a rough estimation and get on with it. I added 3-4 tablespoons of meringue into each of the colored batters, put them into piping bags with a No. 3 Wilton tip and piped the strawberry designs onto the base of the chiffon tin. I baked the designs for 1.5 minutes before pouring in the rest of the batter to bake.*
If you are an experienced chiffon baker, you would have realized that my main batter would not have enough meringue to make it light enough, especially since this recipe has the same number of egg yolks and whites. I only found that out when the cake came out of the oven :P.


As you can see the cake is not very tall. The cake was dense but very fragrant. On hindsight, I should have beaten another egg white separately as the meringue for the patterns. Overall, I was happy with my first attempt and was definitely motivated to try again :). I had some leftover colored batter so I decided to let my elder kid play with it.

We piped some designs on a baking sheet and baked it in our cheap (costs less than $30) and teeny toaster oven. The kids had fun eating the results although the "cakes" are a bit burnt around the edges :P.
I learn something new with each bake and definitely have fun baking chiffons that are arty-farty. Will share more of my experiences when I have the time.
With love,
Phay Shing
* After quite a few tries with patterning chiffon cakes, we realized that the batter for patterning is of a better consistency when cake flour is added. Stay tuned for up-coming posts for the improved method of patterning chiffons.
No comments:
Post a Comment