I have made many designs and themes of character macarons since 2015 but I have never made knight, dragon and castle themed ones before. So I was really excited to make one, in carousel form too!
The castle macarons were made as a backdrop so they are not part of the carousel so I took photos of them as loose pieces.
I used the Swiss meringue method for making the macarons. The bake was split into 2 separate days due to the many colours and rounds of baking involved.
Just to share some photos of the process...
Dragon piped macaron batter. I piped some plain rounds to bake for testing of colours for icing, edible marker and paint post-baking.
Castle piped batter. Everyone says this looks like a dress if you turn it upside down😂.
Knight piped batter.
Piped batter for mortarboard pieces. I put my thumb there to show how tiny they are!
Some of the freshly baked pieces of the carousel frame. This is the first time I made a yellow frame!
Decorated version of the dragon (minus the mortarboard), knight and castle. See what a big difference adding the details make!
The macarons are filled with mango white chocolate buttercream and dark chocolate ganache. Crunchy chocolate balls are added for the large macaron base.
I usually make my mango ganache with a combination of homemade mango compote and freeze-dried mango powder for a strong mango flavour. But as a carousel filling, I needed something really firm so no compote was used. My mango white chocolate buttercream is an adaptation from my usual mango ganache.
Mango white chocolate buttercream (firm and tart filling!)
Ingredients :
140g White chocolate (finely chopped or use chips)
42g Unsalted butter
A pinch of salt
28g Freeze-dried mango powder
1/4 tsp vanilla extract
Note: feel free to adjust the amount of mango powder and white chocolate according to taste and climate.
Steps:
1. Place everything in a microwave-safe bowl. Melt the butter and chocolate in bursts of 10 seconds on medium-low power. Mix well between heating cycles.
2. Set aside to let it firm up in aircon room for half an hour or in the fridge for a few minutes until toothpaste consistemcy. Whip it up to lighten the texture. Transfer into piping bag for use.
I couldn't resist taking a picture of the base as I think it is beautiful too!
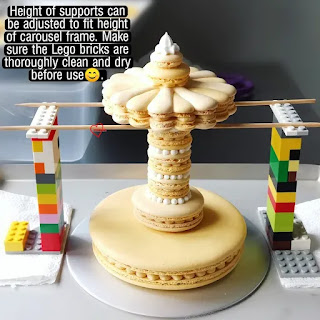
The filling was rather soft when I was assembling so I decided to share my method of assembling such that there is less risk of a carousel collapse. It's Lego to the rescue! You may use other things like retort stand or anything with adjustable height too but Lego is just so handy for me. I shared this little tutorial on how to use Lego as temporary supports during carousel assembly on Instagram.
The wooden skewers help to take some of the weight of the heavy roof.
To remove the skewers and Lego supports, carefully slide the paper towels under the supports away first. This will create some give between the roof and skewers so that it is easier to remove the skewers.
You may wish to assemble 3 (instead of 2 as shown here) of the 5 poles while the supports are still there if you want to be really sure there is no chance for collapse. Once the royal icing on the poles are set firm, the structure is very stable.


How did you pipe the dragon? I have both your books and there is no template. Also, did you pipe one color, wait to dry, and pipe the next color on it? Thank you!
ReplyDeleteThe dragon reference picture was provided by my client and this was a few years after both my macaron books were published so it's not in the books. The technique for piping depends on what effect you are going for. I would wait for sticky membrane to form before piping the next adjacent section or ad a pop-up feature. But if a clear boundary is not required, I just pipe straight away.
Delete