Tuesday 30 June 2015

Clownfish Macarons with Peppermint White Chocolate

I couldn't resist making a school of clownfish with orange coloured batter leftover from my crab macarons bake. Here they are!


My friend wanted whatever excess macarons I have from my big batch of bake but needed the filling to be able to withstand room temperature storage as she was giving away the macarons as gifts. I immediately thought of using melted chocolate as the filling base and spicing it up with a dash of peppermint.

Please refer to my crab macarons post for the recipe. Prepare a small portion of uncoloured/white batter (about 1/8 of the portion for orange batter) to create the stripes. But if you prefer not to have the hassle of preparing two types of batter, you can always add on the white stripes with royal icing after baking the shells. I wanted to take up the challenge of creating the fish almost entirely out of macaron batter.

I used Wilton #12 and #5 round tips for piping, using a toothpick to pull the batter for the mouth and tail sections. Let the body dry for 15 minutes before adding on the stripes and fin on the body. Tap the tray hard a few times after piping the body but before piping the stripes and fin.


Bake for 17-22 minutes at 130°C or until the shells are able to lift off the baking sheet easily.

Freshly baked clownfish!

Use white royal icing to pipe on the whites of the eyes. Use black icing (coloured with charcoal powder) for the eyes. Use black edible marker for filling in the details for the mouth, tail and fin.


Dab the inner surfaces of the shells with a little peppermint essence using a small brush.

Peppermint white chocolate *
45g chopped white chocolate/white chocolate chips
1/8 tsp (or 2-3 drops) peppermint essence

* I made enough filling for about 10 macarons so do scale accordingly to the size of your batch of macarons. Or use another filling if refrigeration is not an issue :).

Melt the white chocolate chips using the microwave oven, stirring in between 10 second bursts of heating at medium power. Alternatively, melt by double-boiling. Just make sure the water doesn't touch the base of the bowl containing the chocolate. Add peppermint essence and keep stirring until smooth and well combined.

Pipe the melted chocolate onto the shells.


Wait for the chocolate to set after assembly. You may speed it up by placing in the fridge for half an hour.

Store in airtight container in cool and dry place.

With love,
Phay Shing


Read More »

Sunday 28 June 2015

Barnyard Farm Animals Tier Chiffon Cake


This is my first attempt making a chiffon cake Barnyard with so many chiffon cake Farm animals! I was rather nervous about so much detailing required for the various animals and barnyard, so thank God for really helping me through this! The animals were cut and carved from small chiffon cake pops and I took 1 day to bake and 1 full day of carving and assembly for the various animals. In addition, I made a ‘Moo-moo’ top tier with Vanilla chiffon cake and Charcoal black patches, as well as a ‘Sky-green grass’ bottom tier with Vanilla Blue pea flowers chiffon cake (on top) and Pandan chiffon cake (below), and fencing made of Chocolate chiffon cake strips. The Barnyard was made from Strawberry Chiffon Cake. These took another 1.5-2 days. Really thank God the cake was very well-received in terms of taste and looks. Happy Birthday to Janelle!!

With lots of love,
Susanne

Read More »

Nautical Ombre Blue Iced Gems with Miniature Sailboats

After a hiatus of a few months, these gems are back! This time they appear in a nicely gradual shade of ombre blue and whimsical teeny sailboats riding on "waves"!


These old school iced gems are really easy to make so if you are a fan of these, do give it a try! No tricky meringue, electric mixers, folding techniques or eyeballing oven temperature needed ;).

Ombre blue gems was requested but I couldn't resist playing with the idea of using the blue icing to form waves! I borrowed the idea from Molang macarons to use sprinkles to form an object. I used chocolate rice and crescent shaped sprinkles to form part of the boat and used royal icing to put the parts together.


Let these babies air dry overnight before attempting to move them.

Recipe for biscuit base (makes about 220-230 biscuits)
Ingredients:
210g plain flour
30g icing sugar
1/8 tsp salt
3tsp baking powder
72g vegetable shortening (or unsalted butter if you prefer buttery taste)
84g milk (may not use all)
1 tsp vanilla extract

Steps:
1. Sift together flour, salt, sugar and baking powder.

2. Rub in shortening until mixture resembles fine breadcrumbs.

3. Add vanilla extract to the milk. Add the milk mixture gradually until a ball of dough can be formed. You may not need all of the milk.

4. Roll the dough to about 3mm thick between two baking sheets. Use a round cutter (about 2cm diameter) to cut out rounds.


5. Lay out the cutouts on baking tray lined with baking sheet. You may place them quite close together as they puff out upwards, not sideways.


6. Bake for 13-15 minutes at 170°C fan mode. Rotate the tray after about 9 minutes. Bake until golden brown. Do note that your baking time may vary from mine.

Freshly baked

Cool completely before icing. You may store in airtight container and ice another day.

 Recipe for royal icing*
Ingredients:
252g icing sugar
18g meringue powder
45g water
1/3 tsp vanilla extract
Wilton sky blue and royal blue gel colouring
Charcoal powder or black gel colouring

* If meringue powder is not easily available, you may make royal icing using raw egg whites. I am not comfortable feeding people raw egg whites so I use the baker's convention method :). Meringue powder can be found at any baking supplies store like Phoon Huat or even departmental store like Robinson's. If you do use raw egg whites, you may dry the iced biscuits in the oven at 70°C fan mode to "cook" the egg whites a little.

Steps:
1. Sift icing sugar and meringue powder together. Add water and vanilla extract and use a hand whisk or spatula to mix until well combined.

2. Use a handheld electric mixer and beat on lowest speed setting for 3-4 minutes, scraping down the sides of the bowl halfway through beating. The icing should be able to hold stiff peaks. I usually whisk by hand for about 6 minutes but with big batches of icing like this, it really takes quite a lot of arm strength. I resorted to using the electric mixer :p. Hand whisking has the advantage of introducing less air bubbles in your icing. Alternatively, some bloggers suggest using electric mixer with a paddle attachment to reduce air bubbles. I don't happen to have that around.


Portion out about 45g icing for each colour.

I could have used blue pea flowers to colour blue but due to the very subtle change in shades of blue spread over 6 portions, it would be hard to control the gradual change. Here's how I coloured:

1. Left as white icing
2. A tiny chopstick tip dip of sky blue gel
3. 3 small chopstick dips of sky blue
4. 5 small chopstick dips of sky blue and tiny dip of royal blue
5. 7 chopstick dips of sky blue, 3-4 chopstick dips of royal blue and very small pinch of charcoal powder.
6. 8-9 chopstick dips of sky blue, 5-6 dips of royal blue and use chopstick to scoop up a bit of charcoal 

Adjust the colours accordingly by doing a visual check.

Cover the bowl of icing with clingwrap until it is time to pipe the icing.

Ombre blue royal icing

Use a star tip to pipe on the trademark iced gem ruffles. Hold the piping tip perpendicular to the biscuit a few mm away from surface. Squeeze the piping bag and slowly lift upwards. Release pressure and lift off the tip sharply.

To pipe the wave-like icing, simply pipe a taller ruffle. Gently press the sailboat onto one side of the ruffle and bend it.

Lil' boats riding the waves!

Dry the iced gems in the oven at 60°C with the fan on for an hour to 1.5 hours or until icing is dry and biscuit is crunchy. I usually make some extras to do a taste test. Cool completely before storing in airtight container. You may pipe some icing on the baking sheet to test for doneness too. Once the icing can be lifted off the baking sheet and is completely dry, the iced gems should be ready. Still do a taste test with the biscuit just to make sure.

All packed for the party!

Do note that the gems with the sailboats will not survive this method of storage as shown in the photo. They have to be stored upright without any pressure on the icing. My kids had so much fun eating the gems with the tiny boats!

Keep a lookout for more nautical themed cookies in the near future :).

With love,
Phay Shing

Read More »

Thursday 25 June 2015

Crab Macarons with Salted Egg Yolk Swiss Meringue Buttercream

It's macaron mania for me again! But will try to intersperse the posts with other bakes so you don't get tired of seeing macarons all the time :p. I have a request for crab shaped macarons with salted egg yolk filling. I was quite excited about trying out this flavour as it is exotic and Asian. Perhaps something akin to 流沙包 (liu sha bao, salted egg yolk custard steamed bun) that is a popular Dim Sum item. Having no recipe as reference on the internet but some experience in making 流沙包 (liu sha bao), I was trying to decide between swiss meringue buttercream (smbc) and custard/ pastry cream as the filling base and finally decided on smbc after consulting hubby which texture would be nicer. He's got a better palate than me :). Here are my salted egg yolk crabs!


Natural colouring was used as far as possible as requested. I used a mixture of pink and yellow Queen's natural food colouring.


Some artificial colouring still had to be added for a more vibrant colour but not as much is needed.

Update 20/8/2015: Do checkout my video tutorial for macaronage and testing of batter consistency!

Recipe for macaron shells**
Ingredients (makes about 25-28 crabs, 50-56 shells):
100g ground almond
100g icing sugar
100g caster sugar
37g water
80g egg whites, divide into 2 equal portions, preferably aged
4g Queen's natural yellow powder food colouring*
4g Queen's natural pink powder food colouring*
3 drops orange gel food colouring

**Doubling the recipe may make it easier for making Italian meringue.
* Omit if don't have. Replace with gel coloring.

Steps:
1. Prepare template of crabs on baking tray with baking sheet over it. Use italian meringue to stick the baking sheet down if it is not flat. Sift together almond, icing sugar and coloured powder. (Top left picture below)

2. Add 40g of egg whites to 1. Mix well until a thick paste forms (top right picture). Add a few drops of orange gel colouring.

3. Prepare the Italian meringue. Heat caster sugar and water in a small saucepan while beating the rest of the egg whites in a clean metal bowl at medium low speed. Do not beat beyond soft peak stage. Reduce mixer speed if necessary. Do not stir the syrup once it boils. Once temperature reaches 115°C, remove from heat, increase mixer speed to high and slowly pour the syrup into the egg whites. Make sure the syrup doesn't fall on the beaters. Keep beating for another 10-12 minutes until stiff, glossy and cool.

4. Fold the meringue into the mass in two additions, adding about 1/3 for first addition. Picture on bottom left shows batter after first addition of meringue. You may add more colouring at this stage if necessary and don't really have to be careful with the way you fold. Just use the fold and press motion until the batter looks even. Leave about 2 tbs of meringue unused. Carefully fold in the rest of the meringue until it falls off the batter in a slow moving lava-like manner but not continuous. Underfold batter a little for macarons with fancy shapes. Bottom right picture shows the completed macaron batter.


5. Transfer about 2tbs of batter into piping bag fitted with Wilton #5 round tip. Transfer the rest of the batter into another piping bag fitted with a Wilton #12 round tip. Pipe ovals for the crab's body using the bigger tip. Tap the tray hard on the table a few times. Finish piping all the bodies before starting on the pincers and legs. Use the smaller tip to pipe the pincers and legs. Use a toothpick to pull the batter for the pincers.

Freshly piped! Note the dollops of Italian meringue used to hold the baking sheet down.

6. Dry the shells in aircon room for 1.5-2 hours or until tops of shells are dry to touch when you run a finger across the surface of the shells.

7. Bake the shells in preheated oven at 130°C for 17-22 minutes with the oven rack at lowest or second lowest position. Let the shells cool before attempting to remove. Bake for 5 minutes more if the shells are still stuck and check again.

You may check out this post for some detailed tips on macarons shell preparation techniques.

I made the crab eyes by piping some white royal icing onto baking sheet and oven drying with fan on for half an hour. I turned on the heat for a few seconds before switching it off. Make sure the icing is completely dry before attempting to remove from baking sheet. Stick the eyes onto the shells using a bit of royal icing.

Crabs with whites of eyes!

Use black royal icing to add in the blacks. I used charcoal to colour black. Draw the mouth using black edible marker or black icing.

Ta-dah! Happy crabs :)

Update 30/6/2016: Checkout my updated recipe for salted egg yolk flavoured macaron filling with extra oomph over here!


Salted egg yolk swiss meringue buttercream
Ingredients:
40g egg whites (about 1 jumbo egg or 1.5 eggs)
27g caster sugar
72g unsalted butter, cubed and softened but cool
Pinch of salt (optional)
1/2 tsp vanilla extract
3 salted egg yolk, approximately 32g***(steamed for 9min and mashed while hot)
1 tbs milk

*** you may add one more salted egg yolk as I personally find this attempt quite mild in taste but nicely sweet and slightly salty at the same time :).

Steps:
1. Add milk to mashed salted egg yolk and mix well. Press through a sieve to break up and get rid of big lumps. Set aside.


2. Prepare the smbc. Place egg white, salt and sugar in a metal bowl over a saucepan filled with about 1" of water. Make sure that the bottom of the bowl is not touching the water. Heat the saucepan over medium low heat while using a hand whisk to whisk the egg whites until foamy. Keep the egg whites moving. When the temperature reaches 71.1°C, remove from heat and beat on high speed with electric mixer until cool, stiff and glossy. About 10 minutes with a damp towel placed under the bowl to speed up the cooling.

3. Add butter one piece at a time to the meringue and beat until incorporated after each addition. Don't panic if it starts to curdle. Just keep beating and adding butter. It will all come together towards the end. Keep beating until you get a smooth cream.

4. Add vanilla extract and beat until incorporated. Gradually add salted egg yolk and beat until well mixed.

Salted egg yolk smbc!

As with all smbc, you may make this ahead of time and freeze it. Just thaw and rewhip before filling the macaron shells.

Filling up the shells!

Looking cheerful!

Store in airtight container in the fridge for at least 24h before consuming.

All packed!

I didn't use up all the orange batter to make crabs. Keep a lookout for another sea creature in my next macaron post that I made with extra batter. Clownfish!

Thank God that the recipient loved the look and taste of these crabs! I was a little apprehensive about how it would be received since it's my first attempt at this exotic flavour. She commented that they were tasty and not too sweet! I guess it's quite a feat for macarons not to be too sweet :p.

She has kindly shared a photo of the crabs at the party :)


With love,
Phay Shing


Read More »

Tuesday 23 June 2015

6 Flavour Rainbow Hearts Chiffon Cake (Updated flavours/natural colours) with Video tutorial


I first made this 6-Flavour Rainbow Hearts Chiffon Cake a while ago for my hubby. It’s a special chiffon cake with 6 flavours embedded into the cake (and also a heart in every one)! :) It all started because I was asking my hubby which flavour he would like the chiffon, he replied many flavours and this is the result of my wacky experiment! It was a really fun cake for my hubby and he enjoyed the many flavours in the horizontal slice.

This is my second attempt at the cake half a year later, with better skill and oven control! As requested, I replaced the azuki chiffon with strawberry chiffon cake, and matcha chiffon with pandan chiffon cake. I also increased the number of eggs in the recipe so as to obtain a taller cake. The different sectors are flavoured according to their natural colours: Red (strawberry), Orange (orange), Yellow (lemon), Green (pandan), Blue (blue pea flowers), Purple (blueberry). It’s a pretty time-consuming bake but a happy labour of love =).

Recipe with picture tutorials now in Creative Baking: Chiffon Cakes. Now out at all major bookstores!

Also available on AmazonBook Depository and Kinokuniya online.


This is my humble first video tutorial with a flip through of the Creative baking: Chiffon Cakes book. Hope you will enjoy this labour of love! My hubby helped me a lot with this video, so thanks to him!


With lots of love,
Susanne

This cake and its recipe has been featured on Straits Times in Feb 2016!


Read More »

Mickey Mouse Gloves and Pants Macarons

I have a request for Mickey Mouse gloves and pants macarons along with Mickey and Minnie Mouse cookiepops. Here they are :)

Salted caramel (gloves) and strawberry (pants) flavoured!

I was told that these were promptly snatched up at the party! Thank God they were well received :).

Recipe for strawberry and caramel shells
Ingredients (makes about 20 macaron pants and 25 macaron gloves. I only made 15 of each and played with leftover batter):
200g ground almond (extra fine)
200g icing sugar
200g caster sugar
75ml water
160g egg whites, preferably aged, divide into one 80g and two 40g portions

5g red yeast powder*
2g beetroot powder*
1/8 tsp red powder food colouring*
1/8 tsp strawberry emulco
A few drops red gel food colouring
1/2 tsp white powder food colouring*
1/8 tsp caramel essence*

*Ingredients for food colouring/flavouring that can be omitted. Just use gel food colouring if you are unable to obtain red yeast and beetroot powder

Steps:
1. Sift together ground almond and icing sugar. Divide into two portions. Place glove and pants templates on baking tray and line with baking sheet. If the sheet does not lie flat on the tray, use a bit of Italian meringue to stick it down.

2. Dissolve beetroot powder in one 40g portion of egg whites. Add sifted red yeast and red powder colouring to one portion of ground almond mixture. Add egg white with beetroot into the almond mixture. Add strawberry emulco and mix well until a mass forms. Add drops of red gel colouring until desired dark shade of red is achieved.

3. Add sifted white powdered coloring to the other almond mixture. Add 40g of egg whites and caramel essence and mix well until a mass forms. You may use white gel colouring or omit the use of colouring.

4. Make the Italian meringue. Heat caster sugar and water in a small saucepan without stirring once the water boils. At the same time, beat 80g of egg whites at medium low speed with electric mixer until foamy. Do not beat the egg whites beyond soft peak stage. Reduce mixer speed if necessary. Boil syrup until temperature reaches 115°C. Remove from heat. Increase mixer speed to high and slowly pour syrup into the egg whites, avoiding the beaters. Keep beating on high speed for 10-12 minutes until meringue is cool, stiff and glossy. Divide the meringue into two equal portions.

5. Fold the meringue into the mass in two additions, leaving about 2 tbs of meringue unused for each batter. First addition is about 1/3 of the meringue to lighten up the batter before adding the rest. Work on one coloured batter and complete piping out before folding the meringue into the other mass. The consistency should be such that the batter flows in a slightly discontinuous manner off the spatula, I.e. under folded. Checkout my video tutorials for the macaronage process.

The masses and macaron batter

6. Transfer the batter into piping bag. I used a Wilton #12 round tip to pipe out the pants.


I used a Wilton #10 round tip to pipe the main part of the gloves, air-dry for 15 minutes before piping the base of the glove with #5 round tip.


Tap the tray hard on the table to release any trapped air bubbles after piping.

7. Dry the shells for 2 hours or until the surface is no longer sticky to touch in an air con room.

8. Bake the pants at 130-140°C for 17-22 minutes with the rack at second lowest position in the oven. Rotate the tray halfway through baking. Let the shells cool on the tray before attempting to remove them. The shells should lift off easily from baking sheet. If it is still stuck, it's under baked. Bake for another 5 minutes at 120-130°C before checking again. Repeat if necessary.

Freshly baked pants! Sounds funny, I know :p

Bake the gloves at 120-130°C for 17-22 minutes with the rack at the lowest position.

Freshly baked gloves!

9. Decorate the shells with edible black marker and yellow royal icing.


10. Fill the shells with strawberry swiss meringue buttercream (smbc)...

I doubled the amount of strawberry emulco used

... And salted caramel smbc with salted caramel at the center...

I omitted the earl grey.

Keep the assembled macarons in airtight container and refrigerated for at least 24 h before consuming.

All packed and ready to party!

I made cute Molang with some leftover white macaron batter. Do check out those! I made something else with leftover red batter to freeze for another party since macaron shells freeze well. Will post about that when the time comes!

With love,
Phay Shing


Read More »

Sunday 21 June 2015

Mickey Mouse Gloves Tier Chiffon Cake


This is my first cake after a hiatus to Disneyland where we met Mickey mouse several times in person! Now I can understand why my friend's son loves cute Mickey gloves so much =). This is a tier version of the Mickey mouse chiffon cake. I added a vanilla chiffon cake tier on top decorated with polka dots. But the challenging part was in carving out the gloves from chiffon cake which took half a day. Made with lots of love, happy birthday to Rayne!
Susanne
Read More »

Saturday 20 June 2015

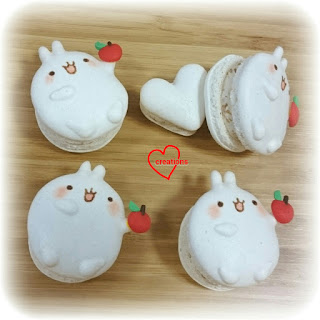
'Molang with Apple' Apple Salted Caramel Macarons

This has got to be one of my cutest macarons! Molang holding an apple :). The filling for these match the subject too! Apple pie filling with swiss meringue buttercream and a small dollop of salted caramel at the center!


I was playing with leftover white macaron batter from making Mickey Mouse glove macarons and can't help but smile :). It's one of those bakes where the inspiration comes along as I am working on it. The idea for Molang to hold an apple came to me suddenly as my little one is ill and the old adage "An apple a day keeps the doctor away" came to mind. The original picture of Molang shows him holding a strawberry. When it was time to fill the macarons, I thought why not make it apple flavoured. With Father's day approaching, I thought why not make it my hubby's favorite apple pie filling flavour! Molang is one of those emojis that we often use when we communicate over Wechat because he's so irresistibly cute. Making an apple flavoured Molang macaron holding an apple is bound to put a smile on my loved one's face :).


Recipe for the shells can be found in my next macaron post.

Just to share some pictures of the process...

I used a Wilton #10 tip to pipe the body, and #5 tip to pipe the ears and limbs. In order to make the limbs 3D, let the body dry for 15 minutes before piping on the limbs. Remember to tap the tray after piping the body and before piping the limbs.

Right photo is taken about 15 minutes after the one on the left.

Freshly baked! Looking cute already

Drawing the face with edible marker and dabbing on rosy cheeks with peach coloured lustre dust and a small brush. Smiling as I am working already!

The apples are made by using red royal icing, chocolate rice and green coloured confetti sprinkles. I carefully halved the circular sprinkles with my fingernail and used a toothpick to position the chocolate rice and sprinkle. I find it helpful to create the apple by using the same template and baking sheet for piping macaron shells. The size of the apple piped using royal icing will be just nice this way.

Very fiddly work!

Dry the royal icing apple overnight or in the oven with the fan on for about an hour. I turned on the heat for a few seconds then switched it off. This helps to speed up the drying process. Gently peel the apple off the baking sheet. Make sure that the icing is completely dry before attempting to remove! Apply a bit of royal icing on Molang's hand and stick the apple on. Air dry for a few hours before filling the shells.

So cute! I can't help gushing over them!

Store the shells in airtight container if you are not filling them yet.

Recipe for apple filling
Ingredients:
100g swiss meringue buttercream (smbc)
1 apple (I used Gala although Granny Smith would be better but I didn't have.)
15g brown sugar (or according to taste)
1/4 tsp cinnamon powder
Pinch of Allspice
Pinch of salt
A squeeze of lemon juice

Steps:
1. Grate the apple over a small saucepan.


2. Add sugar, cinnamon, Allspice, salt and lemon juice. Bring to boil and stir. Simmer for 15-20 minutes, stirring often. Leave to cool completely. Feel free to adjust the amount of flavouring ingredients according to taste. Do make it a little more tart than you would like as macaron shells and smbc are pretty sweet.

Applesauce

3. I used only about 40g of the applesauce. Feel free to add more or less according to taste. Add the applesauce in a few batches to the smbc. Mix well.

Checkout the apple bits and specks of spices!

Fill the shells by piping a ring of apple buttercream. Fill the center with salted caramel. If this is too much work for you, just keep it plain and simple with apple buttercream. But if you are able to, the salted caramel adds an extra oomph to your senses as the aroma of the spices and apple hit you :). I happen to have salted caramel lying around the house.

*droolz*

Keep refrigerated in airtight container for at least 24h before serving.

Happy Father's Day!

Hubby really smiled when he saw the Molangs and took these photos...


I can't help but laugh seeing Molang upright! Makes a more convincing picture of holding the apple :p. Really glad that hubby loved the taste of this cutie with all his favorite stuff... applesauce and salted caramel. He said the flavours are well-balanced and yummy :).

With lots of love,
Phay Shing
Read More »