Sunday 29 December 2013

Sakura Hello Kitty Strawberries and Cream Swiss Roll

After my successful attempts with chiffon, I felt ready to take on swiss rolls! Another bake that I was intimidated by because of the many steps involved and the horror stories about cracked rolls while rolling. After watching Ochikeron's very helpful video tutorial a few times, I made my first swiss roll! A patterned one at that. Here's my Sakura Hello Kitty swiss roll!


As it was my first attempt, I followed Ochikeron's recipe very closely and only substituted cornflour with cream of tartar as the egg white stabilizer. Whenever fruit liquor was mentioned in the recipe, I used strawberry essence. I didn't have a 10x10" square tin so I rummaged through the trays that I have at home and baked the cake in an 8.5 x 11" aluminum tray.


I was really pleased to see the patterns turn out nicely!


As my tray had rounded corners, I had to cut off some portions of the cake before applying the cream and laying out the strawberries. This view looks really appetizing!


I was really nervous about rolling the cake, praying hard that it doesn't crack. So glad that it didn't!


Having to wait patiently for the cream to set was pretty hard as I was really eager to see the results of my labor. I waited for an hour and couldn't wait anymore. In my haste to see the cross-section of the cake, Hello Kitty's face got smeared with cream :P.


The cake is very, very soft and melts in your mouth! I will definitely use this recipe again if I plan to do swiss rolls.... maybe not in the near future as it is a rather time-consuming bake.

If you do try this out I am sure you will have as much satisfaction from it as I did :).

With love,
Phay Shing


Read More »

Friday 27 December 2013

Pastel Rainbow and Hearts Vanilla Chiffon Cake Pops


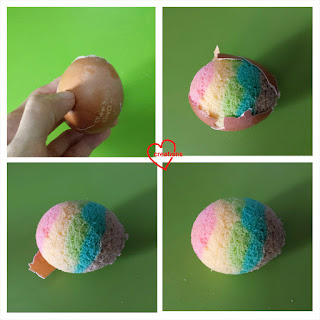
I absolutely love rainbows. After the unexpectedly wonderful reception of the Christmas tree cake pops, I dreamed of making rainbow chiffon cake pops that were so pretty to look at, and so small that one could pop into and melt in the mouth!

Round cake pops was something I wanted to achieve as my son was requesting for basketball chiffon pops for his birthday. Hence, I started experimenting with other mediums to bake the chiffon cakes pops in. I stumbled onto egg shells which I had been collecting to make agar agar, and also silicone heart moulds, simply because I love hearts.

I made them for my best friend's kids who absolutely loved it according to her and made me really happy and humbled! It was such a joy to make sweet treats for those who appreciate! This is probably my favourite and prettiest creation.

See how exciting it is to unmould the cakes!


With love,
Susanne


Read More »

Tuesday 24 December 2013

Christmas Trees Pandan-Strawberry Chiffon Cake Pops


It was going to be Christmas and parents were asked to contribute to the kid's Christmas party in school. My first idea was cake pops since it is cute and will be easier to divide among the kids. However researching and after trying out cake pops, I was a little disappointed. I found them too sweet and hard for the kids.

At this time, my daughter was crazy over ice cream cones and frequently requested chiffon cakes in ice cream cones. She loved to peel off the ice cream cone and eat the cone and cake separately. It was one day when I saw her holding the conical chiffon cake when the 'Eureka!' moment came. Why don't I try out Christmas Tree-shaped chiffon cake "pops"??!

This came about the birth of chiffon cake pops! I experimented first with ice cream cones, and then paper cone cups for water which could be found from skp. I baked pandan chiffon cakes in the cones, and then peeled off the paper. The result: soft, light and fluffy conical chiffon cakes that rose beautifully in the paper cones!

Next, I experimented with patterning "decorations" on the Christmas trees with the new chiffon patterning technique on big cakes. I used red strawberry paste as I wanted a dual-flavoured cake and patterned both swirl and polka designs so that the kid gets to choose! The above picture shows the final result. A forest patch of swirl and polka trees with dual Strawberry-Pandan flavor on hearts snow ground!

The best part? My son's class teacher told me the kids absolutely loved the cute trees. It was the first item to be wiped out within the first few minutes and the kids said it was delicious! It was really such a joy to hear that from the teacher!

The recipe is shared below :)

80g cake flour
25g caster sugar
3 egg yolks
50ml vegetable/corn oil
50ml coconut milk (I substituted with fresh milk/water for health reasons)
1 tsp green pandan paste
½ tsp vanilla extract
½ tsp red strawberry paste

Meringue:
4 egg whites
45g caster sugar
¼ tsp cream of tartar

Method:

1. Preheat oven to 160°C.
2. Prepare the conical cup holder by wrapping at least 2 layers of aluminium foil over a baking tray, and then using chopsticks to make holes. Gently insert the cups into the holes while making them bigger (see picture above).
3. Beat egg yolks with sugar with whisk till foamy before stirring in oil, milk and vanilla extract.
4. Next add in sieved flour and whisk till no trace of flour found.
5. Meringue: Beat the egg whites with ¼ tsp cream of tartar till stiff peak, mixing in caster sugar in 2 additions.
6. Red patterns: Take 6 tsp of egg yolk batter out and mix ½ tsp strawberry paste. Scoop over 10 tbsp of meringue, then quickly but gently fold it in till well-combined (I use Cynthia’s handfolding method). Note: I made the red batter a little ‘stiffer’ since I didn’t intend to pre-bake the patterns (like in the chiffon tin).
7: Green chiffon cake: Add 1 tsp green pandan paste to the remaining egg yolk batter. Fold in 1/3 of the rest of the meringue by spatula, and then the rest using handfolding method.
8. Transfer the red patterning batter over to pipette or bag with wilton 5 tip. Place a spoonful of green batter in the cone, and then pipe red swirls in the cones using the wilton tip. Cover the swirls GENTLY with spoonfuls of green batter till the cup is 2/3 full.
For the polka dot designs, I piped the red dots as I added the green batter (alternate the two 2 times).
9. Bake the cake in preheated 160°C oven for 30-35 min.
10. Unmould as soon as cake pops are cool. Gently peel open the paper cones bottom up, following the paper lines to ensure cake tips are not broken.
11. Stick toothpicks or lollipop sticks below and viola! You may want to decorate the apex of the trees with stars or hearts using glace frosting (2 cups icing sugar, 2 tbsp soft butter, 2 tbsp boiling water) or kaya.

This post is written with lots of love,
Susanne
Read More »

Monday 23 December 2013

Hello Kitty Pandan Chiffon Cake

After my first successful attempt at patterning a chiffon cake, I was really excited to give it another try. And so, I baked my first Pandan chiffon cake with Hello Kitty design! I took the liberty of patterning the sides of the cake with alternating brown and pink dots too.


I will not type out the recipe here as it was taken wholesale from The Baking Biatch, which uses Pandan leaves instead of bottled Pandan paste.

The challenge of this technique to pattern a chiffon cake is the baker has to be pretty good at freehand drawing in order to pipe the designs on, especially complicated ones. It occurred to me that it would be wonderful if we could use a template to help, just like patterned Swiss rolls. Artistically challenged bakers will be thrilled if this technique works.

Susanne warned against greasing or lining the chiffon tin with baking sheet as the batter needs to "cling" onto something to rise. The "kay kiang" (acting smart) part of me thought that the batter at the base of the tin where the designs are doesn't need to climb, so it should be OK to line the base with baking sheet. I happily traced some Hello Kitty and ribbon designs on a baking sheet and piped the designs on using the same technique as I did with my first attempt, except that I beat another egg white separately for the meringue used in the colored batters. This was how it looked like after baking the design for 1.5 minutes.


I was so happy to see the pretty design nicely baked and proceeded with baking the rest of the cake. I had some leftover batter again so I let the kids play with it. They decided on piping a letter "P" on the cupcake... "P" for "Parking" according to them :P. After unmolding and slicing the cake, I was in for some disappointment.


All chiffon cakes have to be inverted immediately after coming out of the oven to cool. I had forgotten that when the cake is upside down, the base has nothing to "cling" on to. This resulted in the patterned surface sagging. However, the cake is still soft and moist, and I learnt an important lesson :).

Looks like we have to rely on good artistic skills to pull off this kind of stunt successfully.

With love,
Phay Shing

Read More »

Saturday 21 December 2013

Rainbow Pandan Chiffon Cake


I was looking for a cake to thank my son's school principal who had been very kind to us when we most needed help (like a rainbow when we most needed it). It was during our short vacation that the sudden inspiration came to me. Since the chiffon tin was a doughnut shape, it was perfect for making two rainbows! The rainbow chiffon cake was the perfect idea for thanking her!

As an experiment, I did not prebake the rainbow patterns batter for 1.5 min (and partly because I was in a rush). The consistency for all the colours were right except for green because at this time, I did not yet have wilton green colour; so I just mixed wilton blue and yellow to get the shade of green but did not correct for the increase in volume. As you can see, the green batter slightly runny compared to the rest of the colours. But overall, the rainbow was still cheery ^_^ and the principal was very happy to have received the pretty cake!

The recipe is below, but we have since optimized the recipe for patterning in future posts (stay tuned!) and have since purchased the whole set of wilton colours. The next rainbow cake will be one with all 6 colours!

5 Egg Yolks
20g Caster Sugar
80ml Fresh Milk (subtract 5 ml for colouring so I added 75 ml)
40ml Corn Oil
80g Cake Flour
1/2 tsp strawberry paste and wilton colours (blue, yellow).
1 tsp pandan paste for main batter

Meringue Batter:
5 Egg Whites
80g Caster Sugar
¼ tsp cream of tartar

Method:-
1. Beat egg yolks with sugar with whisk till creamy before stirring in oil and milk.
2. Next add in sieved flour and whisk till no trace of flour found.
3. Take 2 tsp of egg yolk batter out for each colour and mix in colour. Scoop over 4 tbsp of meringue and quickly but gently fold it in till well-combined (I still love Cynthia’s handfolding method).
4. Use a wilton 230 tip to pipe designs on base of chiffon tin.
5. Bake for 1.5 min (I omitted this step today as an experiment). Results were good for all colours except green (I don’t have green wilton so I mixed blue and yellow but didn’t correct for volume.. ahh).
6. Add 1 tsp pandan paste to the rest of the egg yolk batter. Mix well and gently fold in the rest of the meringue. Gently pour in the rest of the batter over the rainbow patterns.
6. Bake the cake in preheated 160°C oven for 50 minutes (my oven is 5-10 deg below settings so maybe 45 min is sufficient).
7. Invert when cake is removed from oven and unmould when cake is cool.

With love,
Susanne
Read More »

Friday 20 December 2013

Strawberry Yoghurt Chiffon Cake

I have always thought that cakes are loaded with tonnes of butter and sugar so I never gave them serious consideration when I was trying out new things to bake....until I discovered chiffon cakes! They are so light and much lower in fat and sugar content than say pound cakes. What stopped me from attempting to bake one was my fear of beating egg whites as the whole process sounded so complicated. But when Susanne baked her gorgeous Sakura Matcha chiffon cake with Sakura patterns on it, I was so inspired that I decided to put aside my fears and give it a shot. And so I began my chiffon fun by buying a 17cm chiffon tin and baked my first chiffon cake -- strawberry yoghurt chiffon! I fell in love with chiffons from this point onwards :).


Susanne has been very kind to share the recipe with me and patiently answered the questions I bombarded her with for my first bake. Here's the original recipe for making strawberry yoghurt chiffon cake:

Ingredients:
Egg yolk batter
3 egg yolks
15g caster sugar
30g vegetable oil
1/5 tsp salt
3/4 tsp vanilla essence
60g strawberry yoghurt
60g cake flour

Meringue
 3 egg whites
37g caster sugar
1/5 tsp cream of tartar

Steps:
1.Preheat the oven to 160 degrees Celsius.
2. Start with the egg yolk batter by pouring egg yolks and sugar in a bowl. Whisk with a hand whisk until sugar dissolves.
3. Add vegetable oil, salt, vanilla essence and strawberry yoghurt, and mix well.
4. Fold in sifted flour gradually and whisk until no trace of flour can be seen.
5. In another bowl, whisk egg whites until frothy with an electric mixer and add in cream of tartar. Add sugar gradually and beat until the meringue forms stiff peaks. A good test to see if you have reached the stiff peak stage is to turn your mixing bowl upside down and the meringue should not fall out.
6. Fold in one third of the meringue into the egg yolk batter until no trace of meringue can be seen. Quickly but gently fold in the remaining meringue in two batches until well combined.
7. Pour the batter into a 17 cm chiffon tin and bake in a preheated oven at 160 degrees Celsius for 40-45 minutes.
8. Immediately invert the chiffon tin onto a cooling rack/ an upturned cup/ bottle after removing it from the oven and leave to cool completely. When the cake is cooled, remove the cake from the tin. Susanne pointed me to this very helpful video demo of how to unmould chiffon cakes from the tin using bare hands. The result is much cleaner than running a spatula or a knife around the cake to release it from the tin.

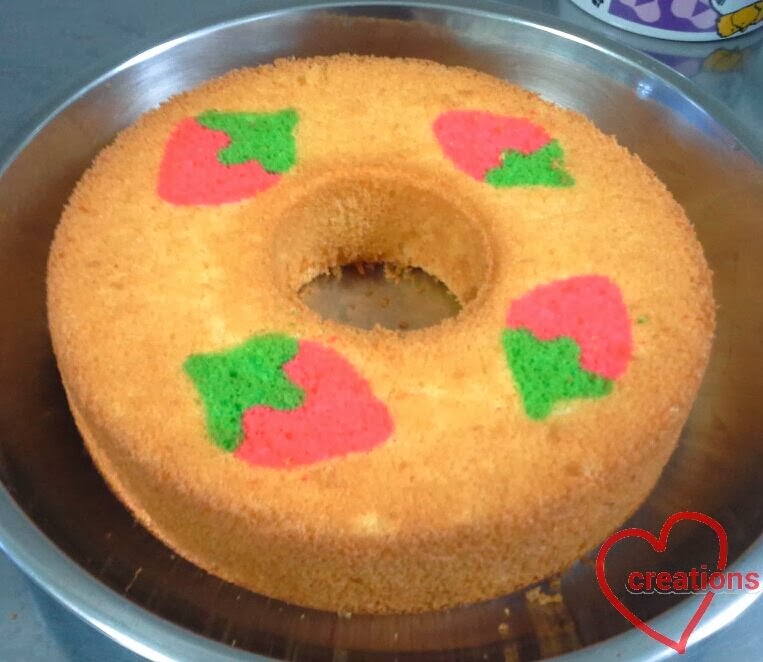
I have been playing with my kids' food for a few years now by making it look cute sometimes to entice the kids to eat. So I couldn't resist the opportunity to play around with patterning my first chiffon, risky as it sounds :P. I took about one heaped teaspoonful of egg yolk batter for each of the colors, red and green for patterning the cake. I added gel food coloring (Wilton) until a desired shade is reached. After getting all excited about making my chiffon look cute, I was stumped by how much meringue to add to the colored egg yolk batters. Having come so far, I decided to do a rough estimation and get on with it. I added 3-4 tablespoons of meringue into each of the colored batters, put them into piping bags with a No. 3 Wilton tip and piped the strawberry designs onto the base of the chiffon tin. I baked the designs for 1.5 minutes before pouring in the rest of the batter to bake.*

If you are an experienced chiffon baker, you would have realized that my main batter would not have enough meringue to make it light enough, especially since this recipe has the same number of egg yolks and whites. I only found that out when the cake came out of the oven :P.


  As you can see the cake is not very tall. The cake was dense but very fragrant. On hindsight, I should have beaten another egg white separately as the meringue for the patterns. Overall, I was happy with my first attempt and was definitely motivated to try again :). I had some leftover colored batter so I decided to let my elder kid play with it.


We piped some designs on a baking sheet and baked it in our cheap (costs less than $30) and teeny toaster oven. The kids had fun eating the results although the "cakes" are a bit burnt around the edges :P.

I learn something new with each bake and definitely have fun baking chiffons that are arty-farty. Will share more of my experiences when I have the time.

With love,
Phay Shing

* After quite a few tries with patterning chiffon cakes, we realized that the batter for patterning is of a better consistency when cake flour is added. Stay tuned for up-coming posts for the improved method of patterning chiffons.

Read More »

Sunday 15 December 2013

Sakura Matcha Chiffon Cake


For the longest time, I was wondering why no one patterned chiffons like swiss rolls which uses similar egg separation techniques. My birthday was coming and being a fan of Japanese anime, I dreamed of a matcha cake with pink sakura flowers. 

My experiment paid off! This represents the first of the patterned chiffon cake inspiring many other prettier ones to come. Needless to say, I had a very happy birthday with my cake! :)

I was very happy that reviews for the cake, especially from my sil was very good! If you're a matcha fan, you would love it. For this cake, I used Ellena guan's 3 egg yolk, 4 egg white recipe which I still love very much for it's lightness and spongyness. More whites than yolks make the chiffon cake fluffier and softer!


Each slice was pretty and had strawberry cake layered in between two layers of matcha cake! It's my first loving creation for my dear family!

Detailed picture tutorial will be out in a Creative baking Chiffon Cakes book coming Jan 2016.

With love,
Susanne

Read More »