Showing posts with label Sumikko gurashi. Show all posts

Wednesday, 17 January 2024

Sumikko Gurashi Lego cake


Playing building blocks with chiffon cake!😄 When was the last time you played with your food?😛 Assembly video on my IG here

With love, 
Susanne 

Read More »

Monday, 26 June 2023

Shirokuma and Furoshiki Vegan Macarons

 I had requests for vegan macaron classes so I have been doing rigorous testing for vegan macaron recipes. After trying French and Swiss meringue methods, I decided to try Italian meringue because Italian meringues have the added advantage of the stabilizing effect of sugar in the form of sugar syrup. After some attempts, I am satisfied with this Italian meringue method recipe especially since it is stable enough for a creation like this!


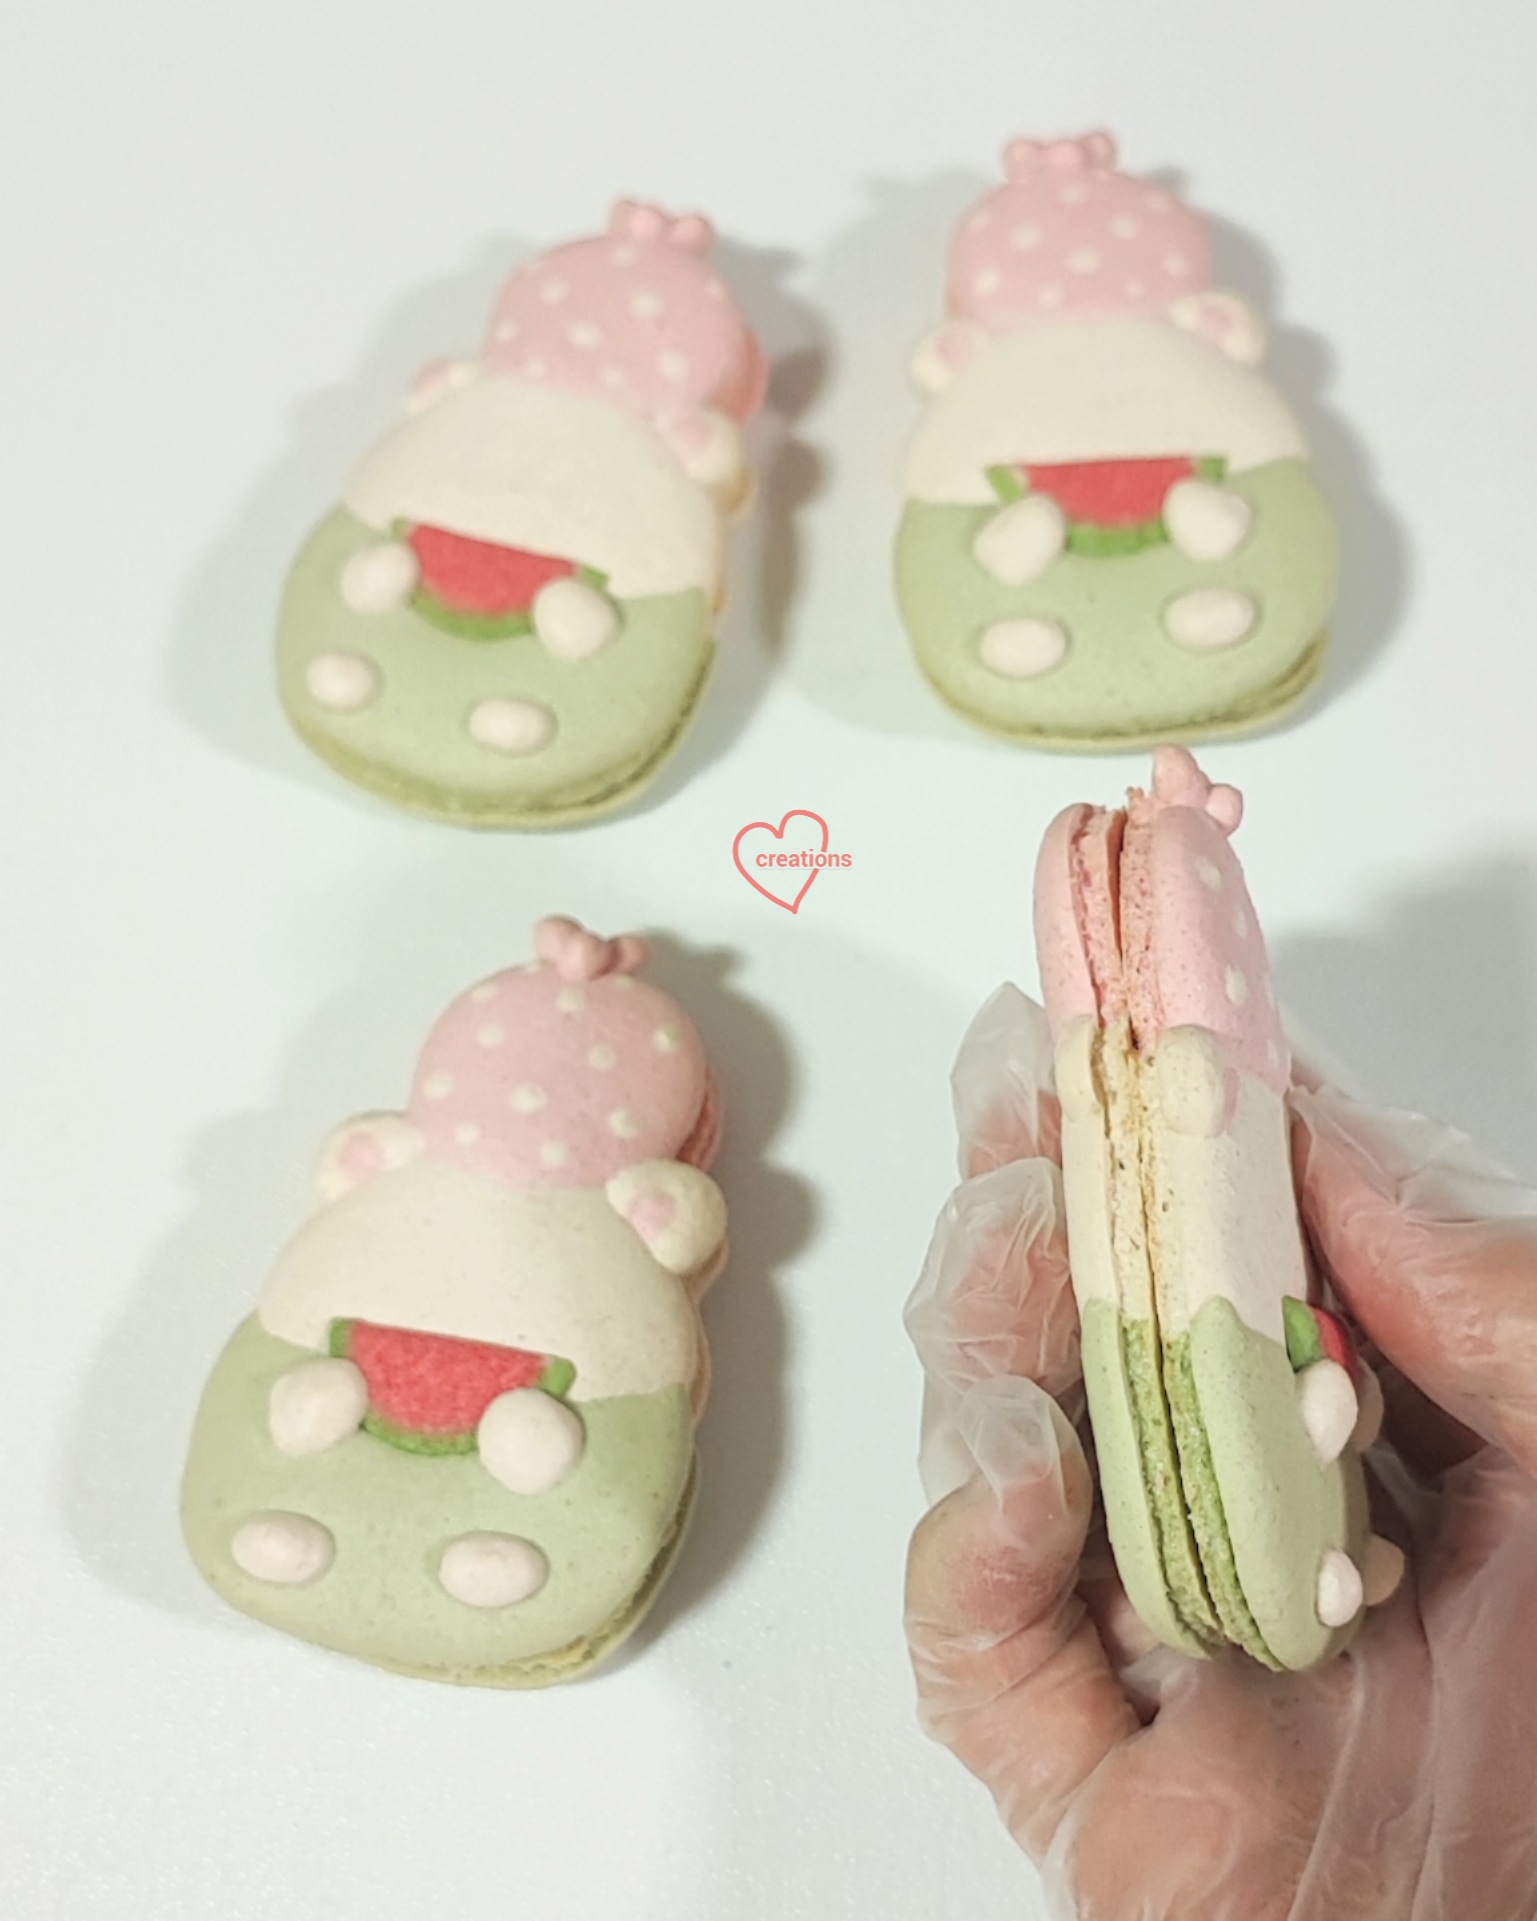
It's summer in the Northern hemisphere now and this year has been especially hot with the El Nino effect going on. Watermelons are definitely welcomed! Shirokuma thinks so too! 

You may ask why did I choose this theme and subject? It's because of the testing I have been doing for class material. I have decided on making simple character Hanami dango macarons with the colours pink, white and green so naturally this image of Shirokuma and Furoshiki came to mind! Note that this design is not for class material. I will be sharing the simple character vegan macaron class material soon so you can sign up for it with Tottstore.

Piped batter. I am sure you can't tell the difference between vegan and egg white based!

Freshly baked shells!

I used royal icing transfers (vegan of course) for the watermelon slices. They can be baked together with piped macaron batter, just like regular macarons.

These macarons are filled with the filling I will be sharing in my class too, which is matcha, vanilla and strawberry vegan white chocolate ganache.

See my reel for the piping process and the filling!


Stay hydrated and cool during this hot spell!


with love,

Phay Shing

Read More »

Thursday, 9 March 2023

Sumikko Gurashi Chiffon Cake


Sumikko Gurashi Birthday chiffon cake for my daughter's birthday party. Thank God it was well-received!

With lots of love,
Susanne


Read More »

Tuesday, 22 November 2022

Egg Chiffon Cakes Tutorial


Eggshell Chiffon Cake Baking Tutorial!🥰 

Watch the tutorial here

I often get questions on these cute chiffon cake egg characters, so I thought to share some tips: 

- Drain the egg contents by making a small hole on the tip of the egg. 
- Fill to 2/3 of the height is enough. 

Egg chiffon cakes are super bouncy because of their high surface to volume ratio☺️ Hope you liked it! =)❤️ 

With love, 

Susanne


Read More »

Tuesday, 29 March 2022

Brown sugar Sushi platter chiffon cake


Brown sugar Sushi platter chiffon cake!
Which is your favourite "Sushi"?

Recipe 
Brown sugar Wood grain chiffon cake 
3 egg yolks 
25g brown sugar 
30g vegetable oil 
35g water 
45g cake flour 
@suncorefoods vermillion annatto (1/4 tsp) and matcha powder (1/4 tsp) 
3 egg whites 
30g castor sugar 
1/4 tsp cream of tartar 

Whisk egg yolks with brown sugar, followed by oil and water. Add in sifted flour and whisk till well combined. Remove 5 tsp batter and add a vermillion and matcha powder to make dark brown batter.
In another mixing bowl, whisk egg whites with sugar till firm peaks. Transfer 10 tbsp meringue into dark brown batter, and the remaining meringue into brown sugar batter. Fold well and pipe dark brown wood grains onto the tube pan. Fill spaces with brown sugar batter. Bake in a 7” cake pan at 140C for 1hr. 
Hope this made you smile!  

With love, 
Susanne 

Read More »

Monday, 29 November 2021

Sugar-Free Chocolate Peanut Tonkatsu Cakepops

This is the third year I am making a Tonkatsu bake for hubby's birthday. Previously, I made choux pastry and oatmeal cookies. This year, I decided to try a sugar-free dark chocolate peanut cakepop! 

Even the nose is made of sugar-free shortbread cookie! 

Tonkatsu always likes to pour sauce on himself to make him more palatable. 

Do note that although I used maltitol here, you may replace with regular icing sugar for the cookie nose and caster sugar for the cake and pastry cream. 

Shortbread cookie nose
Ingredients :
5g sugar (I use maltitol, you may use regular icing sugar) 
10g unsalted butter
15g plain flour 
A little strawberry emulco (may replacs with food colouring) 

Steps:
1. Mix butter and sugar together. 
2. Add sifted flour and form a dough. 
3. Add strawberry emulco a toothpick dip worth at a time until desired shade is reached. 
4. Shape into 5mm ovals and place on lined baking tray. 


5. Freeze tray while preheating oven to 150C.
6. Bake for 10-15 min. Note temperature and time may vary depending on oven. 

Chocolate cake sponge
Ingredients (makes one 7x7" square pan or 7.5"round pan) :
20g alkalized cocoa powder
36g boiling water
33g vegetable oil
22g egg yolks 
54g egg whites
1/4 tsp vanilla extract
1/4 tsp coffee kahlua liqueur (may replace with vanilla) 
45g cake flour/ plain flour or combi
83g sugar (I used maltitol but you maybuse regular caster sugar) 
1/2 + 1/8 tsp baking powder
1/4 + 1/12 tsp baking soda
1/8 tsp salt

Steps:
1. Place cocoa powder in mixing bowl. Pour boling hot water into bowl and whisk until a paste forms. Cover bowl with cling wrap and let the paste cool to room temprature. 

2. In the mean time, sift together flour, sugar, salt, baking powder and baking soda. Set aside. Preheat oven to 170C. Line baking tray with parchment paper. 

3. Add egg yolks and oil to the chocolate paste and use electric mixer to mix until well combined and buttercream-like in texture. 

4. Add in sifted flour mixture and use mixer to mix until well combined.

5. In a clean metal bowl, beat egg whites until frothy. There is no need to whip it up until meringue texture. Add to the batter, along with flavourings. Use electric mixer to mix well for 2 minutes. 

6. Bake for 25min or until skewer comes out clean. 

7. Cool completely before breaking it up into fine crumbs. 

Chocolate sponge adapted from Rose Levy Beranbaum's German chocolate cake recipe. The sponge alone may not be out of this world. But when paired with the pastry cream, it is! That's why this combo and variations of it is my default for chocolate cake requests. 

Sponge cake crumbs


Chocolate pastry cream
Ingredients:
1 egg yolk
125g milk
15g sugar (I used maltitol but you may use regular caster sugar, adjust amount according to taste) 
10g cornflour 
8g cocoa powder
1/4 tsp vanilla extract
1/4 tsp kahlua coffee liqueur 
A pinch of salt
8g unsalted butter
10g 100% dark chocolate couverture (you may use lower percentage but I am going for sugar-free, you may add more or omit according to taste) 
10g freeze-dried raspberry powder (optional, added for a little acidity) 
10-20g heavy cream (optional) 

Steps:
1. Heat milk and flavourings in a small saucepan until steaming but not boiling. 

2. In the mean time, whisk together egg yolk, cornflour, cocoa powder, raspberry powder(if using), sugar and salt together. 

3. Pour hot milk in a thin stream into egg yolk mixture, whisking the egg yolk mox continuously. Pour everything back into saucepan and cook over low heat, whisking continuously. Once mixture thickens, remove from heat and whisk continuously to smooth out. Put it back on heat and continue cooking for a couple of minutes more. 

4. Remove from heat and add butter and chocolate couverture. Add some heavy cream if you wish to lighten the texture further and increase water content of the pastry cream. Press cling wrap on surface of pastry cream and refrigerate for at least 1h.

Freshly made pastry cream! 


Tonkatsu Cakepops
Ingredients(makes about twelve to fifteen 25-30g cakepops) :
All the chocolate sponge crumbled
All the pastry cream
Some peanut butter (I use no sugar no salt added 100% peanut) 
Some ground peanut powder sifted through coarse sieve (to remove really large pieces) 
Shortbread noses
Chocolate sprinkles (for eyes) 

Steps:
1. Add pastry cream to crumbed cake to form a dough ball. Divide into balls of 25-30g each. 


2. Coat the ball of cake with a thin layer of peanut butter, and then roll it in a dish of sifted peanut flour. 

3. Shape the coated cakepop into Tonkatsu shape. Use toothpick to gouge out a depression where the nose is supposed to go. Pipe some peanut butter into the cavity amd stick on the nose. 


4. Do the same with the eyes, using chocolate ball sprinkles for the eyes. 

5. Shape the hands and feet using some peanut butter and powdered peanut mixed together. Gouge out a little peanut layer on the cakepop before using peanut butter to glue on the limbs. 

6. Keep refrigerated in airtight container. Best consumed within a week. 


A peek at what it looks like after a bite! 


With lots of love, 
Phay Shing


Read More »

Monday, 12 April 2021

100% Naturally Coloured Sumikko Gurashi Mango Coconut Macarons

I was super excited when I stepped into Scoop, an Australian wholefoods store, opened near where I live. They have an amazing range of organic dried foods, premade sauces, various non-sugared plant based milk etc. It was the first time I saw green rice too! When I chanced upon some natural food powders that I don't find in Redman (largest baking supplies chain in Singapore), I bought them! Because of these purchases, I had an unplanned bake and made these Sumikko Gurashi mango coconut macarons! They are 100% naturally coloured! 

Tokage, Tokage (real) and Penguin? (Yes those are their names, including the punctuation marks) 

These are the powders I bought, along with organic coconut cream powder (not in the picture ). I supplemented the bake with a little turmeric powder from home to get yellow and create warmer shades of geeen. 

Pandan, spirulina and blue pea flower powders

I was prepared for the bake to turn out "meh" or fail because I haven't had very good experiences with natural sources of food colouring if I want to achieve vibrant colours, especially blue pea flower based ones as it is sensitive to heat and the pH of the mixture it is in. Nonetheless I had to test this out to see if I can use it for my bakes. 

I used the swiss meringue method to create these macarons, adding in the powdered colouring to the almond paste, before the meringue is folded in for each colour. I know this will likely result in visible specks of the powders but since this is only a trial and I didnt need perfect results, I decided to take the short cut. To eliminate or reduce the specks, you should add the powder to some egg whites, leave it to soak for about 10 min, strain it with a very fine sieve and then add the coloured egg whites with sifted dry ingredients to form the almond paste (make sure the correct weight of egg whites are used) . I find this unnecessary for red yeast powder, turmeric powder, cocoa powder and charcoal powder. But for spirulina, pandan and blue pea flower (possibly beetroot as well), it is necessary to take this extra step if you don't want the specks to be seen too obviously. 

You may refer to this post for the detailed steps and recipe for the swiss meringue method. This was what I used for this bake:

Ingredients:
Almond paste
65g almond flour (preferably superfine) 
65g icing sugar (with cornflour already added by manufacturer) 
24g egg whites
3g (1.25 tsp) organic coconut cream powder (optional if you aren't making mildly coconut flavoured shells) 

Swiss meringue 
36g egg whites
47g caster sugar
13g icing sugar (you may replace with caster sugar) 
1/8 tsp cream of tartar (optional) 

Here's a picture of the piped batter. 


For those of you who asked about quantity of powders added, I can only share my reference here for this trial bake and you have to work out how much you want to use, especially if you are using French method instead of Swiss method that I used here as French method doesn't have an almond paste in the equation. 

The almond paste (or mass) for each colour (except yellow and white) is 47g in this bake, with 24g of swiss meringue added after the coloured powders are added. 

Light green: 3/4 tsp pandan powder + 3/32 tsp turmeric powder
Dark green : 1/2 tsp Spirulina powder + 1/32 tsp turmeric powder
Blue: 1/2 tsp blue pea flower powder

I didn't measure the amount of turmeric used for yellow but it is around a pinch or so for the teeny quantity of batter. White is just plain uncoloured batter. 

You can afford to add less blue pea flower powder as I didn't know the colour will be so dark. Tokage is a lighter shade of blue. Do note that out of the 3 powders, blue pea flower powder fades significantly when exposed to prolonged dry heat so the outcome is more of a greyish blue. 

Freshly baked shells! 

Awesome full cross-section! 

I have some thick homemade mango compote on hand so I decided to choose mango coconut as the flavour of filling. The coconut part is a white chocolate buttercream base with coconut cream added.  Feel free to upsize the recipe as necessary. 

Coconut white chocolate buttercream
Ingredients:
40g white chocolate chips (may use couverture or compound, or finely chop from a bar) 
40g unsalted butter
1/8 tsp salt
25g organic coconut cream powder

Steps:
1. Place butter and white chocolate in microwave safe bowl. Heat for 10 sec at medium low power and mix well. Repeat heating and mixing until fully melted. Be careful not to overheat. Don't worry if mixture looks a little separated. Alternatively, you may use the double-boiling method to melt the chocolate and butter. 

2. Add salt and coconut cream and mix well. 

3. Cling wrap and chill the mixture in fridge until firm. Overnight if you wish but it's not necessary. Let it soften again slightly at room temperature until scoopable consistency. 

4. Use an electric mixer (if you upsized by many times) or spatula (if quantity is tiny) to whip up until smooth, light and creamy. 

5. Transfer into piping bag and fill the macaron shells. 

Mango compote can be made by cooking mango puree with about 10-15% by weight of sugar, a dash of lemon juice and a pinch of salt. I usually reduce the mango until it is about half the original weight of puree. This takes patience as you need to be stirring constantly using low heat. 

I had some extra round macarons which I filled too! I purposely left the fibers of the mango in there. Pipe a ring of coconut white chocolate buttercream and fill the centers with mango compote. 

At the time of writing this blog post, I did use the powders again to make naturally coloured macarons with significantly less noticeable specks when I didn't take the shortcut. I hope you find this review and recipe of coconut white chocolate buttercream helpful! 


With love,

Phay Shing

Read More »

Monday, 14 December 2020

Hurricane Christmas Tree Pattern Chiffon Cake with Sumikko Gurashi Shirokuma


Using the Hurricane Chiffon Cake technique to make Christmas trees on the sides of the cake! 🎄💖

Hurricane chiffon cake tutorial here for those who missed it:


This Christmas trees cake uses the Hurricane Type 1 for neater pattern!

Tree Hurricane Chiffon Cake (15-cm tube pan) (by Susanne Ng)
3 egg yolks
18g castor sugar
40g vegetable/corn oil
42g milk/ coconut milk
60g cake flour
4g vanilla extract
1/2 tsp pandan paste
Pink food colouring

3 egg whites
35g castor sugar
¼ tsp cream of tartar

1. Preheat oven to 140°C.

2. Prepare egg yolk batter:
a. Whisk egg yolk with sugar using hand whisk.
b. Add in oil, milk, vanilla extract and mix well.
c. Whisk in sifted cake flour till no lumps are found.

3. Divide the egg yolk batter into two. To the green batter, add pandan paste. To the other batter, add a drop of pink food colouring.

4. Prepare meringue:
a. In a grease-free, dry metal bowl, using electric mixer, whisk egg whites with cream of tartar till frothy.
b. Add in castor sugar for meringue gradually and whisk at high speed till firm peaks form.

5. Divide the meringue into two and gently fold meringue into respective egg yolk batter in 3 additions.

6. To make the hurricane pattern at the side:

Fill the base with pink batter. Cover with green batter.

Type 1:
Using the base of a spatula/spoon, draw downwards, then circle up (without touching the side of the pan), and then draw downwards again. Repeat till you reach one full circle (see video).


And the cake is topped by a sweet bear wishing you a Beary Blessed Christmas in advance!

With lots of love, Susanne


Read More »

Wednesday, 25 November 2020

Tonkatsu Oatmeal Walnut Cinnamon Cookies (Refined sugar-free!)

For hubby's birthday bake this year, I decided to make something healthier and snackable so that it is a cute and special but also practical bake. I decided to make some yummy but healthy oatmeal cookies in the form of one of hubby's favourite characters - - Tonkatsu! 


Photo composition is inspired by wanwantea (Instagram account). I remembered being really tickled when I saw her Tonkatsu macarons in a frying pan some time back. 

How yummy can an oatmeal cookie be you may ask, especially one that is refined sugar-free? It is by making use of a variety of ingredients that add texture and flavour to the bake! Maple syrup is used as the sweetener for this cookie. You may replace with coconut sugar syrup. Both choices are much lower in GI than white sugar and impart a lovely flavour and aroma too! Apart from having a wonderful aroma, maple syrup is a good source of manganese and zinc. I added some walnuts in the cookie to give it an extra crunch as oatmeal cookies can tend to be on the chewy side. Cinnamon adds a lovely aroma. Both walnuts and cinnamon are great health foods as well. You can google for the health benefits of these. Not forgetting the main star of the cookies, rolled oats, is good for your health too! 

This recipe contains wheat flour so it isn't gluten-free. You may replace with alternative flours like coconut flour or almond flour but I like to stick with wheat flour as it gives the best texture in my opinion. 

I took pains to eliminate or reduce the use of refined sugar in this bake, including the decorative details. The nose and eyes of Tonkatsu are made out of cookie too! I will share the technique of doing so. No royal icing is used for these parts! I also took pains to use natural food colouring as far as possible. 

Recipe for oatmeal walnut cinnamon cookies
Ingredients (makes about 20 Tonkatsu cookies) :
85g unsalted butter, softened 
120g maple syrup (or coconut syrup) 
1 egg, lightly beaten
1/4 tsp salt
1/2 tsp vanilla extract 
90g plain flour, sifted (I replaced half with cake flour for a more delicate bite) 
1 tsp cinnamon powder
1/4 tsp cocoa powder (optional, for a bit of added flavour and tonkatsu colour) 
1/16 tsp turmeric powder (optional, for added tonkatsu colour) 
110g rolled oats
40g finely chopped walnuts 

Note: make sure all ingredients are at room temperature before beginning, with the exception of butter which should be softened but still cool (about 20C) 

Steps:
1. Preheat oven to 180C. Line baking tray with parchment paper. 

2. Beat butter until light and fluffy using electric mixer. 

3. Gradually add maple syrup and beat until combined after each addition. 

4. Gradually add egg and beat until smooth and combined. 

5. Add vanilla and salt and beat until combined. 

6. In another mixing bowl, whisk together flour, cinnamon, cocoa powder and turmeric powder. 

7. Sift the flour mix into the butter mixture. Fold in with spatula until no trace of flour is seen. 

8. Fold in chopped walnuts and rolled oats. 

9. Scoop a slightly heaped tablespoon (measuring spoon) of batter and drop it onto the lined baking tray. Use 2 metal teaspoons to carefully shape it into Tonkatsu shape, flattening the top until batter is about 1cm thick. Make sure there is a spacing of at least 2cm between drops of batter. 


Main body of Tonkatsu before baking. 

10. Chill the leftover batter in mixing bowl in fridge. Bake the tray of cookies for 12 minutes. Leave it to cool on tray. If you like soft chewy oatmeal cookies and gladly like to skip the decorative parts, you can stop here and store in airtight container. But I like my cookies crisp/crunchy too. If so, continue baking until really dry and firm at 140C for another 15 to 20 min after the first 12 minutes at 180C or proceed with step 11 if you are making Tonkatsu. Do not bake the extra 15 to 20 min at 140C if you are making Tonkatsu. 

11. Line a small tray with parchment paper. Quickly shape the leftover batter into small balls on the lined tray and freeze it. Return the leftover batter into fridge to chill if it turns too soft and sticky to handle. It is messy but don't worry, you don't have to be super neat because it is Tonkatsu afterall🤣. 

Balls of batter for arms and legs of Tonkatsu

Shortbread cookie parts
Ingredients:
10g icing sugar
20g unsalted butter, softened 
28g cake flour or plain flour
2g cornflour (may replace with plain flour) 
A pinch of salt 
2-3 drops of strawberry emulco
1/16-1/8 tsp charcoal powder
1/2-3/4 tsp cocoa powder
Some water

Note: you won't need all of it to decorate Tonkatsu. You may chill excess dough and bake another day, or just shape cookies out of leftover dough and bake until slightly browned at the bottom at 160-170C.

Steps :
1.  Preheat oven to 150C.

2. Mix unsalted butter, salt and icing sugar together. You don't have to cream it until light and fluffy. 

3. Add strawberry emulco a bit at a time until a desired shade of pink is reached. 

4. Add sifted flours and fold it in until a dough is formed. 

5. Portion out about 1/2 tbs of dough and add cocoa powder, charcoal powder into it. Add water 1/8 tsp at a time into this mixture until a pipeable consistency is reached. Transfer this black/ dark brown batter into piping bag with a small hole cut. 

6. Shape the pink dough into Tonkatsu's nose shape and gently but firmly place it on the main body. 

7. Pipe the eyes. 

Adding Tonkatsu's nose and eyes. 

8. Carefully place the frozen arms and feet made from the oatmeal batter onto the main body. 


9. Bake for 10 minutes. Reduce temperature to 140C and bake for another 10-15 minutes or until the cookie is nice and crisp. Cool completely before storing in airtight container. 

 Bon appetit! 


With lots of love, 

Phay Shing

Read More »

Wednesday, 16 September 2020

Sumikko Gurashi Burger and Fries Chiffon Cake (Mc-Sumikko Value Meal)


My Mc-Sumikko Value Meal! 😆🥰

Both the burger and fries are made entirely from chiffon cake! Apparently Sumikko gurashi has a cute burger character like this! I fell in love with it and had to make it! =p I made up the fries character though, as the burger character looked kind of sad and lonely haha. So I made a fries companion for the burger. I actually made this cake during the circuit breaker when we had no Macdonalds. It sort of cheered us up =).

Recipe for smaller versions of these burgers have been shared here. Here, I baked the "buns" in bigger bowls instead of cake pop molds, and the "fillings" in a bigger pan. The fries are cut entirely from sheet cakes.

On another note, didn't this year pass really quickly?

We are already at the last quarter of the year! We may probably not be able to go on holiday this year, but this doesn't stop us from doing things we love with our families!! 💖💖💪

Take care and lots of love,
Susanne

Read More »

Wednesday, 8 July 2020

'Pusheen with Sumikko Gurashi on a Shopping Trip' Peppermint Dark and White Chocolate Macarons

I took some time to mull over this one and finally came up with this scenario involving specific Sumikko Gurashi members and another character in a scenario entirely from my imagination.

Tonkatsu, Shirokuma, Penguin and Neko on a grocery shopping trip with Pusheen! 

I used the Swiss meringue method to make the macaron shells. It was a challenge as usual, when the number of colours exceeds the number of fingers in one hand 🤣.

Piped batter

I used a mixtute of edible markers and royal icing to add in the details


As the shopping cart is a macaron structure, the filling needs to be fairly firm. I filled the macarons with peppermint white chocolate buttercream on the outside and peppermint dark chocolate ganache on the inside.


You may refer to this recipe for the dark chocolate ganache. Just add 3/4 to 1 tsp peppermint extract to it. The peppermint white chocolate buttercream is something new so I will include the recipe here. Feel free to scale it up for a bigger batch. I only needed a little for this project.

Peppermint white chocolate buttercream
Ingredients:
40g white chocolate, finely chopped or use chips*
20g unsalted butter*
1/8 tsp salt
1/2 tsp peppermint extract
1/4 tsp vanilla extract

* you may adjust the ratio of white chocolate:butter  to suit your climate and tastebuds

Steps:
1. Place all ingredients in a microwave safe bowl. Heat on medium low power for 10 sec. Mix well by mashing the ingredients together against the bottom and sides of the bowl. Repeat heating and mixing until melted and well combined. Do not agitate the mixture by whipping it as it may split.

2. Leave to stand at room temperature until firm if you stay in a temperature climate. And then whip it up with a spatula until buttercream texture. If you stay in hot Singapore like me, chill the mixture in freezer for 2 min and mix well. Chill for 1 min and mix by whipping the mixture with spatula. Repeat chilling and whipping until texture is like buttercream. Alternatively, you may use an ice bath and electric mixer to chill and whip simultaneously.

After assembling the macarons, leave it to mature in the fridge for at least 24h before serving. As the fillings are firm, the macarons can keep for up to 2 weeks in the fridge in airtight condition, for up to a few months in the freezer. Always let the airtight box of macarons warm up at room temperature for 15-20min before opening the box to prevent condensation from forming on the macaron surface.

They look like they are having fun! 


With love,
Phay Shing

Read More »

Thursday, 11 June 2020

Sumikko Gurashi on Rainbow Boat Chiffon Cake


Sending some love, hope and rainbows again with this sweet creation! 💕
My first time making a rainbow from such thin sheet chiffon cake too!

I love rainbows, if you have followed my creations, I've made many chiffon cakes into rainbows

This is my new version and my thinnest yet. It is inspired by the double rainbows we saw across the skies a week back. Very thankful for rainbows, the hope it brings and promise from God it reminds us of. The rainbow was made by piping rainbows onto a baking sheet, swissroll style.

Does the bear look like he is going on a "hopeful" journey in a Rainbow boat? =p Err this was commented by my family lol

Everyone stay safe and take care!

With lots of love,
Susanne

Read More »

Friday, 3 April 2020

Sumikko Gurashi Playground Chiffon Cake


Safe distancing and staying at home. How are you coping?

Even the cute Sumikkogurashi characters are doing their part in safe distancing (1m apart), and staying at home (empty playground below 😅).

The kids will be missing their playground for a while, but let's do our part to protect our loved ones and the medical workers on the frontlines by staying at home and being part of the "circuit breaker"... Let us continue in love and encourage one another during this difficult time.


The cake, including the slide is made entirely from chiffon cake! It is crafted and cut out from bigger chiffon cakes. The Sumikkogurashi characters are usually huddled together, so here they practice social distancing =p. Actually it was just a coincidence. I made it for a JC friend some time back. Hope it made you smile as it did to me!


Stay well and positive!

With lots of love,
Susanne


Read More »

Wednesday, 4 December 2019

Sumikko Gurashi Chocolate Choux Pastries

I made some Sumikko Gurashi choux au craquelin for hubby's birthday as well as for my friend. Both of them love dark chocolate so the pastries are filled with dark chocolate pastry cream 😊.

Tonkatsu is hubby's favourite because he has such a cute and sad back story, and looks really cute too. And of course I had to include Tonkatsu's favourite pal, Ebi.

I have to admit that this set wasn't entirely the easiest to work with due to the shape. It would have been easier if everyone was just a round choux bun lol. Creating them oval shaped requires me to make my own template for cutting out the cookie dough for craquelin instead of using regular round cookie cutters. Piping the choux pastry batter and baking was also a challenge as I had to balance between retaining the colour while at the same time not have the pastry case collapse in the oven. It helps to keep the size of the piped batter less than 3.5cm to fulfil both criteria.

Please refer to this post for the detailed recipe for the craquelin and choux pastry batter, and guide for baking conditions. I didn't take many photos while working on this project. But here is the photo for the craquelin I cut out using homemade templates. As a rule of thumb, I usually cut the craquelin about 5 to 6mm larger than the area of piped batter.


I used my default chocolate pastry cream recipe as it is not too sweet, not too cloying but nice and chocolatey. I lighten the pastry cream with whipped cream to lighten the texture.

Top picture shows the rich chocolate pastry cream and whipped cream. Bottom picture shows the two combined 

Hubby loved his present and savoured the pastries over a few days 😊.

With lots of love,
Phay Shing

Read More »

Monday, 13 May 2019

Sumikko Gurashi Raspberry Macarons

Many people in this day and age still think that depression is something you can think your way out of through positive self talk. It doesn't work that way. What depression sufferers need is lots of love, patience and support. I made some Sumikko Gurashi macarons for hubby and a friend who are fans of Sumikko Gurashi and they have depression. The characters are holding little hearts because depression suffers need all that love ❤.


I filled the macarons with homemade raspberry jam and raspberry whipped white chocolate ganache. Feedback was great in terms of looks and taste!

Due to my fairly packed schedule, I decided to break down the bake into two separate days, and each day baking only a small quantity of macarons. That means choosing the French method to make these because Swiss and Italian methods are best for larger batches although my preference is to use either of these two if I need to work with multiple colours because you can colour the almond paste before meringue is added in, reducing the risk of overfolding.

I used this recipe which is French method stabilized with cornflour. Just to share some photos of piping the batter...


I ran out of blue 😆

You may refer to my macaron books, Macarons and Macaron Basics for more details on the techniques involved in piping and baking macaron shells such as these. I also have various video tutorials on the blog that you may refer to.

Partially decorated macaron shells. I used royal icing and black edible marker to decorate the shells 

I filled the macaron shells with raspberry whipped ganache and homemade raspberry jam. I make it a point to make my own jam from scratch as it is more intense in flavour and I can control what goes in there. I don't necessarily stick to the same ingredient proportions for the jam as it depends on how tart I want it to be, but I don't use thickeners such as cornstarch. Since hubby requested something not so sweet, I made the jam really tart. You may adjust the quantities according to taste.

Raspberry jam
Ingredients:
180g fresh raspberries
20g sugar
Pinch of salt
1 tsp lemon juice

Steps:
1. Place everything in a small saucepan over low heat, stirring often to prevent jam from burning. Reduce the liquid until consistency is to your liking.

2. Press the jam through a sieve to remove the seeds. Store in fridge in airtight glass container for up to a month.


Here's another view of them all lined up neatly!

Spreading the love around

With lots of love,
Phay Shing
Read More »