Showing posts with label sweet potato. Show all posts

Tuesday, 7 May 2019

Naturally Coloured Bean Paste Roses

I thought it's quite timely to post this since Mother's Day is coming soon. I have always admired the beauty of handmade edible flowers but was never really interested in learning how to make them because they were either inedible (gum paste) or contain too much sugar (fondant or sugar paste). And then I saw what my talented baker friend, Helen (IG account: @bakepeoplehappy), did with bean paste. The flowers were breathtakingly beautiful, hyper realistic and flexible. What intrigued me most was the fact that the dough is made of beans and contain significantly less sugar than traditional sugar paste. After having tried it, I have to add that it tastes like a bean flavoured mochi too!

I was determined to try working with bean paste dough so I bought the recipe from her and she guided me along by answering my many questions and providing useful sugar paste flower modelling video tutorials that I could refer to. I am not able to share the recipe in this post as Helen has taken time and resources to develop the recipe that is not easily available on the internet at the moment. But I can share my learning journey in this post 😊.

I was curious to know how the bean paste flowers would turn out if I used natural sources of food colouring. Here is my very first attempt at bean paste roses and leaves!


I have to admit that the bouquet isn't entirely made using natural food colouring. The leaves are coloured using gel food colouring. The pink flower has a little pink gel added.  I experimented with a few food sources as the dough base and for colouring: white beans, mung beans, purple sweet potato, blue pea flower and freeze-dried raspberry powder.

Making the dough may be a fairly lengthy process. The preparation method of the bean paste is very much like making mung bean paste for mooncake filling. I steamed the soaked mung beans. I did both with and without blue pea flowers.

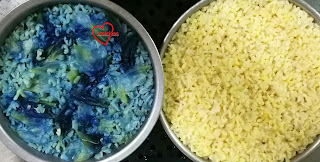
Before steaming

After steaming. See how the beans absorb the blue colour after steaming!

I also prepared blue pea flower coloured and plain white bean paste.

Freshly made bean paste. I used the same treatment using steamed purple sweet potato to make the paste out of it too. I should have cooked the purple sweet potato paste longer as it was wetter than the bean based ones but it was 12am and I needed my zzzzs 😆.

Bean paste dough before steaming. I created one colour of dough using half blue pea flower coloured mung bean paste and half purple sweet potato paste (top left corner) so there are six portions instead of five.

Freshly made bean paste dough that has been steamed, kneaded and wrapped tightly

Helen provided a few video tutorial resources I could refer to since I am learning how to model roses without any hands-on expert guidance. You may refer to this video on how to shape the roses, this video on how to colour the sugar roses, and this video on how to make the rose leaves. I watched the earlier videos in the series by chef Nicholas Lodge as well to have an alternative view of how to shape the roses. Like me, you may not have the necessary shaping tools. Not to worry. You can use your fingers to shape and pinch where necessary. Won't be as professional looking but still nice enough. The videos mention the use of gauge wires to work with the flowers. I used wooden skewers and a styrofoam board instead. The glue I used is also simply made out of some of the dough dissolved in water instead of edible glue sold in baking supply stores.

An assembled rose made with some purple sweet potato dough so there are tiny specks of the potato on some petals. Mounted on wooden skewer to dry a little.


I managed to get a leaf veiner and I already have a fondant rose leaf cutter at home so I could make the leaves.

Veining the leaf with the leaf veiner

The roses would look even more realistic if I had a petal veiner but I didn't get one.

I absolutely love how the natural colours turn out!

Anticlockwise from the top left: plain mung bean dough, plain white bean dough, half purple sweet potato half blue pea flower mung bean dough, blue pea flower mung bean dough

I tried colouring some white bean paste naturally with freeze-dried raspberry powder but it turned rather dull so I added a little bit of pink gel colouring. The resulting colour is a sweet dusty pink colour!


Check out how soft and flexible the rose petals are when freshly made!


I dusted the flowers only with a little petal dust as I felt they look rather nice on their own without dusting.

My parents were around when I made these roses so they got to try. They love the taste of it! Mum chose the colours of roses that she would like on top of the cake I will be making for her later this month too.

There could be some concern about the short shelf life of these flowers based on the information that's out there on the internet. But with proper drying and storage, these flowers didn't turn mouldy even after a week in the fridge or out in the open (with adequate ventilation) in Singapore! Helen said just don't store them airtight at room temperature where they will turn mouldy fast.

Blessed Mother's Day to all mums out there!

With love,
Phay Shing
Read More »

Monday, 15 October 2018

Peppa Pig and Paw Patrol Purple Sweet Potato and Pulut Hitam Sponge & Pudding Cake

When your little one has a variety of characters that she loves, and you would like to try a unique cake flavour, you get a cake that looks like this :)


Peppa Pig meets some representatives from the Paw Patrol squad on top of a black glutinous rice and purple sweet potato sponge and pudding cake!

I have shared the recipe for the black glutinous rice chiffon with purple sweet potato pudding in detail in another blog post. It is a more diabetic friendly cake without compromising flavours and aroma. I didn't use any white sugar in the black glutinous rice chiffon cake, but used coconut palm sugar (Gula melaka) instead. The pretty purple sweet potato pudding contains only a fraction of white sugar as compared to the reference recipe I adapted from. There isn't a need to use a lot of white sugar in the pudding as the coconut milk, fresh milk and sweet potato imparts some natural sweetness to the dessert. The harmonious mix of coconut milk, Gula melaka, pandan, black glutinous rice and purple sweet potato is really nice if you love all these.

What I would really like to share here is the recipe for the macaron shells. As all macaron bakers know, it is a pain to work with many colours within a single batch of batter, and even more so when the quantity of macarons required is so few. That makes it not economical to use Italian method although it is my preferred method for multiple colours of batter within a single batch. I prefer the Italian method when working with multiple colours as it is easier to adjust the colour of the batter without risking overfolding as much as French and Swiss methods because you add the colouring to the batter base before the meringue is added. If you split a single batch of macaron batter into many colours made from French or Swiss method, you have less folds to make before you risk overfolding, because the colouring is added to the batter after the meringue is folded in. The French method also has a less stable meringue than Italian or Swiss meringues as the egg whites are not cooked at all. This means you have to try to work really quickly with the French method if you want to make designs with multiple colours, or resort to using a lot of sugar in the meringue. You could choose to use the Swiss method to make the meringue more stable but you still have to be careful not to overfold the batter while adjusting the colours to the desired shade.

How do I overcome this dilemma? I decided to stick with the French method as it is the simplest logistically and suitable for small batches. But I tweaked the regular recipe to make the meringue stable for a longer time. The key ingredient I added here is cornflour. Much as cornflour helps the macaron shells to dry faster, be less prone to cracking during baking and slows down the breaking down of meringue, adding too much of it will make the batter very thick and the texture a lot more chewy. The slightly higher icing sugar to almond flour proportion used also helps with the stability. Care still needs to be exercised when colouring the batter to prevent overfolding.

Here is the French method recipe for making a more stable macaron batter. Feel free to halve the recipe for an even smaller batch.

Ingredients (makes about 24-28 macarons):
Dry ingredients
90g superfine almond meal
110g icing sugar
1/4 tsp cornflour
1/4 tsp salt (optional)

Meringue
80g egg whites
75g caster sugar
1 tsp cornflour
1/8 tsp cream of tartar

Gel food colouring as needed

Steps:
1. Sift all the powdered ingredients together. Set aside. Prepare baking tray with template and parchment paper. Set oven rack to lowest or second lowest position.

2. Make the meringue. In a small bowl mix cornflour together with caster sugar. Set aside. In a clean metal bowl, beat egg whites with cream of tartar until stiff peaks form, gradually adding caster sugar and cornflour mixture once the egg whites are foamy. Make sure the meringue is really stiff, like whipped cream consistency.

3. Make the batter. Scatter half of dry ingredients into meringue. Gently fold in with a spatula until just combined. Scatter the rest of the dry ingredients. Gently fold in until just combined. Divide the batter to to the number of desired colours. Carefully add as much gel colouring as is needed and gently fold in until the batter is homogeneous. If the batter consistency is still too thick at this point, continue folding until it is able to flow like slow-moving lava.

4. Transfer into piping bag and pipe away! Dry the shells before baking. You may find the details of the basics of making the batter, piping and baking in my Creative Baking: Macaron Basics and Creative Baking: Macarons books.

Just to share some photos of the process...

Freshly baked macaron shells. Checkout the awesome feet!

I made only 9 characters in total with a little leftover batter to spare. But it was tedious! Fine details were added in using edible marker and royal icing.

I filled the macarons with dark chocolate ganache and homemade salted caramel as requested.

I mounted the macarons on cake pop sticks so it is easier to display on top of the cake.

I have a few photos to share for the sponge and pudding cake too. Some people are hesitant to replace all the white sugar with coconut palm sugar in the meringue as they are afraid that the meringue will not whip as well. This is to prove that it can!

Egg whites beaten to firm peak with only coconut palm sugar added

Folding in the egg yolk batter and meringue. The black bits are black glutinous rice grains that I didn't process until superfine to provide some bite to the cake.

Nice and tall pulut hitam chiffon!

Layering the sponge and pudding layers. I love the natural colours!

I added on simple deco with white chiffon sheet cake


With love,
Phay Shing


Read More »

Wednesday, 25 July 2018

Rainbow Miffy Coconut and Sweet Potato Sponge and Pudding Cake

My friend's daughter is a big fan of Miffy so she requested for a few Miffy macaron cake toppers which she can use over a few birthday celebrations for the little girl, and one rainbow sponge and pudding cake topped with one of the cake toppers I made!


You may refer to my previous post for the detailed recipe for Miffy macarons. You may fill it with fillings of your choice. I will focus on sharing the recipe for the cake in this post.

I used a reduced egg yolk chiffon cake recipe in order to get a nice blue and pink sponge without adding too much colouring. The great thing about sponge and pudding cakes is the pudding keeps the sponge moist during storage and the complentary textures of soft fluffy chiffon and smooth pudding is really nice.

Reduced yolk coconut chiffon cake
Ingredients (makes one 15cm chiffon cake):
1 egg yolk (about 17-18g)
3g castor sugar
45g coconut oil
54g coconut milk
1/4 tsp vanilla extract
A few drops pandan flavouring (optional)
A few drops coconut flavouring (optional)
1/8 tsp salt
60g cake flour
Pink, yellow and blue gel food colouring

3 egg whites
1/5 cream of tartar
40g castor sugar

Note, you can choose to bake all colours at once then slice horizontally to separate the different coloured layers or bake them individually in three rounds of baking.

I baked the colours individually as I didn't want to have the stress of ensuring all layers are perfectly level and then slicing them in perfect layers. I baked each layer for about 30-35 minutes. You may also bake the cake or cakes in regular 15cm round pans with the base lined with parchment paper.

Steps:
1. Preheat oven to 150℃ and set oven rack to lowest or second lowest position. You may choose to place a tray of water at base of oven to create steam but this is optional. Increase baking time if using steam baking.

2. Prepare egg yolk batter. Whisk egg yolk with castor sugar until pale and thick. Add oil and whisk until combined. Add coconut milk and flavourings until combined. Gradually sift in flour and salt and whisk until no trace of flour is seen. Divide the batter and add colouring as desired.

3. Prepare the meringue. In a clean metal bowl, beat egg whites with cream of tartar until firm peaks form or stiff peak is just reached, gradually adding sugar once the egg whites are foamy.

4. Quickly but gently fold the meringue into the egg yolk batter in two additions. Pour or spoon batter into chiffon tin/ baking pan.

5. Bake for 10 minutes. Reduce temperature to 130℃ and bake for another 15-20 min if you are baking single colour at a time. If you are baking a full chiffon cake, extend baking time for another 15-20 min or so. Do note that temperature and time suggested here is just a reference. Each oven behaves differently so adjust accordingly. Always use an oven thermometer at all times. Cake is done when a skewer inserted comes out clean. Invert chiffon tin (if using one) to cool completely before unmoulding by hand.

Baked chiffon layers

Store the layers in cling wrap to prevent drying out.

I baked extra chiffon sheet cakes to fill the hole in the middle and for the name on the cake. I cut out circles from the sheet cake for filling the holes.

I make use of the natural colours of different types of sweet potatoes to create the rainbow pudding layers. Here are the steamed and mashed sweet potatoes!

Steamed and mashed orange, Japanese and purple sweet potatoes.

I prepared some pandan juice that has been kept in the fridge for two days to become more concentrated, and added some to the Japanese sweet potato to colour it green.

Adding concentrated pandan juice to colour Japanese sweet potato green

As you can see the colour is rather dull. I still needed to add 1/4 tsp pandan paste to make the green more vibrant. I added 2 drops of liquid orange colouring to orange sweet potato as the natural colour is a little light when mixed with coconut milk.

A key to creating such layered sponge and pudding cakes is to carefully prepare the flexible plastic cake ring. I have tried using springform pan and adjustable metal cake rings before to assemble sponge and pudding cakes. But I find using clear flexible plastic cake rings the best option as it is versatile in the sense that it can be adapted for different cake diameter and height.

As the sponge layers are about 2-2.5cm tall, the pudding layers have to be about that height. I carefully stuck two strips of plastic together using scotch tape to form a taller wall. I also used a marker to make little dots to mark out 2cm intervals along the height so I know how much pudding to fill during assembly.


Measure out the circumference of the cake ring needed using a layer of baked sponge cake and tape the ring.

The sweet potato pudding recipe below is for one layer of pudding. You need to prepare three portions for all three colours. Recipe is adapted from here.

Recipe for sweet potato pudding
Ingredients (for one layer of pudding):
A)
200g pandan water (boil several pandan leaves in saucepan of water for 10 min.)
12g castor sugar
1/4 tsp salt
1/2 tsp agar powder

B)
73g sweet potato puree
90g coconut milk

C)
20g cornflour
34g fresh milk
1/2 tsp coconut oil (optional)

Steps:
1. Combine A) in a saucepan. Mix B) in a bowl and set aside. Mix C) in a jug and set aside.

2. Bring A) to boil while stirring, making sure all agar has dissolved before adding B) to A). Bring to boil again while stirring.

3. Stir C) again before pouring into contents in the saucepan. The mixture will thicken suddenly. Just remove from heat for a while and stir vigorously. Put back on heat and stir for another minute. Strain the mixture through a sieve to remove any lumps.

Note that you should prepare one pudding layer at a time and assemble one pudding and sponge layer at a time.

Assembly
1. Place cake ring on a sheet of aluminum foil with sides folded up. You don't need the foil if you are assembling sponge layer first and you can assemble directly on the cakeboard.

2. Place a piece of circle cutout on top of the foil in the middle.of the cake ring. This is necessary as the cake will slide off the cakeboard easily if there is no sponge to anchor the cake to the cakeboard. Spoon some purple sweet potato pudding to cover the sponge cake. When you have filled about 2cm height worth of pudding, place the blue sponge on top carefully and gently press in down. Fill the hole in the sponge with a other circle cutout cake.

3. Chill the cake in fridge while you prepare the green pudding. Repeat layering of pudding and yellow sponge. Repeat for orange pudding and pink sponge.


4. Cover the top of the cake with cling wrap to prevent the sponge from drying out. Chill for at least two hours before attempting to move the cake to the cakeboard. Carefully remove cake ring when cake is carefully positioned onto cakeboard.

I just used simple deco for the cake with marshmellows and the name in cream coloured sponge.


Not forgetting topping it off with Miffy!

My friend sent me some lovely pictures of the cut cross section. Here's a slice with Miffy too!


With love,
Phay Shing

Read More »

Monday, 21 May 2018

Pulut Hitam and Purple Sweet Potato Chiffon Sponge and Pudding Cake

My mum has diabetes so I have to be creative in coming up with birthday cakes that are tasty but yet low in GI. It is my preference to use wholesome natural ingredients without resorting to artificial sugar and so I came up with this cake that you most probably can't find elsewhere :)


Pulut hitam (black glutinous rice) chiffon cake with purple sweet potato pudding and topped off with sweet potato Ondeh-Ondeh! Absolutely no artificial colouring is used.

I used only Gula melaka or coconut palm sugar as the sweetener in the chiffon cake, and the pudding is adapted from here with only 20% of caster sugar that the original recipe suggested. You may think that this cake will be bland tasting but far from it, it is really flavourful from the harmonious blend of black glutinous rice, coconut milk, pandan, Gula melaka and sweet potato, but yet it is not too sweet!

This cake may appear simple but it is made from scratch with a lot of love. I began by cooking the black glutinous rice porridge. You may refer to this post for the recipe for the porridge. Although I provided the recipe for the pulut hitam chiffon sponge in that post, I tweaked it to make it suitable for baking in a chiffon tin as it needs to be more structurally stable than when you bake a flat layer cake. You may choose to use a recipe that uses black glutinous rice flour but the flour as not as easily available as the raw black glutinous rice grains and I find the flour sold in Singapore isn't as fragrant as the ones from Indonesia that my friend gave me a few years ago. Personally I prefer the version baked by using the porridge. I also usually sneak a bowlful to eat as it is one of my favourite Asian desserts!


Recipe for pulut hitam chiffon cake
Ingredients (for one 17cm chiffon tin or one 15cm chiffon tin + one 7" square sheet cake):
3 egg yolks
33g Coconut oil
180g black glutinous rice porridge
15g coconut cream or coconut milk
80g cake flour
1/8 tsp salt
1/2 tsp charcoal powder (optional)

4 egg whites
1/4 tsp cream of tartar
50g granulated coconut palm sugar (use more if you have a sweet tooth as mine is not a very sweet version)

Steps:
1. Set oven rack to second lowest position. Place a tray of water at base of oven (optional). Preheat oven to 150℃.

2. Whisk egg yolks until pale and thick. Add oil and whisk until well combined. Add coconut cream and porridge and whisk until well combined. Gradually add in sifted flour, salt and charcoal powder and whisk until no trace of flour is seen.

3. In a clean metal bowl, beat egg whites with cream of tartar until firm peaks form, gradually adding in Gula melaka once the egg whites are foamy.


4. Quickly but gently fold the meringue into the egg yolk batter in three additions. Pour into the prepared chiffon tin (and square tray if you are baking a sponge cake to cover the hole of the chiffon cake). Use a chopstick to run through the batter to pop any trapped air bubbles

5. Bake for 15 minutes and then reduce the temperature to 130℃ and bake for another 30 min. Reduce the temperature to 110℃ and bake for another 10-20 min or until skewer comes out clean. Bake the sheet cake for 15 min or until skewer comes out clean.

6. Invert immediately when removed from oven to cool. When completely cooled, carefully unmould the cake from the chiffon tin by hand.


7. Slice the chiffon cake horizontally using a long serrated knife into two, three or even four slices as you wish. I use a ruler and toothpicks as markers to indicate where to slice horizontally. Keep the sliced cake in airtight container while you prepare the pudding.

Recipe for purple sweet potato pudding
Ingredients:
A)
400g pandan water (boil a several torn up pandan leaves in water for 10 min)
16g Caster sugar (please use more sugar if you prefer it sweeter)
1/3 tsp salt
1 tsp agar powder

B)
147g purple sweet potato puree (steamed and mashed)
180g coconut milk

C)
40g cornflour
67g fresh milk
1 and 1/3 tsp coconut oil (optional)

Steps:
1. Place all ingredients in A) in a saucepan. Mix together B) ingredients in a bowl. Mix together C) ingredients in a jug.

2. Bring A) to boil, stirring frequently. Make sure that all the agar powder is dissolved.

3. Add B) to A) and bring to boil while stirring.

4. Stir C) again as the cornflour would have settled to the bottom. Slowly pour in a small and steady stream into the saucepan while stirring the contents in the saucepan. Continue stirring while heating over medium-low heat for another 2-3 minutes. The mixture will thicken.

5. Pour the contents of the saucepan through a sieve to remove any lumps that may be there.

Assembly
You may use a springform pan or flexible clear cake plastic rings like what I used. If using the plastic rings, make sure that you prepare the bottom layer of sponge on the cakeboard with the plastic ring secured before you make the pudding.

1. Place a layer of sponge on cakeboard with the cake plastic ring. You may cover the hole with a round sheet cake cutout from the sheet cake if you wish.

2. Use a ladle to scoop some pudding to cover the sponge. You may layer it as thick or thin as you want.


3. Place the second layer of sponge on top of the pudding carefully. Gently but firmly press it down such that the pudding comes into contact with the sponge.

4. Repeat steps 2 and 3 until you have the desired number of alternating layers.

5. Cover the top of the assembly with cling wrap. Refrigerate for 2h or overnight. Carefully remove the plastic cake ring.

I chose to decorate with some purple sweet potato pudding flower cutouts and sweet potato Ondeh-Ondeh. You may refer to this post for the recipe for Ondeh-Ondeh.


This cake is really lovely for those of you who love pulut hitam and coconut milk combi but want something not so sweet. My friend who took some extra cake that I made let her parents-in-law try. They loved it so much that she wants me to bake that for her father-in-law’s birthday!

Needless to say, my family enjoyed the cake too! Here's a peek at the cross section of the cake


Update: this is the cake I made for my friend's father-in-law. I put the pudding on top instead of the sponge 😊


The freshly baked chiffon cake looks so inviting I just had to take a photo of it!

I made a bigger 17cm chiffon cake.


With lots of love,
Phay Shing

Read More »

Sunday, 4 February 2018

‘Eeyore’ Purple Sweet Potato Chiffon Cake (new natural powder)


As many of you may know, I am a big advocate of natural coloring sources from food, as I am a mother. I stopped mentioning as it’s repetitive but usually I will use natural coloring as much as I can in my bakes eg charcoal powder, cocoa powder, blue pea flowers, red yeast powder etc.

I am really excited to have found an excellent natural food source for purple color in my bakes! This purple sweet potato powder from Natureally is not only a stable natural purple coloring (that doesn’t change colour after baking), but packed with nutrients and flavour from purple sweet potato! I was excited to read from the packaging that this contains 100% purple sweet potato, no other artificial additives. In my early days, I had made paste from purple sweet potato from scratch for my kids’ food and bakes, but it was too time-consuming on a regular basis, so this is a godsend! Also I find it more effective than the blueberry powder I used previously for my purple colour. It is easy to totally dissolve the powder to reconstitute the purple sweet potato without purple spots in the cake.

Comes in a nice packaging

The colour is really pretty, isn't it?

This sweet ‘Eeyore’ Chiffon Cake came out looking really sweet with its natural purple color totally from the sweet potato powder, and nicely fragrant as well. For the final cake, I made a pooh friend from orange chiffon cake baked in an egg shell to accompany the Eeyore =). Recipe for the Purple Sweet Potato Chiffon Cake is shared below, using the natural purple sweet potato powder.

Purple Sweet Potato Chiffon Cake (15-cm tube pan)
3 egg yolks
18g castor sugar
40g vegetable/corn oil
45g water
60g cake flour, sifted (Prima)
2 g vanilla extract
15g purple sweet potato powder in 60g hot water

4 egg whites
45g castor sugar
¼ tsp cream of tartar

1. Prepare the purple sweet potato smooth paste. Dissolve 15 g purple sweet potato powder in 60g hot water. Stir well, so that no more specks of powder is seen.

Purple sweet potato paste made from the powder


2. Preheat oven at 160°C. *I used steam baking like ogura cakes but it is optional.

3. Beat egg yolks with sugar with whisk till pale and light before stirring in oil, water and vanilla extract.

4. Add in sieved flour and whisk till no trace of flour found.

5. Whisk in purple sweet potato paste into the egg yolk batter till even colour.

Purple sweet potato egg yolk batter


6. Meringue: Beat the egg whites with ¼ tsp cream of tartar till firm peaks, mixing in caster sugar in 2-3 additions.

7. Fold in the meringue gently into the batter 1/3 at a time using a flexible spatula.

Glossy batter after folding the meringue into the egg yolk batter


8. Pour into chiffon pan and gently tap on table gently to remove air bubbles (remember to hold down the tube when you tap).

8. Bake for 160°C 15 min, then 140°C for 25+ min, or until skewer inserted into centre of cake comes out clean.
*Alternative baking condition if your oven does not respond well to temperature change: 140°C for 55+ min (or until skewer comes out clean).

9. Invert once out of the oven and unmould by hand when cake is cool (see 'hand unmolding chiffon cakes for a smooth finishing' video).

*For the ‘Eeyore version’: To make the cream patch, spoon out 2 tsp batter before adding in the sweet potato paste. After meringue is whipped, transfer 4 tbsp meringue and fold into plain batter. Pipe cream patch onto tube pan, bake for 2-3 min until patch is dry to touch. Pour purple sweet potato batter into pan.

I made the cuts on the face using a sharp knife, and decorated the ‘Eeyore’ with cut-outs from chocolate chiffon sheet cakes. I used a maple leaf cutter for the hair and oval cutters for the eyes. I used melted marshmallow to stick the features on. If you are doing the 'Eeyore' version, remember to keep a small amount of purple sweet potato batter to bake as sheet cake to cut out the ears.

Hope you like this sweet and healthy creation! By the way I also cooked with the purple sweet potato paste to make the sweet potato rice! It tastes like the real thing =).

With lots of love,
Susanne


Read More »

Sunday, 3 January 2016

Sweet Potato Ondeh-Ondeh

I am kick-starting 2016 with orange and purple sweet potato ondeh-ondeh, with some of them sporting checkerboard designs :)


Why post this kueh dessert on a blog dominated by chiffon cakes, macarons and cookies? I had the inspiration to make this item for my next culinary arts teaching session (no idea yet when this will happen as suddenly we have more volunteer teachers :p) when my neighbour gave me some freshly made orange sweet potato ondeh-ondeh that were still warm from cooking. The "skin" was so soft and fragrant that I had to give it a try!

I am an adventurous baker and love to explore a variety of bakes but don't have the luxury of time or energy to do a wide range of bakes so I didn't have the chance to learn how to make ondeh-ondeh until now. To my delight, I realised that it is quite simple and very similar to making snowskin mooncakes, which I am familiar with, except that you boil the end product. Of course it is not that simple if your standard of ondeh-ondeh is perfection -- thin tender chewy skin that doesn't burst when cooked but bursts with lots of runny gula melaka when you take a bite.

There are lots of recipes out there for ondeh-ondeh so what I will focus on in this post is how to wrap a substantial amount of gula melaka without driving yourself mad and how to create the cute checkerboard patterns. A very good reference I found and adapted my recipe from is Alan Goh's Travelling Foodies blog. What I found really helpful was his suggested ratio of 3 parts dough to 1 part filling by weight. It really worked for me! Manageable wrapping of the gula melaka but at the same time, awesome experience for the palate. The ratio and weight of each part is just nice, 15g dough and 5 g filling :). I didn't agree with the approximate measurement of gula melaka by volume though. 5g of finely chopped gula melaka works out to be about 1 teaspoonful (measuring spoon, not the kind you use to stir coffee at coffeeshops) that is slightly heaped and lightly packed, and not half teaspoonful as suggested. Great tip about using gently simmering water to cook the ondeh-ondeh too! Prevents the balls from bursting while slowly cooking the ondehs to allow the gula melaka time to melt inside.

Some preparation work to do before we get to the main prep...

In a large pot, boil some water with a few Pandan leaves either knotted up or cut into shorter strips.  You will need to use this water for adding to the dough, the dessicated coconut (if you are not using freshly grated coconut) and for boiling the ondeh-ondeh.


Steam some sliced orange and purple sweet potato until soft and mash with a fork or potato masher. I used an unconventional method of pressing the potatoes through a sieve with the back of a metal spoon. This is to ensure that the puree I get is really smooth. Steam the sweet potato slices for about 25-30 minutes.

Freshly steamed sweet potatoes

Prepare some grated coconut by steaming it with pandan leaves and a pinch of salt. Alternatively, you could use desiccated coconut if freshly grated coconut is not available. If you are using desiccated coconut, add some pandan water to it along with a pinch of salt and mix well before steaming. Steam the grated/desiccated coconut for 15 minutes.


I used desiccated coconut as I didn't want to waste any excess freshly grated coconut. Desiccated coconut can be kept for a much longer time and can be used for other bakes (like my pandan kaya gula melaka logcake). Freshly grated coconut would taste better of course.


Recipe for ondeh-ondeh
(Makes about 20 ondeh-ondeh, about 20g each)
110g steamed and mashed orange sweet potato
110g steamed and mashed purple sweet potato
100g glutinous rice flour (divided into 2 equal portions) + extra for dusting
50g Pandan water (you won't need all of it)
100g gula melaka, finely chopped till crumb-like texture

35g grated coconut*
1 Pandan leaf, knotted*
A pinch of salt*

*Alternatively,
35g desiccated coconut
2tbs Pandan water
A pinch of salt

Clockwise from top left: Chopped gula melaka, mashed orange sweet potato, glutinous rice flour, pandan water, mashed purple sweet potato and steamed grated/desiccated coconut

 Add about 50g of glutinous rice flour into each of the mashed potatoes.


Use a combination of rubbing in and kneading to work the sweet potato and flour together. Note that different kinds of sweet potatoes have different water content. The orange sweet potato has a higher water content than purple or Japanese sweet potato so what you get after working the flour and mashed orange sweet potato is most likely a moist and soft dough. You most probably don't need to add any water and may have to add some flour instead for the dough to firm up a little if it is too sticky and soft. On the other hand, you may get what resembles fine breadcrumbs for purple sweet potato mix.


Gradually add pandan water, a teaspoon-a tablespoon at a time and knead the dough until it feels firm but pliable, and doesn't crumble or crack easily when you try to shape it. If the dough feels too sticky, add more flour a little at a time. Getting the right texture of dough is important. Too wet and sticky and it becomes difficult to work with, prone to breaking when wrapping the filling and the end product has a sticky bite. Too dry and the dough cracks or crumbles easily when you try to wrap the gula melaka.

Purple sweet potato dough

You may store any unused dough by wrapping in clingwrap and refrigerating it up to a few days.

Portion the dough into 15g balls if you are making single-coloured ondeh-ondehs. Portion the dough into 8g balls for checkerboard ondeh-ondeh.


Here is how you wrap the filling without going crazy. Create a "bowl" using your fingers that is deep enough to match approximately the scoop height and width of your teaspoon (measuring spoon please). If you find the dough cracking up or is too sticky to work with at this point, feel free to dab on a bit of pandan water or dust with a bit of flour.


Fill the teaspoon with a small heap (not too "mountainous" please) of gula melaka and gently but firmly use a finger to press it into the spoon to pack it in a little. This will help the gula melaka stay in a ball shape as you wrap, which will make life a lot easier. I can't imagine trying to wrap loose "sand" :P.


Tip the gula melaka into the "bowl" of dough.


Carefully gather in the dough over the ball of gula melaka.


Pinch the dough together at the opening of the hole. Make sure you seal it completely to prevent the gula melaka from leaking out.

Dough ball with wrapped filling

If you are making checkerboard ondeh-ondehs, take an 8g portion of dough, place it on baking paper that has been folded into half such that there is a noticeable crease. Fold the baking paper over the ball of dough with the dough nestled against the fold. Use your palm to flatten the dough such that a rough semicircle shape is formed. Lightly dust the baking paper with flour if necessary, i.e. the dough sticks to the paper.


Repeat the above step for the other coloured dough. Place the two semi-circles next to each other, overlapping a little. Fold the baking paper over and use your palm or fingers to press along the seam.


Use a bench scraper or knife to cut the dough into half (left picture below). Flip one piece over such that the reverse order of colours are showing (right picture below).


Overlap the two pieces and fold the baking paper over it. Press the seams together.

Tadah! Checkerboard dough!

Wrap the filling as shown above with the single-coloured dough. Just pinch any seam together that seems to be splitting as you wrap the filling. Do master the single-coloured dough wrapping before you attempt this.

Checkerboard dough ball with wrapped filling

Assembled ondeh-ondehs

Gently drop the balls into a gently simmering pot of pandan water (I removed the leaves) and swirl the water a little to prevent the balls from sticking to the bottom of the pot. When the balls start to float, remove them using a wired sieve or one of those ladles with holes that you use for steamboat.


Place the cooked balls on the plate of grated coconut and roll them to coat with coconut.


Serve immediately if possible!

A close-up view of the runny gula melaka inside!


I did a trial earlier on with Japanese sweet potato as well and coloured the dough green with  homemade pandan juice. I was more generous with the filling so a few of the ondehs burst but checkout the awesome runnyness and thin "skin"!

Yums!


With love,
Phay Shing
Read More »