I was fascinated with Luk Chup since a few years ago but didn't have the motivation to try it out as I didn't manage to find a subject or purpose for it. With my dad's birthday coming up, I decided to give it a try because there were very good and cheap Turkish cherries on sale.
Showing posts with label Cherry. Show all posts
Saturday, 5 September 2026
Hyper-Realistic Cherry Luk Chup
Can you tell which two cherries in the picture below are the real ones?
A close up view of the cut cross-section!
I happened to have some homemade frozen lotus seed puree at home, in preparation for my Mooncaron class. Luk Chup is traditionally made from mung beans but other substitutes are possible too, such as lotus seeds which I had on hand. My recipe is adapted from Catherine Zhang's Luk Chup recipe. Feel free to upsize it as it's a small batch.
Ingredients:
(makes about 12-14)
Dough:
100g lotus seed puree*
50g cherry juice*
40g heavy cream/ coconut cream*
1/16 tsp salt
35g sugar*
1 tsp tapioca starch
Coating:
125g water (room temperature)
1/2 tsp agar (1.6g)
1 tsp sugar (6g)
1/32 tsp salt (pinch)
Finishing:
Red, blue & dark brown colouring + some water
Fresh cherry stems
* NOTES ON INGREDIENTS
🔸Lotus seed puree: I prepared this by first washing & soaking dried lotus seeds. The green shoots are removed. Rinse & boil soaked seeds until soft & easily mashed between fingers. Press boiled lotus seeds through fine mesh strainer. You may store the puree in the freezer double wrapped until it's needed. You may use the traditional mung beans instead of lotus seeds. I happen to have lotus seed puree in my freezer so I used it. You may use red beans (azuki beans), cannellini beans, or possibly chestnuts, sweet potato/taro as well. Basically anything that can form a smooth paste that's used in pastries all over the world. Just take note that you may need to tweak the sugar content &/or liquid used to form a final dough that tastes good & works well but the technique should work
🔸Cherry juice: I used freshly squeezed cherry juice but you may substitute with other juices or use coconut milk instead
🔸Heavy cream/coconut cream: I used coconut cream for this one and heavy cream for my first attempt. Both are great! If you are omitting the use of juice, replace this with coconut milk which has a lower fat content
🔸 Sugar: It's not only a sweetener but also a binder. Too little & your shaped dough will crack easily. I already reduced sugar from the traditional/original recipe by about half
Watch the reel for the video tutorial of the process:
Steps:
1. Blend all ingredients except tapioca starch
2. Pour into non-stick saucepan. Add tapioca starch
3. Cook on med-low heat until a soft pliable dough forms. Make sure it's able to hold its shape when you try to mold it. If not cooked till firm enough, the shaped fruit will slide down the skewer & not hold its shape well. Cool completely
4. Portion out 10-11g of dough for each cherry. Shape using lightly oiled clean hands & ball tool. You may use gloves but I find it causes creases in my shaped cherries😅, much like how bakers who work with fondant prefer to work with bare hands for intricate shaping
8. Dip cherries in agar as shown in reel, waiting for about a few minutes between 1st & 2nd coating. Reheat & stir agar if it starts to thicken/set
9. Attach cherry stem after applying the 2nd coating. Let the coating set fully, about 10 min
10. Remove Luk Chup from skewers. Cut off excess agar at the base & reshape to round out. Store airtight in fridge for up to 5 days
Tuesday, 12 August 2025
Cherry Strawberry Raspberry Lambeth Cake
I made my first Lambeth cake with a very specific request from a young lady --- cake to be covered in red cream and decorated with black cream and pearls to match the dress she would wear for her birthday. I was honestly out of my comfort zone because my cakes tend to be naked and natural or pastel colored but I took the chance to learn something new. Total newbie at this!
What's in this cake?
- Vanilla chiffon sponge brushed with cherry syrup
- Canned cherries and cherry raspberry strawberry Italian meringue buttercream between sponge layers
- Strawberry whipped cream for frosting the cake
- No-dye black buttercream for piping black frills and details (adapted from Sugarologie) . Made some tweaks because Singapore is so hot)
- Fresh cherries and sugar pearls for decoration
I love it that I didn't have to add any artificial black colouring to achieve a deep black colour but because I substituted some butter with shortening, I had to use a little charcoal powder to deepen the colour. The vibrant red is achieved by using red powdered colouring that's used by the Chinese in Southeast Asia for dyeing food like red eggs or kueh like Ang Ku Kueh. I find it much better than other Western brands of red colouring as a little is enough to achieve a vibrant red without leaving any weird aftertaste.
Here's a peek at the filling layers...
Sharing other views of the cake because I was rather pleased that it looked nice despite little imperfections here and there!
Thank God my friend and her daughter were willing to be my guinea pigs and the cake was well received!
with love,
Phay Shing
Saturday, 19 July 2025
Sugar-Free Kirby Cherry Strawberry Marshmallow Coated Chocolate Hazelnut Cakepops
I had to satisfy my curiosity to see if it works for my sugar-free version of marshmallow as well. So glad it works! Presenting Kirby as sugar-free marshmallow coated cakepops!
Two of the Kirbys in the picture are plastic figurines so don't be fooled 🤭
I used the same sugar-free recipe as my chick marshmallows over here, except that I used fresh chery puree that was reduced instead of passionfruit puree. I also added prebiotic soluble fibres in both cakepop and marshmallow in addition to using a sugar-replacement to further lower the GI of the confection. I added strawberry emulsion to the marshmallow batter to impart some colour in addition to the cherry puree as well as to increase the fruity taste. I adapted the sugar-free chocolate hazelnut cakepop from the one I used for my Christmas bear with present marshmallow class. You may sign up for the online class over here if you are interested!
You may wonder if taste is compromised. I have various taste testers who love it and can't tell it's sugar-free! Main recipient was my hubby and he's glad to have a treat he can enjoy that's made in one of his favourite game characters!
I am not able to share this sugar-free recipe yet but I will have a studio and online class for a similar content in October so keep a lookout for it on my Instagram! For the time being, you may refer to my book Deco Marshmallows which has sugar-free recipes for both gelatin and agar based marshmallows where I use a different sugar replacement from the current one I am using.
You may refer to this reel for the video tutorial of making these adorable treats:
Friday, 30 August 2019
Dairy-Free Blackforest Chiffon Cake
My friend sent me a picture of her daughter lying on a field and reading, and asked if I could make something like that for her daughter's birthday. I thought long and hard about the various genres of bakes I could use to make this and finally settled on chiffon cake since I think it is the best medium for this theme. It is the first time I made a full-bodied human figurine so I am glad it came out quite decently! Presenting my chiffon creation on top of a dairy-free naked blackforest cake!
Instead of cooked dough method for making chocolate chiffon, I tried doing it the regular chiffon way but bloomed the cocoa powder in boiling water instead of sifting together with cake flour. Blooming cocoa powder for bakes helps to intensify the chocolate flavour. I baked three 9" round layers. My friend's kids are allergic to dairy at some degree so the whole bake had to be dairy free.
Recipe for dairy-free chocolate chiffon cake
Ingredients (makes three 9" layers):
Egg yolk batter
9 egg yolks
95g cake flour
50g Dutch processed (alkalized) cocoa powder
1/2 tsp baking soda
1/4 tsp salt
102g canola/vegetable oil
108g boiling water
2.5 tsp vanilla extract
1 tsp Kahlua coffee liqueur
Meringue
9 egg whites
1/2 tsp cream of tartar
150g caster sugar
Note: divide the meringue ingredients into three to bake the layers individually unless you are able to bake all three at once.
Steps :
1. Dissolve cocoa powder in boiling water in a small mixing bowl. Cover with cling wrap and leave to cool. Preheat oven to 150°C, set oven rack to second lowest position. Line bottom of baking tray with parchment paper.
2. Prepare egg yolk batter. In a large mixing bowl, whisk egg yolks until thicker in consistency and paler in appearance. Add oil and whisk until we'll combined. Add cocoa and water mixture and whisk until combined. Add vanilla and coffee liqueur and whisk until combined. Gradually sift in flour and salt and whisk until no trace of flour is seen. Divide the batter into three equal portions if baking one layer at a time.
3. Prepare meringue. In a clean metal bowl, beat egg whites with cream of tartar until firm peaks or just reach stiff peaks while gradually adding in castor sugar once the egg whites are foamy.
4. Quickly but gently fold the meringue into the egg yolk batter in three additions. Pour batter into prepared baking tray. Gently run a chopstick around the batter to pop any air bubbles.
5. Bake for 10 minutes. Reduce temperature to 135°C and bake for another 30-35min or until top of the cake springs back when lightly pressed and a skewer comes out clean. Cool for 5 minutes before unmoulding by hand or gently using a spatula. Cool on cooling rack with a other parchment paper over it. Not that baking time and temperature varies from oven to oven so adjust accordingly.
I assembled the cake using non-dairy whipping cream and cherries. I brushed the surface of the cake with simple syrup (1:1 ratio of sugar and water) before putting on the cream.
I covered the naked blackforest cake with a thin layer of chiffon sheet cake before mounting the figurine on top. The most challenging part of the figurine was figuring out how to make the arms holding a book as it is a little gravity defying. I made the book out of bean paste dough as I thought bean paste is more suitable for the look of a book. I bought the recipe from a talented baking friend so am unable to share the exact recipe but you may refer to this post for my experience of making the dough. It is like fondant except that it is a lot less sweet and tastes like bean flavoured mochi. The figurine is made of dairy free vanilla chiffon sponge. I used a combination of thin sheets of chiffons and chiffon baked in small moulds to create the figurine.
Thank God I managed to pull it off!
With love,
Phay Shing
Read More »
Instead of cooked dough method for making chocolate chiffon, I tried doing it the regular chiffon way but bloomed the cocoa powder in boiling water instead of sifting together with cake flour. Blooming cocoa powder for bakes helps to intensify the chocolate flavour. I baked three 9" round layers. My friend's kids are allergic to dairy at some degree so the whole bake had to be dairy free.
Recipe for dairy-free chocolate chiffon cake
Ingredients (makes three 9" layers):
Egg yolk batter
9 egg yolks
95g cake flour
50g Dutch processed (alkalized) cocoa powder
1/2 tsp baking soda
1/4 tsp salt
102g canola/vegetable oil
108g boiling water
2.5 tsp vanilla extract
1 tsp Kahlua coffee liqueur
Meringue
9 egg whites
1/2 tsp cream of tartar
150g caster sugar
Note: divide the meringue ingredients into three to bake the layers individually unless you are able to bake all three at once.
Steps :
1. Dissolve cocoa powder in boiling water in a small mixing bowl. Cover with cling wrap and leave to cool. Preheat oven to 150°C, set oven rack to second lowest position. Line bottom of baking tray with parchment paper.
2. Prepare egg yolk batter. In a large mixing bowl, whisk egg yolks until thicker in consistency and paler in appearance. Add oil and whisk until we'll combined. Add cocoa and water mixture and whisk until combined. Add vanilla and coffee liqueur and whisk until combined. Gradually sift in flour and salt and whisk until no trace of flour is seen. Divide the batter into three equal portions if baking one layer at a time.
3. Prepare meringue. In a clean metal bowl, beat egg whites with cream of tartar until firm peaks or just reach stiff peaks while gradually adding in castor sugar once the egg whites are foamy.
4. Quickly but gently fold the meringue into the egg yolk batter in three additions. Pour batter into prepared baking tray. Gently run a chopstick around the batter to pop any air bubbles.
5. Bake for 10 minutes. Reduce temperature to 135°C and bake for another 30-35min or until top of the cake springs back when lightly pressed and a skewer comes out clean. Cool for 5 minutes before unmoulding by hand or gently using a spatula. Cool on cooling rack with a other parchment paper over it. Not that baking time and temperature varies from oven to oven so adjust accordingly.
I assembled the cake using non-dairy whipping cream and cherries. I brushed the surface of the cake with simple syrup (1:1 ratio of sugar and water) before putting on the cream.
Using acetate sheet to surround the cake helps with neat assembly.
I covered the naked blackforest cake with a thin layer of chiffon sheet cake before mounting the figurine on top. The most challenging part of the figurine was figuring out how to make the arms holding a book as it is a little gravity defying. I made the book out of bean paste dough as I thought bean paste is more suitable for the look of a book. I bought the recipe from a talented baking friend so am unable to share the exact recipe but you may refer to this post for my experience of making the dough. It is like fondant except that it is a lot less sweet and tastes like bean flavoured mochi. The figurine is made of dairy free vanilla chiffon sponge. I used a combination of thin sheets of chiffons and chiffon baked in small moulds to create the figurine.
Here is a peek at the works in progress state of the figurine. Looks a little spooky 😂
Thank God I managed to pull it off!
With love,
Phay Shing
Friday, 25 January 2019
'Family Picnic' Cherry Macarons on Blackforest Cake
My friend requested for a birthday bake for her mum that is personalized and special for her family...A family picnic scene on top of a blackforest cake!
I was not given reference pictures for a caricature of the family members and it's beyond my skill to design my own. And so I got a talented artist (@ryaccoon, Instagram account) to design the picnic scene and invidividual characters. I made the macaron template based on the drawings but with some minor modifications based on my friend's feedback and the number of coloured batter I could cope with.
I am usually quite nervous about working with fresh dairy creamed cakes that are under a macaron structure as Singapore's weather is really warm. Pure dairy cream doesn't hold up well although it tastes delicious. I usually use gelatin or white chocolate as a stabilizer but never both of them together. I tried using both this time round as an experiment. The cream still tastes of fresh cream although it's richer and slightly sweeter than if I use icing sugar and gelatin but it's a lot more stable and easy to work with! Usually my pure dairy whipped cream stabilized with gelatin and sweetened with icing sugar will melt into a puddle within 30 min of being left out on my kitchen counter. But this cream held it's shape after being left out on the counter for an hour! I will share this recipe later in this post. But first let me share some photos of the process...
I used the swiss meringue method with egg white split into two batches. Reason being, it's easier to work with many colours that way as I can colour the almond paste portion before meringue is added in.
I used the yummy chocolate chiffon sponge recipe from the blackforest logcake I made last year soo you may refer to that. I upsized the recipe to a 6 egg white recipe for baking three 9x9" square cakes.
I am always on the lookout for creating a fresh cream tasting filling that is more stable in Singapore's hot weather. This time round, I am trying not to resort to adding non-dairy cream which already has some stabilizers added. I didn't want to end up with so many half-used cartons of cream 😂. I stumbled across one such recipe that I thought I could adapt. It uses both gelatin and white chocolate as stabilizers for dairy cream, instead of simply just gelatin or white chocolate. I didn't have double cream (which as higher fat percentage (45%) than heavy cream (35%)) at the moment so I used a little unsalted butter to increase the fat content, which in turn makes the filling more stable too.
Stabilized dairy whipped cream recipe (richer version)
Ingredients:
400g whipping cream/double cream
20g unsalted butter (replace with double cream if using double cream)
1 and 1/4 tsp gelatin powder
20g cold water
110g white chocolate, chopped or use chips
A pinch of salt
1.5 tsp vanilla extract or bean paste
Steps:
1. Put water in a small microwave safe bowl. Scatter gelatin powder over and let it sit for 10 minutes at room temperature.
2. Place the rest of the ingredients in a heatproof bowl and set it over a saucepan of water without the water touching the base of the bowl. Bring the water in the saucepan to a gentle simmer while stirring the mixture in the bowl. Melt everything together until smooth. Remove from heat.
3. Microwave the bloomed gelatin at medium power for 10 seconds and stir, making sure it is totally dissolved. Add melted gelatin into white chocolate and cream mixture and mix well.
4. Cover bowl with cling wrap and chill in fridge for at least 4h or overnight.
5. Whip at low speed with electric mixer until stiff peaks. Be careful not to overbeat. Do this step only when you are about to assemble the cake.
Assembly
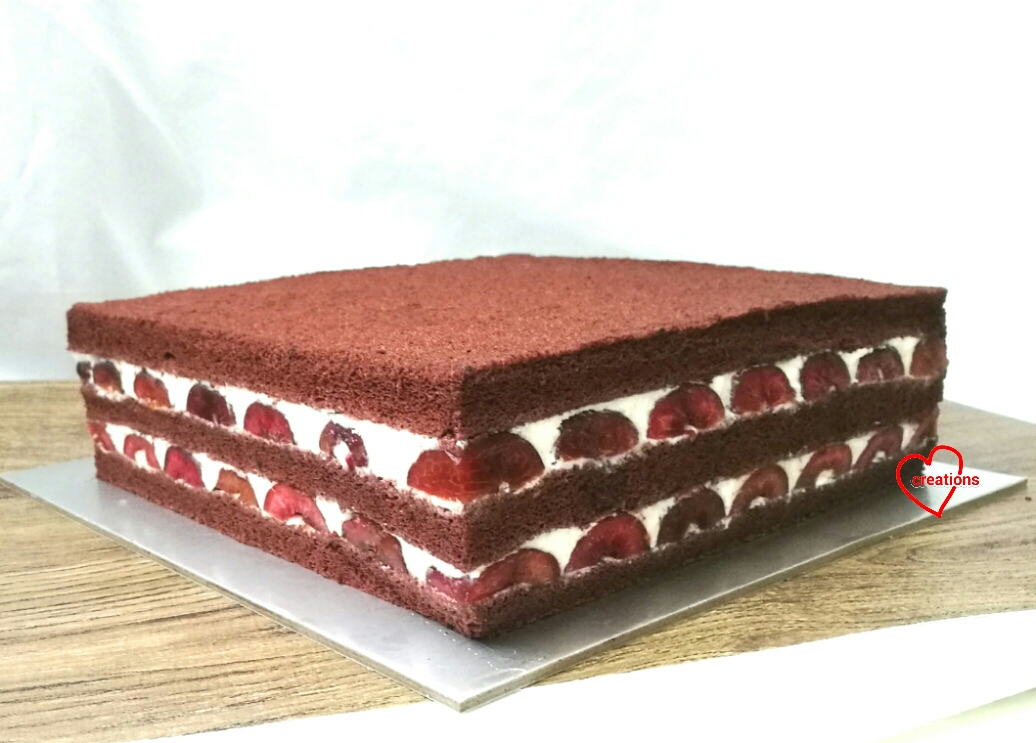
1. Cut about 30-40 cherries into halves and remove the seeds. Dry with paper towel so excess juice doesn't seep out and mess up the cream when you slice it.
2. Prepare stabilized whipped cream. Add a little cream on cake board before putting first layer of chocolate sponge cake on.
3. Brush on some liquid from the cherry jam. Use a spatula to apply a thin layer of cream before lining the sides with cut cherries. I filled the middle of the square with fresh cherries and the homemade cherry jam.
Cover the cherries with more cream. Just enough cream to cover will do.
4. Carefully place another sponge cake on top. Repeat step 3 and then place the final layer of sponge on top.
5. Use a spatula to apply a little cream on the sides and smooth it out. This is to fill any air gaps around the edges.
6. If you happen to like this rustic look, you may leave the cake as it is. If you want to show the sliced cherry view, cover the cake with cling wrap and freeze for 2 hours. Use a long serrated knife to slice about 1cm off each side of the cake. I heat the knife over a flame and clean the blade after each cut to help ensure a cleaner cut. I wish I had a longer knife though 😆. It would have been even neater if I had one.
If you are serving the blackforest cake as it is without fancy deco, you may want to add a little more stabilized cream on top in dollops with fresh whole cherries and a light sprinkle of chocolate rasps. At least that's what I would have done for a naked version of plain blackforest cake 😊.
Remember to keep the cake chilled in fridge until it is time to serve. I can assure you it is delicious 😋! Best served a day or two after assembly but it's good for a few days. If you prefer a lighter, less rich cream, you may use the stabilized whipped cream recipe from this post but double the amount of gelatin used to make it more stable.
A tip about macaron cake toppers on naked or semi naked cakes. Always store them separately as the moisture from the sponge cake will turn the macarons soggy quickly. If you need to make a cake with the macarons left on it during storage, you need to frost the whole cake with cream to create a barrier between exposed sponge and macarons.
With love,
Phay Shing
Read More »
I was not given reference pictures for a caricature of the family members and it's beyond my skill to design my own. And so I got a talented artist (@ryaccoon, Instagram account) to design the picnic scene and invidividual characters. I made the macaron template based on the drawings but with some minor modifications based on my friend's feedback and the number of coloured batter I could cope with.
I am usually quite nervous about working with fresh dairy creamed cakes that are under a macaron structure as Singapore's weather is really warm. Pure dairy cream doesn't hold up well although it tastes delicious. I usually use gelatin or white chocolate as a stabilizer but never both of them together. I tried using both this time round as an experiment. The cream still tastes of fresh cream although it's richer and slightly sweeter than if I use icing sugar and gelatin but it's a lot more stable and easy to work with! Usually my pure dairy whipped cream stabilized with gelatin and sweetened with icing sugar will melt into a puddle within 30 min of being left out on my kitchen counter. But this cream held it's shape after being left out on the counter for an hour! I will share this recipe later in this post. But first let me share some photos of the process...
I used the swiss meringue method with egg white split into two batches. Reason being, it's easier to work with many colours that way as I can colour the almond paste portion before meringue is added in.
Piping out the human figures and picnic basket. My friend requested for the grandpa not to be bald so I had to patch that post-baking 😂
It was quite a mad bake trying to cope with other designs concurrently. These are only some of the shells I baked that day!
Fully decorated macaron shells. Decoration is done with combination of edible markers and gel food colouring made into paint. By diluting it with a little vodka.
I filled the macarons with cherry white chocolate buttercream.
A little too generous with the jam for the picnic mat! I wouldn't recommend it unless you are topping up with more buttercream to cover the jam spots as it would wet the upper shell rather quickly.
I added some royal icing grass to finish off the picnic scene.
I am always on the lookout for creating a fresh cream tasting filling that is more stable in Singapore's hot weather. This time round, I am trying not to resort to adding non-dairy cream which already has some stabilizers added. I didn't want to end up with so many half-used cartons of cream 😂. I stumbled across one such recipe that I thought I could adapt. It uses both gelatin and white chocolate as stabilizers for dairy cream, instead of simply just gelatin or white chocolate. I didn't have double cream (which as higher fat percentage (45%) than heavy cream (35%)) at the moment so I used a little unsalted butter to increase the fat content, which in turn makes the filling more stable too.
Stabilized dairy whipped cream recipe (richer version)
Ingredients:
400g whipping cream/double cream
20g unsalted butter (replace with double cream if using double cream)
1 and 1/4 tsp gelatin powder
20g cold water
110g white chocolate, chopped or use chips
A pinch of salt
1.5 tsp vanilla extract or bean paste
Steps:
1. Put water in a small microwave safe bowl. Scatter gelatin powder over and let it sit for 10 minutes at room temperature.
2. Place the rest of the ingredients in a heatproof bowl and set it over a saucepan of water without the water touching the base of the bowl. Bring the water in the saucepan to a gentle simmer while stirring the mixture in the bowl. Melt everything together until smooth. Remove from heat.
3. Microwave the bloomed gelatin at medium power for 10 seconds and stir, making sure it is totally dissolved. Add melted gelatin into white chocolate and cream mixture and mix well.
4. Cover bowl with cling wrap and chill in fridge for at least 4h or overnight.
5. Whip at low speed with electric mixer until stiff peaks. Be careful not to overbeat. Do this step only when you are about to assemble the cake.
Assembly
1. Cut about 30-40 cherries into halves and remove the seeds. Dry with paper towel so excess juice doesn't seep out and mess up the cream when you slice it.
2. Prepare stabilized whipped cream. Add a little cream on cake board before putting first layer of chocolate sponge cake on.
3. Brush on some liquid from the cherry jam. Use a spatula to apply a thin layer of cream before lining the sides with cut cherries. I filled the middle of the square with fresh cherries and the homemade cherry jam.
Cover the cherries with more cream. Just enough cream to cover will do.
4. Carefully place another sponge cake on top. Repeat step 3 and then place the final layer of sponge on top.
5. Use a spatula to apply a little cream on the sides and smooth it out. This is to fill any air gaps around the edges.
6. If you happen to like this rustic look, you may leave the cake as it is. If you want to show the sliced cherry view, cover the cake with cling wrap and freeze for 2 hours. Use a long serrated knife to slice about 1cm off each side of the cake. I heat the knife over a flame and clean the blade after each cut to help ensure a cleaner cut. I wish I had a longer knife though 😆. It would have been even neater if I had one.
Cake with trimmed edges
If you are serving the blackforest cake as it is without fancy deco, you may want to add a little more stabilized cream on top in dollops with fresh whole cherries and a light sprinkle of chocolate rasps. At least that's what I would have done for a naked version of plain blackforest cake 😊.
Remember to keep the cake chilled in fridge until it is time to serve. I can assure you it is delicious 😋! Best served a day or two after assembly but it's good for a few days. If you prefer a lighter, less rich cream, you may use the stabilized whipped cream recipe from this post but double the amount of gelatin used to make it more stable.
A tip about macaron cake toppers on naked or semi naked cakes. Always store them separately as the moisture from the sponge cake will turn the macarons soggy quickly. If you need to make a cake with the macarons left on it during storage, you need to frost the whole cake with cream to create a barrier between exposed sponge and macarons.
With love,
Phay Shing
Sunday, 20 January 2019
'Peter Rabbit in Pink' Cherry Macarons
I have been trying not to overload myself with requests as I need to prepare for a month or more of bakes and step by step photo taking for the upcoming Deco Choux Pastries book. But I manage to squeeze this request in as I could do it concurrently with a couple of requests. I must say that I probably bit off more than I can chew but I am glad that they turned out well! I made Peter Rabbit macarons three years ago and it's nice to revisit an old bake again but with a slight twist. The requestor wanted Peter to be in pink this time, along with some juicy looking carrot macarons on the side 😊.
You may refer to my original post in 2016 over here for recipe, detailed piping steps and template for Peter Rabbit. The template and piping steps of the carrots can be found in my Creative Baking: Macarons book. I used a Swiss method recipe here instead of the Italian method shared previously. Just to share some photos of the macaron shells for this bake...
I usually pair cherry jam with dark chocolate ganache but this time round it's going to be just pure cherry flavour for Peter Rabbit and dark chocolate ganache for the carrots. I shall share the recipe for the cherry white chocolate buttercream here. Feel free to scale up the recipe as needed.
Cherry white chocolate buttercream
Ingredients:
60g white chocolate
30g unsalted butter
1/4 tsp salt
35g cherry jam
1/2 tsp lemon juice
1 tsp freeze-dried raspberry powder *
* You may omit if you don't have or add 1-2 tsp freeze-dried cherry powder instead. I added the raspberry powder as I didn't have cherry powder on hand but wanted to add a little more berry-like tartness to the filling.
Steps:
1. Melt white chocolate and butter together using double boiling or microwave. Add salt and freeze-dried raspberry/cherry powder and mix well.
2. Let it rest on the counter until firm, about half and hour to an hour. Beat with spatula until light, smooth and fluffy like buttercream. If you want to speed up the process, you may chill the mixture in the fridge/freezer for 1-3min and beat the mixture with a spatula. Repeat until the texture is smooth and creamy like whipped buttercream.
3. Add lemon juice and beat it into the buttercream. Gradually fold in the cherry jam, a teaspoon at a time. I didn't puree the cherries but finely chopped instead.
Just to share a photo of the crazy macaron bake that I did concurrently with other requests...
Thank God that the macarons were very well received! The requestor sent me a photo of the macarons at the dessert table taken by professional photographer (@underthestarsphotography on Instagram). Much better than any photo I can take 😆
With love,
Phay Shing
Read More »
You may refer to my original post in 2016 over here for recipe, detailed piping steps and template for Peter Rabbit. The template and piping steps of the carrots can be found in my Creative Baking: Macarons book. I used a Swiss method recipe here instead of the Italian method shared previously. Just to share some photos of the macaron shells for this bake...
Piping Peter in pink
Piping carrots
Freshly baked shells. Check out the feet!
I usually pair cherry jam with dark chocolate ganache but this time round it's going to be just pure cherry flavour for Peter Rabbit and dark chocolate ganache for the carrots. I shall share the recipe for the cherry white chocolate buttercream here. Feel free to scale up the recipe as needed.
Cherry white chocolate buttercream
Ingredients:
60g white chocolate
30g unsalted butter
1/4 tsp salt
35g cherry jam
1/2 tsp lemon juice
1 tsp freeze-dried raspberry powder *
* You may omit if you don't have or add 1-2 tsp freeze-dried cherry powder instead. I added the raspberry powder as I didn't have cherry powder on hand but wanted to add a little more berry-like tartness to the filling.
Steps:
1. Melt white chocolate and butter together using double boiling or microwave. Add salt and freeze-dried raspberry/cherry powder and mix well.
2. Let it rest on the counter until firm, about half and hour to an hour. Beat with spatula until light, smooth and fluffy like buttercream. If you want to speed up the process, you may chill the mixture in the fridge/freezer for 1-3min and beat the mixture with a spatula. Repeat until the texture is smooth and creamy like whipped buttercream.
3. Add lemon juice and beat it into the buttercream. Gradually fold in the cherry jam, a teaspoon at a time. I didn't puree the cherries but finely chopped instead.
Cherry white chocolate buttercream!
The rabbits were filled with a ring of cherry white chocolate buttercream and a few chopped pieces of cherries from the jam in the middle.
Just to share a photo of the crazy macaron bake that I did concurrently with other requests...
And that's not all the shells I baked that day! Stay tuned for a family portrait bake!
Thank God that the macarons were very well received! The requestor sent me a photo of the macarons at the dessert table taken by professional photographer (@underthestarsphotography on Instagram). Much better than any photo I can take 😆
With love,
Phay Shing
Subscribe to:
Posts (Atom)


