Showing posts with label Culinary Arts Ministry. Show all posts

Sunday, 26 July 2026

Dubai Chewy Cookie (for CAM)


Here's the recipe for Dubai Chewy Cookie for upcoming Culinary Arts Ministry class. In addition to the classic flavour, I've added another flavour variation for the young-at-heart!

Dubai Chewy Cookie Recipe 
Makes 12

Classic pistachio kunafa filling
28g toasted kataifi pastry
47g pistachio cream (35%)
3g tahini
Pinch of salt (1/12 tsp)

Biscoff kunafa filling
22g toasted kataifi pastry
41g Biscoff crunchy spread
15g pistachio cream (35%)
Pinch of salt (1/12 tsp)

Chewy chocolate skin
25g unsalted butter, cut into cubes
72g marshmallows (~13)
10g cocoa powder (natural), sifted
5g milk powder
Extra cocoa powder for coating, sifted (7g)
Oil for lightly greasing gloves (12g)


1. Make the filling. Add the toasted kataifi pastry to the pistachio cream, tahini and salt, and mix well with a spatula. Do likewise for the Biscoff version.

2. Divide each filling mixture into 6 balls (~12g). *Chilling helps to harden but is optional.

3. In a microwave-safe bowl, combine the marshmallows and unsalted butter. Microwave for about 20-25 secs until the marshmallows are half melted.

4. Remove from the microwave and mix with a spatula. Add the cocoa powder and milk powder and mix until fully combined.

5. Allow the mixture to cool slightly. Lightly oil your gloves and spatula.

6. Divide the chocolate marshmallow mixture into 12 portions (~9g).

7. Flatten one portion in your palm, place a pistachio kunafa ball in the center, and wrap the marshmallow mixture around it. Do this for all 12 balls.

8. Roll the entire cookie in cocoa powder to coat the outside.

9. Let the cookies sit at room temperature (30 mins) until the exterior sets slightly and becomes chewy.

Here is a video tutorial, bear version =).

God bless! With love,

Susanne


Read More »

Saturday, 18 April 2026

Mini Passionfruit Biscoff Basque Cheesecake

 Inspired by a flavour combination for macarons that I made for one of my regulars who said it's "Superbly good! 10/10!",  I made the same combination of flavour for basque cheesecake!


This cheesecake is only 9cm in diameter!


Checkout the creamy cross-section!


Burnt basque cheesecakes are simple to make once you figure out how to work with your oven because the most technically challenging part is trying to nail the char while keeping the interior in a creamy "Goldilocks condition" where it's not too uncooked and runny nor curdled due to overbaking. It took me several tries to nail this for a mini version which is more challenging than larger cheesecakes because mini ones either end up charred and overbaked (curdled inside) or lack the char if the interior is right. 

I can assure you that this combination is superb as a cheesecake because the richness of cheesecake is balanced out by the light caramel notes of Biscoff and fresh tartness of passionfruit. I have so many people who tasted it said they loved it so much! I had trouble stopping myself from sampling more each time I did my trial bakes too! 

I shared the full recipe along with important notes in my reel and the captions of the reel:

https://www.instagram.com/reel/DWBdP9BiXxY/?igsh=dm9maTFrbWk2anJo


Ingredients:
(makes one 9cm mini cheesecake)
150g cream cheese
30g smooth Biscoff spread/cookie butter 
30g caster sugar
1/8 tsp salt
1 egg (about 60g with shell on)
90g heavy cream
40g passionfruit puree
1/2 tsp vanilla extract/essence

Toppings:
(may not use up all)
25g whipped cream of choice
8g thickened passionfruit puree 
1 Biscoff biscuit, coarsely crushed 

Method:
1. Mix room temperature cream cheese and Biscoff spread together until smooth.

2. Add sugar and salt. Mix well gently.

3. Add egg and gently whisk it in.

4. Add heavy cream, passionfruit puree and vanilla. Gently whisk until smooth.

5. Sieve batter before pouring into prepared tin lined with parchment paper/disposable panettone mould

6. Run a skewer in the batter to pop air bubbles.

7. Bake in preheated oven at 240°C fan/260C for 20 min or until internal temperature is 65-68°C. Rotate the tray after 12 min if your oven heat is uneven. Baking time and profile is just a reference as each oven behaves differently.

8. Cool completely before refrigerating overnight or for at least 6h.

9. Decorate with whipped cream of choice, thickened passionfruit puree and crushed Biscoff crumbs before serving.


with love,
Phay Shing
Read More »

Saturday, 29 November 2025

Cinnamon Brown Sugar Christmas Cookies

Instead of doing the Christmas cookie mass bake this year, we are inviting the residents in the neighborhood to join us for a cookie decorating session at church!


We decided on adding cinnamon to my default brown sugar cookie recipe that I have used for years (as not everyone like the gingerbread spice mix) to make the cookies more festive. I have updated the royal icing recipe with the addition of light corn syrup to soften the bite of the icing when it is hardened too.

You may see the reel over here for the decoration process:

https://www.instagram.com/reel/DRt-h3GEsKo/?igsh=MTl5YTh6NWlsaGh0cA==


Christmas Iced Cookies

(Makes about eighty 5-6cm cookies)

Feel free to adjust the spice mix type/proportion & amount according to taste. You may downsize the portion if you are not making so many cookies.

Brown sugar cookie
420g plain flour
1.25 tsp baking soda
2 tsp cinnamon powder (or spice mix of choice)
135g unsalted butter, cubed
160g brown sugar
1 large egg (about 60-65g with shell on)
100g golden syrup
2.5 tsp vanilla bean paste/extract
1/2 tsp fine salt

Steps:
1. Sift together flour, baking soda & cinnamon into a large bowl

2. Rub butter into 1. until mixture resembles fine breadcumbs

3. Add sugar & mix until well distributed

4. In a small bowl, whisk together egg, golden syrup, vanilla & salt until homogenous & salt is dissolved. Pour into 3. & mix until a ball of dough forms

5. Divide dough into a few portions. Roll each portion between parchment paper until 5mm thick. Freeze until firm, at least 30 min. You may prepare the dough in advance

6. Cut shapes using cookie cutter of choice. Place cutouts on lined tray, at least 2cm apart. Chill cutouts while preheating oven to 165C fan/175C

7. Bake for 12-15 min or until done, rotating the tray halfway through baking

8. Cool completely before storing in airtight container. The cookies are still good for consumption after one month of storage at cool room temperature in airtight condition

Additional tips:
This cookie recipe is really versatile and you can churn out crisp or soft chewy cookies from the same dough simply by adjusting some parameters. For crispy cookies, roll the dough thinner (2-3mm) and bake at a lower temperature for a longer time to ensure the cookie is thoroughly dried out without burning. For soft chewy cookies, roll the dough to 5-6mm thick and bake at a higher temperature for a shorter time. I went for somewhere in between for iced cookies as the moisture from the royal icing will soften the cookies a little. These cookies taste better with storage too as the flavour deepens with time!


Royal icing
500g icing sugar (more as needed to thicken)
36g meringue powder
1/2 tsp salt
1 tsp vanilla extract (optional)
90g drinking-safe warm water (more as needed to thin)
20g light corn syrup
Gel food colouring as needed

Steps:
1. Whisk together icing sugar, meringue powder & salt together in standmixer bowl

2. Add water, light corn syrup & vanilla (if using)

3. Beat on medium-low speed for 3-5 minutes, scraping down sides of the bowl with spatula now & then. The consistency of the icing should be thick, glossy & able to form firm peaks when sufficiently mixed by the standmixer

4. Divide the icing & colour with gel food colouring. To thin the icing, add a few drops at a time & mix well. The consistency should be such that any peaks disappear in 15 secs for flooding consistency. To thicken the icing, add icing sugar 1 tsp at a time until desired stiffness of peak 

5. Transfer into piping bags, cut a hole in the bag & decorate the cookies. Always keep unused icing in airtight condition with cling wrap in contact with the icing to prevent it from crusting over. Store in the fridge for up to a month. Stir/mix thoroughly before using after storage. Dry iced cookies in the open overnight or for several hours before storing in airtighr container. Alternatively, use a dehydrator to speed things up or oven-dry for 15-20min at 60C fan/70C before drying in the open for a couple of hours


with love,

Phay Shing

Read More »

Monday, 17 March 2025

Hot-Cross Choux Buns

I decided to make a choux pastry version of the classic hot-cross bun and this is what I came up with!


What's on the menu?
- Spiced choux au craquelin (cream puff pastry with crunchy butter cookie layer)
- Orange icing cross (to give an added crunch)
- Cream cheese filling that's lightened with whipped cream and peppered with juicy orange juice soaked raisins. The filling is aromatically flavoured with dark brown sugar, cinnamon, vanilla and orange zest.

My family is really thankful to have found a church community that generally tries to live out the faith by showing love and generosity towards those in need. We have been on the receiving end of such generosity for some years now, and the motivation for them to do so is because of the new life that we have found in Jesus. It's a far cry from some who have used the name of Jesus for selfish personal gain and dragged it into the mud. So as part of the church's Culinary Arts Ministry, I am happy to share what God has gifted me with! Feel free to bring along your family or friends to join you to hear the Gospel in an informal setting at this event! 

You may watch part of the process of making these choux buns in this reel:


Hot cross choux buns
(makes about 32-36 mini buns)

Craquelin
You may prepare this in advance and keep frozen until needed, up to a month ahead of time if kept in airtight condition. Place the cutouts in layers separated by parchment paper if stacking for storage.

28g unsalted butter, slightly softened
24g caster sugar
28g plain flour
1/4 tsp cinnamon
1/4 tsp allspice

1. Mix butter and sugar together briefly with a spatula for about a minute. Sugar doesn't need to dissolve in the butter.

2. Add sifted flour, cinnamon and allspice. Mix well until a dough forms.

3. Roll to about 2-3mm thick (I roll mine to 2.4mm thick using metal guides) between parchment paper. Freeze until firm, at least 20 minutes.

 4. Cut 3mm circles with cookie cutter. Place cut-outs on a lined baking tray. Put back into the freezer until needed. 

Choux pastry*
120g water
1/4 tsp salt
1 tsp sugar 
20g unsalted butter, room temperature
20g olive oil (may replace with butter)
60g plain flour, sifted
2 large eggs**, lightly beaten 

* The Instagram reel shows baking of pastry batter from frozen after piping into 3cm diameter silicone molds. If you don't have the molds, you may follow the steps described in this post. You may resize the template below provided to fit A4 paper for 2.5cm diameter circles. If baking from frozen, increase baking time by 5 minutes


**50-58g without shell on for each egg. Use more egg as necessary depending on batter consistency

1. Preheat oven to 220C/205C (fan). Line baking tray with 2.5 cm diameter circle template and place perforated mat over the template. You may use parchment paper or silicone mat if you don't have perforated mats. Perforated mats are the best for making sure the base of the pastry is flat and it helps to retain the pastry shape better.

2. Place water, sugar, salt, oil (if using) and butter in small saucepan. Bring to a rolling boil while stirring with spatula. Once it boils, remove from heat and pour the flour all in at once. Whisk quickly for the flour to absorb the liquid. Switch to spatula and knead until no flour is seen.

3. Put the dough back in stove to cook over low heat for 2-3 minutes to cook off excess water while kneading continuously with the spatula. I usually use a more precise weight measurement of an 8-10% reduction in weight of the dough after cooking instead of using time measurement. Transfer dough into a mixing bowl and let it cool to at least body temperature.

4. Add half the egg into the dough and mix well until smooth. Add half of the remaining egg and mix until smooth. Add the remaining egg a spoon at a time, mixing well after each addition, until the batter appears smooth and shiny, and is able to fall off the spatula slowly, leaving a deep "V" as it hangs off the spatula as shown in the reel.

5. Transfer batter into piping bag fitted with a large round piping tip (or just cut a 1 cm hole if you don't have piping tip). Pipe tall dollops of batter over the circle template until it reaches the circumference of the circles. The dollop of batter should be about 2.5-3cm tall.

6. Quickly place frozen craquelin circles on top of each piped batter and press down slightly. Dab a little water in the baking tray all around before putting into the oven. The steam produced by the water will help the pastries to rise although it's optional.

7. Bake for 10 min at 215C/200C (fan). Reduce temperature to 190C/ 175C (fan) and bake for 20min. Reduce temperature once again to 145C/ 130C (fan) and bake for another 15-20 min until pastry is totally crisp and dry but not browned further. Cool completely before filling or storing in airtight container. You may freeze it and fill it another day. Re-crisp the pastries in the oven by baking for 8min at 160-170C if you stored it in the freezer or for 5 min if stored at room temperature for up to a week. Do note that oven temperature and time is only a guide. Adjust according to what works for your oven. Do not open the oven door during the first 20-25 min of baking as the pastries may collapse.

Orange icing***:
50g icing sugar
4g meringue powder
10g fresh orange juice

1. Whisk together icing sugar and meringue powder. 

2. Add orange juice and whisk until icing is smooth and thickened, about a few minutes.

3. Transfer icing into piping bag fitted with a #44 ribbon piping tip or cut a side slit about 5mm long along one of the seams of the piping bag to mimic the ribbon piping tip without the actual tip. 

4. Pipe the cross on top of the pastries and tap down with a clean finger dampened with water to ensure the ribbons piped are flat against the pastry as shown in the reel.

5. Dry in 70C oven for 20 min or until hardened. Cool completely before filling.

*** If you don't want to use meringue powder for the icing, you may make royal icing the traditional way from raw egg whites. If using raw egg whites, whisk 12g egg whites with 60g icing sugar and 1/2 tsp orange juice until smooth for 6-8 minutes. Drying in the oven at 70C is necessary to cook the egg whites as well as dry the icing thoroughly. It will take about 1h or more. Feel free to use melted white chocolate for decorating the cross if you prefer something faster and find the extra crunch optional.

Hot-cross bun flavoured cream cheese filling:
300g cream cheese, softened
120g whip topping
180g whipping cream (at least 35% fat)
80g dark brown sugar
2-2.5 tbs orange zest
1/2 tsp cinnamon powder
120g raisins 
1-2 tsp vanilla extract (optional)
60g (4 tbs) orange juice (for soaking raisins)

1. Soak raisins in orange juice overnight in the fridge or for at least an hour. Drain the excess juice from raisins. Set aside.

2. Mix softened cream cheese, sugar and cinnamon together until smooth with a spatula. Add vanilla if you wish.

3. Whip cold whipping creams until firm peak with an electric mixer.

4. Fold whipped cream into cream cheese mixture in a few additions. 

5. Add orange zest and drained raisins. Mix well. 
Transfer into piping bag. Fill the pastries as shown in the reel. 


with love,
Phay Shing
Read More »

Monday, 4 November 2024

Christmas Cookie Box

It's that time of the year to prepare for our annual Christmas cookie bake for giveaway! This year, the Culinary Arts Ministry team from Adam Road Presbyterian Church has decided to create cookies that are easy to make, tasty, healthier and makes use of Redman's Super biscuit premix. Why the premix? Because it tastes awesome and you only need good unsalted butter as the other essential ingredient. So here are the cookie flavours I have come up with using the premix!


What's on the menu?
🔸Brown butter chocolate chip cookies
🔸Strawberry jam sandwich cookies
🔸Dark chocolate cookies with white chocolate star
🔸Matcha cranberry Christmas tree cookies

Besides the recipe and additional baker's notes, I will be including a longer form video on my Youtube channel for a more detailed visual, and a shorter form video on my Instagram reels. 

Here's the YouTube video:

Here's the shorter video in my Instagram reels:

The cookies are so simple to make even non bakers and kids can make them! 

Redman has kindly agreed to sponsor the biscuit premix and unsalted butter for our mass bake. 


We are including Alchemy Fibre, which is a prebiotic fibre blend of inulin and edible gum beneficial for gut health, cholesterol and glycemic load, to make the cookies healthier this year.


You may choose to replace the prebiotic fibre mix with inulin (available from health food stores) or simply replace with the biscuit premix if health is not a concern for you. The addition of the fibre affects the dough texture slightly but has no noticeable effect on the final baked cookies in terms of taste and texture. Ratio for replacement is 1:1.

Important reminder
Remember to take oven baking time and temperature as a reference only as each oven is different. Just bake until lightly browned and crisp. You may have to bake extra pieces just to sacrifice some for taste testing and calibrating the recipe for your oven.


Brown butter chocolate chip cookies


Ingredients:
(makes about 14 cookies)
90g Biscuit premix
22g Alchemy fibre 
70g unsalted butter
40g mini chocolate chips

Steps:
1. Place butter in a light coloured saucepan. Heat over medium-low heat until butter is browned*. Set aside.

2. Whisk together premix and Alchemy fibre. Sift into a mixing bowl.

3. Add brown butter and mix well to form a dough. Cling wrap and refrigerate for 15-20min/freeze for 6-10min to cool down the dough and allow the butter to firm up slightly. Dough should remain pliable after chilling.

4. Add mini chocolate chips and mix well*. Refrigerate 10min while preheating the oven to 160C fan/170C.

5. Portion out 14g (13g if you reserved some chocolate chips) of dough and roll into a ball. Place the balls about 6cm apart on a baking tray lined with parchment paper/Teflon sheet/silicone mat/perforated mat.

6. Bake for 10-12 min or until browned at the edges, rotating the tray halfway through baking.

7. Cool for 5 min before transferring the cookies on a cooling rack to cool completely. Store in airtight container.

*Baker's notes:
🔸You know the butter is done browning when you see numerous specks of brown bits in the butter and the hue of the liquid changes from yellow to a more brownish hue. It also smells great! Swirl the pan as the butter is being heated up or you may stir with a spatula.

🔸If you want the cookies to appear more aesthetically pleasing, reserve about 10-15g worth of chips instead of adding everything into the dough. I was lazy and didn't bother! Press a few reserved chips into the tops of each ball of cookie dough just before baking.


Strawberry jam sandwich cookies


Ingredients:
(makes about 10-11 sandwich cookies, 20-22 pieces of cookies)
96g Biscuit premix
24g Alchemy fibre 
60g unsalted butter, softened
40g strawberry jam

Steps:
1. Heat strawberry jam in microwave oven or over stovetop until it is thicker or weight is reduced by 15-20%*. Set aside to cool uncovered 

2. Whisk together premix and Alchemy fibre. Sift into mixing bowl with softened butter.

3. Mix together to form a ball of dough. Roll between two sheets of parchment paper until about 3mm thick.*

4. Refrigerate 20min or freeze for 10min. In the meantime, preheat oven to 160C fan/170C.

5. Cut 5cm circles of dough out with a round cookie cutter. Place them at least 3cm apart on a lined baking tray*. Use a small heart cookie cutter to cut out a heart shape in the middle of half of the circle cutouts for the top cookie in each sandwich*. 

6. Bake for 9-11 min or until lightly browned, rotating the baking tray halfway through baking.

7. Cool on the baking tray for 5min before transferring onto cooling rack to cool completely.

8. Spread about 1/4-1/3 tsp of cooled reduced jam on the bottom cookie.* Press the top cookie onto the bottom cookie. Store in airtight container.

* Baker's notes:
🔸If you are using store bought strawberry jams, they are usually too watery to use straight from the jar so it is necessary to reduce it to evaporate some moisture. If you try to spread wet jam onto the cookies, they will turn soggy very fast instead of remaining crispy. The consistency of the reduced jam should appear noticeably more viscous while hot, very firm and fairly dry when totally cooled. Use 10 second bursts at high power if using microwave oven to reduce the jam. Stir after each heating cycle and check the weight to see if sufficiently reduced. Use low heat and constant stirring if you are reducing the jam on stovetop.

🔸 If you are upsizing the recipe, it is advisable to divide the dough into multiple portions to roll and chill. This keeps each portion of dough in optimal working condition when you are cutting out the circles. The dough should not be so cold and hard that it tends to crumble when cut, but not so soft that it is tricky to transfer into baking tray. Dividing the dough also ensures that at any point in time, you always have at least a batch of dough that is being chilled, ready for cutting out once you are done with the current batch.

🔸 Line baking trays with perforated mat if possible. This ensures that each cookie has a very flat surface which can sandwich the jam perfectly.

🔸 When cutting out the small hearts, press the cutter vertically downwards firmly and then give it a little wiggle while applying pressure. This ensures a cleaner cut. In the event that the dough cutout has jagged edges, you may use the side of a wooden toothpick to file off the rough outline of the heart after the cookie is baked.

🔸When filling sandwich cookies, less is more. Keep the jam layer thin except for the middle where it can be slightly thicker, but not thicker than the cookie (3mm). Leave a border of about 2-3mm without jam around the circumference of the bottom cookie. This is to ensure jam doesn't spill or peek out from the sides.


Dark chocolate cookies with white chocolate star 


Ingredients:
(makes about 13 cookies)
90g Biscuit premix
12g Alchemy fibre 
18g cocoa powder (I used Valrhona)
60g unsalted butter, softened
25g compound white chocolate chips

Steps:
1. Whisk together premix, Alchemy fibre and cocoa powder. Sift into mixing bowl with softened butter.

2. Mix well to form a ball of dough. Roll between two sheets of parchment paper until about 5-6mm thick.*

3. Refrigerate 20min or freeze for 10min. In the meantime, preheat oven to 160C fan/170C.

4. Cut 5cm scalloped circles of dough out with a scalloped circle cookie cutter. Place them at least 3cm apart on a lined baking tray. Use a small star cookie cutter to cut out a star shape in the middle of each dough cutout*. 

5. Bake for 8min. Reduce baking temperature to 150C fan/160C, rotate the tray and bake for another 7min or until crisp.

6. Cool on the baking tray for 5min before transferring onto cooling rack to cool completely.

7. Place cooled cookies on a tray lined with a fresh sheet of parchment paper. Melt the white chocolate using microwave oven or double boiling method*. Transfer melted chocolate into piping bag, cut a small hole and fill the star cavities. Use a skewer to pull the melted chocolate such that it fills the cavity nicely if necessary

8. Freeze the tray of white chocolate filled cookies for 5min to set the chocolate. Carefully remove each cookie and store in airtight condition.

* Baker's notes:
🔸Please see 2nd and 4th notes under strawberry sandwich cookies for tips on portioning the dough and cutting out the small star cavity.

🔸If using microwave oven to melt white chocolate, use 10 second bursts at medium-high power, stirring to mix well after each heating cycle. The chocolate should be really runny and smooth before you transfer into piping bag. If using double boiling method, make sure the hot water doesn't touch the base of the bowl you are using to contain the chocolate. Be careful not to overheat chocolates or it will seize! 


Matcha cranberry Christmas tree cookies


Ingredients:
(makes about 18 trees)
90g Biscuit premix
24g Alchemy fibre 
6g Matcha powder*
60g unsalted butter, softened
24g dried cranberries, very finely chopped*
Compound white chocolate chips (optional)*

Steps:
1. Whisk together premix, Alchemy fibre and matcha powder. Sift into mixing bowl with softened butter.

2. Mix well to form a ball of dough. Add chopped dried cranberries and mix well until the berries are evenly distributed throughout the dough. Roll between two sheets of parchment paper until about 5-6mm thick.*

3. Refrigerate 20min or freeze for 10min. In the meantime, preheat oven to 160C fan/170C.

4. Cut out the Christmas trees with a 5-6cm Christmas tree cookie cutter*. Place them at least 3cm apart on a lined baking tray. 

5. Bake for 8min. Reduce baking temperature to 150C fan/160C, rotate the tray and bake for another 7min or until crisp.

6. Cool on the baking tray for 5min before transferring onto cooling rack to cool completely. 

7. Pipe melted white chocolate tinsel* and freeze for 5 min to set the chocolate if you wish (optional). Store in airtight container.

* Baker's notes:
🔸You may use ceremonial grade matcha powder if you can afford it as it would give the most intense matcha flavour and colour naturally. If not, you may use culinary grade matcha powder. Do note that matcha powder oxidizes when exposed to air so the green color will turn duller and more brownish with time. You may use Redman's bakeable matcha powder if you want the cookies to retain the vibrancy as it has some green colouring added.

🔸Please see 2nd note under strawberry sandwich cookies for tips on portioning the dough.

🔸Please see last note under dark chocolate cookie for tips on working with melted white chocolate.

🔸 Matcha cranberry cookies are traditionally made as ice box cookies which are sliced from a chilled log of dough because the presence of the cranberry bits make it trickier for cookie cutouts to have neat edges. While it's possible to create neat cookie cutouts, it takes some patience. Chopping the cranberries until they are really fine (1-2mm) helps a lot. In the event the cookie cutout edges are untidy due to cranberry bits, carefully nudge the dough back into place where the cranberry bits stick out or are gouged out from the dough in the process.


Time management tips
Many of us are busy people so anything that helps to make a massive bake manageable is always welcomed. The great thing about cookies is the work can be spread out over time with short bursts of work in between.

1. You can prepare the dough in advance and store it in the freezer. For sheeted dough like the sandwich cookies, dark chocolate cookies and matcha cookies, you may roll sheets of dough between parchment and freeze them as a stack. You may portion the brown butter chocolate chip cookie dough into 14g portions and store in containers in a single layer in the freezer. 

2. You can break the dough prep over time if you are preparing the dough for hundreds of cookies to make it more manageable. Just freeze the dough each time you make.

3. For cookies made from cutouts, you may freeze the cutouts in single layers separated by parchment. Make sure the base layer is chilled until firm before stacking.

4. Baked cookies can be frozen right after cooling down to room temperature and stored in airtight condition. Either pack them in their final packaging or store in single layers separated by parchment in airtight condition. Let the cookies thaw at cool room temperature before opening the container as exposure of cold cookies to warm moist air will cause condensation to form on the cookies, making them lose their crispiness. 

5. Remember to add a minute or two to your baking time if you are baking from frozen. Just bake until lightly browned and crisp.


Do give these a try and they are yummy but simple to make!


 with love,

Phay Shing

Read More »

Thursday, 12 September 2024

Chocolate Truffle White Lotus Snowskin Mooncakes (for CAM)


Hi everyone, here is the recipe for Chocolate Truffle White Lotus Snowskin Mooncake Recipe for CAM class. Hope you will enjoy the recipe as well as the talk! 

Chocolate Truffle White Lotus Snowskin Mooncake Recipe (by Susanne Ng) 
Makes 10 50g-truffle mooncakes 

Ingredients 
70g Kou fien, sifted 
10g Wheat starch 
40g Icing Sugar, sifted 
25g Shortening 
40g Cold water 
75g Cold ice cream soda 
250g White Lotus paste 
28g Chocolate biscuit crumb + 32g Chocolate lotus paste 
Chocolate emulco (1/4 tsp) 
Extra 1 tsp koufien for dusting 

1. Mix chocolate biscuit crumb and chocolate lotus paste in a plastic bag. Roll into a log and divide into 10. Roll into balls. 

2. Roll white lotus paste into a log. Divide equally into 10 (~25g each). Wrap white lotus paste around the chocolate balls and roll into a larger ball. 

3. Mix sifted kou fien, wheat starch and icing sugar together till uniform using a spatula. 

4. Add in shortening and quickly mix using gloves until the mixture resembles bread crumbs. 

5. Pour in the cold water and soda and knead the dough until it becomes soft and smooth. Divide the dough into two. 

Plain dough: knead until smooth and cover. 

Brown dough: add ¼ tsp chocolate emulco and knead until smooth. 

6. To the plain and brown dough, roll into log and divide dough into 5 (~26g). 

7. Flatten the prepared dough into an 8-cm circle. Put the filling and pinch to seal. Dust the dough ball. 

8. Place the ball in, press and push out the mooncake. 

9. Store the cakes in an airtight container (label) and refrigerate for about 1-2 hrs for the mooncake to become firm before consuming. The mooncakes stay soft at least for several days. Enjoy! =) 

With lots of love, 
Susanne


Read More »

Thursday, 16 May 2024

Chocolate Cheesecake Tarts (Classic Chocolate and Sanrio)


Which is your favorite cheesecake tart? Recipe for these no-bake chocolate cheesecake tarts below =) 

I experimented with a no-bake cookie dough as tart crust so that it is easier to shape, and will be teaching the chocolate version at my church APRC’s culinary arts ministry this Sunday. You can watch a reel video here for some steps. 

Dark Chocolate Cheesecake Tarts (by Susanne Ng
Makes 4 

Tart crust 
60g oat flour 
160g oreo cookie crumbs 
80g unsalted butter, melted 
30g honey 

Combine all in a medium mixing bowl. Mix with spatula and divide into 4 (around 70g mixture per tart). Spread and line base and sides of tart case with tart crust mixture. You can also roll out the dough to line the tart case. 

Chocolate cheesecake filling 
160g cream cheese, room temperature 
80g castor sugar 
110g dark chocolate callets (58%), melted 
10g cocoa powder, sifted 
110g heavy cream, chilled  

1. Melt chocolate in microwave (30+20 secs) or double boiler and allow to cool. 
2. Soften cream cheese with spatula, then beat cream cheese with sugar using spatula till smooth. 
3. Whip heavy cream to firm peaks using an electric mixer. 
4. Whisk/fold in half cream to melted chocolate, then whisk all in. 
5. Fold in cocoa powder, then quickly whisk to incorporate evenly.  
6. Whisk in cream cheese mixture till even. 
7. Fill 90-95g per tart (divide into four). Chill at least 15min to set cheesecake. 
        *Best to unmold after 2 hours. 
8. Decorate with gold flakes, or as desired. 

Recipe for the classic cheesecake version is found here (in caption)

With lots of love, 
Susanne


Read More »

Tuesday, 26 March 2024

Tie-dye Langue De Chat

 I have shared heart shaped Langue de Chat sandwich cookies over here and here earlier this year. Here's another fancy but simple way of making these crisp buttery cookies --- tie-dye!


This is my contribution to this year's Culinary Arts Ministry event at Adam Road Presbyterian Church in April. 

I make use of matcha powder and cocoa powder to colour and flavour the cookies naturally. Feel free to use other colouring/flavours if you wish!

Ingredients (makes about 22-24 cookies):
50g unsalted butter, slightly softened
Pinch of salt
45g sifted icing sugar
25g egg whites, room temperature
1 tsp vanilla extract
¼ tsp soy lecithin (optional)
*Plain: 17g cake flour 
*Matcha: 16g cake flour + 3/8 tsp matcha powder
*Cocoa: 15g cake flour + ¾ tsp cocoa powder 

* Replace with 50g cake flour if you are just making a single colour of batter instead of 3.

Here is the video tutorial of the process:

Steps:

1. Line baking tray with template and parchment paper. 

Resize this template to fit A4 paper.

If you have Teflon sheet or silicone mat, use it as the spreading of the batter will be more even than parchment paper. Preheat oven to 150-160C.

2. Beat softened butter briefly with electric mixer/ hand whisk/ spatula.

3. Add sugar and salt. Beat until well combined.

4. Add egg whites in 2-3 additions. Beat until smooth. Add soy lecithin if you wish to help with emulsification.

5. Add vanilla and mix until well combined.

6. Divide into 3 equal portions, about 40g each.

7. Add sifted cake flour + flavouring to respective portions. Fold with spatula until combined.

8. Transfer into piping bag with #7 or #8 tip.

9. Position piping tip over middle of the circle, about 4-5mm away from surface of baking tray. Pipe until the batter reaches the circumference of the innermost circle. 

10. Switch to another colour of batter and place piping tip over middle of piped batter. Pipe until the first batter reaches circumference of middle circle.

11. Switch to final colour of batter and place piping tip over middle of piped batter. Pipe until the first batter reaches circumference of outermost circle or as large as you like. Repeat for all circles, switching the order of the colours as you wish. Try to stack the circles right in the middle for a neater floral/tie-dye pattern.

12. Use a skewer to pull the batter from the center of the circle to the circumference as shown in the middle cookie, fourth row from the top. Clean the skewer after each stroke.

13. Repeat step 12 but in the diagonal positions (forming an “x” instead of “+”)

14. Use skewer to pull the batter from the circumference to the center of the circle between the points in step 12 and 13 to form the flower pattern. Repeat for all piped batter.

15. Carefully remove the template. Bake for 10-11 min or until edges are browned. Reduce temperature to 110C and bake for another 5-6 min to thoroughly dry it out to be crispy.

Cool completely before storing in an airtight container. Feel free to bake the cookies again at 150C for a few minutes to re-crisp it if it has softened after storage.


Enjoy!


with love,

Phay Shing

Read More »

Tuesday, 7 November 2023

Baby Jesus and Angel Cookies

 This is the third year our church's Culinary Arts Ministry is having a cookie giveaway project. And for this year, we decided to tell the Christmas story through cookies! Several of us are involved in baking hundreds of cookies so this takes some co-ordination and planning in advance. With many of us having busy schedules, using royal icing transfers is one way to make a big project more manageable. I am in charge of making the angel cookies and a couple of other members have kindly volunteered to make the baby Jesus cookies. We have sheep, heart, star and candy cane (representing shepherd's staff) as part of the cookie storytelling too! Of the whole collection, baby Jesus and the angels will be made using icing transfers as they can be made way in advance and the use of templates makes it easier for those of us who cannot pipe by freehand. Here are some of the icing transfers and sample cookies I made.


I chose to use my default brown sugar cookie as the cookie base as it is actually adapted from a gingerbread cookie recipe which does well being exposed for long periods, has a long shelf-life, and has a soft chewy texture that is still great after being softened by royal icing. I coloured and flavoured it by substituting 10% of plain flour with black cocoa powder. I wanted the cookie to appear like the angels against the night sky as they brought the good news of Jesus' birth to the shepherds. As the cookies are smaller (about 4-4.5cm), baking time should be around 10-12 min at 170-180C. Cookie and royal icing recipe is in the link for my default brown sugar cookie recipe. 


Here are the templates for baby Jesus and the angels.


Resize the templates to fit on A4 paper before printing. Please acknowledge me if you use the templates and share your work 😊. The icing transfers can be used on cookies that are 4-4.5cm in diameter. Feel free to change the hairstyles if you wish like what I did for some of the angels. I crafted the design with simplicity in mind for those of us who need to produce hundreds of cookies but have limited time. So if you have the bandwidth, feel free to embellish your icing transfers with more details like halo, rosy cheeks etc.

You may refer to my reel or YouTube video for the piping steps (will update the post soon with the video links). 

Here's the angel royal icing transfers I made in advance! I will be baking the cookies and sticking the transfers on nearer the date. This method of making the design really makes the work more manageable when you have to make so many!


Here are some tips and pointers you may find helpful.

How long can I store royal icing transfers?

They can be stored in airtight conditions at room temperature for a few months with no issues if they are thoroughly dried and sealed. This means that you can already prepare the icing transfers right now in early- mid November if you intend to give out the cookies at Christmas time. You may stick the transfers to the cookies a week or even two weeks before the giveaway.

What surface can I pipe the icing transfers on?

You may use parchment paper, teflon sheets, silicone mats or even acetate sheets. Refrain from using warm oven to dry the icing transfers if you are using acetate sheets.

Royal icing transfer tips and Instructions

- Store unused icing in the fridge covered in airtight container and with cling wrap touching surface of icing. You may prepare the royal icing in advance and it can be stored in the fridge for a month.

- Stir icing thoroughly before transferring into piping bag or OPP (oriented polypropylene) cone for use. Do not overfill OPP cone if using.

- Make sure consistency of icing for baby Jesus/angel is at flooding consistency I.e. when you try to draw streaks of icing in the mixing bowl, it should disappear within 10 -15 seconds. If it does not, add a few drops of drinking-safe water at a time and stir thoroughly before testing the consistency again.

- Make sure consistency of icing for the hay is stiff. i.e. when you try to make any peaks of icing in the container, it should stand up straight without curling over.

- Cut a hole about 2mm in size in piping bag for piping baby Jesus' swaddle, angel's body, the face and hair. Cut a 1mm hole in OPP cone for the nose, angel wings and eyes (if piping dots for eyes instead of stamping with toothpick). 

- Use a skewer to nudge the icing where necessary. 

- Use a damp paper towel to quickly erase any mistakes before the icing sets. 

- Make sure icing for face is hardened on the surface before you pipe/ stamp out the nose and eyes. Use the blunt end of a toothpick to stamp out the eyes for a quick way to ensure that the eyes are consistently round and the same size. Use fan or oven with fan mode at 60-70C to speed up drying process.

- Make sure icing transfer is thoroughly dried before attempting to remove it from the parchment paper. Icing may appear dry on the surface but inside could still be soft and wet so it may be safer to err on the side of drying for a longer time. Overnight drying in the open is definitely safe.

- Store icing transfer in airtight condition before use.

- After baked cookie has cooled down completely, you may pipe the hay using the stiff icing in piping bag fitted with a #233 tip with adapter for attaching baby Jesus icing transfer. Pipe a swirl starting from the circumference and ending in the middle of the cookie. Gently but firmly press the icing transfer onto the hay.  Pipe a small dollop of icing to stick the angel onto the cookie. (See video tutorial)

- Please switch piping tips once the holes of #233 tip starts becoming clogged. Quickly wash and dry thoroughly before using again. Using a tip adapter helps you to make the switch more seamlessly because stiff royal icing hardens much faster than flooding consistency icing.  

- Dry in the open overnight before storing/packing. Alternatively, you may dry in oven at 60-70C for 15 minutes + 30 minutes in the open or until icing is dry. Cool completely before packing.  It is not recommended to dry the icing with the cookie for too long in the oven as it may cause oil from cookie to seep into the icing.

Troubleshooting

1. Help! My piped icing is bumpy and not smooth!

Icing consistency may be too thick so you may need to thin it out a little. Be careful not to over-thin it or you may experience issue number 2 below. Try to work in a more humid area that has no draft to prevent the icing from setting too fast on the surface. Resist the urge to prod the piped icing too much with a skewer once you have piped it as the longer it stays piped, chances are a thin crust has already formed and disturbing the icing will cause the surface to appear bumpy.

2. My piped icing surface is smooth but after sitting out for a while, the middle starts to sink in and form a crater/crack.

There are 3 possibilities:

a) Your icing consistency is too runny

b) You didn’t stir the stored icing sufficiently before transferring into piping bag 

c) You left the piped icing sitting out for too long and the meringue structure of the royal icing breaks down before a crust starts forming on the surface 

For issue with c), try splitting the templates into smaller quantities to work with e.g. pipe only 4 or 8 at a time before sending into 60-70C oven to quickly dry the surface. This is what I practice at home to prevent the cratering effect. I set up 2 or more trays and keep rotating them between oven and work surface, piping only a few to several transfers at a time. Oven drying for about 2-4 minutes helps the crust to quickly form, preventing the cratering effect.

3. Help! I broke the icing transfer! Is there anyway to rescue it?

That depends on how bad the damage is. I would usually discard because trying to fix it and still make it look nice is difficult. Prepare to make extras because icing transfers are generally fragile and time consuming to make. Accidents usually happen while removing transfers from parchment paper and while transferring it from place to place. The risk of breakage only stops happening once it is stuck on the cookie where it belongs! If a clean crack happens across the swaddle, you may use white icing to pipe across it so it appears like part of the design on the swaddle. If the crack happens across the face, sorry you may have to discard the transfer.

4. Help! I accidentally thin out my royal icing with too much water!

Add icing sugar a little at a time until royal icing reaches the correct consistency.


I am not a cookie decorating expert but I have made iced cookies since about 9 years ago. Hopefully what I shared is helpful for you if you intend to make large batches of Christmas cookies!


with lots of love,

Phay Shing

Read More »

Tuesday, 15 August 2023

Love SG Raspberry Tiramisu


Going to share this Raspberry Tiramisu with vegan mascarpone cream this Sat at my church ARPC's Let's Carnival to bless the community =). As Singapore's National was around the corner, I spruced up the traditional Tiramisu, which usually has dreamy layers of mascarpone cream, coffee soaked-ladyfingers and cocoa powder, with additional red raspberry layers! The combination is really rich and refreshing at the same time! 

Tiramisu is said to have originated from Veneto in the 1800s. Authentic tiramisu using raw (or sometimes pasteurized nowadays) whipped egg whites, and separately whipped egg yolks with mascarpone to obtain super creamy mascarpone cream. Due to food safety concerns, many modern day versions (and also mine) uses whipped cream to replace the eggs. The resulting mascarpone cream is also rich and creamy =). To make the recipe even safer, the version that I am presenting is dairy-free/vegan, using non-dairy whipping cream as well as vegan cheese substitute, which should be able to sit out for around 2hrs.

So here goes the recipe! 

Love SG Raspberry Tiramisu

100g heavy cream + 100g mascarpone cheese (or 150g non-dairy cream + 50g vegan cheese substitute)
24g icing sugar
2g vanilla extract
1/2 cup strong coffee (5 g coffee powder, 100g hot water, 7g sugar)
1/2 tbsp kahlua/rum/marsala *optional
200g raspberry preserve/compote (recipe below, or store bought)
16 ladyfingers (savoiardi) - 2 fingers/tiramisu
Cocoa powder (for sifting in between layers)
Raspberry powder and snow powder (for sifting decorations on top)

1. Make strong coffee by dissolving coffee powder and sugar in hot water. You can also use espresso. Add 1 tbsp kahlua/rum/marsala (optional).

2. Mix mascarpone cheese, icing sugar and vanilla until combined.

3. Beat heavy cream until medium-stiff peaks.

4. Whisk in mascarpone cheese mixture and beat again till smooth. Transfer the mascarpone cream mixture to piping bag.

5. Smoothen the raspberry preserve and transfer to a piping bag.

Assembly:

1) Dip the ladyfingers quickly in a shallow dish of coffee and line the base of the glass cups.

2) Pipe a layer of mascarpone cream.

3) Pipe a layer of raspberry preserve. 

4) Sift a thin layer of cocoa powder.

5) Line a layer of coffee-infused lady fingers (try to pack neatly).

6) Pipe a layer of mascarpone cream.

7) Sift a layer of raspberry powder (with design), or sift a layer of raspberry powder, followed by snow powder (with design)

*You can repeat steps 1)-4) if your jar is taller. 


Raspberry compote/preserve (You can DIY or use store-bought)

240g raspberry (2 cups)
14g granulated/castor sugar (2 tbsp)
10g lemon juice (2 tsp)
4g pectin (1 tsp) or 4g cornstarch (2 tsp)* optional

1. Place the raspberries and lemon juice in a saucepan.

2. Add sugar, or sugar mixed with pectin (or cornstarch), to the saucepan. Stir with a whisk or spatula.

3. Bring to a boil over low heat and allow to thicken (few mins) till the compote coats the back of a spoon.

4. Allow to cool and transfer to piping bag. Keep in the fridge until ready to use.

Here's a short video tutorial I made before to make the raspberry compote/preserve. It was actually for another online class I had :)


Ladyfinger sponge (savoiardi) (You can DIY or use store-bought)

100g egg whites
½ tsp cream of tartar
83g castor sugar
3g salt
83g egg yolks (5 egg yolks)
83g plain flour, sifted

1. Whisk egg whites with cream of tartar using an electric mixer. Add sugar and salt in 3 additions and whisk till stiff peak.

2. Whisk in egg yolks using the mixer (< 5sec).

3. Fold in the plain flour in 2 additions.

4. Transfer to piping bag and pipe 2” long fingers.

5. Sieve icing sugar over.

6. Bake at 180C for 8 min.

And here are some other versions :)


Hope you enjoy this creation! =)

With lots of love,

Susanne


Read More »

Sunday, 19 February 2023

Hot Cross S'mores

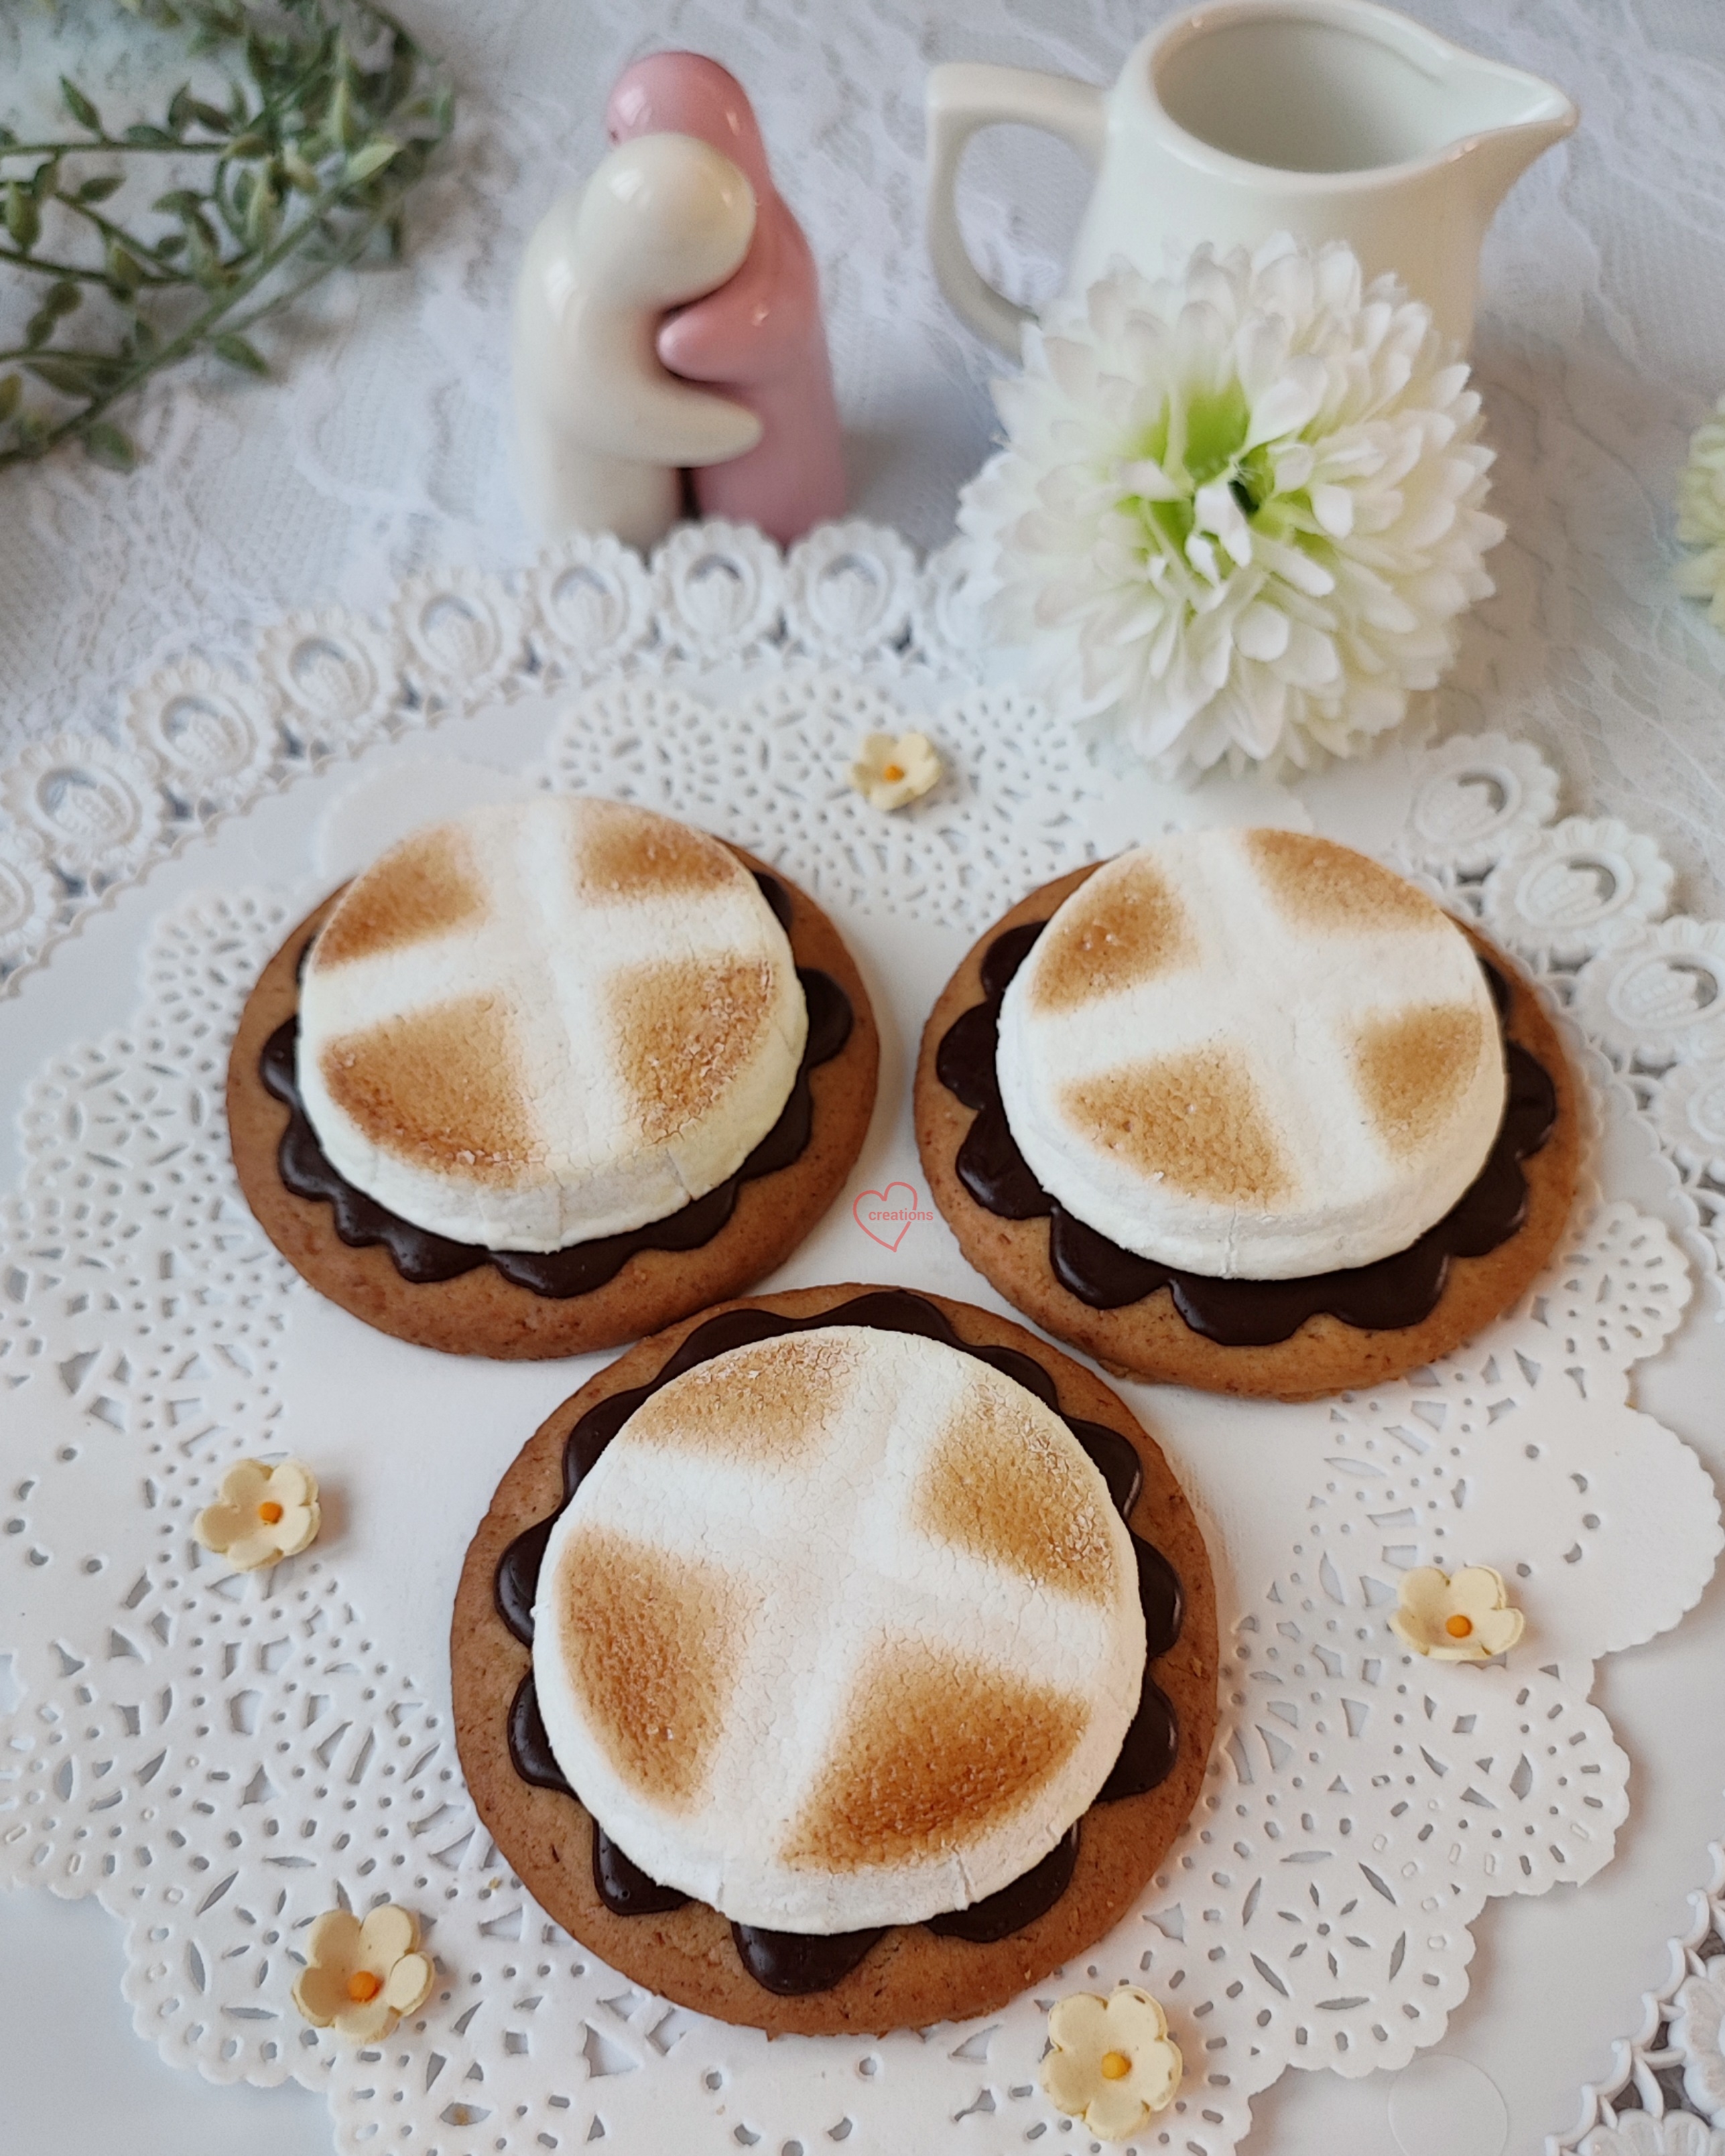
 Here's my marshmallowy twist to the classic hot-cross buns--- hot-cross S'mores!


I am in charge of coming up with the item for April's Culinary Arts event with the church and since it is scheduled near Good Friday and Easter, a theme that relates to Jesus' death and resurrection is appropriate. 

S'mores was the reason I fell in love with marshmallows when I don't have a sweet tooth. The complementary flavours and textures of the components are so delightful! Although Graham crackers are the classic cookie base for S'mores, I am using digestive biscuits for convenience because they come in rounds and the size is just nice. You could also make the Graham crackers from scratch but I am trying to keep things simple for the event and keep the marshmallow bit as the only technical part.


Hot-cross S'mores recipe
(Makes about 15-16)
Ingredients:
15-16 digestive biscuits*

Piping chocolate*
80g chocolate couverture (percentage of cocoa up to personal preference)
4g vegetable shortening

Marshmallow (to set in 15-16 44x35mm cupcake cases)
8g (3/4 tbs) gelatin powder (I used bovine 170bloom)
40g ice cold water
2 tsp vanilla extract
150g sugar
1/8 tsp salt 
60g light corn syrup
1/16-1/8 tsp cinnamon powder
40g water
canola oil spray
Cornstarch or tapioca starch for dusting

* If you want to simplify it further, use chocolate coated digestive biscuits and omit the extra step of melting and piping chocolate. You may also use Nutella but note that it is sweeter than dark chocolate but has that hazelnut flavour added.

Steps:
1. Bloom gelatin by scattering gelatin over cold water and whisk until well combined in large mixing bowl. Add vanilla over the gelatin bloom. Add cinnamon powder if you wish. Set aside.


2. Heat sugar, salt, water, corn syrup in saucepan till 115C without stirring. Gently swirl the saucepan. Use medium-low heat.

Monitoring syrup temperature with a candy thermometer.

3. Pour onto bloomed gelatin and stir with spatula until gelatin is melted.

4. Beat with electric mixer for 5-7 min, starting with low speed and gradually increase to high speed. Volume of mixture should increase by about 3x.

Marshmallow mixture should become fluffier and thicker as you whip.

5. Transfer into piping bag and pipe into greased cupcake cases until about 1 inch high or 15g. Tap down any peaks with damp finger. (Tip: Easiest way to quickly and effectively grease the cupcake cases is to spray with an oil spray from pressurized can but you may also wipe with paper towel dipped in oil or melted butter).


6. Leave to set overnight at cool room temperature or in the fridge for 30min. Note that gelatin in the marshmallow will continue to set with time for up to 24 hours.

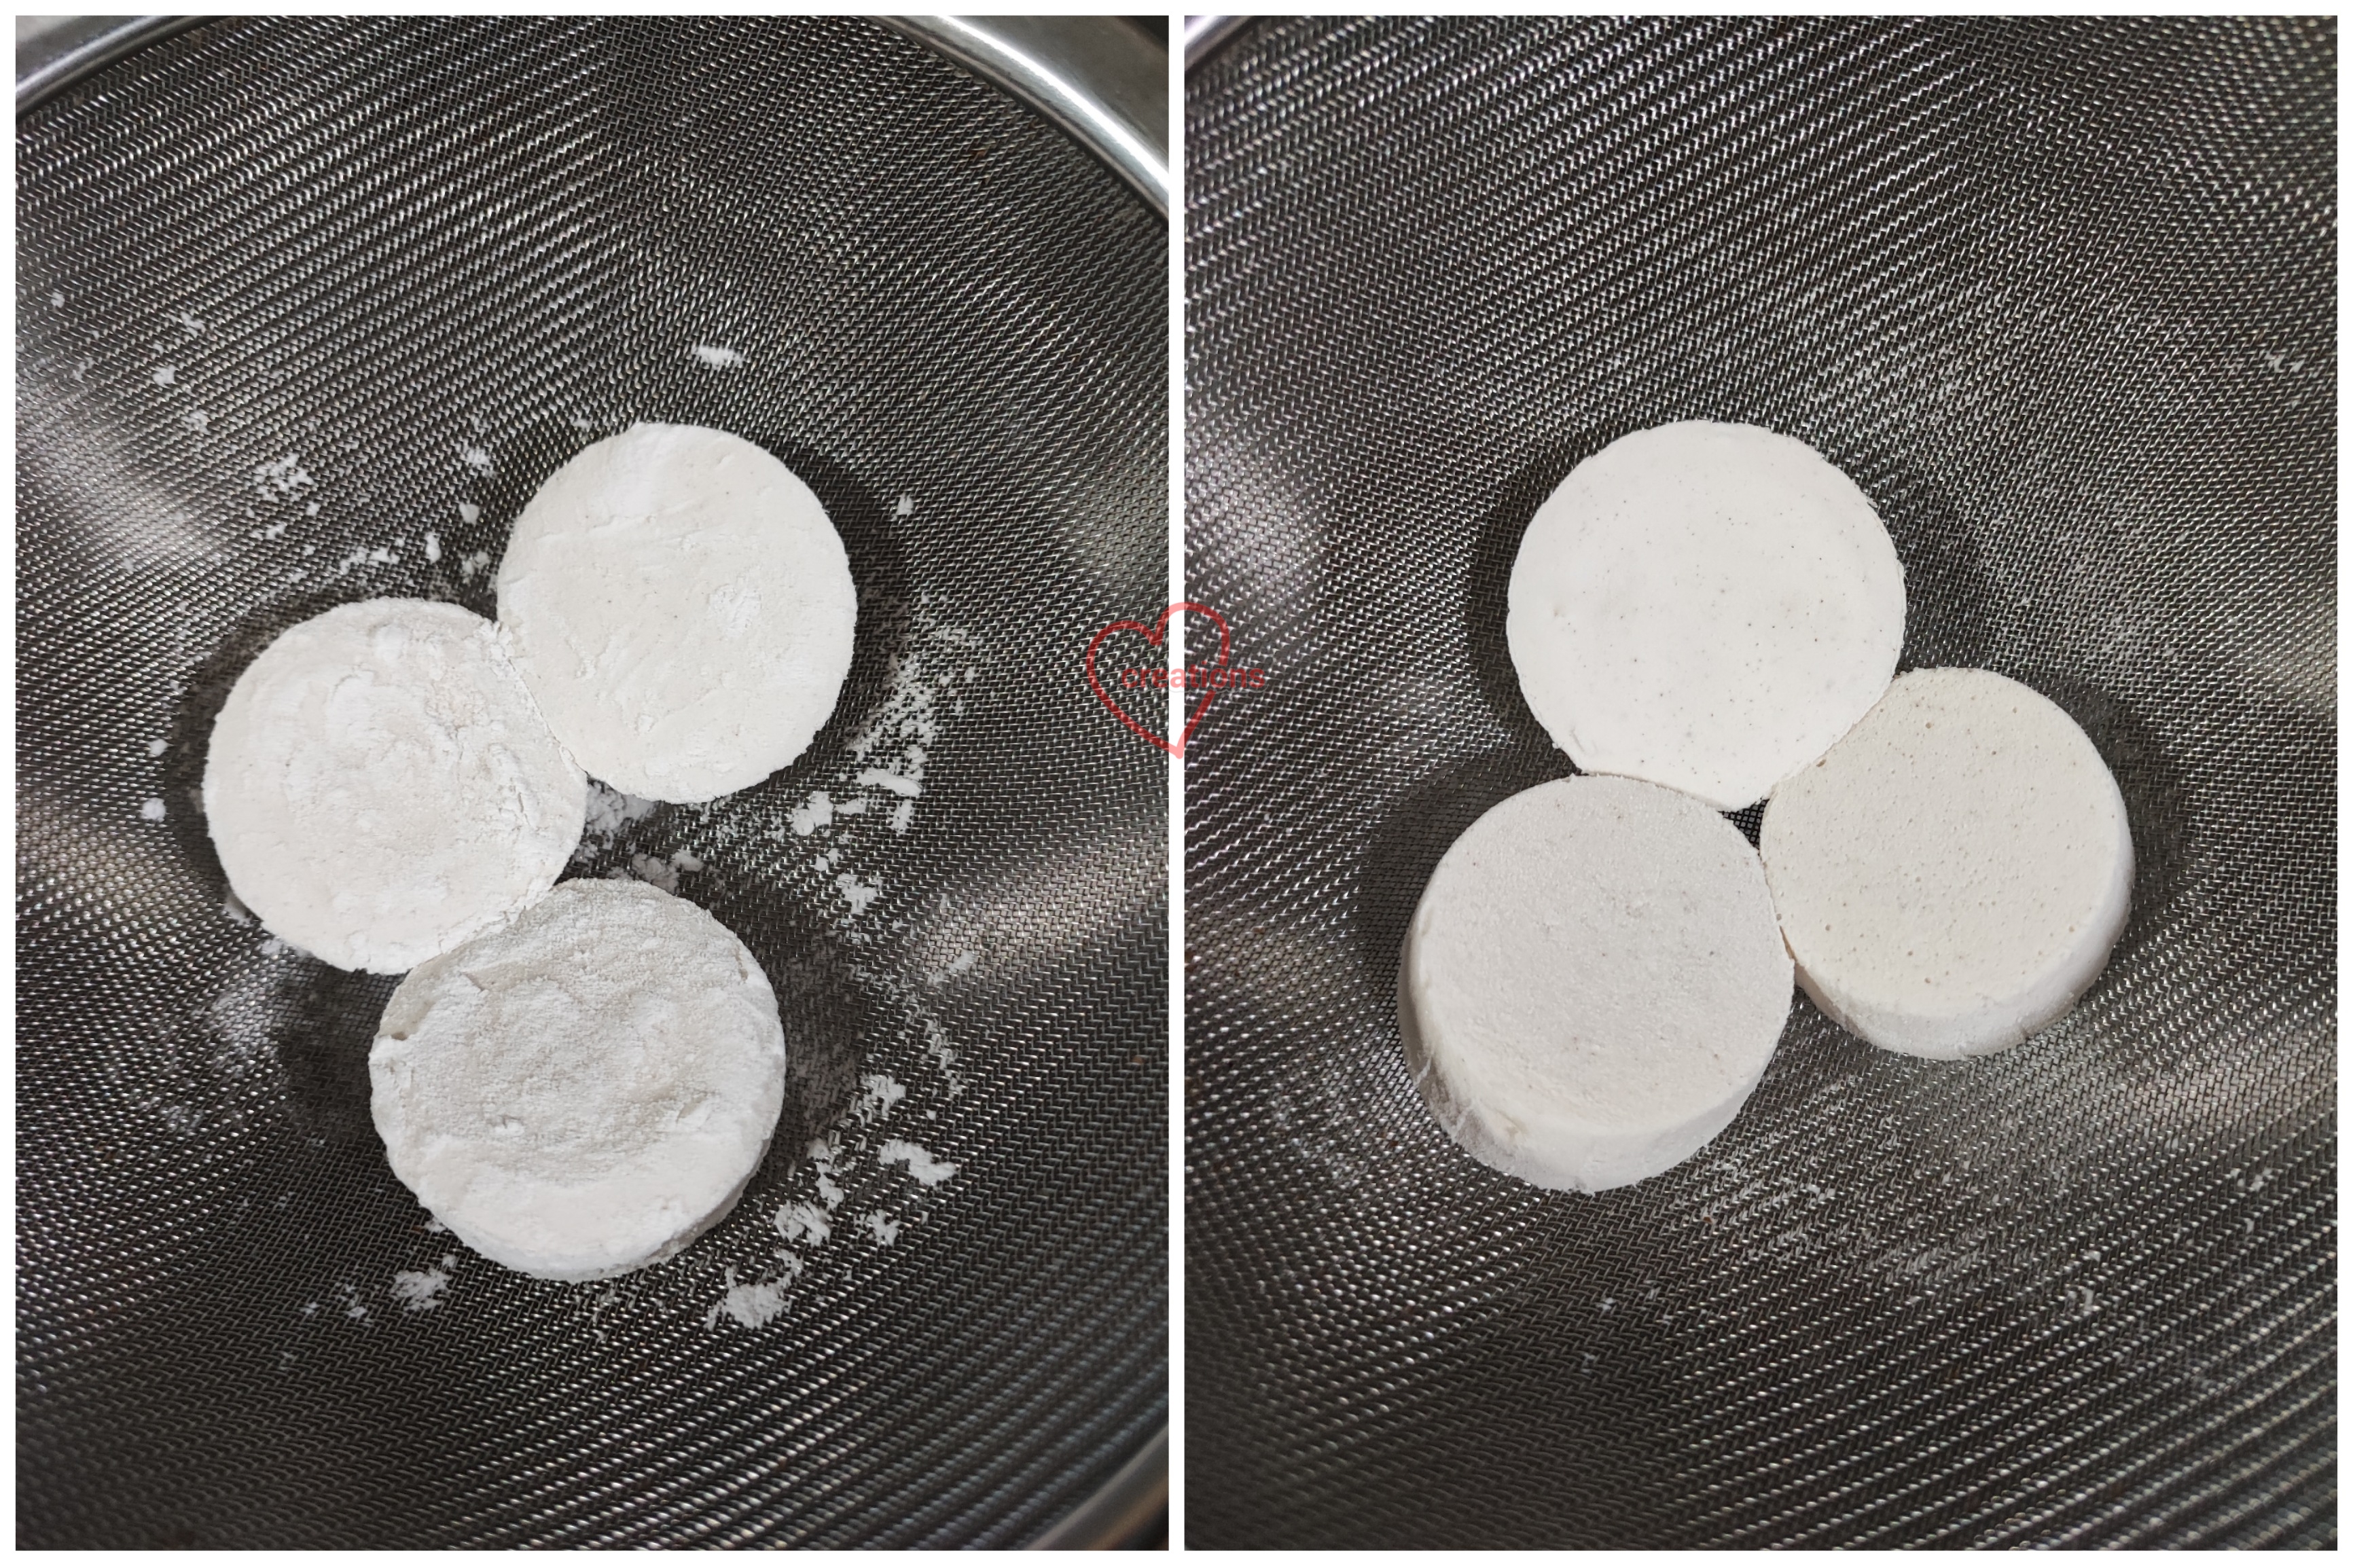
7. Unmold the marshmallow onto a bed of cornstarch. Coat with cornstarch or tapioca starch and remove excess by tossing it around in a sieve. 

Put a teaspoon of corn/tapioca starch on top. Open up the sides of the cupcake case.

Invert the cupcake case and deposit the marshmallow on corn/tapioca starch. Coat it well.

Tossing coated marshmallows.

8. Let the marshmallows dry out in the open or loosely covered (preferably aircon environment as Singapore is very humid) for 2-4 days before using it as toasted marshmallows. Marshmallows will melt into a puddle easily if they are too moist when toasted.

9. Melt chocolate with shortening and pipe onto biscuits. You may pipe the chocolate decoratively if you wish!

10. Place dried out marshmallow on top and toast. Enjoy the S'mores freshly toasted! See the notes below on how to create the foil cross and how to toast.

Storage
Freshly made marshmallows may be stored in airtight container and kept at cool room temperature for two weeks if you are not toasting or consuming immediately. For longer storage, keep in the freezer.

Flavour variations
Although marshmallows can be easily bought from supermarkets, homemade ones taste better and are less sweet. You can also customize it with your own favourite flavour by replacing water with juices or purees (except highly acidic juices or juices that contain enzymes that break down gelatin), tea and coffee, or use different types of flavouring extracts. Just make sure you avoid using fresh fruits containing enzymes that will break down gelatin like kiwi, mango and pineapple. You may use them if you simmer for 20minutes before using as the prolonged heat will destroy the enzymes. Make sure all liquids used for blooming gelatin are chilled in the fridge before using.

You may replace light corn syrup with honey, glucose syrup or dark corn syrup if you wish.

You may also replace white sugar with brown sugar but keep in mind that the syrup will boil higher so you may have to use a taller saucepan or stir occassionally to prevent the syrup from boiling over. Stirring won't cause recrystallization of sugar if you have added an invert sugar like light corn syrup/honey/glucose syrup/dark corn syrup.

Aluminium Foil Cross 
In order to create the cross shaped marking on top of the marshmallows, you will need to make a mask.

1. I used a 5mm wide and 11cm long wooden stirrer available from SKP in Singapore to help with folding the foil. You may work without it if you wish. Just fold the foil with the help of a ruler and your fingers. Create a rectangular piece out of foil around 5mm x 8-9cm.


2. Repeat step 1 to make another rectangular piece.


3. Place the two foil pieces perpendicular to each other. Cut a slit that is as long as the width of the foil pieces (around 5mm) as shown in the picture below. Carefully slide one end of the perpendicular piece into the slit and pull it through. Flatten the pieces to form the cross.


Notes for toasting:
- Lightly coat the foil cross with a little oil before placing on top of marshmallow
- Make sure marshmallow is not too moist or it won't retain the shape well. Dry out for 2-4 days in aircon room.
This is what happens if you toast your marshmallows while they are too moist😆

- Place the digestive cookie with marshmallow close to top heating element, about 4-5 cm away. Avoid placing too close to bottom heat or the whole marshmallow will melt instead.
- Toast for 30 sec-2 min or until browned at the tops. Check every 30 sec in the beginning and every 10 seconds once it shows signs of browning to avoid burning.
- Carefully remove foil with tweezers or chopsticks.

Remember to eat the S'mores when they are freshly toasted as that's when it tastes the best!

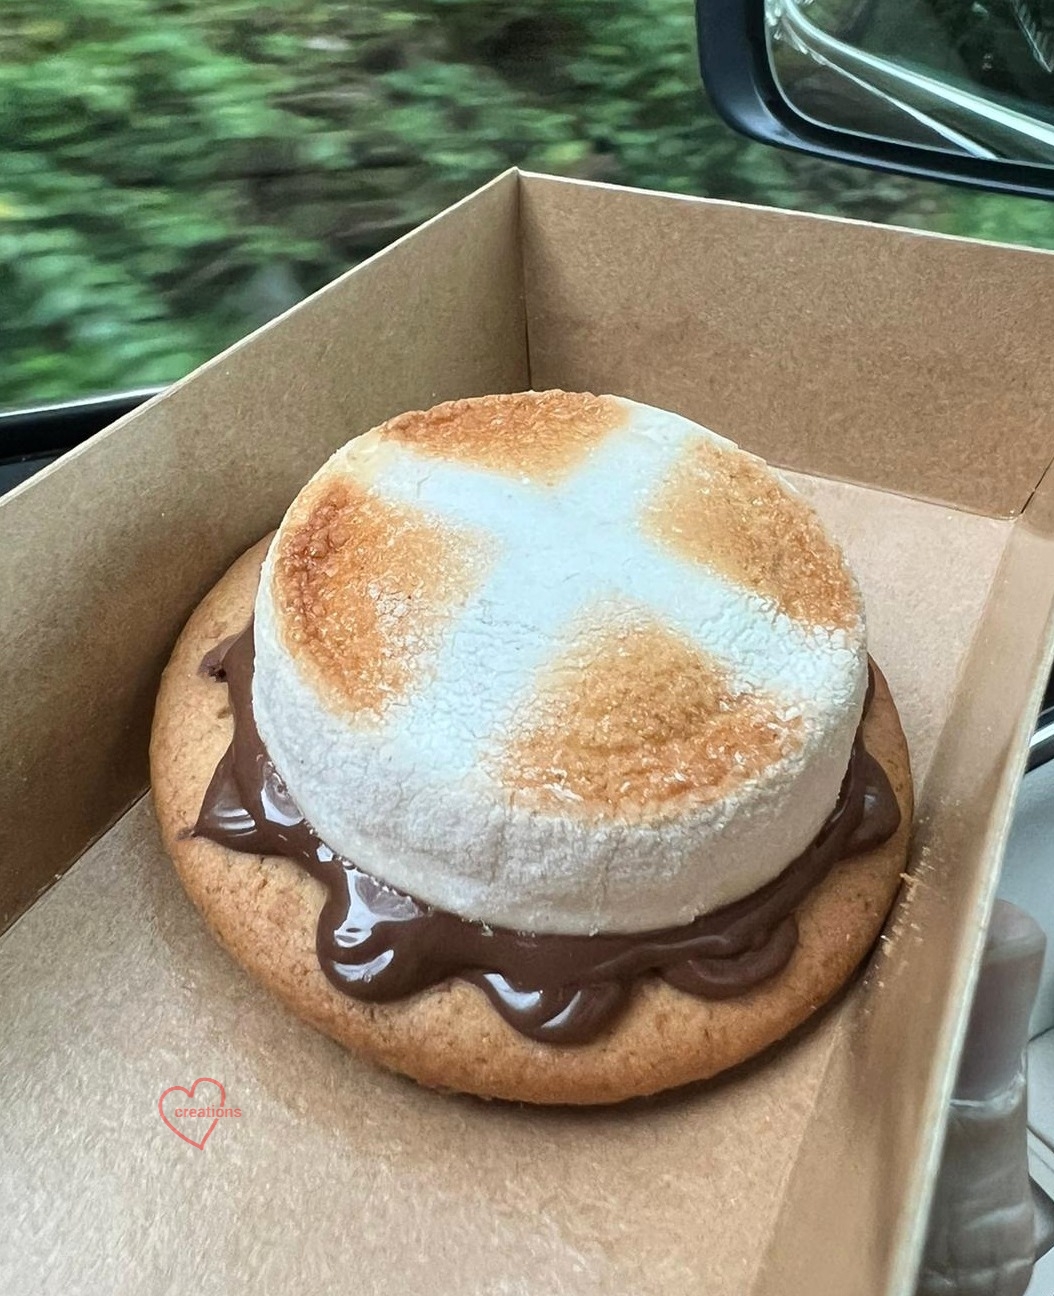
Update:
Here's a lovely photo taken by someone at the event. I couldn't have taken a better photo!


with love,
Phay Shing

Read More »