I made this cake again for a friend who loves Hello kitty and strawberries! Hello Kitty was one of my earliest creative chiffon cakes and recipe has been shared here. Here, I used a larger pan and decorated the clothes into a strawberry using sheet cakes.
Here, I combined Hello kitty with a "Wood stump" chiffon cake. A version of the "Wooden stump" cake has been shared here.
Here I used dark pearl chocolate chiffon cake, and instead used the knife to get the circular wood grains on the top. I love dark pearl chocolate chiffon as it is richer. Recipe has been shared below:
Dark pearl chocolate chiffon cake (6-inch)
2 egg yolks
26g vegetable/corn oil
43g milk
52g dark chocolate
23 g cake flour, sifted
10 g cocoa powder, sifted
Pinch of baking powder
Pinch of baking soda
1. Preheat oven to 140°C. Prepare a 15-cm tube cake pan.
2. Melt dark chocolate in a double boiler and stir till smooth. Set aside to cool a little.
3. Prepare egg yolk batter: whisk egg yolks with castor sugar till light. Add in oil and mix well. Add in milk and mix well. Add in sifted cake flour, cocoa powder, baking powder and soda, and whisk till no lumps.
4. Prepare meringue: Using an electric mixer, whisk egg whites with cream of tartar and castor sugar till firm peaks are formed.
5. Fold in meringue gently into egg yolk batter 1/3 at a time.
6. Pour into cake pan, leaving 2-cm from the brim.
7. Bake at 140°C for 55 min, or until skewer inserted into centre of cakes come out clean.
8. Allow cake in pan to cool completely inverted on wire rack.
9. Hand unmould the cake after it is fully cooled.
Hope you will like this yummy chocolate cake and sweet creation!
Please take care of yourselves during this period!
This is a long overdue post but I had more pressing bakes to post first. That's why the 2 month delay. I made this Spongebob themed raspberry dark chocolate cake for a friend's daughter!
Toasted almond flour that I use for making macarons is great as edible "sand"!
Here are some photos for the process of making the macaron decorations.
Piping out the shells. I used French method for such a small batch.
Freshly baked shells!
I drew the black outlines using fine-tipped edible marker before filling in the details with royal icing. Make sure that you dry the black ink thoroughly overnight or in 60°C oven for an hour (fan on) before adding on the royal icing, or the black ink will run.
I filled the shells with raspberry dark chocolate ganache.
Raspberry dark chocolate ganache
Ingredients:
65g dark chocolate couverture
6g unsalted butter
18g heavy cream
1/8tsp sea salt
1/2 tsp vanilla bean paste
1/2 tsp coffee liqueur
8g freeze-dried raspberry powder
Steps :
1. Place all ingredients except raspberry powder in microwave-safe bowl. Heat on medium power for 20 sec and mix well. Repeat heating and mixing as necessary until smooth and melted.
2. Add freeze-dried raspberry powder and mix well.
3. Let the ganache firm up until toothpaste consistency before transferring into piping bag. You may choose to whip the ganache for a lighter texture if you wish.
Ta-dah! I assembled this using stiff royal icing.
Let the assembled structure air dry preferably in air conditioned room for an hour before storing in airtight condition in the fridge. This can keep in fridge for up to 2 weeks.
Adding oven-baked raspberries between the chocolate sponge layers adds a refreshing tangy touch and balances the richness of chocolate.
I baked the fresh raspberries by laying them out in a single layer on parchment paper, sprinkle some lemon juice , a pinch of salt and some sugar, and bake in preheated oven at 110°C for about 30 min. This can be prepared in advance and kept in the fridge. Reserve any liquid that seeped out from the raspberries as well. This can be used to brush on the sponge to moisten and flavour it.
Here was how I assembled the cake. It is similar to the stump cake, except that I added the raspberries on top of the mixture of chocolate custard and dark chocolate ganache before layering on anothee layer of sponge. I made 4 layers of sponge and 3 layers of filling for this.
The sponge is only about 4 inches in diameter so it is a really small cake. I covered the cake assembly with a coat of dark chocolate ganache and used a spatula to create some vertical marks. I sprinkled some toasted almond flour at the base of the cake.
Of all the "macawrongs" that bakers experience, hollow shells is perhaps one that many tear their hair out over. While I don't obsess over hollows because I understand why it is fairly difficult although not impossible to achieve full macaron shells consistently (see the happy red shell below), many bakers do. I have typed my response too many times over in the macaron group so I have decided to once and for all, pen it down properly so I don't have to repeat myself 😂.
The blue and green hollow shells looking at the full red shells with envy!
Before I begin explaining how to overcome hollows, let me explain the fundamentals and science of things. Macarons are meringue based cookies and meringues are UNSTABLE structures that will breakdown over time. Even when you use Swiss or Italian meringues where the egg whites are semi cooked to produce a more stable meringue than the French meringue, they will eventually breakdown with time. Hollows happen when the meringue in your piped batter starts to breakdown before the internal structure of the macaron shell is set by baking.
That leaves us with two strategies to combat hollows:
1. Anything that helps to set the internal structure as soon as possible by baking
2. Anything that helps to keep the meringue stable for a longer time during drying stage (if you are drying) and during the initial baking stage (piped batter in oven but structure not set yet).
Not resting at all is what some bakers do to fulfil option 1. But this is not always possible for some bakers as the membrane formed on the surface of the piped batter may not be strong enough to withstand the internal expansion of the batter in the oven. This results in cracked shells. I believe many would rather have hollow shells than exploded shells. Whether or not you are able to get away without resting depends a lot on how your oven transfers heat to your macarons, the humidity of environment, type of meringue, ingredient ratio and whether things like cornflour /cornstarch is added. The longer you rest your shells before baking, the sturdier the membrane on the surface of the piped batter is. But if the meringue starts to break down during this resting stage, a hollow will start to form under that membrane. So there is a tradeoff you have to consider.
What can we do to minimize the resting time then?
-Reduce humidity of environment. If you live in an arid area, good for you! You probabably don't need to rest your shells or rest for long. For those of us in the tropics (like me), you may have to dry your shells in an aircon room, under a fan or use a dehumidifier to speed this up.
- Add cornflour /cornstarch to your dry ingredients or French meringue (if using French method). This helps a membrane to form more quickly and your shells dry faster. It also makes the membrane sturdier and less prone to cracking when you bake. How much to add? I personally don't add more than 1tsp per egg white recipe as I find that it alters the delicate texture of macarons to become a lot chewier. But this can be fixed by maturing for longer time with filling or brushing the bottoms of the shells with unwhipped heavy cream before filling. Some bakers add up to 10g cornflour per 100g dry ingredients. That is way too much for me but it works for them.
- Oven drying. There are 2 ways to go about this. The first one is a technique I use in macaron class to speed things up. I partially dry the shells at 60°C oven for 5-10min using top and bottom heat only. And then either pop it straight into another oven preheated to baking temperature or let it continue to rest at room temperature while the oven preheats to baking temperature. The second method is a method that I use to get super full and shiny surfaced shells. But it is very much oven dependent. I preheat the oven to baking temperature, pop the freshly piped tray of macarons in and bake with the door ajar (about 10cm wide) for 3-5min before closing the door to bake the rest of the way. You need to keep a close eye on this one and do some trial and error as to what temperature works best for your oven. I don't recommend this method if your oven tends to have high temperature overshoot or unstable oven temperature during baking.
Using a higher initial baking temperature also ensures the meringue starts setting quickly before it starts breaking down in the oven. When the initial temperature is too low or when heat conduction to the base of the macaron shell is poor (due to use of silicone mat, poor heat conduction of baking tray), the hollow forms near the base of the shell instead or near the top, resulting in a concave at the base of the shell.
How do we go about option 2?
- Add cornflour or cornstarch to dry ingredients or meringue (for French method). Besides helping to shells to dry faster and form a sturdier membrane, this also helps to stabilise the meringue. Some bakers use it as a stabiliser for the meringue in chiffon cakes.
- Add egg white powder to egg whites for making meringue. When the egg whites are whipped to form the meringue, protein molecules in the egg whites unravel and form a foam structure. By adding more protein in the form of egg white powder, you are adding in more building blocks to the foam structure, making it sturdier and less prone to collapse. I personally don't really like this although many bakers swear by it, because I find that the macaron batter is thicker and resulting surface of piped batter is less smooth. It is great for round macarons, but not so good for someone like me who makes intricate characters and shapes most of the time.
(Update 07/03/22: After revisiting this option again for a few rounds of bakes involving character macarons, I find that it helps to improve meringue stability without affecting texture too much if not too much egg white powder is added. About 1/2-3/4 tsp per large egg white is sufficient.)
- Add Cream of tartar. This is an acid that helps to stabilise the meringue. I use it in macarons and chiffon cakes all the time. You add it to the egg whites when they are beaten to frothy stage for French method and before beating the egg whites for Swiss and Italian methods. Some people find that adding cream of tartar ruin their macarons but some find it helpful. You have to try it out for yourself to see if it works. I add about 1/8tsp per egg white.
- Use Swiss or Italian method instead of French. When I have projects that require long hours of piping with several coloured batter for character macarons, I use the Swiss or italian methods because of the better meringue stability.
- Ensure that your meringue is of good quality. If you are using French method, beat your meringue until it is really stiff and dry but not curdled looking. For those of you using stand mixers, the meringue should be able to ball up inside the whisk. Take your time to whip up the meringue at medium to medium-high speed on the mixer as it will be more stable this way. You should take about several minutes to beat to stiff peaks.
If you are using Swiss method, make sure that the sugar is all dissolved in the egg whites during double boiling stage before you transfer to stand mixer to beat till firm peak. Any undissolved sugar will cause the meringue to be unable to whip up to firm peak within a few minutes of medium-high speed beating. Heat up your egg whites slowly to make sure the sugar has enough time to dissolve and don't forget to keep whisking. I take about several minutes to do this.
For Italian method, make sure that your syrup temperature reaches 115-118°C before pouring into egg whites slowly and beat the meringue at high speed until it is cool enough (around body temperature) before you stop the mixer to check. Don't stop beating too early.
If your meringue is under-whipped for all three methods, it will break down earlier.
I hope this is helpful information for you and you don't fret as much about hollows because the recipients don't really care, as long as the macarons are yummy! Most of the time even if you get hollows, they aren't super huge and they will disappear with time after maturing with filling. Don't take the joy out of baking by stressing over little details like this!
This is perhaps one of my most massive bakes that is almost on par with my macaron playground on strawberries n cream cake I made in 2018. I made a pink ombre castle with rainbow and rainbow bunnies out of macarons! The whole thing sits on top of a 6-layered dark chocolate banana cake!
A macaron structure like this really needed time for planning and execution. I used the swiss meringue method but tweaked the recipe for a reduced sugar version without needing to use rice flour to replace some icing sugar in the dry ingredients portion like I always did. In order to maintain stability of the meringue while reducing sugar content, I replaced some of the caster sugar with icing sugar that has cornflour added, and cook the egg whites to a slightly higher temperature. I am still in the process of finding the optimal higher temperature to heat the egg whites to so I won't be sharing the detailed updated reduced-sugar swiss method recipe yet. You may refer to this post for the original swiss method recipe, and this post for the reduced-sugar swiss method recipe using rice flour and cornflour substitution for icing sugar.
Just to share some pictures of the process...
Piping the batter for various components!
Freshly baked shells!
Adding the details of the rainbow bunny using edible marker and gel colouring dissolved in vodka that is painted on. This bunny is modelled after baby Ashley's favourite toy
Just to show the heartbreak I get sometimes when working...
Oops! I accidentally dropped one fully decorated shell! All the hardwork 😂. Thank God I made extras!
The rainbow is a huge macaron that extends quite tall vertically so I had to take pains to make sure that it is securely anchored. I didn't want to risk it toppling over during transport. Here is a sneak peek of how I did it.
The anchoring actually starts all the way down to the cakeboard with 2 wooden skewers on each end of the rainbow. Stiff royal icing at both ends of the rainbow may not be sufficient to secure it.
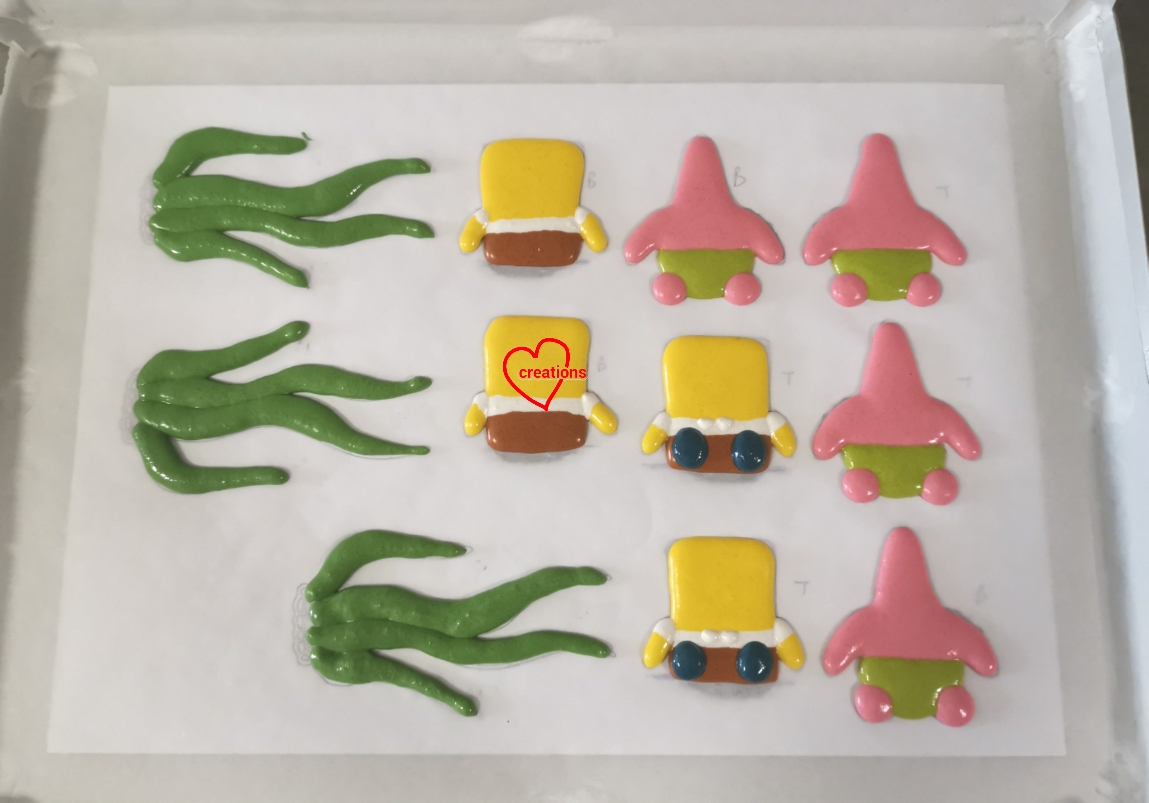
Works-in-progress! Stiff royal icing is used to glue the pieces together, as well as to create the grass
Does this sight put a smile on your face?
My ultimate chocolate cake has always received rave reviews and this time round, I decided to add bananas to complement the rich chocolate. I baked the banana slices briefly in the oven at 200°C, with some slices sprinkled with sugar on top so that it caramelizes. You may refer to this blog post for the detailed recipe.
Here was how I assembled...
Add a little chocolate custard on cakeboard, place a layer on sponge on top, pipe on the mixture of chocolate ganache and custard, add the bananas, add a thin layer of custard-ganache mixture, place the next layer of sponge and repeat, finally crumb coat with whipped dark chocolate ganache
You may choose to leave the cake in a semi-naked style or cover it with more dark chocolate ganache. I ran 3 wooden skewers through the whole height of the cake to prevent the cake layers from sliding.
I did a simple vertical-line pattern using a spatula, and covered the base with some chocolate pearl crunch sprinkles.
Thank God the cake was really well received and people were amazed that you can actually construct a castle out of macarons!
Chiffon cake inspired by Valentine's day Pusheen with a Giant heart candy! It was love at first sight when I first saw it!
Sending some love and hugs to everyone in the midst of this difficult time.. and truly we are very thankful for all the brave healthcare workers on the frontline. A big thank you..
This is a bake I squeezed in for a young lady to bring her some cheer. She happens to be a fan of Gudetama. The concept of this bake was inspired by the first episode of season one of Sugar Rush, the baking competition. On that episode, one of the contestants made "egg on toast" for the confections round of the competition but the egg yolk was spherified pineapple curd on top of egg white (milk panna cotta), midori buttercream with marshmellows and a coconut pound cake (the "toast"). I was so totally amazed by how realistic the "egg yolk" looked and saved the idea in my memory until there was a chance to use it. So here it is! My version of "egg on toast"! Spherified lemon curd on vanilla panna cotta and lavender vanilla bean chiffon cake!
Just to show you how cool it is, I made a video of how the spherified curd is like but the curd and panna cotta are resting on an actual slice of bread because I didn't make extra "toast".
You can pick the "yolk" up and finally pierce it to let the inner goodness ooze out when you had enough fun poking at it! I know it looks awfully cruel 🤣
This bake looks simple but it has quite a few elements to prepare.
Gudetama's facial features are made from something inspired by Yuni Sweets, one of the queens of patterned deco roll cakes. I used her simple recipe for the patterned parts of the roll cake to create Gudetama's face.
Recipe for Gudetama's facial features
Ingredients:
10g unsalted butter, room temperature
10g icing sugar
10g cake flour
10g egg whites
Charcoal powder
White gel food colouring
Steps:
1. Place template of Gudetama on baking tray. Line tray with teflon sheet or parchment paper. Lightly grease the surface with oil and paper towel. Preheat oven to 150°C.
2. Place butter, sugar, flour and egg whites in a small mixing bowl. Whisk together until smooth.
3. Divide the batter into 2 and add charcoal powder to one portion and white colouring to the other. I didn't measure but instead add a bit at a time until desired shade is reached.
4. Transfer each coloured batter into piping bag and cut a small hole at the end. Pipe the black parts, followed by the white part. Use a toothpick to nudge the batter where necessary.
5. Bake in oven for 6-7min or until batter appears dry. Cool completely on tray before storing in airtight condition. You may prepare this a day or two ahead of time.
* to prepare lavender milk, heat 40g of milk with 1-1.5tsp of dried lavender flowers until the milk just starts to bubble. Let it steep for 10 min. Strain out the flowers and measure out 28g.
Steps:
1. Preheat oven to 140°C and set rack to second lowest position. Line bottom of baking tray with parchment paper but leave the walls unlined.
2. Prepare egg yolk batter. In a mixing bowl, whisk egg yolks and sugar together until pale and thick. Add oil and whisk untik combined. Add milk, lavender oil, vanilla and salt and whisk until combined. Gradually sift in flour and cocoa powder and whisk until no trace of flour is seen.
3. Prepare the meringue. Place egg whites and cream of tartar in a clean metal bowl. Beat with electric mixer until firm peaks or just reach stiff peaks, gradually adding sugar once the egg whites are foamy.
4. Quickly but gently fold meringue into egg yolk batter in three additions. Pour into prepared baking tin. Tap the tin on the table a few times or run a chopstick around to pop air bubbles.
5. Bake for 30-35 minutes. Turn the temperature up to 170°C and bake for another 5-10min. This is to brown the exterior of the cake to make the "crust" of the toast. Usually I leave a tray of water at the base of the oven but I omit for this bake as I want the browning to happen. Note that time and temperature is oven dependemt so adjust accordingly.
6. Cool the cake upright. Carefully unmould the sides by hand or with the help of a spatula. Slice the cake till it is about 3cm tall. Carefully remove part of the crust at the flat face of the cake by gently rubbing off crumbs of the cake to create the toast pattern. It is optional to do so for the middle of the cake since the egg is going to cover it but I did it anyway for fun!
Did I totally fool you with this 😉?
Store the cake in airtight container until ready to assemble. You may wish to brush the surfaces of the cake with vanilla flavoured simple syrup to moisten it if you wish as I purposely baked until dry on the surface for the toasted look. The cake will still not be awfully dry when you eat as it is eaten with panna cotta and lemon curd
I made more lemon curd and panna cotta than necessary so I placed them into cups for a refreshing pudding dessert for my kids.
Recipe for panna cotta
Ingredients:
200g heavy cream
200g fresh milk
1 tsp vanilla extract
40g caster sugar
6g gelatin sheets (3 sheets) **
Some ice water in a bowl**
**you may use powdered gelatin. If using this instead, scatter same weight of gelatin powder over 50g of cold milk or water to bloom for 10 min before microwaving and stirring to dissolve the gelatin.
Steps:
1. Soak gelaton sheets in ice water for 10 min. In the mean time, place all other ingredients in saucepan and heat and whisk until sugar dissolves.
2. Continue heating the cream and milk mixture until it just starts to bubble at the edges. Remove from heat. Squeeze excess water out from gelatin sheets. Add into saucepan and whisk until dissolved.
3. Pour the mixture into cups/moulds. I prepared acetate sheet rings with cling wrap at the bottom for the "egg white" portion of the fried egg. Sorry I didn't take any photos of it as I was working close to midnight for this part.
4. Chill overnight in the fridge or at least 4 h.
Spherfied lemon curd
I used this blog post as my reference for the spherificarion process.
Ingredients :
240g lemon curd (replace lime with lemon from recipe)
30g water
6g calcium chloride
800g + extra 500g distilled water
4g sodium alginate
Steps:
1. Prepare lemon curd.
2. Dissolve calcium chloride in water but whisking them together.
I added a little turmeric to the lemon curd to make it a deeper yellow shade but you won't taste it at all
3. Add calcium chloride solution into lemon curd and whisk well. Transfer into silicone hemispherical mould. I used the 4cm diameter one
4. Freeze overnight or for 2 hours at least until very firm.
5. In the mean time, prepare sodium alginate solution. Scatter sodium alginate in 800g water in a glass loaf pan (or any other shallow tray). Use a blender to blend until no more gel lumps left. You may find it easier to do this in a measuring jug and then sieve the solution into the loaf pan but I was lazy to wash more things. Set aside to settle for 2h until solution turns totally clear.
Preparing sodium alginate solution
6. When the solution is ready and lemon curd is frozen, prepare another bath of distilled water for rinsing the spheres. Pop the frozen spheres into alginate solution, a few at a time. Gently agitate the spheres in the solution for about 3 min. Remove with slotted spoon and rinse in distilled water before draining over paper towel and carefully depositing on top of panna cotta. You may find it helpful to dig out a small cavity in the panna cotta such that the "egg yolk" can sit nicely on it without sliding around.
Add on the facial features and you are done!
Keep the assembled creation in the fridge for up to 3 days. The spherified curd I made can survive for up to 3 days stored although what I have read so far for spherified juices needed to be consumed within a day. The spheres I made can remain intact and burst with oozy goodness even on the third day!
I recommend smearing the burst curd all over the cake/ panna cotta and eat together with panna cotta for a well balanced flavour as the addition of calcium chloride to lemon curd makes it sharper than it originally is.
We just said goodbye to the Year of the Pig but that doesn't stop me from making these cute piggy choux pastries!
"We have piggitude!"
I had a request to make some simple pig choux pastries but they should sport different facial expressions. I have made and taught pig choux pastry a year ago but I decided to inject a bit more life to them by giving them a range of expressions and changing the design of the ears a little.
You may refer to this post for detailed recipe of the craquelin and choux pastry batter. I coloured the batter and craquelin with some white powder colouring, orange and pink gel food colouring to create the peach colour. There is a step that I do slightly differently from the past, which is to use metal guides for rolling out the craquelin. I find this method results in more evenly thick craquelin than using the softer silicone guides that came with the rolling pin. I bought these 2.38mm thick metal guides from an art supplies store (Art Friend in Singapore)
Rolling out craquelin with metal guides.
As usual, I recommend using perforated mats for baking the main case. Craquelin: 3cm diameter, piped batter:2.5cm diameter
Piped ears and snout. These are baked at 170°C for about 12 to 15min.
I cut a hole at the base of the pastry case this way to thoroughly dry out the insides at a 140°C oven for 20 min. This ensures that the pastry cases remains crisp. Don't discard the small round cutout. You may cover back the hole after filling the pastry cases
You may refer to this post for video tutorial on how you can assemble a choux pastry character.
You may refer to this post for the chocolate pastry cream recipe that is rich flavour, light in texture but not too sweet.
If you have not tried your hand at making deco choux pastries, do give it a try! I love choux pastries for it's lower sugar content but rich flavours and wonderful textures! Remember to fill the pastries only just before consuming so your pastry cases remain crisp!
This is inspired by their Surprise plush - Winter Wonderland!
Another exciting Pusheen news, "Let's Bake! A Pusheen Cookbook", a collaboration between the creator of Pusheen, Claire Belton and myself is coming in June! It's filled with sweet treats of all kinds, for all levels of bakers! You can preorder a copy of the book here.
Also praying for the Wuhan virus situation.. everyone please stay healthy!