Showing posts with label Matcha. Show all posts

Tuesday, 9 June 2026

Matcha Strawberry Wedding Macarons

 I was tasked to make 80 wedding macarons with a very specific design and shade of green. This was what I made!


Matcha macarons filled with strawberry and matcha ganaches. The shells were decorated with royal icing and edible paint made from gold and silver dust. As these were meant to be gifts for guests to bring home, I made the fillings dairy-free and temperature stable without compromising the flavour.

A closer view from the side!

 Check out the feedback I got for the taste!


It has taken me many years and iterations to find a filling base that can accommodate different flavours and yet be practical enough for gifting in tropical Singapore. 

I made the macaron shells using my Swiss method recipe but with premium Matcha powder added.

Please see the reel for the process of making these macarons and for the recipe:

https://www.instagram.com/reel/DZdwe0ASXmK/?igsh=bmpwdGhkb2hrNnpy


with love,

Phay Shing 

Read More »

Thursday, 14 May 2026

3D Turtle Matcha Yuzu Macarons

 I have a fairly large wedding macaron order coming up so I took the chance to play around with matcha macaron shells which was requested for the wedding batch. I ended up with these turtles!


3D macaron shells in the form of hemispheres are perfect receptacles for turning macarons into mini entremets because of the extra volume they can hold. Here's what the turtles contain:

- Matcha macaron shells
- Yuzu royal icing coating the insides of the hemispherical shells
- Matcha ganache
- Matcha vanilla bean mousse

The bright and tangy yuzu complements the earthy premium matcha really well! The icing layer prevents the top hemispherical shell from maturing so it stays crunchy, whereas the bottom macaron shell matures as per normal so it has a soft chew. The creamy mousse filling rounds off the texture nicely.


Here's a picture of the undecorated and unfilled macaron shells...


I will share the ingredient list for the filling here. I used my default Swiss meringue method macaron recipe for the shells but with some premium matcha powder added.

Matcha vanilla bean mousse:
75g + 75g heavy cream 
25g white chocolate couverture, melted
1 egg yolk (about 15g)
5g sugar
3g matcha powder (dissolve in 9g hot water to form a smooth paste)
2g gelatin bloomed in 8g cold water
1/2 tsp vanilla bean paste

Matcha ganache:
120g white chocolate couverture, melted 
1/16tsp salt
4g light corn syrup
12g matcha powder
32g hot water (may replace with hot cream)
2g gelatin in 8g cold water (optional)

Note: Hot water is used instead of cream to bring out a more intense matcha flavour. You may replace hot water with hot cream if you wish for a more milky ganache. Omit gelatin as well if you wish. I added it to make it more temperature stable in the tropics where I live.

Yuzu royal icing:
42g icing sugar
3g meringue powder
7g 100% yuzu juice concentrate
1g light corn syrup

Watch the reel for the process. The method is in the pinned comments of the reel.
https://www.instagram.com/reel/DYYO6ykSA5S/?igsh=MWZlNTU5YzQ5cDMybQ==

This is really delightful for people who love the matcha -yuzu combo! 😋

with love,
Phay Shing
Read More »

Sunday, 25 January 2026

Assorted Piped Butter Cookies

 Whether it's the upcoming Lunar New Year, Valentine's Day, Mother's Day, Father's Day, Christmas or any day, an assortment of butter cookies is always a welcome 😊. I adapted the recipe from Buttermilk Pantry to make a more delicate cookie by increasing the butter to flour ratio.


Orange/vanilla:
65g Golden Churn butter
15g French butter of choice
26g icing sugar
4g milk powder (or replace with icing sugar)
Scant 1/8 tsp fine salt
30g cornstarch
65g cake flour
1/4 tsp vanilla extract/bean paste (optional for orange)
3-4g orange zest (omit for plain/vanilla)

Chocolate:
65g Golden Churn butter (already salted)
15g French butter of choice (may replace with Golden Churn)
35g icing sugar
12g Dutch processed cocoa powder (I used Valrhona)
20g cornstarch
63g cake flour
1/8 tsp fine salt

Matcha:
65g Golden Churn butter 
15g French butter of choice
35g icing sugar
6g Matcha powder (use high grade)
24g corn starch 
65g cake flour 
Scant 1/8 tsp salt

Method:
1. Whisk softened butter, sugar & salt until lightened in colour but not too fluffy.

2. Sift in cornstarch & milk powder/ cocoa/matcha. Whisk until smooth

3. Add orange zest &/or vanilla if using. whisk until combined 

4. Sift in cake flour & fold in using a spatula until no trace of flour is seen 

5. Transfer into large piping bag fitted with open star tip of choice. I used 1M but you may use others like #827. Double up your piping bags if it's thin to prevent it from bursting. Clip the end & separate the dough into two portions within the bag as shown in reel for ease of handling

6. Pipe rosettes onto lined tray. Freeze for at least 1h or overnight if you wish.

7. Bake in preheated oven from frozen according to your preferred cookie texture*. Start at a lower temperature, bake for a longer time & end off high for crispier texture. Start high & end off low, baking for an overall shorter time for a more tender melt-in-your-mouth texture. Use a perforated mat help to contain the spread of the cookie in the oven during baking. Cool on tray for 5min before transferring onto cooling rack to cool completely. Store in airtight container.

* The aim of the baking profile I used is to get a delicate texture throughout the cookie with a light crunchy bite & slight toasty notes. This cookie won't be so delicate that it crumbles too easily when stacked & stored, but also not so hard that you have to bite hard before it crumbles. The long baking time I used is for a thoroughly crisp cookie that crumbles when you bite softly. Bake in preheated oven at 140C fan mode/ 155C (as read by an accurate oven thermometer) for 10-12 min, rotate tray & bake for another 10 min. Increase temperature by 20C & bake for 1 min. Rotate tray & bake for 1 min. 

Please see the reel below for more visuals:

with love,
Phay Shing
Read More »

Sunday, 21 December 2025

Matcha Christmas Tree Marshmallow with a Surprise Inside

 Although I made Christmas tree marshmallows with a surprise inside 3 years ago, this updated version yields a more stable marshmallow batter that holds ridges and peaks well without needing to freeze in between piping layers. Matcha lovers will love it too!


A closer peek at the Meiji strawberry chocolate candy inside!


Matcha honey vanilla marshmallows:
12g meringue powder* (I used Wilton)
36g drinking safe warm water*
10g caster sugar

7g gelatin powder
28g ice cold water

100g caster sugar
8g matcha powder 
1/8 tsp charcoal powder (optional, for sage green colour)
1-2 drops of forest green gel food coloring (optional)
1/8 tsp salt
20g honey 
35g water
1/4 tsp vanilla extract or essence

Other ingredients:
Cornstarch or a mixture of cornstarch and icing sugar (for dusting)
Round sprinkles of choice 
Star sprinkles

* May replace meringue powder and warm water with 48g fresh egg whites

See the reel for the video tutorial and for the method.


with love,
Phay Shing
Read More »

Friday, 5 December 2025

Hojicha Matcha Christmas Log Cabin Cake

 I decided earlier this year to make a matcha sponge based log cake with fresh berries and cream for my extended family this Christmas because it looks so Christmasy. But I saw the log cabin cake that joyfulhomecooking (Instagram account) made and fell in love with it! I stayed true to the flavour profile I originally planned into the cabin cake and this is what I came up with!


The insides still looks Christmasy!

Composition:
- Matcha honey chiffon sponge cake layers
- Stabilized fresh cream between matcha sponge layers and on the roof
- Fresh strawberries between matcha sponge layers and on the roof, and blueberries on the roof as well
- Hojicha Swiss meringue buttercream to coat the layered sponge assembly
- Iced brown sugar cookies for external decorations 
- Lady's finger sponges for the roof. You may make your own from scratch but I bought mine from a baking supplies store.

I made one cake earlier for my immediate family just so I could destroy the cake and share the content and recipe earlier for those of you who want to make this.

It's really yums!

The cake is light and refreshing, and the Hojicha buttercream tastes like Hojicha latte with a secret ingredient added! 

The whole project may seem like a massive undertaking but the good news is, the components can be broken down into manageable blocks of time for those of us with busy schedules. I will share the components in the order you should be making.

See the process of making the cake in this reel:

1. Brown Sugar Cookie Decorations
The iced brown sugar cookie recipe can be found here. You may choose to omit the cinnamon or replace with a gingerbread spice mix if you wish.

Iced cookies!

The cookies have an excellent shelf life of 1 month at cool room temperature storage so you may make this first. The dimensions of the windows and doors are:
Windows: 3 cm x 5cm
Doors: 3.5cm x 6cm
Use the smallest cookie cutters you have for other decorations. Feel free to adjust dimensions according to your preference.

2. Matcha Honey Chiffon Sponge
(12x16" tray)
5 large eggs, separated
10g matcha 
55g hot water
16g honey 
1.5 tsp vanilla
64g oil
87g cake flour 
1/8 tsp salt
1/4 tsp cream of tartar
75g caster sugar

1. Make egg yolk batter. In a small bowl, whisk together matcha powder & hot water. Add honey & whisk until smooth. Sieve into large mixing bowl. 
2. Add oil, salt & vanilla. Mix well
3. Sift in flour & whisk until combined
4. Add egg yolks & whisk until smooth. Set aside
5. Make the meringue. Beat egg whites with cream of tartar until firm peaks, adding sugar gradually once egg whites are foamy.
6. Fold meringue into yolk batter in 3 additions. Pour into baking tray lined with Teflon sheet or parchment paper. Feel free to use alternative baking tray sizes because the sponges will be cut into pieces anyway.
7. Bake in preheated oven at 160C fan/170C 12-15 min or till done
8. Immediately flip onto a fresh sheet of parchment paper to cool completely. Cut into pieces for assemby Wrap in double layer of cling film to freeze if not assembling yet. 
Dimensions:
- 11cm x 21cm 3 pieces of sponge
- 7cm x 21cm 1 piece of sponge
- 4cm x 21cm 1 piece of sponge 
- 2.5cm x 21cm 1 piece of sponge

3. Hojicha Swiss meringue buttercream 
145-155g egg whites (about 4)
1/8 tsp salt
130g sugar 
280g unsalted butter, slightly softened
16g Hojicha powder
4g dark cocoa powder (optional, for darker brown & added richness)
16-20g milk powder*

* You may toast the milk powder for a caramel flavour as well! To toast, bake in a thin layer in the oven at 140C, stirring every 8-10 min until golden brown but not too dark. Total duration depends on whether you are toasting in bulk or small amounts. Milk powder adds stability to the buttercream too.

1. Double boil egg whites with salt & sugar, whisking constantly until mixture reaches 71.1C. 
2. Whip till stiff, glossy peak. 
3. Add butter 1tbs at a time. Continue beating 8-10 min on med-high speed until light & fluffy. 
4. Add hojicha, cocoa & milk powder during the last min of beating until incorporated. 
5. Use immersion blender for a shiny & smoother buttercream to finish off. You may use immediately with 8mm piping tip or freeze in airtight condition until use if making ahead of time. Mix again with immersion blender after defrosting. If making it ahead by a day, you may refrigerate the buttercream. Let it soften slightly at room temperature before using an immersion blender to mix until smooth & creamy.

4. Fresh Berries
Slices of strawberries should be prepared just before assembly and before whipping the fresh cream. I sliced the strawberries to a thickness of about 1cm. Place cut surface on paper towels to absorb excess moisture. You may prepare this up to several hours in advance, keeping the cut fruits in the fridge until assembly.

5. Stabilized whipped cream
220g + 30g heavy cream*
200g non-dairy cream*
1 tsp vanilla extract 
8g gelatin bloomed in 32g ice water

* You may use all dairy, non-dairy or your own preferred ratio of creams. If using only dairy, add a little icing sugar to taste. The non-dairy whipping cream I use is pre-sweetened. I use a mix for better stability in hot Singapore but still tastes good.

1. Place 220g of heavy cream, non-dairy cream & vanilla extract in a cold mixing bowl. Whip cream until soft peaks.
2. Melt bloomed gelatin using microwave or by immersing in another bowl of hot water.
3. Add 30g of cream into melted gelatin & mix well
4. Pour 3. into 1 in a thin stream while whisking the whipped cream by hand. Continue whipping until firm peaks. 
5. Transfer into piping bag & use immediately. If storing overnight or for 1h or more in the fridge, you will need to stir the whipped cream with a spatula again to smoothen it out before transferring into piping bag. Pipe the cream onto the cake using 1cm diameter piping tip

6. Assembly
Assembly can be spread over two days as well to make it manageable.
1. Layer the matcha sponge, fresh cream and strawberries as shown in the reel. Refrigerate overnight or freeze for 2 hours.
2. Pipe hojicha buttercream over the assembly and smoothen it out with a spatula. Melting small amounts of the cream to smear it horizontally along walls of the log cabin will create a natural subtle wood grain effect.
3. Add cookie decorations
4. Add lady's finger sponges for the roof
5. Pipe fresh cream on the roof
6. Add fresh berries on the rooftop
Refrigerate the cake for at least a few hours before serving. You may store the cake in the fridge for up to 3-5 days.

I made the flavour profile not too strongly of matcha so that kids can enjoy this cake as well. If you prefer a stronger matcha flavour, brush the matcha sponge with matcha syrup during assembly before layering the fresh cream and fruits. Alternatively, add matcha powder to the fresh cream.


Wishing you a blessed Christmas in advance!


with lots of love,
Phay Shing
Read More »

Thursday, 23 January 2025

Yuzu Matcha Wintermelon Mochi Tarts

 Inspired by the filling of wife biscuits (老婆饼) & the pastry of pineapple tarts during the Lunar New Year season, I came up with these!


A closer look at the insides!


It was a challenge to get nice pictures of a bite cross-section because the pastry is light and crumbly. I have shared the recipe and video of the process on Instagram 

https://www.instagram.com/reel/DFJTQ1ghkpm/?igsh=MTh6aGJkeDJwZnRh

But I will just copy and paste the recipe and baker's notes on this blog post for those of you who find it hard to read off the captions of the reel. Feel free to upsize as this is a small batch.

Yuzu Matcha Wintermelon Mochi Tarts 
(makes about 25 tarts)

Filling:
100g candied wintermelon (糖冬瓜)* blended or minced
1/8 tsp salt
6g oil
4g honey
20g yuzu/Jeju citron* marmalade without rind
25g water* (more if necessary, 1/2 tsp at a time)
40g cooked glutinous rice flour* (a.k.a. 糕粉)
2g matcha powder*
12g yuzu/citron rind from marmalade, finely chopped

Pastry:
110g plain flour 
10g cornstarch 
6g matcha powder
20g milk powder
25g icing sugar
1/8 tsp salt
100g cold unsalted butter, cubed
1 egg yolk

Egg wash:
1 egg yolk
7g milk/water

1. Blend or mince candied wintermelon. Add salt, oil, honey, marmalade & water. Mix well

2. Whisk together cooked glutinous rice flour & matcha powder. Add to 1. & mix until dough forms

3. Add rind & mix well. Add more water if dough is dry*

4. Divide filling into 8g balls. Keep airtight & refrigerate until ready to assemble

5. Sift together all dry ingredients for pastry

6. Rub in butter until it resembles fine breadcrumbs

7. Add yolk. Mix until dough forms. Wrap & refrigerate for 30min

8. Divide dough into 10g portions. Wrap the filling. Make a hole to vent* during baking

9. Freeze & preheat oven to 135C fan/150C

10. Once oven is preheated, place chilled tarts on lined baking tray. Apply egg wash. Add black sesame seeds if you wish

11. Bake for 30 min or until lightly browned, rotating the tray halfway. You may reapply the egg wash halfway through baking if you wish. Remember to adjust baking temperature and time according to your oven as each oven is different. 


*Baker's notes:

🔸Candied wintermelon, cooked glutinous rice flour and yuzu/Jeju citron marmalade are most likely things you can find in an Asian grocer if you don't live in Asia. These are common items in Singapore. If you can't get cooked glutinous rice flour, simply dry fry glutinous rice flour over low heat for 10 min until aromatic. There's a distinctive cooked glutinous rice flour smell you can't miss

🔸I was given some high grade matcha powder from @alovelikesobo but you may use whatever you have on hand. Do note that lower quality matcha may oxidize with exposure/heat and the green colour may be less vibrant after baking. Needless to say, higher quality powder would taste better

🔸The amount of water needed for the filling will vary depending on how dry your candied wintermelon is. Err on the side of adding less water first because it can get difficult to handle if too much water is added and it becomes a sticky mess. Add enough water such that it's still soft and tacky to touch but doesn't stick to your finger when lightly pressed as shown in the reel

🔸I went for a slightly firmer pastry than regular pineapple tart pastry but still crumbly as the filling is slightly chewy due to the glutinous rice flour. Personally I feel if the pastry is too delicate, it wouldn't fit this filling but feel free to adjust the ratios of the dry ingredients in the pastry. The higher the percentage of cornstarch, the more delicate the pastry

🔸Traditional wife biscuits are made with flaky pastry that doesn't use butter. I decided to have a light buttery pastry to accompany the aromatic and slightly chewy filling. Slits or holes are usually made in the flaky pastry before baking. They act as vents to release steam from the filling, which in turn prevents the pastry from cracking uncontrollably. Don't be alarmed if you see your tart pastry cracking in the oven as this is due to the expansion of filling/ release of steam. The appearance of the cracks will reduce upon cooling. Using lower heat with longer baking time helps to keep cracking minimal


with love,

Phay Shing

Read More »

Sunday, 1 December 2024

Meringue Powder-Based Macarons

 I made some Christmasy small macarons for our church's creche helpers this year! It may look like ordinary macarons but I am so excited to share it because these were made using meringue powder instead of fresh egg whites! 


Look at how full the insides are! 

The split open shell was piped 8 hours after I made the batter! What's more, with the use of meringue powder, having to deal with extra egg yolks will be a thing of the past for bakers who choose this method!

Here's a closer look at some of the macarons.


Why make the macarons small when I can make them bigger? Because I wanted them to fit into jars like these as gifts.


Pardon the poor photo quality because I was taking the photo late at night under low lighting. The macarons had to be 3.5cm in diameter in order to fit into the jars in this arrangement.

This meringue powder experiment and mass bake came about because of the superb performance of meringue powder for my character marshmallows. Although I am a convert to using meringue powder for marshmallows, I can't say I will do this for macarons. I will explain in this blog post. Although meringue powder as fresh or carton egg white substitution works, it's not without some differences/challenges. Just as sugar-free marshmallows are possible, it's impossible for macarons due to the presence of almond flour which contains oils, and the necessary condition that nice feet formation should be present on the cookie before it can be called a macaron.

I used this mass bake to conduct an experiment for small and large batch. Both pass with flying colours. The recipe I come up with has easy to remember ratios.  The ratio for rehydration of meringue powder I use is 1:3 for meringue powder : water. The ratios of all the ingredients are 1:1:1:1 for "egg whites" : caster sugar : icing sugar : almond flour. Feel free to tweak it a little in terms of proportion but not by too much.

Ingredients:
15g meringue powder (I use Wilton brand)
45g water (room temperature or lukewarm)
60g caster sugar
60g icing sugar
60g almond flour

1. Sift together almond flour* & powdered sugar. Set aside
2. Whisk together caster sugar & meringue powder. Add water & whisk until well combined 
3. Continue whisking over double boiler until sugar is dissolved (use fingers to test) & temperature is about 45C
4. Whip meringue until very stiff peak*
5. Fold sifted dry ingredients into meringue gently* as shown in reel until batter is able to flow off spatula slowly in a continuous ribbon
6. Pipe as per usual. Rest piped batter until very dry to touch*. Bake* in preheated oven that's about 10C lower than your usual & longer by about 5-10min.

Meringue powder based meringues for macaron making tend to be less robust than fresh egg white based meringues. Although it tends to deflate more easily due slightly under whipping, oils, certain food colouring & rough handling during folding, it's able to produce a stable batter that stays stable for many hours provided you take note of the baker's notes below.

*Baker's notes:
🔸Make sure your almond flour is not oily or your batter will not remain stable for long. I have YouTube videos for proper drying of almond flour & sifting dry ingredients so as not to cause more oil in your batter

🔸Whip your meringue to as stiff as you can. It should ball up in the whisk & offers a lot of resistance when you run the whisk through. Just like vegan meringues, meringue powder based meringues may tend towards being less robust in the presence of oils (from almond) although stabilizers like cream of tartar has already been added in the ingredients. 

🔸Drying time for meringue powder macarons is longer than you think. The skin/membrane of piped batter may feel dry to touch already but it's not ready to bake yet if it's still soft, much like vegan macarons, as the meringue produced is less robust than using fresh egg whites. Insufficient drying time may produce feet that are large & protruding/exploding outwards more than usual. Feet may also be lopsided.

🔸Fold the batter with gentleness & care. It takes less number of folds to go from under to overfolded due to the less robust nature of the meringue 

🔸Baking time & temperature needs to be slightly longer & lower respectively, much like vegan macarons due to the meringue properties. Baking temperature that is too high will also tend to result in protruding/exploding feet more than egg white-based macarons. Longer baking time is also needed due to the lower baking temperature. I reduce by about 10C from my usual baking temperature & bake longer by 5-10min. Note that temperature & time adjustments are just suggestions as each oven works differently. Use the guiding principle I shared to tweak accordingly

🔸The appearance of wrinkled & patchy tops on baked shells is evidence of meringue that's not stiff enough, use of certain colouring, or oily almond. The crust tends to be thinner & more fragile than fresh egg white based macarons but with proper technique, this can be minimized

Here's the video tutorial for using meringue powder to make macaron batter:


Here's the video for piping tutorial of the wreath, candy cane and snowflake designs using the wet-on-wet batter technique borrowed from royal icing cookie decoration. You may apply this same piping technique on macarons made using fresh egg whites as well. 


For the lacey, more complex snowflake design, please refer to this post for the piping tutorial:

I filled the macarons with passionfruit spice ganache, matcha ganache with dried cranberries and dark chocolate orange ganache.


with love, 

Phay Shing

Read More »

Sunday, 22 September 2024

Succulents & Cacti Marshmallows in Butter Cake Pot

 I made this for my dad's birthday this year!


Made another simpler cake for my uncle's birthday too!


Both my dad and uncle love a little bit of gardening so I thought this theme is just right for them. The old school butter cake recipe can be found in this blog post. I included some prebiotic soluble fibres to make it healthier.

The succulents and cacti are made out of zephyrs, an agar-based marshmallow. Instead of using fresh egg whites, I used meringue powder. Those of you who bought my Deco Marshmallows book may be pleased to know using meringue powder works just as well! Please refer to this reel for the substitution and some visuals:


The zephyrs are coloured with a combination of matcha powder and gel food colouring.

Here are some pictures to share...

Piped marshmallows 


Butter cake pot with chopped toasted almond slices as the "soil"


A slice of the cake!


Dad posing with a cactus!

This is the reel with snippets of piping the succulents:

https://www.instagram.com/reel/DAN_8s2y-Px/?igsh=MW5sbWg5YTZnanllMg==


Both Dad and Uncle loved the cakes!


with lots of love,

Phay Shing

Read More »

Tuesday, 26 March 2024

Tie-dye Langue De Chat

 I have shared heart shaped Langue de Chat sandwich cookies over here and here earlier this year. Here's another fancy but simple way of making these crisp buttery cookies --- tie-dye!


This is my contribution to this year's Culinary Arts Ministry event at Adam Road Presbyterian Church in April. 

I make use of matcha powder and cocoa powder to colour and flavour the cookies naturally. Feel free to use other colouring/flavours if you wish!

Ingredients (makes about 22-24 cookies):
50g unsalted butter, slightly softened
Pinch of salt
45g sifted icing sugar
25g egg whites, room temperature
1 tsp vanilla extract
¼ tsp soy lecithin (optional)
*Plain: 17g cake flour 
*Matcha: 16g cake flour + 3/8 tsp matcha powder
*Cocoa: 15g cake flour + ¾ tsp cocoa powder 

* Replace with 50g cake flour if you are just making a single colour of batter instead of 3.

Here is the video tutorial of the process:

Steps:

1. Line baking tray with template and parchment paper. 

Resize this template to fit A4 paper.

If you have Teflon sheet or silicone mat, use it as the spreading of the batter will be more even than parchment paper. Preheat oven to 150-160C.

2. Beat softened butter briefly with electric mixer/ hand whisk/ spatula.

3. Add sugar and salt. Beat until well combined.

4. Add egg whites in 2-3 additions. Beat until smooth. Add soy lecithin if you wish to help with emulsification.

5. Add vanilla and mix until well combined.

6. Divide into 3 equal portions, about 40g each.

7. Add sifted cake flour + flavouring to respective portions. Fold with spatula until combined.

8. Transfer into piping bag with #7 or #8 tip.

9. Position piping tip over middle of the circle, about 4-5mm away from surface of baking tray. Pipe until the batter reaches the circumference of the innermost circle. 

10. Switch to another colour of batter and place piping tip over middle of piped batter. Pipe until the first batter reaches circumference of middle circle.

11. Switch to final colour of batter and place piping tip over middle of piped batter. Pipe until the first batter reaches circumference of outermost circle or as large as you like. Repeat for all circles, switching the order of the colours as you wish. Try to stack the circles right in the middle for a neater floral/tie-dye pattern.

12. Use a skewer to pull the batter from the center of the circle to the circumference as shown in the middle cookie, fourth row from the top. Clean the skewer after each stroke.

13. Repeat step 12 but in the diagonal positions (forming an “x” instead of “+”)

14. Use skewer to pull the batter from the circumference to the center of the circle between the points in step 12 and 13 to form the flower pattern. Repeat for all piped batter.

15. Carefully remove the template. Bake for 10-11 min or until edges are browned. Reduce temperature to 110C and bake for another 5-6 min to thoroughly dry it out to be crispy.

Cool completely before storing in an airtight container. Feel free to bake the cookies again at 150C for a few minutes to re-crisp it if it has softened after storage.


Enjoy!


with love,

Phay Shing

Read More »

Thursday, 28 December 2023

Matcha Ice-Cream Cake with Dan Heng & March 7th Marshmallow Toppers

 My elder kid wanted matcha ice-cream cake for his birthday and requested for Honkai Star Rail theme with Dan Heng and March 7th as the characters of choice. It's a challenge because anime type characters have tonnes of details and I have not made ice-cream cakes before and wondered if photography would be a challenge in tropical Singapore. 

Fortunately, I managed to pull it off with this delicious number!


I used my default basic marshmallow recipe and shared the ingredient list along with the piping video in this reel:

https://www.instagram.com/reel/C1UItrxSC4x/?igsh=bHpndWh3ODZsdGg5

Here's a photo of all four of the marshmallows I piped. It took me many hours to complete this due to the sheer number of details! I made duplicates in case of accidental uglification or butter fingers.


Here are the completed marshmallows!


As it's my first attempt at ice-cream cakes, I needed a reference and found one I really liked. Although I used my own matcha honey chiffon sponge recipe which is really moist and soft, I followed the matcha ice-cream recipe and loved it! It is no-churn, creamy and not icy rock hard when frozen but doesn't melt into a puddle that quickly (so I had time to take photos and videos). Do choose ceremonial grade matcha powder for the best taste. I only had culinary grade on hand so it still tastes good but it would have been even better with a higher grade tea powder. I added vanilla bean paste to the whipped cream and used a combination of non-dairy and dairy whipping cream due to Singapore's perennially hot weather.

I used this blog post as my reference with some tweaks.

Matcha honey chiffon sponge
Egg yolk batter
3 egg yolks
40g oil
6g (1 tbs) matcha powder
34g warm water
10g honey
1 tsp vanilla extract
60g cake flour
pinch of salt

Meringue
3 egg whites
1/4 tsp cream of tartar
45g caster sugar

Steps:
1. Line 10 x 12" tray with Teflon sheet or parchment paper. Preheat oven to 170C.

2. Egg yolk batter. Dissolve matcha powder, salt and honey in warm water. Add vanilla. Set aside. In another bowl, whisk egg yolks until thick. Add oil and whisk smooth. Add matcha mix and whisk until combined. Gradually sift in flour and whisk until no trace of flour is seen.

3. Meringue. In s clean metal bowl, beat egg whites with cream of tartar until firm peaks form, adding in sugar once egg whites are foamy.

4. Fold meringue into yolk batter in 3 additions. Pour into prepared tray. Bake for 15 min or until done.

5. Immediately flip onto fresh sheet of parchment. Cool completely. Cut circles out with the cake rings you are using for assembling the cake(s). I used 8cm and 10cm diameter cake rings.

Matcha ice-cream 
2 egg yolks
20g caster sugar
1/16 tsp xanthan gum (optional)
50g white chocolate
120g whipping cream (I used 40g Whip topping and 80g heavy cream)
6g (1 tbs) matcha powder
2 tbs warm water

Steps:
1. Whisk matcha powder in warm water. Set aside.

2. Melt white chocolate and keep warm. Set aside.

3. Whip whipping cream to soft peaks.

4. Set a saucepan with 1" water to simmer. In a heatproof mixing bowl, whisk together sugar and xanthan gum (if using). Add egg yolks and whisk together. Continue whisking over the saucepan until sugar is completely dissolved. The bottom of bowl should not touch the water. Temperature of egg yolks reached about 60C for me.

5. Add matcha paste and melted chocolate. Whisk until combined.

6. Gradually add mixture to whipped cream and fold gently after each addition. 

7. Transfer into piping bag and pipe onto sponge when ready to assemble.


Vanilla bean whipped cream
45g heavy cream*
40g whip topping*
1 tsp vanilla bean paste

* Use whipping cream of choice. Do not overwhip if using only dairy cream and add sugar according to taste.

Steps:
1. Begin whipping only when matcha ice-cream layer is frozen. Put all ingredients in a bowl and whip till firm peaks (not too stiff, peak with a curl).

2. Transfer into piping bag when ready to assemble.

Assembly
1. Line cake rings with acetate sheet cut to the height of cake that you want. Place the cake rings on lined tray.

2. Place a layer of sponge in the ring.

3. Pipe matcha ice-cream until the top of the ice-cream layer is about 2cm from the top rim of the acetate sheet.

4. Place another layer of sponge on top and gently press it in. Freeze for 1h.

5. Prepare vanilla whipped cream and pipe on top of the sponge. Slightly over-fill such that cream is a little higher than the rim.

6. Level the whipped cream with a spatula. Freeze for at least 1h or overnight before unmolding.

7. After unmolding, sift a little matcha powder and add matcha white chocolate decorations if you wish.


Here's the reel for making and assembling the ice-cream cake:


with lots of love,
Phay Shing

Read More »

Monday, 26 June 2023

Shirokuma and Furoshiki Vegan Macarons

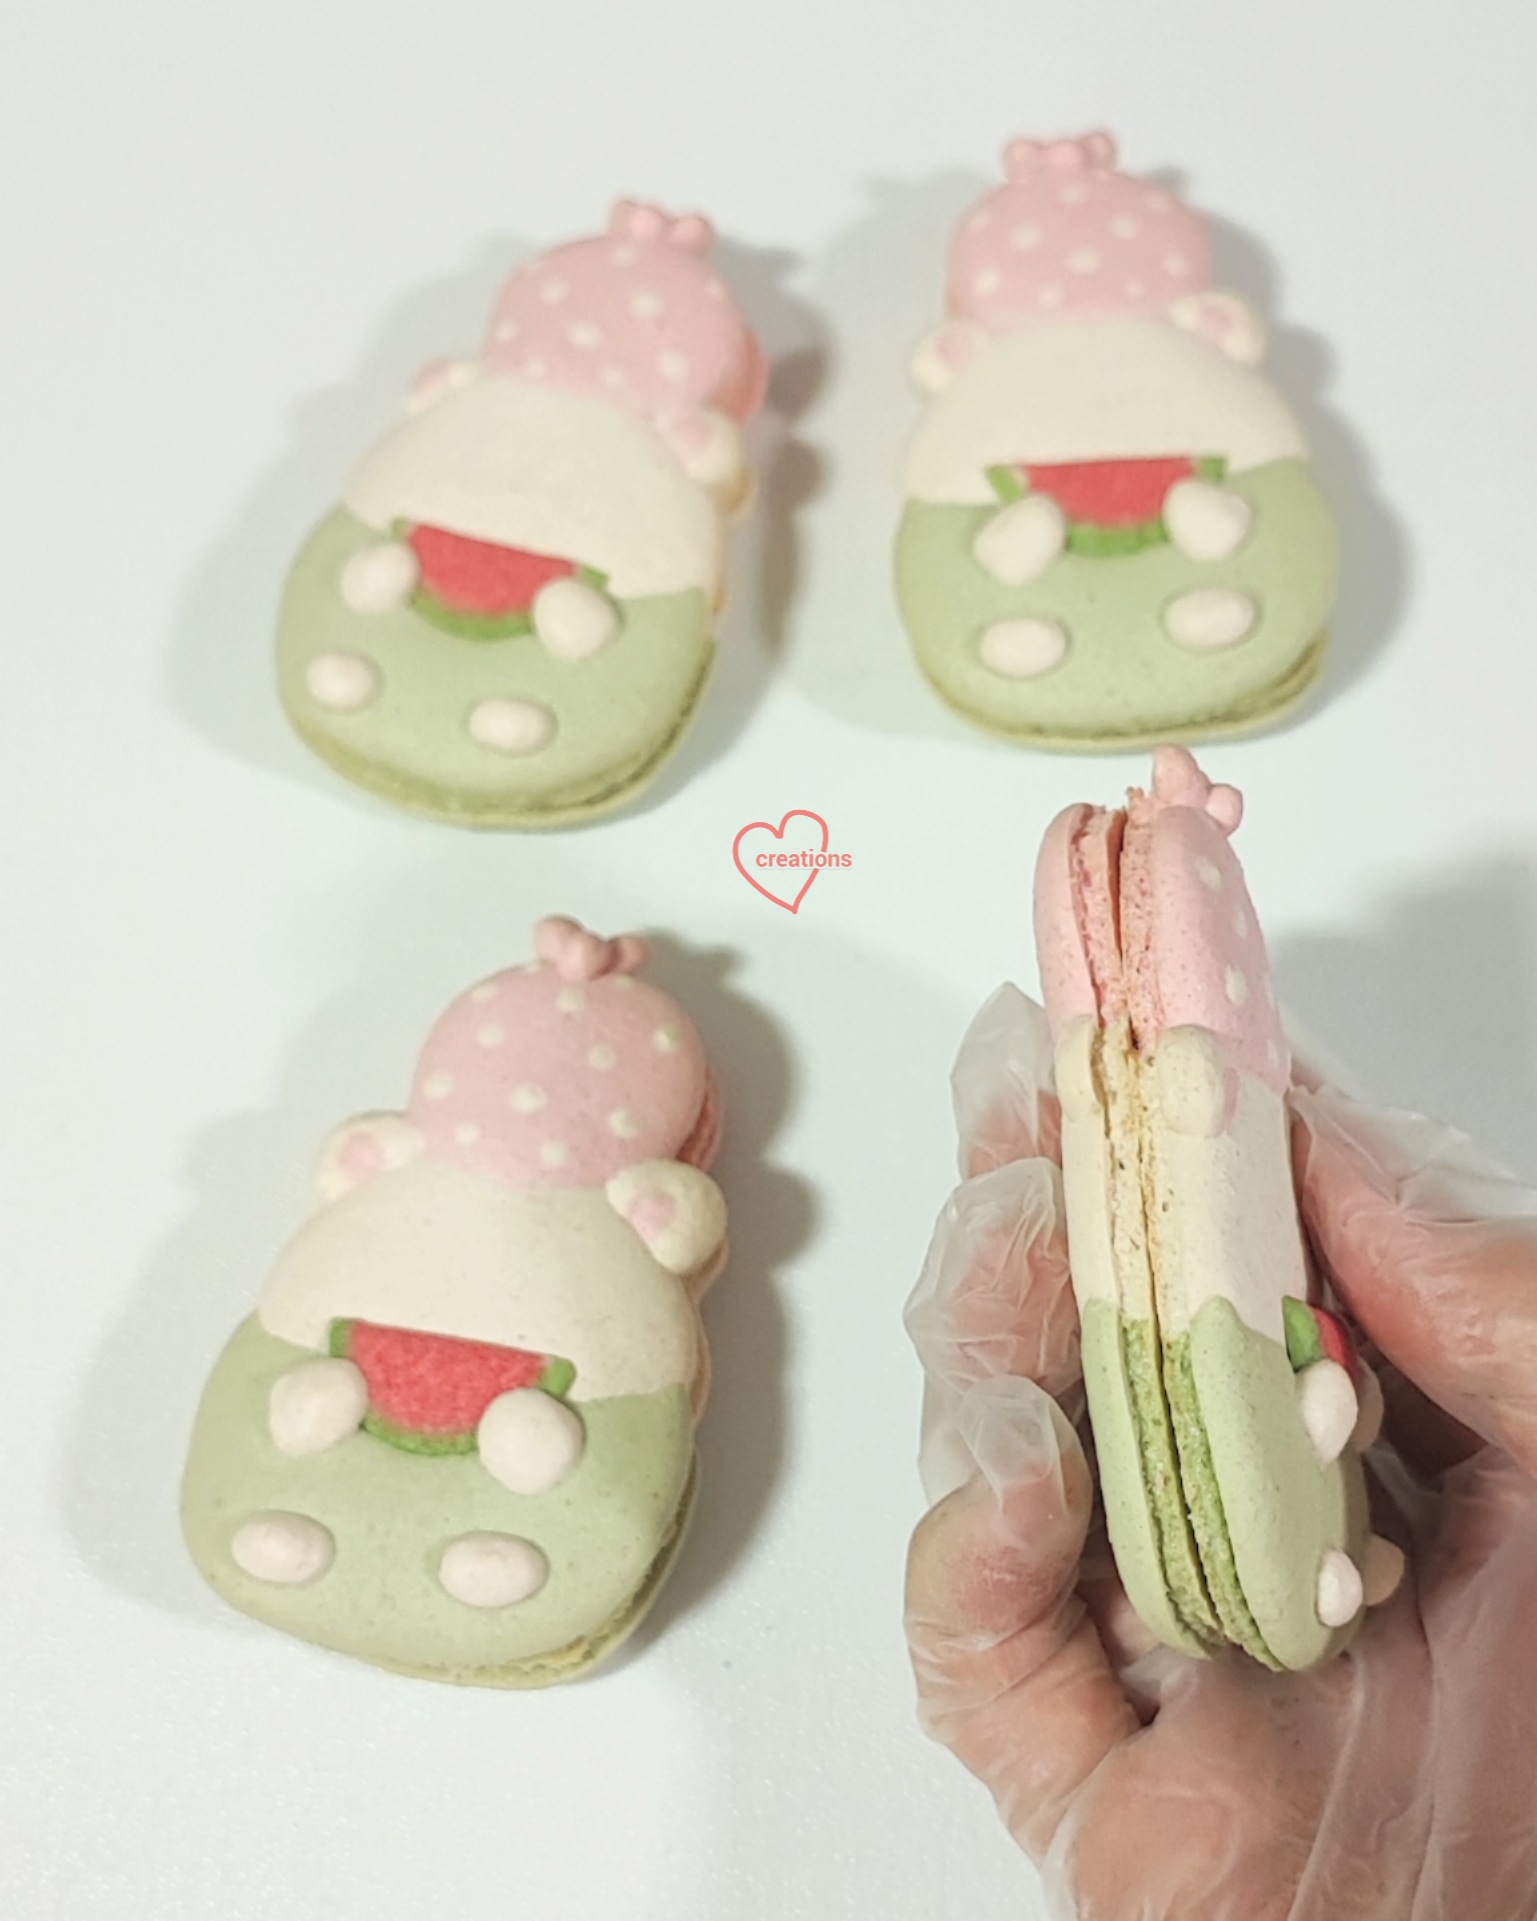
 I had requests for vegan macaron classes so I have been doing rigorous testing for vegan macaron recipes. After trying French and Swiss meringue methods, I decided to try Italian meringue because Italian meringues have the added advantage of the stabilizing effect of sugar in the form of sugar syrup. After some attempts, I am satisfied with this Italian meringue method recipe especially since it is stable enough for a creation like this!


It's summer in the Northern hemisphere now and this year has been especially hot with the El Nino effect going on. Watermelons are definitely welcomed! Shirokuma thinks so too! 

You may ask why did I choose this theme and subject? It's because of the testing I have been doing for class material. I have decided on making simple character Hanami dango macarons with the colours pink, white and green so naturally this image of Shirokuma and Furoshiki came to mind! Note that this design is not for class material. I will be sharing the simple character vegan macaron class material soon so you can sign up for it with Tottstore.

Piped batter. I am sure you can't tell the difference between vegan and egg white based!

Freshly baked shells!

I used royal icing transfers (vegan of course) for the watermelon slices. They can be baked together with piped macaron batter, just like regular macarons.

These macarons are filled with the filling I will be sharing in my class too, which is matcha, vanilla and strawberry vegan white chocolate ganache.

See my reel for the piping process and the filling!


Stay hydrated and cool during this hot spell!


with love,

Phay Shing

Read More »

Wednesday, 3 May 2023

Grogu Matcha Marshmallow

This was an unplanned creation as I am really swamped with making each entry in Deco Marshmallows. I was making a matcha marshmallow character for the book when I realised that May the 4th is around the corner and I can take a little time out to create Grogu, baby Yoda!

Pardon the off-colour as my phone camera doesn't pick up the true colours sometimes 


This is the correct color


A works-in-progress shot!


As I wanted to keep things as simple as possible, I used a store bought product for Grogu's body. I bought Twiggies, a cream filled sponge by Gardenia.

Watch the reel on how I made this! Recipe for matcha marshmallows will be in Deco Marshmallows.


with love,
Phay Shing


Read More »

Monday, 27 March 2023

Sanrio Hanami Dango Vegan Macarons

I am finally done with the first draft of Deco Marshmallows! While waiting for the editor to get back to me with it, I have decided to work one something I have been procrastinating for years---vegan macarons! 

As Sakura season is here, I am inspired by the Hanami dango, which is a traditional Japanese confectionery that announces the arrival of spring. Of course I couldn't resist the chance to make it kawaii with Hello Kitty, My Melody and Keroppi! 

Matcha, strawberry and vanilla white chocolate ganache as filling to match the traditional colours 

Besides vegan macarons with vegan fillings, I took the chance to try out vegan royal icing for some of the fine details.

All credit goes to Meiyee (Instagram account: nm_meiyee) for sharing her vegan recipes. Her work is beautiful, naturally coloured and flavoured! I adapted from her recipes that are shared so I didn't follow exactly what she did but do check out her account for the recipes and to marvel at her work! 

I used bakeable matcha powder with no additional artificial green colouring for the matcha shells and ganache. I added freeze-dried strawberry powder and a tiny bit of bottled strawberry emulsion for strawberry. I used matcha Pocky sticks for the "skewer" (I know it's not vegan but I prefer having everything edible but I didn't want to make the biscuit sticks from scratch too 🙈)

Here are some photos of the process:

Freshly baked shells. I was working on a separate set for future vegan macaron class material at the same time.

I actually rushed through the decoration and didn't manage to finish as I had to go out of the house. This is the works-in-progress decoration with vegan royal icing. Could have been better if I didn't rush

Strawberry, matcha and vanilla vegan white chocolate ganache before whipping it up to lighten the texture.

Filling up the macarons and inserting a matcha Pocky stick


Experienced macaron bakers will be able to tell that I had issues with one of the colours of batter and they would be right! I knew what went wrong and but am confident I can rectify it for the class. After all, this is my first attempt and it was rather ambitious of me to try three colours/flavours of macaron shells in a single batch. The flavour that I left to the last to work on had issues because the meringue needed to be whipped stiffer again and I should have trusted my instincts to do so. Can you tell which one it is? 

I am excited to be able to include vegan macarons as part of my class content after this experiment. Stay tuned for class announcements July onwards for vegan macarons! But note that I won't be teaching the Sanrio characters. 


Check out my Instagram reel for some video snippets of the aquafaba meringue and macaron batter!


with love,
Phay Shing


Read More »