Showing posts with label Brawl Stars. Show all posts

Sunday, 30 June 2024

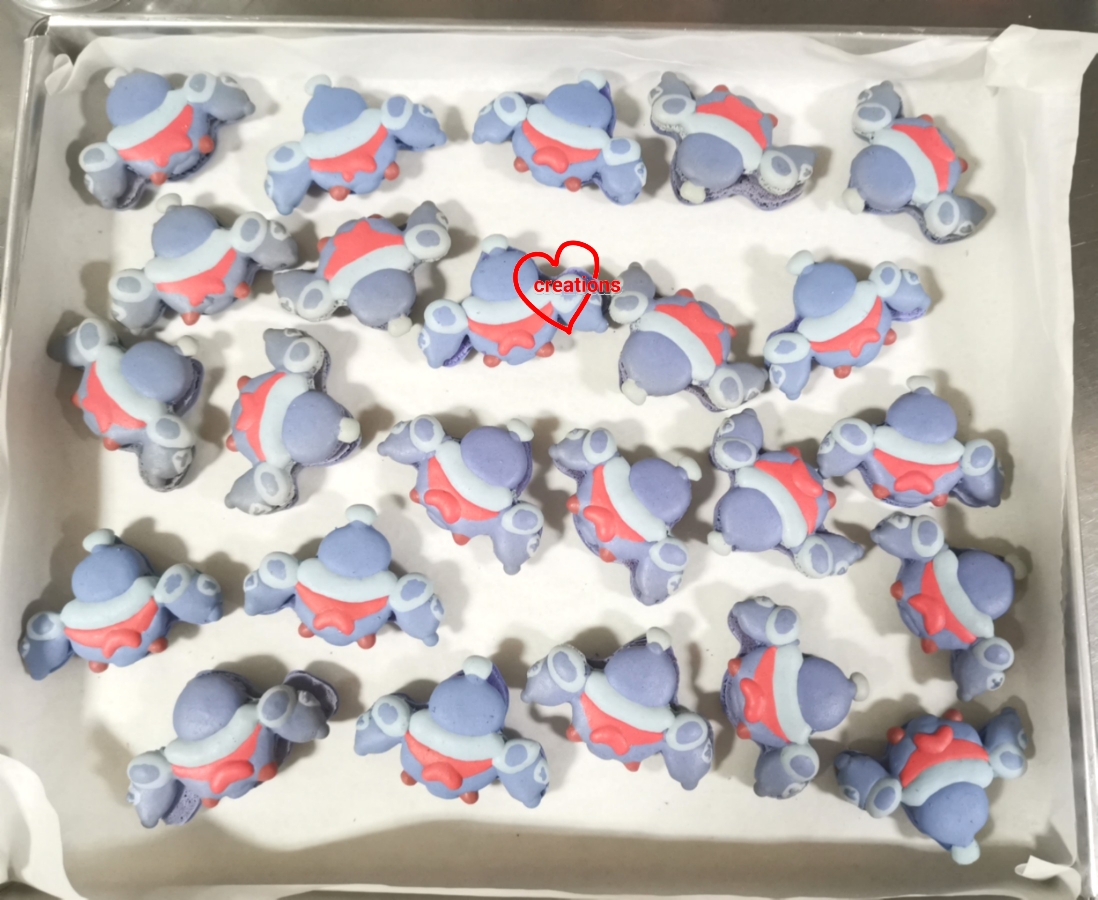
Brawl Stars Macarons: Stu and Buzz

 I am not a fan of making really intricate and detailed character macarons. But the end result is rather satisfying! These Stu and Buzz macarons fall under this category!


As I age, my eyesight isn't too good so characters with many small details need to be made bigger in order for me to manage😆. I can't make too many as well so I only managed 8 Stu and 6 Buzz in a single batch from my default Swiss meringue method recipe upsized to 200g almond flour.

Piped batter for Stu

Piped batter for Buzz


I decorated with edible paint, royal icing and edible marker with some vodka wash.

Works-in-progress for decoration!

Checkout the awesome feet on the macaron shells!


I filled these with dark chocolate ganache with some gelatin added to provide better stability in hot Singapore. Since these were made for kids, I chose dark chocolate with only 55% cocoa. It's firm at aircon temperature (about 22-24C) and won't melt at 30C non air-conditioned room temperature although it will soften. Please don't leave it out in the sun😆.


Dark chocolate ganache for warm weather
Ingredients:
200g dark chocolate couverture (55%)
100g heavy cream
10g invert sugar (I used light corn syrup)
20g softened unsalted butter
1/8 tsp salt
1 tsp vanilla extract
3g gelatin bloomed in 12g ice water*

* Use bovine or porcine gelatin. Don't use fish gelatin as it has a low melting temperature of about 24-27C.

Steps:
1. Melt chocolate over double-boiler or in microwave oven 

2. Heat cream, invert sugar and salt until warm (46C). 

3. Melt bloomed gelatin and add to 2 along with vanilla. 

4. Pour 3 over melted chocolate. Stir in one direction with spatula until well mixed. Use an immersion blender if you wish. 

5. Add butter and mix well with spatula or blender.

6. Press cling wrap onto surface of ganache and let it firm up in air-conditioned room temperature (21-24C) for 30min-1h. 

7. Transfer into piping bag and fill the macarons. Let the shells mature for at least 24h with the filling in the fridge before consuming.

You may watch the reel for the process of making these over here:

https://www.instagram.com/reel/C8yABwiyb6h/?igsh=M2xrbHZ5anZzeW16


with love,

Phay Shing


Read More »

Thursday, 26 December 2019

'Leon in a Chocolate Bomb' Earl Grey Macarons

When I asked my elder kid what he wants for his birthday bake, he told me he wanted his favourite Brawl Stars character, Leon, in a pinata of sorts that can be cracked open like a pinata. He also wanted Leon to be made using macaron as the medium with Earl Grey filling. And what does Mama the baker come up with? I decided to make all the components edible as far as possible. And so I decided to hide Leon in chocolate bombs which are to be cracked open by a brown sugar cookie hammer!


I used French method to make the macarons since it is such a small quantity. You may refer to this post for the recipe. Just to share some photos of the process...

Piping Leon

Freshly baked shells

I decorated the shells with edible black marker, royal icing, and white coloured rice sprinkle for the lollipop stick

I filled the shells with Earl grey ganache. You may refer to this post for the recipe


I made the cookie hammer by using my fingers to mould a log shaped cookie dough and stuck the end of a wooden chopstick knto the dough. I wanted the cookie to be really hard so that the chocolate shell shatters instead of the cookie. To do that, I baked the cookie at a lower temperature of 145°C for 45 min but checking the progress of baking every 10 min. The brown sugar cookie recipe can be found here.

What was new in this bake and unfamiliar to me is making the chocolate bomb out of tempered chocolate. To be honest I was really nervous and out of my comfort zone but excited to try it out as well. Why nervous? Because the average ambient temperature that I work in is 28-32°C all year round. And humidity is high as well. Terrible conditions to work with chocolate but I don't have a choice. I chose dark chocolate as it is less tricky to work with than milk or white chocolate. (Although I did make the fuse of the bomb out of white chocolate). I studied two chocolate books that I bought recently on tempering chocolate and watched a few youtube videos on how to create chocolate spheres. So I am sharing my first experience properly working with chocoate in hot and humid home kitchen here.

I find that the most convenient method for me to temper dark chocolate was to use the double boiler and ice bath method. The seeding method didn't work so well since the kitchen was so warm. You need a candy thermometer as the temperature has to be very precise. I melted 270g of dark chocolate couverture over barely simmering water without the water touching base of bowl until temperature reaches 50°C. I quickly sit the bowl into another bowl with ice water and stir the chocolate with spatula while monitoring the temperature. I removed the mixing bowl out of the ice bath from time to time as the chocolate in contact with the bowl may solidify. Bring the temperature down to 28°C and put it back in double boiler. Stir and heat the melted chocolate until temperature is 31-32°C. I added a little oil based black food colouring to deepen the shade of the chocolate a little.

To create the chocolate sphere, I used a brush meant for food use to coat the insides of silicone hemisphere mould with a layer of tempered chocolate. I put it in the freezer for 3 min before adding another coat of chocolate. I repeated this so there are 3 layers. Freeze for 10 min for the last coat. Use a metal spatula or bench scraper to scrape off any bits of chocolate sticking out from the surface of the mould. This is harder to do cleanly if you are using a relatively soft silicone mould like me. But if you are using a rigid plastic mould for chocolate, this shouldn't be an issue. If the chocolate is properly tempered, it should come out of the mould easily and have a shiny appearance.

My first attempt! Happy with it! 

Do wear latex gloves when handling the unmoulded chocolate or you will risk melting it or leave smudges on the surface. Handling unmoulded chocolate was really a challenge for me since it is so warm here 😂. For the little knob on top of the sphere, I piped the tempered chocolate into a jumbo straw and let it set for 10 min in the fridge. I used a chopstick to push the hardened chocolate out of the straw. I heated a small knife over a flame and cut the unmoulded log of chocolate into short sections, cleaning the knife after each cut. I used the heat of my fingers to shape compound white chocolate chip into ropes.

Rule of thumb of gluing chocolate parts together is to place the joining surfaces on a warmed non stick frying pan to melt the chocolate surface a little, then quickly stick the melted surfaces together. Just place the pan on heat for a few seconds and turn off the heat. In instances where placing the chocolate on pan is not possible, I heat the end of a metal chopstick over a flame for a couple of seconds and use it to melt the chocolate surface.

Partially assembled bombs! I used stiff royal icing to stick the macarons down. 

After assembling the bombs, I glued some roasted ground peanuts onto the cakeboard for a "sandy" dessert scene.

Unfortunately Singapore is so warm you have to store this creation in the fridge or in ideal situation, a really cold aircon room at 16-18°C. Fridge storage does mar the appearance of the chocolate bomb but since this is for my kid, who cares 🤣! It's a fun creation nonetheless!

Finally the deed is done! 

I think I should have just done 2 layers of chocolate coating lol! Nonetheless it was still fun to crack the bomb open!


With lots of love,
Phay Shing


Read More »

Thursday, 7 November 2019

Brawl Stars Cookies N Cream Macarons

This is an unprecedented project due to the amount of details and quantity involved. Because it is for my younger kid and my friend's nephew's birthdays. I baked and decorated more than 70 of these!

Nita, Spike and Tick cookies n cream macarons! 

Now that I am teaching at two studios, I have to plan my time more carefully. Due to the scale of this project, I baked two characters in advance and froze the undecorated shells, planning to defrost them only when I was ready decorate nearer the date.

I used the Swiss meringue method for these and baked one character at a time, spreading the baking over 3 separate days.

Just to share some photos of the process...

Piping Nita

Piping Spike

Piping Tick

I layered the baked shells between pieces of parchment paper in an airtight container and froze it. To defrost, leave the container at room temperature overnight without opening. 

Freshly baked Tick! I didn't freeze these as I baked them closer to the date. 

Decorating the shells with edible marker, homemade paint* and royal icing is not a job for the faint hearted. It took me one and a half days of intensive work to finish all 70 plus pieces. This was just day 1 of work. 

*I made edible paint in dark green colour for Spike by dissolving some gel food colouring in vodka.

All that hard work was worth it when you see the fruits of your labour 😊.

This is only about a third of the decorated macaron shells! 

I made a Swiss meringue buttercream based cookies n cream filling.

Recipe for cookies n cream filling (fills about 30-35 macarons) 
Ingredients:
50g egg whites
1/8tsp salt
35g caster sugar
80g unsalted butter, cut to small pieces and slightly softened
1 tsp vanilla extract/ bean paste
70g oreo cookies without cream, crushed

Steps:
1. Place egg whites, salt and sugar in mixing bowl set over a pot of simmering water without the water touching base of the bowl. Whisk continuously while monitoring the temperature with a candy thermometer.

2. When temperature reaches about 70°C, remove the mixing bowl from heat and beat the egg whites with electric mixer at medium high speed until stiff peaks form and meringue is cooled to room temperature.

3. Add butter about a tablespoon at a time and beat with mixer until incorporated before adding more. Don't worry if mixture appears to curdle. It will come together in the end. Continue to beat at high speed after all butter is added for 2 min.

4. Add vanilla and beat until incorporated.

5. Fold in crushed oreo cookies. Transfer filling into piping bag to fill the macaron shells. Store filled macarons in airtight container in fridge for at least 24h before serving. Always leave the airtight container at room temperature for 15-20min before opening and serving the macarons because condensation will appear immediately on the shells if you expose them to the air when they are cold.


Thank God that it was really well received!

A peek at the insides of a macaron for my younger kid, which I filled with pistachio white chocolate ganache and salted caramel instead.

Nice and full shells! 


With love,
Phay Shing
Read More »