Showing posts with label Minions. Show all posts

Sunday, 9 April 2023

Lemon Minions Bunny Egg Cakes


Sharing some cute Lemon Minion Bunny Egg Cakes with recipe =) ❤️ 

Ingredients (5 egg shells) 
1 egg yolk 
13g vegetable oil 
7g lemon juice 
7g milk 
1/4 tsp vanilla extract 
20g cake or all-purpose flour  
¼ tsp lemon zest 
Yellow and blue food coloring 

1 egg white 
25g castor sugar 
Few drops lemon juice 

Whisk egg yolk with oil, lemon juice, milk, vanilla, zest. Add sifted flour and whisk till well combined. Divide the batter 2 (yellow): 1 (blue). Whisk egg whites with sugar and lemon juice in a new bowl till firm peaks. Fold in the meringue into respective colored batter. 

Pipe yellow batter till 1/2 full, followed by a layer of blue batter in each egg shell. Bake at 140C for 30 mins. Crack open the egg shells when the cakes are cool. Decorate with melted chocolate. 

Hope they made you smile!!❤️❤️🥰 

Video baking/assembly reel here on my IG: @susanne.decochiffon 

With love,
Susanne

Read More »

Wednesday, 10 August 2022

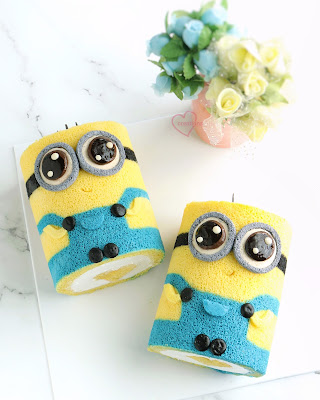
Minions Roll Cake


Do these cute roll cakes make you smile? I made these Minions Roll Cakes for my daughter's birthday as desserts.

Thank God they were well-received! 

Here is a video reel on the making of these roll cakes with surprise. Hope you like them! 

With lots of love,
 Susanne                                                                                                                                                                       

Read More »

Monday, 1 August 2022

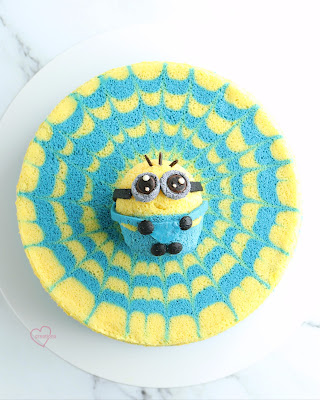
Minions Dizzy Chiffon Cake


My daughter's birthday is here and she's a Minions fan after watching Minions: The Rise of Gru, so I designed some Minions cakes for her celebration. I watched the show myself and thought it was really funny and cute! 

Here is a video reel where I shared how to pipe and make the spiderweb design for the dizzy chiffon cake. It's actually inspired by the movie poster with the dizzy background! I used a turntable for this so it was really quite easy to make the design though it looks complicated. I was really thankful to collaborate with Tastemade to post this as well! 

Video reel here

I also put banana surprise fillings into the mini Minions as well! 

Watch another video reel here on the insides! 

Hope you are keeping well! I've been very busy with the kids, so posting less. Do take care too! 

With lots of love, 

Susanne 


Read More »

Saturday, 16 July 2022

Minions Chiffon Cake (with Zodiac Stone Surprise!)


Guess the surprise inside this Otto Minions Cake! 😍 I watched Minions: The Rise of Gru and found Otto the Minion so cute!🥰 

Obvious hint: It's related to Otto!😆❤️ 

Watch the video reel here or here for the answer! =p 

With lots of love, 

Susanne 


Read More »

Monday, 18 September 2017

Minion Coconut Macaron Cake Toppers

I made these Minion macaron cake toppers for Susanne's elder daughter's birthday a while back :).


This was a bake done concurrently with the Gudetama coconut macarons using a reduced-sugar Swiss method recipe so you may refer to that post for details of the recipe.

Just to share some photos of the process...

Piping the shells!

A darker blue was used for the overalls so that I can paint over lighter blue on the baked shells to create a denim-like texture. The paint was made by dissolving blue and white gel food colouring in some vodka. I painted some streaks or highlights on the overalls to create the denim texture. The other details were added on using royal icing or edible marker.

Filling the shells with coconut white chocolate ganache.

It brought a smile to my face to know that the little girl loved the macarons very much :)

With lots of love,
Auntie Phay Shing

Read More »

Sunday, 23 July 2017

3D Minions Chef Chiffon Cake


Haven't made Minions for a long time. This Minions Chef is made entirely from chiffon for a dear friend's son! The yellow is from vanilla lemon chiffon cake, while the plain and black are from vanilla and charcoal chiffon cakes respectively. I really liked the theme of "chef" because it reflects my own love for making cakes! You can see my previous post on 3D Minions cake for more details. I used a similar recipe, except that I substituted the blue with plain batter and charcoal batter, and added lemon zest for the yellow batter. Thankful the chiffon cake was well-received by the little kids!

With lots of love,
Susanne


*Creative baking cookbooks now available at Naiise in Singapore and Malaysia! 

Read More »

Monday, 30 May 2016

Strawberries n Cream Vanilla Chiffon Cake with Dark Chocolate Minion Macarons

My friend requested for a Minion strawberries and cream cake for her son's birthday. Here it is!

You can almost hear them shouting "Happy Birthday!"

The Minion cake toppers are macarons filled with dark chocolate ganache. You may refer to this post for the macarons. I gently inserted a toothpick into the filling of each macaron so that the macaron figures are able to stand on the cake.

As my friend prefers a less sweet cake, I have taken care to use less sugar in the cake for a light tasting version. If you have a sweet tooth, do increase the amount of sugar used.

I created a rectangular cake without the help of cake rings. I will show you how it is done in this post. The cake is mounted on a 6x9" cake board.

Vanilla chiffon sponge recipe
Ingredients:
Plain thick layer cake (10 x12" tray)
3 egg yolks
10g caster sugar
42g vegetable/canola oil
42g fresh milk
56g cake flour
1/16tsp salt
1 tsp vanilla extract

4 egg whites
1/4 tsp cream of tartar
40g caster sugar

Green thin layer cake (10x12" tray)
2 egg yolks
5g caster sugar
28g oil
28g milk
38g cake flour
A pinch of salt
1/2 tsp vanilla extract
Green and yellow gel food colouring

3 egg whites
1/5 tsp cream of tartar
30g caster sugar

Steps:
1. Line baking trays with baking paper. Set oven rack to second lowest position. Place a tray of water at the bottom of the oven (optional). This is to create steam. Preheat oven to 160°C.

2. Prepare egg yolk batter. Whisk together egg yolks and sugar until pale and thick. Add oil and whisk until combined. Add milk and vanilla extract. Whisk until combined. Gradually add in sifted flour and salt. Whisk until no trace of flour is seen. Add colouring and mix well.

3. Prepare meringue. With an electric mixer, beat egg whites with cream of tartar until firm peaks or just reaching stiff peaks, gradually adding sugar once the egg whites are foamy.

4. Quickly but gently fold the meringue into egg yolk batter in three additions. Pour into prepared trays. Tap the trays on table to release trapped air.

5. Bake for 13-18 minutes depending on thickness of layer. Use a toothpick to check for doneness.

6. Flip the cake onto another baking sheet and gently peel the baking sheet off from the cake. Cool with baking sheet over cake.


Vanilla cream
Ingredients:
250g dairy cream, chilled (I used Millac Gold with stabilizers added)
2tbs icing sugar
1/2 tsp vanilla extract

Steps:
1. Chill the mixing bowl or prepare an ice bath that can fit the mixing bowl.

2. Beat the cream with icing sugar until  firm peaks form.

3. Add vanilla and beat until stiff peaks form. If using pure dairy cream, be careful not to over whip or the cream will separate.


Assembly
1. Place cakeboard on a tray lined with baking sheet for easy removal and transport of the cake in between steps. Cut the base vanilla cake according to size of cakeboard with a long serrated knife. Do the same for top vanilla cake and thin green layer cake.


2. Apply a thin layer of cream with spatula. Place strawberries on. Cut the strawberries to roughly the same height to ensure the top layers of cake are level.


3. Pile up more cream to cover the strawberries.


4. Place plain vanilla sponge on top to sandwich the strawberries and cream. Apply a very thin layer of cream and place the green layer cake on top. Both pieces of cake are cut to roughly the size of the cakeboard.

5. Press the cake down firmly but gently to squeeze the cream into the crevices between the strawberries.


6. Freeze for 1h with cling wrap covering the whole assembly. Use a long serrated knife to cut the edges to reveal strawberries. Wipe knife cleanly after each cut.

Ta-dah! No need for cake rings, turntables or tricky frosting top and sides of cake with cream


Decoration is simple but cute enough. Simply use a daisy flower cookie cutter to cut out some green cake and half it with a knife to create some tufts of grass. Stick them on with a bit of cream. You may wish to brush a little syrup (dissolve 10g sugar in 20ml water) on the "grass" to keep it moist. As quite a few words are required for the birthday message, I decided to print out a banner instead of thinking about how to write it with food. The way the minions are posing is screaming for a banner to be over their heads!

Pack the macarons in a separate box and assemble them on the cake just before serving. Store both cake and macarons in the fridge. Best served the day after assembly!

Thank God everyone loved the cake and macarons!

With love,
Phay Shing

Read More »

Thursday, 19 May 2016

Minions and Monster Mike Macarons with Dark Chocolate Ganache

Here are some Minions and Mike macarons to brighten up your day :)


These macarons are actually for two different requests that came about the same time. The full-bodied minions are cake toppers for a strawberries and cream cake for my friend's son. The head-only version of the minions and Mike are for my cousin's fiance.

I used the basic recipe without sugar reduction for these macarons as I was making other complex shaped macarons at the same time. Please refer to this post for video tutorials of macaron basics, this post for video tutorials of piping complex shapes and my Creative Baking: Macarons book for more details and pointers. I will just briefly describe the process here.

Macaron shell recipe
Ingredients:
Mass
200g superfine almond powder
200g icing sugar
80g egg whites
1/8 tsp salt (optional)
Yellow, green, blue and black gel food colouring
Any other natural or powdered food colouring

Italian meringue
200g caster sugar
75ml water
80g egg whites
1/8 tsp cream of tartar (optional)

Steps:
1. Prepare baking tray with template and baking sheet.

2. Prepare mass. Combine sifted almond and icing sugar in a large bowl. Add egg whites and mix well to form a paste. Divide mass into portions for different colours. Add respective colouring. Divide the mass according to estimated surface area that each colour covers.

3. Prepare Italian meringue. Heat sugar and water in a small saucepan until 115°C. In the mean time, beat egg whites in clean metal bowl with electric mixer at medium low speed until soft peaks. Reduce mixer speed if necessary. Once syrup is ready, increase mixer speed to medium high and carefully pour syrup into egg whites in a thin stream. Continue beating on high for 10 minutes or until meringue is stiff, glossy and cool.

4. Divide meringue into portions for the different coloured batters according to formula weight of meringue = 0.55 x weight of mass. Fold meringue into mass in two additions until batter flows off the spatula in a slow-moving lava-like manner.

5. Transfer into piping bags fitted with round piping tips of aporopriate sizes and pipe. Remember to bang the tray on the table after each stage of piping. Use a toothpick to pull the batter where necessary or to pop stubborn air bubbles.

Piping minion heads and Mike

Piping full-bodied minions in stages.

6. Dry the shells under the fan and/or in an air-conditioned room for 1-2 hours or until the shells are dry to touch. Preheat oven to 140°C towards end of drying time. Set rack to lowest position.

7. Bake for 10 minutes. Rotate tray and bake at 130°C for another 7-8 minutes before checking the feet of the shells to test for doneness. If the feet appear wet, place the macarons back in the oven and bake for another 5 minutes at 120°C. Cool completely before removing shells from baking paper. Be extremely careful with the full-bodied minions as the arms are fragile and prone to breaking. I broke one arm off a minion while removing it from the baking sheet.

Freshly baked shells!

Add on the details with royal icing and edible marker for the mouth.


I filled the macarons with dark chocolate ganache. Refrigerate in airtight container for at least 24h before serving.


Here's a closer look at the awesome feet!


With love,
Phay Shing


Read More »

Thursday, 17 September 2015

3D Minions Chiffon Cake


This is a fluffy and naturally colored (yellow) 3D Minions Chiffon Cake for a friend’s son!

I finally figured out how to make a tall 3D Minions with correct shape from chiffon cake (from my previous Minions creations a while ago)! It is thanks to an impulse buy for a pink Unopan chiffon tin at Phoon Huat lol.

The pink Unopan 6-inch chiffon tin is extra tall and more cylindrical in shape than most chiffon tins, and has the same dimensions as the wilton ball cake pan. So I paired the 2 together to form the soft fluffy minions! I baked a 2-tone yellow-blue chiffon cake like my previous minions using natural Queen’s yellow colouring and put the extra yellow batter in the wilton ball cake pan. The 6-inch chiffon cake is actually so soft, it cannot support the head chiffon cake without getting squashed. So I had to add an extra dowel support to support the head cake. 

Recipe for Vanilla Chiffon (for one two-tone 6-inch Unopan tube pan and one Wilton ball cake pan)
*you can also use this recipe for a 8-inch to 9-inch normal tube pan for a normal chiffon cake and you will not need to divide the batter into two colours

5 egg yolks
33g castor sugar
65g vegetable/corn oil
76g water
1.5 tsp vanilla extract
100g prima cake flour, sifted
natural yellow food coloring (Queen's)
blue food coloring (Wilton gel)

7 egg whites
75g castor sugar
1/4 tsp cream of tartar

1. Preheat oven to 160°C.
2. Beat egg yolks with sugar with whisk till pale yellow before stirring in oil, water and vanilla exract.
3. Add in sifted cake flour and whisk till no trace of flour found.
4. Divide the batter 2/3 and 1/3 (by weight). Add 10 drops of natural yellow food coloring into 2/3 of the batter. Add dip of blue gel food coloring into the 1/3 portion. Mix well.


5. Meringue: Beat the egg whites with ¼ tsp cream of tartar till firm peaks form, mixing in caster sugar in 2 additions.
6. Divide the meringue 2/3 and 1/3 (by weight or drawing a pie chart). Gently fold the respective meringue into the egg yolk batters 1/3 at a time.
7. Fill the chiffon pan with the yellow batter till 1/2 full then fill with the blue batter. Pour the rest of the yellow batter into the ball cake pan.
8. Bake the chiffon cake at 15 min at 160°C and then 25-30 min at 140°C. Bake the ball cake pan at 15 min at 160°C and then 15-20 min at 140°C, or until skewer comes out clean.
9. Invert the chiffon cakes once removed from oven.
10. Unmould by hand after the cakes are completely cool (see 'Hand Unmoulding Video').

The shoes, gloves and eye bands were from charcoal chiffon cake (grey and black). The hair this time round is made from toothpick dipped in cocoa powder. 

My friend shared her son and the kids loved the cake! Happy belated birthday Joel!

With lots of love,
Susanne

Read More »

Thursday, 18 September 2014

Two Minions Orange Chiffon Cakes


This was made for my good friend's son and his best friend after the super cute Minions from the hit movie! They look so happy together, just like the two adorable boys! 

The two chiffon cakes are orange flavored and the blue layer is baked into the cake just like in the pastel rainbow cake. The black goggles band is made of charcoal chiffon cake wrapped swissroll-style around the cake. I baked a vanilla chiffon cake and portioned the batter into plain (for eyes), grey (less charcoal, for goggles), and black (more charcoal, for band) and cut them out using round cutters. I piped in the eyes but they didn't come out nicely so I ended up drawing them on with charcoal paste :p.

I thank my friend for giving me the liberty to have a different design for Fred. Can you tell what his hair is made of? Yes, our favorite Pocky! :p


And for Albert, he had a round head with hair made of toothpicks dipped in black meringue! It's made of another orange chiffon cake in a round glass bowl :).


Recipe for orange "minion" chiffon cake is below:
3 egg yolks
20g sugar
39g vegetable oil
41ml orange juice
60g cake flour
Orange zest (from 1/2 orange - I reduced it so that they will not be so much "bits" in the exterior)
Orange paste/yellow gel food coloring
Blue gel food coloring

4 egg whites
45g sugar
1/4 tsp cream of tartar

1. Preheat oven to 160°C.
2. Beat egg yolks with sugar with whisk till pale yellow before stirring in oil and orange juice.
3. Next add in sieved flour and orange zest and whisk till no trace of flour found.
4. Scoop over 10 tsp into another bowl and add blue gel food coloring. To the remaining batter, add orange paste (and yellow gel food coloring) to desired colour.
5. Meringue: Beat the egg whites with ¼ tsp cream of tartar till stiff peak, mixing in caster sugar in 2 additions.
6. Scoop over 20 tbsp meringue for blue batter. Gently fold in.
7. Fill the chiffon tin with the yellow batter till 2/3 of the tin, then scoop over blue batter at the top.
8. Gently tap the chiffon tin on the counter top to release air bubbles.
9. Bake the chiffon cake at 15 min at 160°C and then 20 min at 150°C and then 12 min at 140°C.
10. Invert the chiffon cake once removed from oven.
11. Unmould the chiffon cake by hand. Gently pull the cake from the sides of the tin at each angle and push the removable base up to unmould the sides. To unmould the cake from the base, gently lift up the cake from the base using hands, repeating this at each angle before turning the base over. (Watch The Baking Biatch for an excellent video tutorial on hand unmoulding chiffon cakes).

Thank God the cakes were well-received! My friend shared that the kids were thrilled and they taste very good too - light with a tangy refreshing taste! This is really the baker's greatest joy! :)


Happy belated birthday to Fred and Albert!!

With lots of love,
Susanne


Read More »