Wednesday, 28 June 2017

Princess Charity Brown Sugar Cookies (2 ways to create gradual shades)

My friend requested for brown sugar cookies for her little girl who loves Princess Charity from The Princess Parables series. Here are the four cookies that I made for her!


I have written a very detailed step by step recipe for the brown sugar cookie base and royal icing decoration in this post so I shall not repeat it here. I will instead highlight how I created gradual tones or shades in two ways: using royal icing and using edible marker. People often remark how life-like my iced cookies are. Besides paying attention to details like adding highlights to the eyes of the characters, using gradual shades of a colour (instead of a single solid colour) helps to liven up the character.

Let me just reiterate that I have been using the same recipe for a few years because I always get rave reviews for these cookies in terms of taste. They have excellent shelf life of about 1.5 months at tropical room temperature when sealed so you can make these way ahead of time.

Just to share some photos of the process...

Cutting out cookie dough using homemade template. You may find out how to make and use your own templates over here.

Tracing outline of Charity using edible marker.

It is advisable at this point to let the cookies rest for a day between baking sheets to absorb excess oil from the cookie surface before icing.

I have unorthodox way of icing cookies. I create 3D noses by first letting a layer of icing harden where the nose is before flooding another layer of icing over it 

Day 1 of icing! I could have continued but I needed to do other stuff 

Creating gradual shade using royal icing
1. Prepare the lightest and darkest shade of royal icing that you need. Consistency should be of flooding consistency whereby any peaks should disappear within 3 seconds. Add more icing sugar to stiffen the icing. Add more water to make the icing more runny.

2. Pipe the two shades one after another immediately. I am using the right sleeve as an example here.


3. Use a toothpick to make little swirls to merge the two shades. Add the required shade a drop at a time before swirling with toothpick again in areas where you need a little more of a particular shade. Work quickly before the icing starts to harden.


Creating gradual shade using edible marker
1. Ice the subject with the lightest shade of the colour that you need. Make sure the icing is completely dry before using edible marker on it. Preferably do this one day after letting the icing harden.

2. Draw or colour the area where you want the darkest shade to be using an edible marker.

3. Use a small, soft brush dipped in vodka or any other colourless, odourless alcohol to spread the ink.


4. Wash the brush in alcohol and repeat spreading of the ink away from the coloured portion.

See the difference between hair with and without shading 

I hope these tips have been helpful! I know not everyone has the patience to work on brown sugar cookies like I do but you may be curious about the techniques I use ;).


With love,
Phay Shing


Read More »

Sunday, 25 June 2017

'Pineapple Watermelon' Fruits Chiffon Cake


This yummy fruity tier cake is made entirely from Fruit-flavoured Chiffon cake! The "Pineapple" top tier is made from Lemon Chiffon Cake. The "Watermelon" bottom tier is made from Strawberry Yoghurt-Pandan Chiffon Cake. I had originally wanted to use strawberry chiffon, but the Korean strawberry season is over, so I couldn’t find those nice sweet juicy strawberries (only the sour types), so yoghurt was used instead. The small juicy fruits décor are also from chiffon cake: "lemon" from lemon chiffon, "cherries" and "strawberries" from strawberry yoghurt chiffon.

The cake is naturally coloured using natural coloring (Magic colours brand and PME, from baking supplies shops e.g. Bake king) and lemon zest.


Lemon Chiffon Cake (6-inch tube pan) – which makes the "Pineapple"
3 egg yolks
30 g castor sugar
40 g vegetable/corn oil
24 g lemon juice
24 g water
Zest from 1.5 lemons
60g Prima cake flour, sifted
Yellow coloring, few drops (natural, Magic colours brand)

Meringue
4 egg whites
1/4 tsp cream of tartar
46 g castor sugar

1. Preheat oven to 160°C. Prepare a tray of water under the lowest rack for steambaking. *Optional but helps to increase moisture and control oven temperature for ogura-like texture.

2. Beat egg yolks with sugar with whisk till pale and light before stirring in oil, lemon juice and water.

3. Add in sieved flour and lemon zest and whisk till no trace of flour found.

4. Meringue: Using an electric mixer, beat the egg whites with ¼ tsp cream of tartar till frothy. Add in half the castor sugar for meringue and whip till soft peaks. Add in all the castor sugar and whip till firm peaks form or just to the point of reaching stiff peak.

5. Gently quickly fold in the meringue into respective batter in 3 additions.

6. Pour the batter into the tube pan and gently tap to remove air bubbles.

7. Bake the chiffon cake for 15 min at 160°C and then 140°C for 25-30 min, or until skewer inserted into centre of cake comes out clean. *You can also bake at 140°C for 55 min, or until skewer comes out clean.

8. Invert the chiffon cake once removed from oven and allow to cool completely.

I used a knife to make cuts on the chiffon cake for pineapple-like patterns.


Recipe for "Watermelon" Chiffon Cake can be found here in my previous work. I’m also starting work on a new Basics of Deco Chiffon cookbook that is written Textbook style with more in-depth, increased step-by-step pictures/instructions on layering the batter for the cake (out year end!). Hopefully it will address some of the questions I get from PMs! =)


"Pineapple leaves": Cut from pandan chiffon sheet cakes. Glued with melted marshmallows.

"Lemon": I baked leftover lemon chiffon batter in a 5-cm cake pop. The white details were piped on using Candy melts.

"Korean Strawberries": baked from hearts chocolate molds.

"Cherries": baked from 3-cm cake pop molds.


With lots of love,
Susanne


*Updates: Deco Chiffon Cakes now available at Naiise in Malaysia!

Read More »

Thursday, 22 June 2017

Dessert Themed Shortbread Cookies

I love it when requesters give me relatively free rein for the design of bakes :). Someone requested for ice-cream and cupcake shortbread cookies that I made last year but I expanded the selection of desserts!


You may refer to this post for a detailed write-up of recipe and shaping steps for making the ice-cream cone and cupcake cookies using homemade templates. I will briefly describe what I did for this batch. Please refer to this post on how to shape the lollipop cookie.

I try to use as little artificial colouring as possible, relying on flavouring to colour the cookie dough instead.

Ingredients (makes about 25-30 cookies):
60g icing sugar
120g unsalted butter, slightly softened
165g plain flour
15g cornflour*
1/4 tsp salt
1/4-1/2 tsp strawberry emulco
1/2 tsp lemon paste
1/8-1/4 tsp cocoa powder (I use Dutch processed but regular will do)
A drop of blue and red gel food colouring

* You may replace with plain flour for a firmer, less melt in your mouth cookie.

Steps:
1. Beat butter with icing sugar and salt until light and fluffy. You may beat by hand or use an electric mixer.

2. Add sifted cornflour and plain flour. Fold in with a spatula until a ball of dough forms.

3. Divide dough into 72g for brown, blue and pink dough, 140g for yellow dough and 5g for red dough. You may divide the colours equally too if that's your preference.

4. Roll the dough between two baking sheets to desired thickness (4-6mm). Use homemade cookie templates to cut out desired shapes or simply shape using your fingers. The lollipops for example, don't require templates. I made each lollipop using 7g of coloured dough for each colour.

5. Place cookie dough cutouts in baking tray lined with baking sheets. Chill in refrigerator until firm.


Cookie dough cutouts! I made a few bee cookies as well for another request.

6. Bake in preheated oven at 150℃ for 15-17 min or until done. Use the middle rack. Keep an eye on the cookies to make sure they don't turn brown.

7. Let the cookies cool completely on the tray before decorating or storing in airtight container.

Freshly baked cookies!

Decorate with royal icing or melted dark/milk chocolate and sprinkles as you wish. Store the decorated cookies in airtight container after the icing/chocolate has dried. These cookies can keep for about 1.5 months in airtight, cool room temperature.

My kids had some leftover dough to play with. It's been some time since I had time and energy to let them meddle with leftovers from my bakes. They didn't have the benefit of working with chilled dough and couldn't resist using up all the leftover sprinkles :p. Here's their handiwork...

You can tell which one was done by me as a demo piece!

My kids thought their creation was yummy ;).

With love,
Phay Shing

Read More »

Monday, 19 June 2017

Heart-Shaped Iced Brown Sugar Cookies

Social workers are a great support to many families in Singapore but their services often go unrecognized. I had the privilege to bake some door gifts for these people who have given their services with a big heart some months ago.

A special large cookie with a "K" was made for a staff who was leaving.

I have written a very detailed step by step recipe for the brown sugar cookie base and royal icing decoration in this post so I shall not repeat it here. Let me just reiterate that I have been using the same recipe for a few years because I always get rave reviews for these cookies in terms of taste. They have excellent shelf life of about 1.5 months at tropical room temperature when sealed so you can make these way ahead of time.

I was really busy with this large batch of 51 heart shaped cookies and another 20 PJ Mask cookies so I didn't take many photos. Here are a couple of works-in-progress photos of the cookies..


With love,
Phay Shing


Read More »

Sunday, 18 June 2017

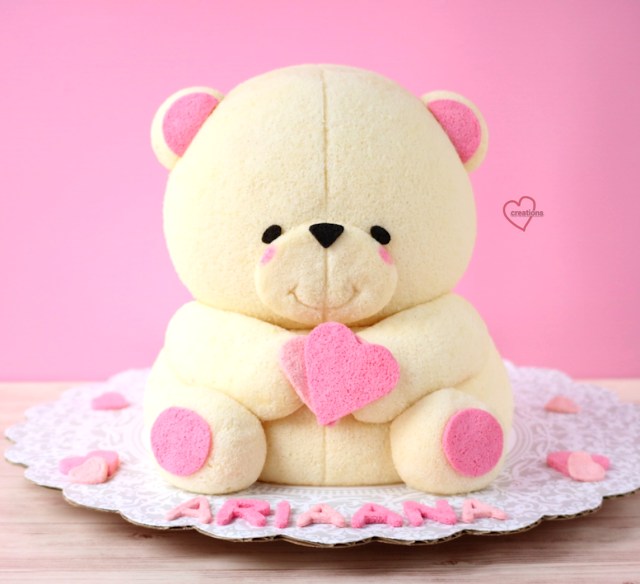
Forever Friends Bear Chiffon Cake


Here's my Forever Friends bear wishing Happy Father's Day to the wonderful daddies!!

Yes it's chiffon cake and not stuffed toy =p This is actually my 3rd time making the cute bear! My most challenging version so far. Recipe for the bear vanilla chocolate chiffon cake is here. I combined it with chiffon cake from a doll cake pan using the same recipe. Thankful it was well-received!

Am still on holiday, sorry any delays in replying your messages and the short post! Have a great week ahead! *Warm hugs to you*

With lots of love,
Susanne


Read More »

Wednesday, 14 June 2017

Assorted Animal Macarons (updated whipped strawberry ganache recipe with higher fruit content)

A dear friend requested for animal macarons for her toddler's birthday. These aren't just any random animals but those that little Hannah can identify :)

Spider, chicken, shark and snail macarons!

I used the reduced sugar recipe for the macaron shells here. Both regular and reduced sugar recipes can be found here. You may refer to my Creative Baking: Macarons book for a systematic presentation of the basics and complex shaped macarons. You may refer to my video tutorials for macaron basics and piping of complex shapes on the blog too.

Just to share some photos of the process...

Piping shark and some rounds

Piping chickens! If they look familiar, that's because I made them before over here but I used the French method previously.

Piping snails!

Piping spider body

Freshly baked shells! Love the feet 😍

Freshly baked animal shells! The spider is not recognizable yet without eyes and legs 

I decorated the shells with royal icing and edible marker.

Kid friendly filling that can withstand storage out of fridge for several hours was requested. I filled the macarons with firm dark chocolate ganache and lemon curd or whipped strawberry white chocolate ganache. The strawberry ganache has higher fresh fruit puree content as I omitted heavy cream. It is also stable at Singapore's warm room temperature of 27-28℃.

Here's the recipe for updated whipped strawberry white chocolate ganache recipe.

Recipe for whipped strawberry white chocolate ganache
Ingredients (fills about 16-20 macarons):
55g white chocolate, chopped
10g vegetable shortening
10g unsalted butter
1/8 tsp fine sea salt
26g strawberry puree (or homemade strawberry jam*)
1/2 tsp strawberry emulco/ paste

*(Update 29/3/18): for a more intense strawberry flavour, you may make your own strawberry jam instead of using fresh fruit puree. Simply weigh out double the weight of fresh fruit puree required, place in saucepan together with a pinch of salt, a little sugar and half to one tsp of lemon juice. I don't use precise measurements as it's not necessary and it depends on your taste. Cook over low heat in a small saucepan until liquid is reduced and consistency is jam-like. Be careful not to burn the jam.

Steps:
1. Place white chocolate, vegetable shortening and butter in a microwave-safe bowl. Heat at medium power for 20 seconds. Mix well with a spatula. Repeat until mixture is smooth. Add salt and mix well.

2. Freeze the bowl for 2 minutes and mix well with spatula. Repeat freezing and mixing. As the mixture thickens, start to beat it with the spatula. You will notice that the texture will lighten up and become creamy.

3. Add a teaspoon of puree and whip the mixture with the spatula until well combined. Repeat until all the puree has been added. Add strawberry paste and mix well. The texture should be like buttercream.

4. Transfer whipped strawberry ganache into piping bag and pipe onto the shells. Store assembled macarons in the fridge in an airtight container for at least 24h before serving.


Filling up all the shells!

Another look at the animals :)


I hope they brought a smile to your face :).

With love,
Phay Shing

Read More »

Sunday, 11 June 2017

Astronaut 'Galaxy' Chiffon Cake


My humble attempt at a "Galaxy" chiffon cake, inspired by the "milky way"! My humble video of my Galaxy chiffon cake can be found here! Since Father's day was coming, I thought to post on cake on a 'Super man' in space! Actually I was trying to depict an Astronaut who had just conquered the moon lol.. Thank God cake was well-received!

Thank God for the 'Super dads' we have! I am on holiday break, so will be slightly slower in my replies, please bear with me! =)

With lots of love,
Susanne


Read More »

Wednesday, 7 June 2017

Cute Wechat Emoji Macarons (Early Father's Day present and tips included)

I have been slowing down with blogging as I have been/will be busy spending time with family and away on a much needed break! I have been making macarons for my dear hubby for Father's Day for the past three years. And this year, I have decided to make macarons out of our favourite wechat emoji icons because they have a special meaning for us :)

Bear, hamster and cat who are the best of friends!

I have included some tips on making macarons that can survive transport and room temperature storage for extended periods at the end of this post.

I used the reduced sugar recipe for the macaron shells here. Both regular and reduced sugar recipes can be found here. You may refer to my Creative Baking: Macarons book for a systematic presentation of the basics and complex shaped macarons. You may refer to my video tutorials for macaron basics and piping of complex shapes on the blog too.

Just to share some photos of the process...

Piping bear

Piping cat

Piping hamster

Freshly baked shells!

I filled the macarons with dark chocolate ganache and lemon curd

Checkout the awesome feet and cute face!

I brought these cuties along on a trip and the macarons survived after being roughed about on bumpy bus and speedboat ride. They tasted fine too even after staying out of the fridge for 2 days. Some tips to consider when you want to make macarons that can survive like mine did.

1 . Try to go for designs that are generally rounder in shape without long thin parts sticking out of the shell so that they are less fragile.

2. Place each macaron in paper cupcake cases to add some cushioning.

3. Consider ganache based fillings if you would like to transport the macarons overseas where refrigeration along the way may not be possible. They can be kept out of the fridge at warm room temperature (27℃) for three days without going bad.

4. Make the ganache firmer than you usually would by increasing the proportion of chocolate to cream. You may refer to this recipe for the dark chocolate ganache I used but add 30-40g more dark chocolate to the recipe.

5. If you have runny centers for fillings like lemon curd, jam or salted caramel, try not to add too much as it will make the shells soggy fast. Try to encase most of the runny filling with ganache such that not much runny filling comes into direct contact with the shells. Recipe for lemon curd can be found here but replace lime with lemon.


With lots of love,
Phay Shing

Read More »

Saturday, 3 June 2017

‘Pusheen Cat' Black Sesame Chiffon Cake


I love black sesame flavour but the colour isn’t the sweetest colour, so when I got this Pusheen request which is grey in colour, I was happy to try it again. I actually made Black sesame chiffon way back when I started baking. The original recipe I tried from Okashi few years back uses soy milk and brown sugar for the egg yolk batter, so feel free to substitute with these. Mine is a lighter version in terms of texture (as I use more meringue) with the same flavour intensity (if I remember the taste correctly).

Briefly I made the Pusheen by joining a 6-inch tube pan with a ball cake pan chiffon cake at the top. The same black sesame chiffon recipe is used for the 6-inch pan and ball pan, which I have shared below. The hands, feet and ears are from cake pops molds.

Black Sesame Chiffon Cake (6-inch tube pan or ball cake pan)
Egg yolk batter
3 egg yolks
6g caster sugar
38g vegetable/corn oil
20g black sesame paste
50g fresh milk
3g vanilla extract
60g Prima cake flour

Meringue
4 egg whites
1/4 tsp cream of tartar
45g caster sugar

1. Preheat oven to 160°C. *Optional: I used steam baking, i.e. I placed a pan of water under the lowest rack before preheating – to control oven temperature, prevent cracks and for moister texture.

2. Whisk egg yolks with sugar until light, fluffy and well-mixed.

3. Whisk in oil, black sesame paste, milk and vanilla extract in that order until well combined.

4. Whisk in sifted cake flour and mix till well-combined.

5. Prepare meringue:

In a grease-free, dry metal bowl, using electric mixer, whisk egg whites with cream of tartar till foamy. Gradually add in the castor sugar and whisk at high speed till firm peaks form, or just the point of stiff peak.

6. Gently fold meringue into egg yolk batter with a flexible spatula 1/3 at a time, till no streaks remain.

7. Pour the batter into a 6-inch tube pan.

*Same recipe is used for the ball cake pan with some excess for cake pop molds.

8. Baking conditions:

6-inch tube pan: Bake at 160°C for 15 min, 140°C for 25+ min, or until skewer inserted into centre of cake comes out clean.

Ball pan: 160°C for 15 min, 140°C for 20+ min, or until skewer inserted into centre of cake comes out clean.

Cake pops (3-cm for limbs and 5-cm for ears): 160°C for 12-15 min.

**If you use steam baking, you may need to bake for a few more minutes. You may need to adjust the baking time, depending on your oven.

9. Invert tube pan to cool on a wire rack completely. No need to invert for ball pans and cake pop molds.

10. Unmould the chiffon cake by hand (see video tutorial ‘Hand unmoulding Chiffon cakes for a clean finishing’).

The whiskers are from licorice string candy. I cut the facial features from charcoal sheet cakes but you can also pipe on with melted chocolate. The scarf is cut out from plain chiffon sheet cake. I pinched the 5-cm cake pops at the tips for the ears. The hat is also made from rainbow chiffon cone pops (in Creative baking: Chiffon Cakes) - picture below from the book.


The 'cupcake' is also made from chiffon cake by baking chiffon cake in a cupcake liner and a 5-cm cake pop mold. I assembled the parts using melted marshmallows or chocolate as 'glue'.

Lots of work went behind this cake so it's a bit hard to describe everything =p. Hope you like this cute creation and yummy black sesame flavour! Thankful cake was very well-received too!

With lots of love,
Susanne

More picture tutorials here..

Read More »