Sunday 30 November 2014

Doraemon Vanilla Chiffon Cake


This Doraemon chiffon cake is for my good friend’s daughter who loves Doraemon. My son also likes Doraemon very much and we almost had it for his birthday last year! Doraemon is a robotic cat who travels back in time in aid a boy Nobita in the cute Japanese manga and anime ^_^.

My friend preferred a pop-out 3-D roundish Doraemon face than a 2D one, so here I used my ball cake mold for baking the pop-out face. The picture is not obvious but I actually baked 1/3 of a ball for the face. I used a 2 egg vanilla chiffon cake recipe for it. Then I cut out the facial features from chiffon cake baked in 6-inch layer trays (3 egg recipe divided into plain batter, charcoal batter, and red yeast powder batter). The eyes, bell and nose were cut out from cakes baked in my cake pop maker for small round cakes.


The details on the bell were made by using a fruit knife to cut 2 lines (but not through). I actually made a real through-hole for the lock (using a straw for the circle and knife) and stuffed black cake into the lock hole to capture the spatial details. I used melted marshmallows to glue the chiffon cake pieces together.

The base cake was a 3 egg recipe vanilla chiffon cake in 17 cm chiffon tin. Recipe for vanilla chiffon cake is below:

Vanilla Chiffon Cake
3 egg yolks
20g sugar
39g vegetable oil
37 ml water
5 ml vanilla extract
60g cake flour

Meringue:
4 egg whites
45g sugar
1/4 tsp cream of tartar

1. Preheat oven to 160°C (I used steam baking but it is optional).
2. Beat egg yolks with sugar with whisk till pale yellow before stirring in oil, water and vanilla extract.
3. Add in sieved flour and whisk till no trace of flour found.
4. Meringue: Beat the egg whites with ¼ tsp cream of tartar till stiff peak, mixing in caster sugar in 2 additions.
5. Fold in the meringue gently into the batter 1/3 at a time.
6. Pour the batter into the chiffon tin from a height.
7. Gently tap the tin on table 3x to remove air bubbles
8. Bake the cake for 15 min at 160°C then 30-31 min at 140°C.
9. Invert immediately once out of the oven to cool
10. Unmould after the cake is cool.


My friend shared the cake was very nice and her daughter T was delighted!

Happy birthday to Tessa and her daddy!

With love,
Susanne

Read More »

Saturday 29 November 2014

Koala, Panda & Bear Salted Egg Custard Steamed Buns (流沙包)

I almost decided to title this post "The three bears with Goldilocks inside". But then some would argue that koalas are marsupials, not bears. And there's no blonde girl inside the buns but golden custard :p. Here are my beary baos!


Check out the salted egg custard and fluffy bun!


I am still experimenting with the recipe and steaming times to get the right taste and consistency. This time round, the taste is close to what is commercially sold but can still do with more improvement in the "runnyness" department.

I omitted cornflour, reduced the amount of custard powder and increased the amount of coconut milk used in the hope that it will help to make the custard more runny. It seems like I still need to reduce the amount of custard powder used. I was right to omit the cornflour upon checking the ingredients list of commercially sold frozen liu sha baos.

The bao skin recipe is almost the same as the one I always use as it is simple, soft and fluffy. I added less water this time and used high heat to steam for a shorter time. From my previous bao experiment, I found that the dough can be stored in the fridge in between steps without affecting the taste of the bao if the first proofing is done with the dough in the fridge. A very necessary "step" for me especially when kids are home during the school hols and I still do activities with them, cook and do housework!

Recipe for the filling and bao skin is very similar to my guinea pig liu sha bao post.

Recipe for salted egg custard 
Ingredients (makes 9 baos):
2 salted egg yolks, cooked and mashed
40g unsalted butter, softened
32g icing sugar
15g custard powder (I will reduce to 10g in my next attempt)
30g milk powder
25g coconut milk (I will increase to 30g next time)

Steps:
1. Mix butter and sugar until well combined. Add all other ingredients and mix well. Pass the mixture through a fine sieve to make it smooth.

2. Chill in fridge for 30 minutes-1 hour until firm. Portion into balls of 16-17g each. I find it helpful to wrap them in cling wrap and freeze them until it is time to assemble.


Recipe for bao skin
Ingredients:
150g Hong Kong bao flour plus extra for dusting
28g cornflour
26g caster sugar
Pinch of salt
1 tsp dry yeast
1/6 tsp baking powder dissolved in 1/2 tsp of water

92g water
11g vegetable shortening

7g Milo powder
1/4 tsp charcoal powder
Some hot water

Steps:
1. Mix the first 5 ingredients together in a bowl. Make a well in the centre and pour water in. Use a wooden spoon to stir the mixture until a dry dough forms. Gradually add baking powder solution and continue kneading/ stirring the dough in the bowl.

2. Pour the dough onto a non stick mat and knead for about 5 minutes. Gradually knead in shortening and keep kneading until dough passes windowpane test. About 20 minutes. Alternatively, you may use a stand mixer or bread maker to knead.

3. Let the dough proof for 30 minutes or until double in size. I placed the dough in a measuring jug lined with cling wrap and refrigerated it. I monitored the rise of the dough now and then. Just nice, the dough rose to almost double in size when I was ready.

4. Knead the dough for a couple of minutes to expel trapped air.
Divide the dough accordingly:
15g-black
98g-grey
94g-brown
Remaining dough-white

Make a paste with Milo and charcoal by adding a bit of water. Colour the dough with the pastes. I was busy so I put the coloured dough back in the fridge to prevent it from over-proofing. Set aside 30g of dough for each bao, with extras for features.

5. Lightly dust your work surface and fingers with flour. Flatten a 30g ball of dough and place the frozen filling in the middle. Wrap it and pinch seal. Place the seal side down on a small piece of baking sheet. Add on the animal features. I just used my fingers, a bench scraper and toothpick as tools. I was trying out different ways of adding on the features to see which style is nicer.

Pandas!

Teddy bears!

Koalas! 

I was interrupted while working on the koalas so the bao surface is not as smooth as the other 2 batches.

6. Proof the assembled baos at room temperature for 45 minutes before steaming. There is no need to cover them while proofing. Towards the end of the second proofing, prepare the wok/ steamer for steaming. Steam on high heat for 6 minutes. Turn of the heat and leave the baos covered in the steamer/ wok for 3 minutes before removing them.

Enjoy them while they are hot! If you would like to store them, wait for the baos to cool down completely. Store in airtight container/zip lock bag and freeze it. Resteam for 12 minutes.

My little one with sweet tooth loves these beary much :).

Update: please refer to my next attempt. The filling is very runny and remains so even after freezing and resteaming! My kids think that this following batch of liu sha baos is the best I have made so far!

With lots of love,
Phay Shing


Read More »

Wednesday 26 November 2014

Rabbit Reduced Sugar Pandan Chiffon Cake (75%)


This is a cute rabbit made out of chiffon cake for my friend's teacher who is born in the year of the rabbit! As she is quite advanced in age, my friend requested for low sugar recipe for pandan chiffon cake. The amount of sugar here is reduced by 25% and my mum who likes things less sweet said it was very nice.

The rabbit is made out of vanilla chiffon cake baked in a 11 mm glass bowl (for body), cake pop maker (for bushy tail), and cut-out layer cake (for feet). The wordings and paws were cut out from layer strawberry chiffon cake.

Reduced Sugar Pandan Chiffon Cake (for 17cm tin)
3 egg yolks
5g sugar
40g vegetable/corn oil
24 ml coconut milk
8 ml pandan juice
2 ml vanilla extract
7 ml pandan paste
60g cake flour
A pinch of salt

Meringue:
4 egg whites
45g sugar
1/4 tsp cream of tartar

Method:
1. Prepare fresh pandan juice by blending fresh pandan leaves (10 leaves cut into small pieces, omitting the tips) with 50 ml water. Strain with a sieve and press out all the liquid with a spoon.
2. Preheat oven at 160°C (I used steam baking but it is optional).
3. Beat egg yolks with sugar with whisk till pale yellow before stirring in oil, milk, pandan juice and then vanilla extract and pandan paste.
4. Add in sieved flour and salt and whisk till no trace of flour found.
5. Meringue: Beat the egg whites with ¼ tsp cream of tartar till stiff peak, mixing in caster sugar in 2 additions.
6. Fold in the meringue gently into the batter 1/3 at a time.
7. Pour the batter into the chiffon tin from a height.
8. Gently tap the tin on table 3x to remove air bubbles
9. Bake the cake for 15 min at 160°C then 30 min at 140°C.
10. Invert immediately once out of the oven to cool
11. Unmould after the cake is cool.

Fresh from the oven!


Vanilla Chiffon Cake (for rabbit)
2 egg yolks
14g sugar
26g vegetable/corn oil
24 ml boiled water
4 ml vanilla extract
40g cake flour

3 egg white
20g sugar
1/4 tsp cream of tartar

1. Preheat oven to 160°C.
2. Beat egg yolks with sugar with whisk till pale yellow before stirring in oil, water and vanilla extract.
3. Add in sieved flour and whisk till no trace of flour found.
4. Meringue: Beat the egg whites with ¼ tsp cream of tartar till stiff peak, mixing in caster sugar in 2 additions.
5. Fold in the meringue gently into the batter 1/3 at a time.
6. Gently scoop and level the batter into the bowl, cake pop maker and baking paper-lined 6-inch tray and gently tap them on table to remove air bubbles.
7. Bake the bowls for 25-30 min, cake pop maker for 12 min and layer cake for 18 min at 150°C.
8. Leave to cool on cooling rack once out of the oven to cool
9. Unmould by hand after the cakes are cool.

I brushed some cocoa powder around the hole for burrow soil and stuck on the rabbit bum and feet with some melted marshmallows. There we get a rabbit sticking her head into the burrow (chiffon hole)! 


Thank God my friend shared she loves it and was delighted by the cake!

With lots of love,
Susanne

Read More »

Sunday 23 November 2014

Shooting Stars Rainbow Orange Chiffon Cake


Twinkle, twinkle, little star
How I wonder what you are :)

This is big rainbow chiffon cake with colorful shooting rainbow stars for a little boy turning 2 years old! The chiffon cake is made of rainbow colors as his mum likes colorful but rearranged to have yellow as the top as we thought pink would be too girly for a boy. His first word was 'star' so his parents decided to theme his birthday 'star'!

The rainbow chiffon cake is orange flavored and I used the same recipe as my Little Twin Stars Rainbow Orange Chiffon Cake except that I have rearranged the colors yellow, orange, pink, purple, blue and green (from top to bottom). In addition, I have added orange zest in for stronger flavor. I have also pre-baked an orange star topper and several rainbow-colored layer cakes (orange chiffon, 1 egg yolk recipe each) to cut out stars of rainbow colors as well as his name.

And yes, it's another pinata cake! This time I hid some colorful surprise inside the cake ^_^. Here's another look at the 'boyish' rainbow layers!


Happy birthday to Jonathan!

With love,
Susanne


Read More »

Dairy-Free Peaches and Cream Vanilla Log Cake


"Jesus paid it all
All to Him I owe
Sin had left a crimson stain
He washed it white as snow"


This hymn written by Elvina Hall came to mind as I worked on this white-as-snow log cake. It's another homely bake just for my family and Susanne's so there's no pressure here to be perfect :). As we are not chocolate people and prefer something lighter, I made the vanilla sponge dairy free and used non-dairy cream (fresh cream would taste better but my family is feeling a little under the weather so something lighter would be nice). And there's the same set of Christmas gingerbread cookies adorning the cake :).

Here's a view of it from the side...


You can probably tell I wasn't very patient when I creamed the cake :p. You should wait for the cream to set for a couple of hours before slicing the ends of the swiss roll, and then wait for the creamed surface to set before drawing the bark patterns with a fork. I didn't wait for too long so the patterns are not as distinct as the buttercream covered log cake. I suppose you could freeze the cake to speed things up but I wasn't sure that the texture of the fruit inside would still be the same.

Log cake without decorations

Ingredients (9x12" pan):
Vanilla sponge
3 egg yolks
15g caster sugar
42g canola oil
42g water (you may replace with milk)
1/2 tsp vanilla extract
55g cake flour
Pinch of salt

4 egg whites
1/4 tsp cream of tartar
43g caster sugar

Cream
1/2 cup whip topping (a non-dairy cream, or you may replace with whipping cream/ heavy cream. Add 1 tbs of icing sugar if using dairy cream.)
1/2 tsp gelatin powder
1/2 tbs water

Canned peaches, sliced
Syrup from canned peaches

Steps:
1. Preheat oven to 160°C and line the pan with baking sheet.

2. Make the egg yolk batter. Whisk egg yolk and sugar until pale and thick. Take a few minutes to do this. Add oil and whisk until thick like mayonnaise. Add water and vanilla extract and whisk until combined. Gradually add in sifted flour and salt and whisk until no trace of flour is seen.

3. Make the meringue. In a clean metal bowl, beat egg whites until foamy with an electric mixer. Add cream of tartar and beat until soft peaks form. Gradually add sugar and beat until stiff peaks form.

4. Fold the meringue into the egg yolk batter in three batches. Slowly pour the batter into the tray. Drop the tray on the table a few times to release any trapped air bubbles. Bake for 15 minutes or until skewer comes out clean.

5. Immediately remove cake from pan and roll it up. Leave to cool.

6. Make the cream. Sprinkle gelatin over water and let it sit for a couple of minutes. Microwave on medium-high for 10 seconds until the gelatin is dissolved. Heat 1 tbs of whip topping (or dairy cream) until warm (10 seconds on medium in microwave oven will do). Add warm cream to gelatin and stir until well combined. Let it cool to room temperature.

7. Beat chilled whip topping (or dairy cream) in a bowl until marks of the beaters can be seen. Gradually add gelatin mixture and beat on high speed until firm peaks form. Add 1 tbs of icing sugar to the cream if you are using dairy cream and be careful not to over whip dairy cream as it will separate.

8. Unroll the cake and brush some syrup on the surface (I forgot this step! So I brushed the outer surface of cake after rolling with fruits and cream). Spread cream on the surface, leaving the top edge cream-free. Arrange sliced peach in 3 rows.


9. Roll the swiss roll carefully, using the baking sheet under the cake to help. Chill in the fridge for 2 hours. I was impatient and chilled for 40 minutes only. Store the rest of the cream in the fridge.

10. Slice the ends off the swiss roll and place the cake on the cakeboard. Re-whip the cream and cover the cake with cream using a spatula. Don't have to be neat about it.


11. Place the cut ends on the creamed cake to form branches.


12. Add cream to the sides of the branches. You may choose to cover the whole cake with cream but I thought it would be nice to show what filling there is inside :).


13. Chill the cake for 20 minutes in the fridge before using a fork to draw bark patterns on the cream. I didn't wait :p. Refrigerate the cake for a couple of hours before serving.

My family enjoyed our half of the cake with hubby and kids giving it a thumbs up. Susanne's family found the cake good and she loved the texture of the chiffon sponge.

This is a mild tasting and light cake. You may wish to add fruit liquor into the syrup for brushing the sponge for a more intense flavour.  Using fresh cream would make it yummier too.

Enjoy!

With love,
Phay Shing


Read More »

Thursday 20 November 2014

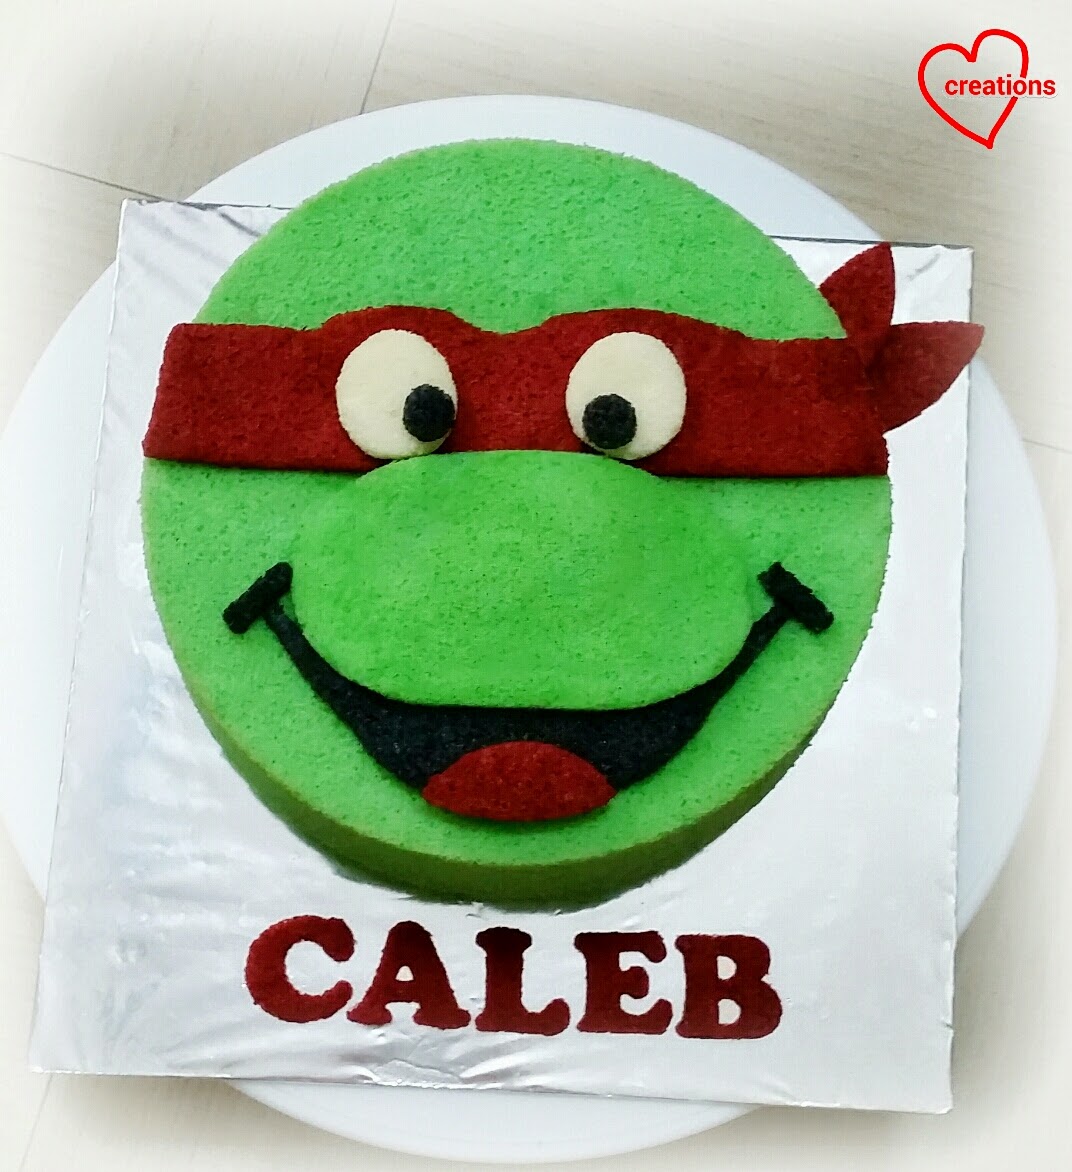
Ninja Turtles Pandan Chiffon Cake


Teenage Mutant Ninja Turtles.. Heroes in a half-shell.. Turtle power! LOL.. this familiar song brings a smile to my face =). I grew up in the era where TMNT was popular. A decade later, I'm amazed it is still around and loved. 

This cake is for Caleb who loves Ninja turtles particularly Raphael (the red one) and pandan chiffon cake. A Ninja turtles pandan chiffon cake just seemed so right together! I transformed the whole pandan chiffon cake into the Ninja turtles' face ^_^.

The red mask and black mouth are pandan chiffon cake colored naturally with red yeast powder and charcoal powder. They were cut from chiffon cake baked in trays swissroll-style. I filled the centre tube hole with honey stars to 1/2 cm above the top so that the nose would be ‘pop-out’, and then I covered the hole with the green pandan chiffon cake (cut into an oblong nose using knife). Below I share more in detail the steps =).

Pandan Chiffon Cake
5 egg yolks
33g sugar
67g vegetable/corn oil
40 ml coconut milk
14 ml pandan juice
3 ml vanilla extract
13 ml pandan paste
100g cake flour
A pinch of salt

Meringue:
7 egg whites
75g sugar
1/4 tsp cream of tartar

Method:
1. Prepare fresh pandan juice by blending fresh pandan leaves (10 leaves cut into small pieces, omitting the tips) with 50 ml water. Strain with a sieve and press out all the liquid with a spoon.
2. Preheat oven at 160°C. Prepare a 17 cm chiffon tin, a baking-paper lined 9-inch and two 6-inch trays.
3. Beat egg yolks with sugar with whisk till pale yellow before stirring in oil, milk and pandan juice.
4. Add in sieved flour and salt and whisk till no trace of flour found. Scoop out 9 tsp and add red yeast powder for red, and another 6 tsp and add charcoal powder for black, and 1 ml of pandan juice to each. To the remaining batter, add in the pandan paste.
5. Meringue: Beat the egg whites with ¼ tsp cream of tartar till stiff peak, mixing in caster sugar in 2 additions. Scoop over 18 tbsp and 12 tbsp to the red and black batter respectively and fold in the meringue gently into each batter 1/3 at a time.
6. Fold in the rest of the meringue gently into the green batter 1/3 at a time.
7. Pour the green batter into the chiffon tin from a height till ¾ full. Spread the red batter into a 9-inch tray and the black batter into a 6-inch tray. Spread the remaining green batter into a 6-inch tray.
8. Gently tap the tin and trays on table 3x to remove air bubbles
9. Bake the chiffon tin for 15 min at 160°C then 31 min at 140°C, and the trays for 14-16 min at 150°C.
10. Invert the chiffon tin immediately once out of the oven to cool.
11. Unmould the cakes after they are cool.

The letters were cut out using alphabet cutters. These were then stuck on to the cakeboard using melted marshmallows. Brush the small pieces with a bit of syrup to prevent them from drying out and always keep them in an airtight container in between working. I cut out the mask and mouth from the red and black cakes using a sharp knife, which were fastened similarly using melted marshmallows.

Here's another look at the TMNT pandan chiffon cake!


Happy birthday to Caleb! =)

With love,
Susanne

Read More »

'Stump of Jesse' Mini Milo Logcake with Horlicks Swiss Meringue Buttercream


"There shall come forth a shoot from the stump of Jesse, and a branch from his roots shall bear fruit." Isaiah 11:1


I drew inspiration for this log cake from the Bible and from here. While most log cakes are basically high class swissrolls covered with cream or ganache, I was really inspired by the tree stump version that I saw from gracekitchencorner. Isaiah 11:1 immediately popped into my head and I thought I will kick start my log cake making with this :). This is my first attempt at making a log cake! I did this as an experiment for someone who wanted Milo chiffon cake with Horlicks SMBC (Swiss meringue buttercream). My neighbour happily obliged to be my taste tester. My first time making smbc too! I rushed through this and didn't bother with being a perfectionist about looks and photography so pardon the homely look :p. My family needed my attention too. I decorated with Christmas themed gingerbread cookies that I made earlier.

I adapted the recipe for smbc from Baking Library. I was really impressed by the low sugar content as compared to most smbc recipes. It uses half or less than half the amount of sugar in most recipes. While it works well for chocolate smbc, it doesn't seem to do well for Horlicks flavour. But as chocolate smbc, it is awesome! Very chocolately without being overly sweet or creamy. Look out for my chocolate log cake post in the near future. My neighbour and I agree that although it is not too sweet, it is pretty creamy. I will have to increase the sugar content next time and maybe introduce a bit more salt and some Milo. She said the cake tasted better with less cream :p.

Recipe for Horlicks Swiss meringue buttercream
Ingredients:
63g egg whites (about 1.5-2 egg whites)
42g caster sugar (should increase to 60g next time. Still 20-40g less sugar than regular smbc recipes for the same amount of egg whites.)
113g unsalted butter, softened but cool, cut into tablespoon sized cubes.
1/4 tsp vanilla extract
20g Horlicks
3/4 tbs hot water

* I didn't add the following this time but next time I will add:
-  1/8 tsp salt to the Horlicks mixture to offset the increase in sweetness
- 5g Milo with additional 1 tsp hot water

Steps:
1. Dissolve the Horlicks (Milo and salt) in hot water to form a paste. Set aside.

2. Fill a saucepan with a bit of water and set it to simmer. Place the egg whites and sugar in a metal mixing bowl. Place the mixing bowl over the saucepan. Make sure that the water doesn't touch the bottom of the mixing bowl. Whisk with a hand whisk (or electric mixer but I find it unnecessary) until sugar dissolves and mixture is foamy. Once the temperature reaches 71.1°C, remove the mixing bowl from heat. This takes about 5-6 minutes. If you don't have an instant read thermometer, just whisk for about 5 minutes continuously and check with your fingers to see if you can feel any undissolved sugar in the egg whites. If the egg whites feel warm to touch and no longer gritty,  it is ready.

3. Use an electric mixer to beat the meringue at high speed until stiff peaks form and the meringue cools down to room temperature.


4. Add butter one piece at a time while beating on medium speed. The mixture may turn runny and/or curdle but just continue beating. Increase speed when all butter has been added and beat until smooth. Add vanilla extract and beat until incorporated.

Smooth smbc!

5. Add Horlicks mixture and beat until well incorporated. If your are keeping this in the fridge, just let it come to room temperature and beat it again until it is of the right consistency when you are ready to assemble. I prepared the smbc a day before I baked the chiffon sponge cake so I needed to re-whip the cream.

Although my neighbour and I are not too pleased with the smbc (maybe because we are light-and-soft cake people, not of the dense-rich-creamy persuasion), we thought the Milo sponge was really good! Very soft and moist but full of Milo flavour. The key to this was using a lot less flour and a lot more Milo, with an extra egg white in the meringue to give it extra lightness. The Milo chiffon sponge is also low in caster sugar as Milo itself is sweet.

Recipe for Milo Chiffon layer cake
Ingredients (9x12" pan):
2 egg yolks
8g caster sugar
28g vegetable oil
28g hot water
22g Milo powder
25g cake flour
1/2 tsp vanilla extract
A pinch of salt

3 egg whites
1/5 tsp cream of tartar
30g caster sugar

Steps:
1. Dissolve the Milo in hot water. Set aside. Preheat oven to 160°C. Line the baking tray with baking sheet.

2. Prepare egg yolk batter. Whisk egg yolks and sugar until pale and all sugar has dissolved. Add oil and whisk until thick like mayonnaise. Add Milo mixture and whisk until well combined. Gradually add in sifted flour and salt and whisk until no trace of flour is seen.

3. Prepare meringue. Beat egg whites with electric mixer until foamy. Add cream of tartar and beat until soft peaks form. Gradually add sugar and beat until stiff peaks form.

4. Fold the meringue into the egg yolk batter in three batches. Slowly pour the batter into the prepared pan. Gently drop the pan on the table a few times to release any trapped air bubbles.

5. Bake for 13-14 minutes or until skewer comes out clean.


6. Immediately remove from pan and gently remove baking sheet. Cool with another baking sheet over it and roll it up along the direction of the short side as tightly as you can while the cake is still warm. Leave to cool.


7. Unroll the cake and cut into 4 (or 5) equal pieces. Spread some smbc on a slice and roll it as tightly as you can. Spread some smbc on a second piece and roll it around the first piece. Repeat until all pieces are done. You end up with a vertical swiss roll.

8. Pipe a spiral of cream on top and crumb coat the sides of the cake. Refrigerate for 5-10 minutes.


9. You may wish to stick in a shoot like I did. I made it out of some leftover cake from previous bake and a small piece of Milo sponge with a toothpick inserted for support. Apply more cream at the sides of the cake. You don't have to be neat about this. Use a fork to draw the bark patterns. Refrigerate until set.


You may add some decorations if you wish. I chose to decorate with baby Jesus and star cookie that are in line with the theme of the promised Saviour.

Here's a peek at the cake when it is cut...


I am quite satisfied with my first attempt at making log cake although it has room for improvement. Will attempt other flavours and designs soon!

With love,
Phay Shing


Read More »

Monday 17 November 2014

Girly Baby Shower Themed Orange Chiffon Cupcakes

This is part of a big project with Susanne that we took on together. She made a bigger cake with some cupcakes and I made the bulk of the cupcakes. Presenting my batch of girly chiffon cupcakes for a baby shower!

Girly pram, romper and sippy cup!

You only see 3 cuppies here but I made 59 of these. Why the odd number? Hmm not enough cake for decoration. Haha. But 59 was already pretty involved work for me! The cupcakes are orange flavoured with vanilla layer cakes for the girly decorations.

Recipe for orange cupcakes
Ingredients (makes 22-24 small cupcakes):
4 egg yolks
20g caster sugar
56g canola oil (or vegetable oil)
56g fresh orange juice
11g orange zest
1/4 tsp orange emulco (optional)
80g cake flour
1/8 tsp salt

5 egg whites
1/4 tsp cream of tartar
60g caster sugar

Steps:
1. Preheat the oven to 150°C. Place the paper cups on a tray.

2. Prepare the egg yolk batter. Whisk the egg yolks and sugar until pale and all the sugar has dissolved. Take a few minutes to do this. Add oil and whisk until thick like mayonnaise. Add orange juice and whisk until well combined. Gradually whisk in sifted flour and salt until no trace of flour is seen. Add orange zest and emulco. Whisk until well combined.

3. Prepare the meringue. In a clean metal bowl, beat the egg whites until foamy with electric mixer. Add cream of tartar and beat until soft peaks form. Gradually add sugar and beat until stiff peaks form.

4. Fold the meringue into the egg yolk batter in three additions. Be careful not to deflate the egg whites. Transfer batter into a batter dispenser or piping bag. Fill the cups till about less than 1cm away from the rim. I used a jumbo ziplock bag fitted with a piping tip adapter to help with filling many cups quickly. If you have a batter dispenser it will be helpful but not necessary. Scooping the batter in would take too much time to fill the cups if you are baking more than 20 cupcakes in each batch.

5. Bake at second lower rack for 17-20 minutes or until skewer comes out clean.

My dad sampled an orange cuppy and said it reminds him of cakes he ate when he was young! I think it's because natural ingredients are used and it's so full of natural orange goodness. Don't skimp on the orange zest for really good flavour and added moisture!

Recipe for vanilla layer cakes*
Ingredients (makes one 10" & one 6" square tray):
2 egg yolks
10g caster sugar
28g oil
28g water
1/8 tsp vanilla extract
40g cake flour
A pinch of salt
Gel food colouring
Charcoal powder

3 egg whites
1/5 tsp cream of tartar
33g caster sugar

* I had to bake many rounds of layer cake.
Light pink: two 10" square and four 6" square cakes
White: two 10" and one 6" cakes
Dark pink: one 10" cake
Black: one 6" cake

Steps:
1. Preheat oven to 160°C. Line the trays eith baking sheet.

2. Follow the above steps to prepare the batter, adding the appropriate gel coloring/ charcoal after the flour is whisked in.

3. Bake at 160°C for 13-14 minutes. Immediately remove from pan and cool with baking sheet covering it. You may freeze the cakes after double wrapping with cling wrap and stored in ziplock bag.

Assembly
I used cookie cutters and a small fruit knife to cut out the various shapes from the layer cakes. I used marshmellow creme to glue the pieces on.

Works in progress!

As the cakes have to be left out in the open for a couple of hours, I brushed the surface with simple syrup (1:1 ratio of sugar and water) flavoured with orange zest before storing them in airtight container.

Here's our big project on a tiered cake stand :).


With love,
Phay Shing


Read More »

Queen's Crown Chiffon Cake (and Cupcakes) for Baby Shower


This Queen crown is a chiffon cake made especially for a very dear friend's baby's manyue. The baby's name is Queena, so the cake was to be a sweet sweet crown fit for the baby Queen! The right shows the tiered set-up with the crown on top and chiffon cupcakes with various sweet designs and 'Happy 1st Month Queena'. I wasn't confident coping with the quantities in the big project so thankfully I had Phay Shing's help with a lot of the cuppies!

The sweet crown with stars above!


Close-up of the pretty tiered set-up!


The crown chiffon cake was vanilla-flavored and made by dividing a pink vanilla chiffon cake (3 egg yolk recipe) into a 15 cm chiffon tin and a 10-inch layer cake. I intentionally made the chiffon cake shorter so that its proportion would look like a crown. For your convenience, I have pasted the scaled-up ingredients and baking times below :).

Vanilla chiffon cake
3 egg yolks
20g sugar
39g vegetable oil
36 ml boiled water
5 ml vanilla extract

Meringue:
4 egg whites
45g sugar
1/4 tsp cream of tartar

15 cm chiffon tin, filled to slightly less than 2/3: 15 min at 160°C, then 16 min at 140°C.
10-inch layer tray (lined with baking paper): 15 min at 160°C.

I baked an additional purple and blue vanilla chiffon layer cakes (2 egg yolk recipe each in 10-inch tray) to cut out gems and stars to decorate the crown. I brushed on some melted marshmallows to help them adhere to the crown.

The cuppies were orange chiffon cupcakes (scaled to 4 egg yolks) with vanilla chiffon layer cakes replacing fondant for letters and decorations. I did the letters and Phay Shing the girly designs. Similar to the crown, I baked another three 10-inch vanilla layer chiffon cakes, 2 pink and 1 purple (2 egg yolk recipe each) to cover the cupcakes and to cut out the designs on top.

Freshly-baked cuppies wishing Queena a Happy 1st Month!


With lots of love,
Susanne


Read More »

Sunday 16 November 2014

Rainbow Cloud Shortbread Cookies

Instead of bringing cakes to school, my little one is bringing cookies for birthday to share with friends :).

Cheery rainbows!

I followed Guai Shu Shu's easy to remember ratio of the basic ingredients (1:2:3 for sugar:butter:flour) to create this simple cookie. I made a cloudless version some time back. My kiddo requested for clouds to be added this time so there's more work for me! I replaced some plain flour with corn flour so that the cookies have a softer, more crumbly and pleasing texture. I reduced the baking temperature too to reduce the chances of browning.

Ingredients (makes 36-40 rainbows):
100g icing sugar
200g unsalted butter
280g plain flour
20g cornflour (you may replace with plain flour)
2 tsp vanilla extract
1/2 tsp salt
Gel food colouring

Steps:
1. Sift icing sugar and flours together. Rub in butter until it resembles breadcrumbs. Add vanilla extract and mix well. Knead the mixture until a dough forms.

2. Portion the dough in the following manner:

-Red: 81g
-Orange: 69g
-Yellow: 56g
-Green: 44g
-Blue: 31g
-Purple: 19g
-Uncoloured: 6g

-Excess uncoloured for clouds.

Place the colored dough and 6g of uncoloured dough in quart sized ziplock bags. Please use this size only for the respective portion of coloured dough to work. Add gel food colouring for respective colours.

3. Roll the remaining uncoloured dough between two baking sheets until about 5-6 mm in thickness. Refrigerate the dough.

4. You may refer to my old post on how to shape the rainbows. Here's a quick pictorial summary of how to do it:


5. Line baking trays with baking sheet and preheat oven to 160°C.

6. Cut the rainbow log to thickness of about 5-6mm. You may mark out the positions to cut.


Cut each rainbow circle in half and place on baking tray. You may bake it at this point if you are making cloudless rainbows.

7. Use a small flower cutter to cut out clouds from the flat layer of uncoloured dough. Cut a bit of rainbow off at both ends and attach the clouds. Use your fingers to nudge the dough a bit in places where the rainbow is a bit out of shape. Gently press the joining part of the rainbow and clouds together. If the dough is too soft to work with at any point, simply refrigerate it for 10 minutes before continuing. Similarly, if the dough is too hard, just leave it out at room temperature for a while until soft enough.


8. Chill the rainbows in the fridge for 15 minutes before baking for 12-14 minutes.  Be careful not to overbake to prevent it from browning.

Hope these homely colourful cookies brighten up your day :).

Blessed birthday my little one!

With lots of love,
Phay Shing


Read More »

Wednesday 12 November 2014

Minnie Mouse Strawberry Chiffon Cake


The last time I made a Minnie Mouse chiffon cake, my dear friend Fel remarked that Minnie Mouse will be more like Minnie if she was wearing pink instead of red LOL (pink is Fel's favorite color!). So I promised her my next Minnie Mouse will be wearing pink! :) I made this cake for a little girl who is very very sweet and so reminded me of the pink Minnie Mouse. This sweet cake is inspired by the sweet girl :). I changed the flavor to strawberry so that I could use strawberry puree and paste for the pinkish color. The head cake was colored black using charcoal powder. Recipe for the strawberry chiffon cake is as follows.

Strawberry Chiffon Cake (17 cm chiffon tin)
3 egg yolks
20g sugar
39g vegetable oil
44 ml strawberry puree
1.5 ml strawberry paste
60g cake flour
Dip of wilton pink coloring *optional

4 egg whites
45g sugar
1/4 tsp cream of tartar

1. Prepare strawberry puree. I was lazy to break out my blender so I used a grater and then strained the mixture to obtain the puree.


2. Preheat oven to 160°C (I used steam baking but it is optional).
3. Beat egg yolks with sugar with whisk till pale yellow before stirring in oil and strawberry puree.
4. Add in sieved flour and whisk till no trace of flour found. Whisk in strawberry paste and a dip of pink wilton coloring (optional).
5. Meringue: Beat the egg whites with ¼ tsp cream of tartar till stiff peak, mixing in caster sugar in 2 additions.
6. Fold the meringue into the batter 1/3 at a time and gently pour into the chiffon tin from a height. Gently tap tin on table 3x to remove air bubbles.
7. Bake the chiffon tin to 160°C for 15 min then at 140°C for 31 min.
8. Invert the chiffon tin once it removed from oven and leave to cool on a cooling rack.
9. Unmould the chiffon cake by hand. Gently pull the cake from the sides of the tin at each angle and push the removable base up to unmould the sides. To unmould the cake from the base, gently lift up the cake from the base using hands, repeating this at each angle before turning the base over.

The minnie mouse head and shoes were made from the same strawberry chiffon cake recipe, but with batter divided into black (charcoal powder) and pink in 2:1 ratio baked in a big round cake mold and 2 smaller bowls. They were fixed together using melted marshmallows.

I added in some pink marshmallows flowers into the hidden surprise so that it will be more fun to cut the cake (also inspired by the sweet girl)!


My friend shared that it was a very soft and yummy cake and looked really sweet ^_^.

Happy birthday to the sweetie!

With love,
Susanne


Read More »

'Dinosaur' Strawberries and Cream Chiffon Cake

It's finally time to bake the dinosaur birthday cake after my trial bake two months ago!


This is a very involved bake with brown sugar cookies, a 3-D dino, two base vanilla sponge cakes, a green layer cake AND cream to make. Needless to say, the entire thing required lots of planning and patience. So glad that it's finally all come together!

To prevent this blog post from being super long,  I won't go into the details of how to make the various chiffon cakes and brown sugar cookies. I will just type out the ingredients, baking time and temperature for each component of the chiffon cakes. Note that baking times are approximate values only as every oven is different. Use the skewer and/or spatula pressing test to check for doneness.  You may refer to my trial bake post for details of chiffon cake making.

Brown sugar cookies
Refer to my old post for recipe.

Baked and iced brown sugar cookies!

Store in airtight container until it is time for assembly.

Vanilla sponge cakes
Ingredients (makes two 9" round cakes):
5 egg yolks
25g caster sugar
70g canola oil (or any vegetable oil)
70g milk
100g cake flour
1 tsp vanilla extract
1/8 tsp salt

7 egg whites
80g caster sugar
1/2 tsp cream of tartar

- Bake for 15 minutes at 160°C and then for another 15-20 minutes at 150°C.

Freshly baked!

Tightly double cling wrapped, placed in ziplock bag to prepare for freezing.

Green layer cake
Ingredients (makes one 10" square):
2 egg yolks
10g caster sugar
28g vegetable oil
28g milk
40g cake flour
1/4 tsp vanilla extract
A pinch of salt
Green gel food colouring

3 egg whites
1/5 tsp cream of tartar
33g caster sugar

- Bake at 160°C for 15 minutes.
- Wrapped and frozen until assembly. You will need to cut it to fit the size of the uncoloured vanilla sponge cakes.

Dinosaur
You will need a yellow and a bit of white layer cake for this in addition to the red cakes. If you feel lazy you could paint on the features like I did for the trial. I made some changes to the ingredients to make the dino a brighter shade of red, and some baking parts to make the dino more lively. I didn't bother with giving Dino toes this time.

Ingredients:
2 egg yolks
10g caster sugar
28g oil
28g milk
40g cake flour
A pinch of salt
1/8 tsp vanilla extract
1/2 tsp strawberry emulco
1/2 tsp beetroot powder
1/4 tsp red yeast powder
Some red gel food colouring

3 egg whites
1/5 tsp cream of tartar
32g caster sugar

- I divided the egg yolk batter and meringue ingredients into 2 as there are many parts to bake:
• first batch: one 6" square very flat layer (neck and tail), one 6" square thicker layer (spine), 4 round ice cube tray cakes (feet)
• second batch: two egg shells (head plus one extra) and two round bottomed glass bowls (body plus one extra). My glass bowls had outer diameter of 8.5cm.
- Baking times:
6" very flat layer: 160°C 8-9 minutes
6" thick layer: 160°C 14-15 minutes
Ice cube tray: 160°C 14-15 minutes
Egg shells: 160°C for 10 minutes, followed by 150°C for 7-10 minutes
Glass bowls: 160°C for 10 minutes followed by 150°C for 20 minutes (I filled the glass bowls till they are quite full).

Here's the assembled dino!

Without spots!

With spots!


Do brush the dino with simple syrup before storing in air tight container if you are not assembling the whole cake yet to prevent it from drying out too much.

Assembly
Here's a picture summary of how I assembled the cake with strawberries and non-dairy whipping cream. First time using a cake ring for cream and fruits so pardon the amateurish assembly :p. I used melted marshmellow to stick the dino and cookies on. As these cookies are of gingerbread man texture, they are still yummy when stored in the fridge with cake. Brush the base layer cakes with syrup too to moisten them before adding cream. There is a thin layer of cream between the green layer and plain sponge below.

Finally done! 

The birthday boy was really happy to see his favourite creature on the cake and his friends were all excited about the cake too! My friend said the cake and cookies were yummy :). The cake was light and not too sweet. The "bless" was already in Nathan's tummy when my friend wasn't watching :p.

So glad that the cake was well received! Blessed birthday Nathan!


With love,
Auntie Phay Shing

Check out my second dinosaur cake! Someone requested for the same design but different colour :).


Read More »