
I was not given reference pictures for a caricature of the family members and it's beyond my skill to design my own. And so I got a talented artist (@ryaccoon, Instagram account) to design the picnic scene and invidividual characters. I made the macaron template based on the drawings but with some minor modifications based on my friend's feedback and the number of coloured batter I could cope with.
I am usually quite nervous about working with fresh dairy creamed cakes that are under a macaron structure as Singapore's weather is really warm. Pure dairy cream doesn't hold up well although it tastes delicious. I usually use gelatin or white chocolate as a stabilizer but never both of them together. I tried using both this time round as an experiment. The cream still tastes of fresh cream although it's richer and slightly sweeter than if I use icing sugar and gelatin but it's a lot more stable and easy to work with! Usually my pure dairy whipped cream stabilized with gelatin and sweetened with icing sugar will melt into a puddle within 30 min of being left out on my kitchen counter. But this cream held it's shape after being left out on the counter for an hour! I will share this recipe later in this post. But first let me share some photos of the process...
I used the swiss meringue method with egg white split into two batches. Reason being, it's easier to work with many colours that way as I can colour the almond paste portion before meringue is added in.

Piping out the human figures and picnic basket. My friend requested for the grandpa not to be bald so I had to patch that post-baking 😂

It was quite a mad bake trying to cope with other designs concurrently. These are only some of the shells I baked that day!

Fully decorated macaron shells. Decoration is done with combination of edible markers and gel food colouring made into paint. By diluting it with a little vodka.

I filled the macarons with cherry white chocolate buttercream.

A little too generous with the jam for the picnic mat! I wouldn't recommend it unless you are topping up with more buttercream to cover the jam spots as it would wet the upper shell rather quickly.

I added some royal icing grass to finish off the picnic scene.
I am always on the lookout for creating a fresh cream tasting filling that is more stable in Singapore's hot weather. This time round, I am trying not to resort to adding non-dairy cream which already has some stabilizers added. I didn't want to end up with so many half-used cartons of cream 😂. I stumbled across one such recipe that I thought I could adapt. It uses both gelatin and white chocolate as stabilizers for dairy cream, instead of simply just gelatin or white chocolate. I didn't have double cream (which as higher fat percentage (45%) than heavy cream (35%)) at the moment so I used a little unsalted butter to increase the fat content, which in turn makes the filling more stable too.
Stabilized dairy whipped cream recipe (richer version)
Ingredients:
400g whipping cream/double cream
20g unsalted butter (replace with double cream if using double cream)
1 and 1/4 tsp gelatin powder
20g cold water
110g white chocolate, chopped or use chips
A pinch of salt
1.5 tsp vanilla extract or bean paste
Steps:
1. Put water in a small microwave safe bowl. Scatter gelatin powder over and let it sit for 10 minutes at room temperature.
2. Place the rest of the ingredients in a heatproof bowl and set it over a saucepan of water without the water touching the base of the bowl. Bring the water in the saucepan to a gentle simmer while stirring the mixture in the bowl. Melt everything together until smooth. Remove from heat.
3. Microwave the bloomed gelatin at medium power for 10 seconds and stir, making sure it is totally dissolved. Add melted gelatin into white chocolate and cream mixture and mix well.
4. Cover bowl with cling wrap and chill in fridge for at least 4h or overnight.
5. Whip at low speed with electric mixer until stiff peaks. Be careful not to overbeat. Do this step only when you are about to assemble the cake.
Assembly
1. Cut about 30-40 cherries into halves and remove the seeds. Dry with paper towel so excess juice doesn't seep out and mess up the cream when you slice it.
2. Prepare stabilized whipped cream. Add a little cream on cake board before putting first layer of chocolate sponge cake on.
3. Brush on some liquid from the cherry jam. Use a spatula to apply a thin layer of cream before lining the sides with cut cherries. I filled the middle of the square with fresh cherries and the homemade cherry jam.

Cover the cherries with more cream. Just enough cream to cover will do.
4. Carefully place another sponge cake on top. Repeat step 3 and then place the final layer of sponge on top.

5. Use a spatula to apply a little cream on the sides and smooth it out. This is to fill any air gaps around the edges.

6. If you happen to like this rustic look, you may leave the cake as it is. If you want to show the sliced cherry view, cover the cake with cling wrap and freeze for 2 hours. Use a long serrated knife to slice about 1cm off each side of the cake. I heat the knife over a flame and clean the blade after each cut to help ensure a cleaner cut. I wish I had a longer knife though 😆. It would have been even neater if I had one.
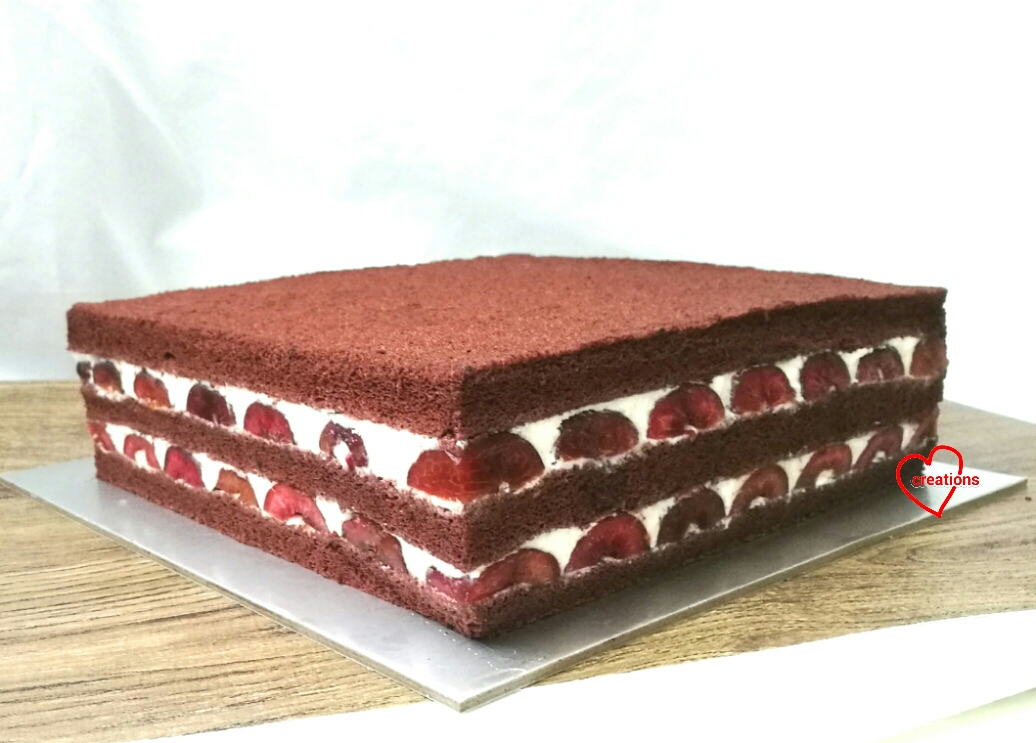
Cake with trimmed edges
If you are serving the blackforest cake as it is without fancy deco, you may want to add a little more stabilized cream on top in dollops with fresh whole cherries and a light sprinkle of chocolate rasps. At least that's what I would have done for a naked version of plain blackforest cake 😊.
Remember to keep the cake chilled in fridge until it is time to serve. I can assure you it is delicious 😋! Best served a day or two after assembly but it's good for a few days. If you prefer a lighter, less rich cream, you may use the stabilized whipped cream recipe from this post but double the amount of gelatin used to make it more stable.
A tip about macaron cake toppers on naked or semi naked cakes. Always store them separately as the moisture from the sponge cake will turn the macarons soggy quickly. If you need to make a cake with the macarons left on it during storage, you need to frost the whole cake with cream to create a barrier between exposed sponge and macarons.
With love,
Phay Shing
Adorable and yummy cake
ReplyDelete