Friday, 17 April 2015

Lego Head and Blocks Chiffon Cake


It has been a lego week for me! I made a Legoman Head Chiffon Cake with small chiffon blocks and a Lego (blocks) Chiffon Cake for my friend and school besties’ kids who are both Lego lovers.


The Legoman Head is baked in a 7-inch chiffon tin and naturally coloured like my Miffy Vanilla Lemon Chiffon Cake. I filled the centre with marshmallows before covering up with Lego lid. The small Lego pieces were cut out from thick and thin chiffon cake baked as layers in baking trays. To make use of more natural coloring, different coloured blocks were differently flavoured according to them: green blocks - pandan, the red blocks – strawberry/red yeast, the black - charcoal/chocolate, the blue – blue pea flowers (wilton blue was needed). My bestie managed to guess all the flavours apart from the flowers haha. The assembly of the tiny blocks was really tedious as the pieces were tiny. I cut the blocks with knife and small circles using a straw and glued them on with melted marshmallows. Better to invest in some Lego molds next time! The big Lego block chiffon cake was baked in a square chiffon tin as I had made previously (thanks to dear Evon for her tin!).

Thank God they were well-received!

With love,
Susanne

Read More »

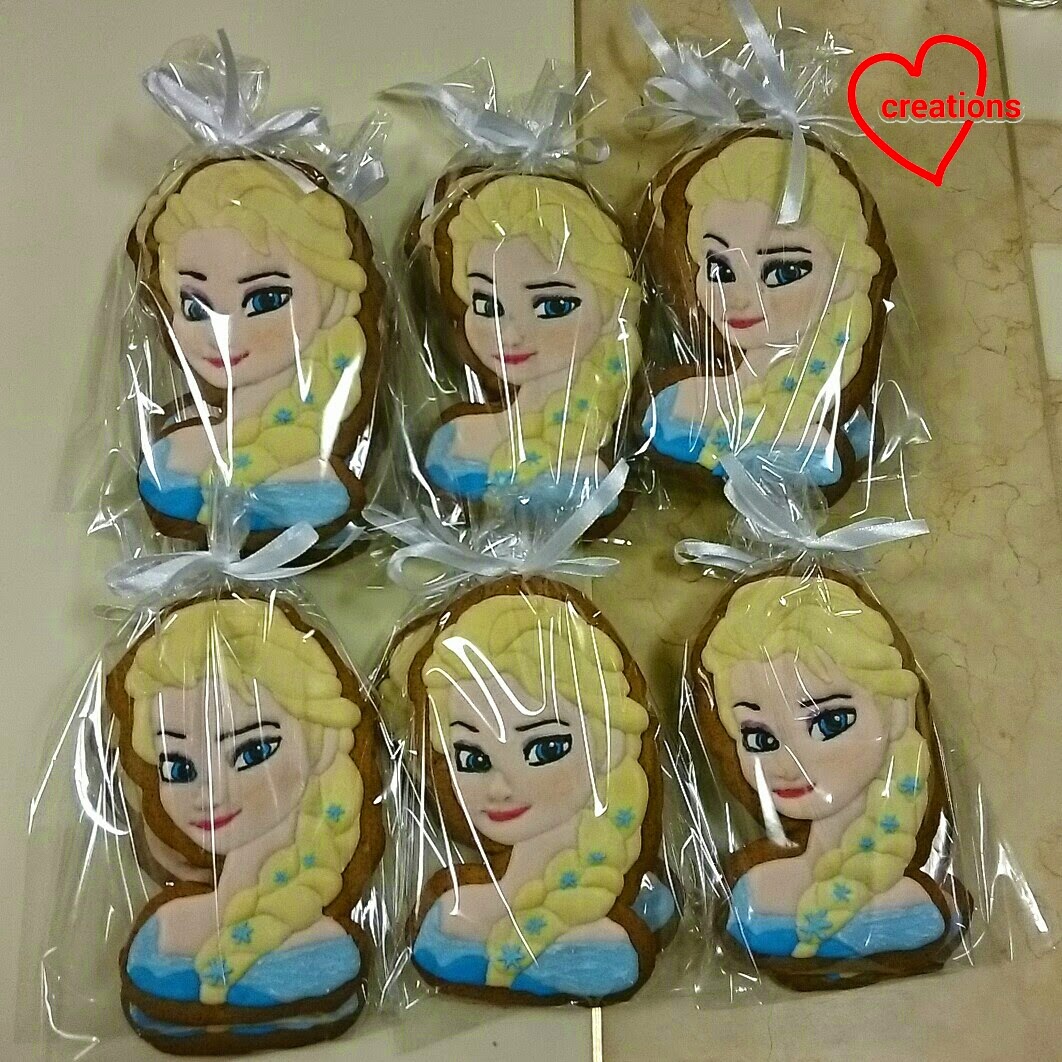
Elsa Brown Sugar Cookies

As mentioned in my previous post for Olaf cookies, this particular request includes Elsa as well. 14 were requested but here's a close-up view of one of them :).


I must admit that this batch really tested my patience and whatever little artistic skills I have! I think I will not make as many as 14 in the future! About 6 is as many as I am willing to go :p. There's definitely room for improvement and I need to figure out how to add on really fine features. Sometimes the icing doesn't land on where I wanted it to go so Elsa ended up having a thicker eyeliner than she was supposed to have!

I used the same brown sugar cookies and royal icing recipe which can be found here. Roll the dough to 5-6 mm thick and bake at 160-170°C for 16-18 minutes or until browned.

As for the colours of the icing, here's what I did to get more natural looking colours:
Skin: ivory + a bit of rose pink
Hair: ivory + a bit of golden yellow + a bit of black/ dark brown
Lips: rose pink + red + bits of purple and teal
Clothes: sky blue + a bit of violet and/or royal blue or teal

Just to share some photos of the whole process...

Cutting out the dough from homemade template and freshly baked cookies

Tracing and filling out the outlines with edible marker

Icing the face!

 I used an unorthodox method of icing by filling in all facial features before outlining and flooding the face. Most people would add on the eyebrows and mouth later. Probably the nose as well. The reason is, my freehand drawing is not that good so I find it hard to fill in the features after the face has been filled with flesh colored icing, even with the help of a template. Homemade templates are good enough if very fine precision is not required. As far as human portraits go, any slight deviation in features will change the entire face. If I had a Kopykake projector, it would be a different story!

 I tried to create a 3D nose by first icing a thick blob and waiting for it to harden before flooding with flesh coloured icing. I am not clever enough to come up with this cool trick for the nose. I got the idea from here.

Adding in the clothes... I had an extra bit of cookie for testing out icing and painting effects.

Adding in the hair. This alone took me 3-4 hours!

Adding in the purple eye shadow and black portions of the eyes. I used a fine brush/toothpick/needle to help me apply the icing. Very fiddly work!

Adding in fine details like white glint in the eye, peach coloured lustre dust blusher, snowflakes in the hair and brushed some white icing on the clothes.


All packed together with Olaf!

It took me almost a whole week to work on these two characters (20 cookies in total) from making the templates to packing the completed cookies. You definitely need lots of patience for these!

With love and patience,
Phay Shing

Read More »

Wednesday, 15 April 2015

Olaf Brown Sugar Cookies

I have a request for some Olaf cookies. Here they are :).


It was quite a challenge to take photos of Olaf as he has quite a huge contrast. I finally figured out that a black background works best to show up the features just when I was about to pack them :p.

As usual, I used my favorite brown sugar cookie recipe and same royal icing recipe.
The cookie dough is rolled to 5-6mm thick, chilled and cut into Olaf shape.

Homemade plastic template at work here! Check out this post for detailed steps on how to create and use one.

Bake for 15-18 minutes at 160-170°C or until browned. I tend to overbake a little as the cookie will soften a bit after icing. Baking time may vary depending on the size of your cookie template/ cutter.

Trace/ draw Olaf onto cookies with edible marker.


Start icing! It's my first time testing out some painting techniques so I made an extra Olaf head. Use the outline-and-flood icing technique to gradually add on parts of Olaf. You may use oven drying at 60°C fan mode to speed up the drying, especially for large sections of the body. Be careful not to dry for too long or the oil from the cookie will leach into the icing, making it look patchy.

Almost done!

I painted on some light brown highlights for Olaf's twigs, some blue and grey shadows around the eyes, and some grey shadows at selected portions of the head, body and buttons to create a more 3D and realistic effect. The light brown highlights was made from royal icing. The shadows were made from some gel food colouring dissolved in *ahem* Chinese rose wine. I didn't have vodka so I used the next closest thing I have at home :p.

Painting on the "eye shadow"

Putting on the "eyeliner"

Finally, add on the carrot nose with medium stiff icing. Just add icing sugar to the flooding icing until the peaks can somewhat hold the shape. Add on shadows for the nose if you wish.


A closer look at Olaf!


The highlights and shadows are meant to be understated so you don't really notice them if you are not looking out for them. But adding details like these makes Olaf more life-like.

I couldn't resist a retro shot!


All packed!

You may be wondering how come someone ordered so few cookies? Keep a lookout for my other Frozen-themed cookies. Elsa!

With love,
Phay Shing


Read More »

Sunday, 12 April 2015

3D Big Princess Peppa Chiffon Cake


Hee I always post my Peppa pig cakes first because I think Peppa is so cute (I’m a big Peppa fan)!! This is a Princess Peppa version of my previous 3D Big Peppa Pig Strawberry Chiffon Cake sitting on a 12-inch cake board. I added a yellow crown, star wand and wings (can’t be seen here) from chiffon cake! Thankful the cake was well-received and can tell the birthday girl is dearly loved!

Happy birthday Ashley!

Lots of love,
Susanne

Read More »

Saturday, 11 April 2015

Angry Bird and Ladybug Macarons

I had some leftover macaron batter after making Elmo macarons. Here's what I did with the leftovers :)

Red Angry Bird and ladybug!

I made a template as shown below...


I portioned out a bit of the red batter (about 2 tbs) and added charcoal powder (1/3 tsp) to create the black batter. A 5-6 mm tip was used for piping the rounds and a 3mm tip was used to pipe the finer features. Angry bird's tail was painted on using a toothpick as it's too fine to be piped.

Before and after baking the shells.

Pairing up freshly baked shells


Freshly iced with royal icing along with extra Elmos!

Filling with chocolate ganache and strawberry swiss meringue buttercream!

A friend's kids and my kids got to enjoy these extra macarons!

With love,
Phay Shing


Read More »

Wednesday, 8 April 2015

Minnie Mouse 2-Tier Strawberry-Vanilla Chiffon Cake


This is a sweet 2-tier Minnie Mouse Chiffon Cake that is strawberry-vanilla flavoured for baby Rainie’s full month celebration! It’s somewhat a big sister version of my previous Minnie Mouse Strawberry Chiffon Cake. Here, I added a vanilla chiffon cake tier on top decorated with pink polka dots. I also felt more confident to tie a bow using chiffon cake for her hair compared to last time. I'm a little late in blogging this cake to wish the baby full month :p. Hope she is growing well! Thankful cake was well-received.

Made with lots of love,
Susanne

Read More »

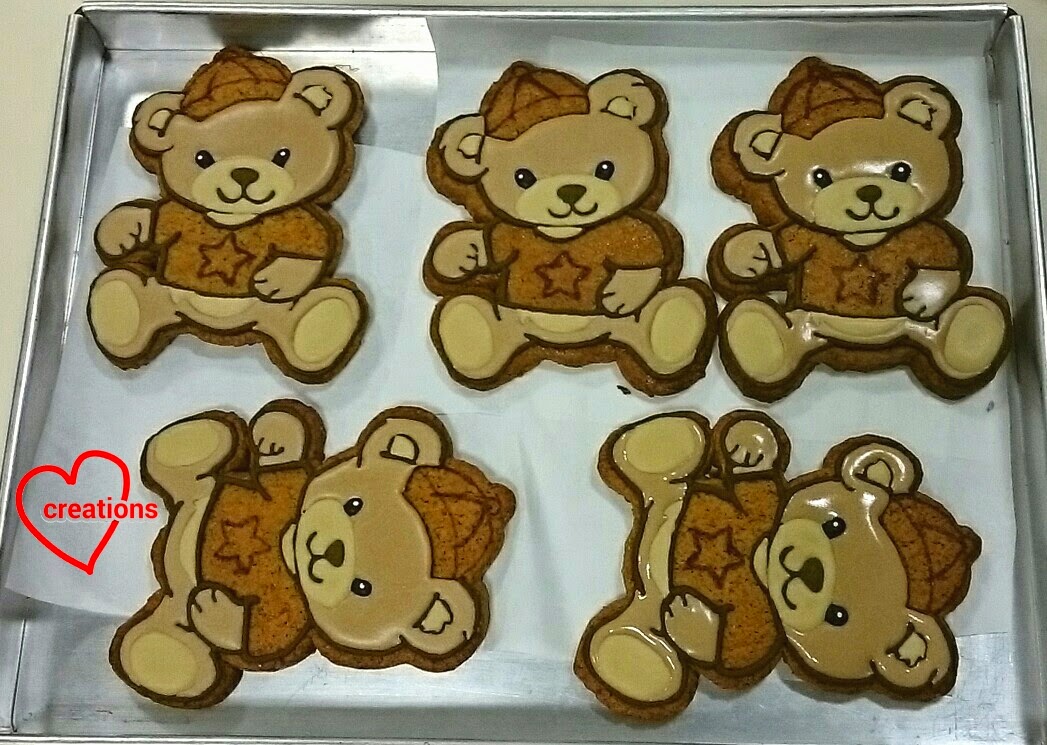
Teddy Bear Brown Sugar Cookies (how to make complex-designed cookies with homemade template)

Someone sent me a picture of a cute bear and requested for cookies to be made with that bear on it. So here they are :)

Only 4 here but I actually made 20!

Here's the original picture of the bear...


The purpose of this post is to show you how to make and ice cookies with complex designs, without the help of specialized cookie cutters or a Kopykake projector, but with the help of a cheap homemade template. If you have superb artistic skills, you may ice by freehand. But I am not that good :p. So I need a template.

First, find a line drawing of the image if possible on the internet for character cookies. If it's not possible to find one, then just work with the best image you can find. Resize the image until it is about 9-10cm and print it out. Trace the outline and some details of the image on clear plastic files that you can find from bookshops like Popular. Use a sharp craft knife to cut out the template.

Don't throw away the outer plastic sheet with the bear outline! You will need it.

Choose important details to cut out from the template.


Wash the templates thoroughly and dry them.

I used my good ol' brown sugar cookie recipe to make this. For a batch of 20 large cookies, I needed to use a little under 2.5 times of this recipe.

Use the inner template to trace the outline of the bear with a small knife onto the cookie dough. Roll the dough to a thickness of 5-6mm.


Chill the tray of cookie dough for 15 minutes before baking at 160-170°C for 15-18 minutes or until browned. Let the cookies cool completely before working on them. Preferably let them rest for a day before icing.

Use the outer template to trace the outline of the bear with edible marker. The reason why we don't use the inner template to trace the outline is because we don't want the marker to be visible on the cookie, but completely covered by icing. Use the inner template to trace whatever details you wish. Fill in the rest of the details using the traced parts as a guide. Your drawing doesn't have to be perfect. It's OK to make mistakes as it will be covered by icing.


Prepare the royal icing. You may refer to this recipe and scale accordingly for about 350g worth of icing sugar. I used charcoal for black and some cocoa powder for brown to reduce the use of artificial colouring.

Begin by icing the outline of the subject. Fill in the details later on.

Day 1 of icing!

Works-in-progress

Almost there!

I was about to call it a day on Day 2 at this point but persevered in finishing it up after the kids have gone to bed.

Finally done!

All done in two days of intensive icing!

Let the icing dry overnight in air con room before packing them. You may speed up the drying process by drying in the oven at 60°C fan mode until dry. Keep an eye on the cookies as the icing may appear patchy if left for too long in the oven.

All packed!

Another look at these bears!

It takes patience to make these as I needed a few days of work for 20 cookies! One day to prepare template, one day to bake the cookies, one-two days to trace/ draw the outline and details, and two days to ice the cookies! I have a family to take care of so quite a bit of the work was done in short sessions. Having said that, it brings me great joy to watch the subject come to life as I iced it, and the appreciative exclamations of the recipient as she received it :).

With love,
Phay Shing


Read More »

Tuesday, 7 April 2015

Robocar Poli Vanilla-Pandan Chiffon Cake


This is my humble attempt at crafting the cartoon character Robocar Poli from chiffon cake. It’s a South Korean cartoon gaining popularity here and Poli is the noble policecar that helps to protect the residents. Ah this was another tedious topper to craft; I took 2 days just for the tiny topper. The base cake is naturally coloured with turmeric-based powder (for sky) and pandan (for grass), and I made some trees from pandan chiffon cake to go along with it. Thankful it was well-received and her son loved it.

With love,
Susanne

Read More »

Saturday, 4 April 2015

Longevity Peach (寿桃) Lychee Chiffon Cupcake 'Peaches'

My friend would like me to bake a longevity peach cake for some elderly members of her family. Although the date is still far away, I have always wondered if I could make the peaches entirely out of chiffon cake. I have been making the peaches using snowskin mooncake instead of fondant for longevity peach cakes that my friends or family request, as fondant is way too sweet for elderly people.  Chiffon cakes are nice and soft so if I could succeed in making longevity peach chiffon cake peaches, it would be great! I am happy that my experiment turned out well! The best part is, these are not difficult to make :). Why didn't I think of them earlier?!


The method of making these peaches is actually similar to the snowskin mooncake version. I use the same mould, same spray painting method and same way of creating the leaves.

I used silicone ice cube tray for the small peaches and heart shaped silicone moulds bought from Daiso for the larger peaches.


Lightly grease these moulds with oil before baking to make it easier to unmould the cakes.

I had a bit of lychee puree left from my Peppa pig, George, Candy Cat and Suzy Sheep cupcake bake so I decided to make lychee flavoured cupcakes for this trial bake.

I made use of natural food colouring to colour the peaches. I love this stuff! Must get more when I visit relatives in Malaysia!


Recipe for lychee chiffon "peaches"
Ingredients:
1 egg yolk
15g caster sugar
42g canola/vegetable oil
48g lychee puree*
60g cake flour
1/4 tsp baking powder
Pinch of salt
1/4 tsp vanilla extract
Green and white (optional) gel food colouring

4 egg whites
40g caster sugar
1/4 tsp cream of tartar

*blend some canned lychee in a bit of syrup from the can. Strain the mixture to remove the woody bits and large lumps.

Steps:
1. Preheat the oven to 160°C. Position oven rack to second lowest position. Prepare some bowls or a tray of water at the base of the oven. This is optional but I like the fact that steam is produced during baking, which softens the cake. Line a 6x6" or 7x7" square tray with baking sheet.

2. Whisk egg yolk and sugar until pale and thick. Gradually add oil and whisk until thick like mayonnaise. Gradually add puree and vanilla extract and whisk until well combined. Gradually whisk in sifted flour, baking powder and salt.

3. Scoop out 3-4 tsp of egg yolk batter and colour it green. I added 1/2 tsp of Queen's natural food colouring and a drop of green gel. I added a few drops of white gel food colouring (optional) to the rest of the batter.

4. Prepare the meringue. Beat egg whites with cream of tartar until soft peaks form. Gradually add sugar and beat until stiff peaks form. Fold the meringue into the egg yolk batters in three additions quickly but gently. Portion about 2.5 tbs of meringue for every tsp of egg yolk batter.

5. Fill the moulds/tray. Tap a few times on the table to release air bubbles. Immediately turn the temperature to 150°C after the oven door is closed. Bake at the following times and temperature:
Layer cake: 150°C for 9-10 minutes
Small hearts: 150°C for 9 minutes, 135°C for 5 minutes
Medium sized hearts: 150°C for 9 minutes, 135°C for 10 minutes.
Large hearts: 150°C for 9 minutes, 135°C for 12-13 minutes.

Do test for doneness with a toothpick as my oven and yours behaves differently.

Immediately remove layer cake from tray and cool with baking sheet over it. Carefully unmould hearts by hand when cooled completely. Gently press the cake down at the edges and away from the sides of the mould.

Shaping and Assembly

Lightly brush the surfaces of the cakes with simple syrup (1:1 ratio of sugar and water). Use a butter knife to mark out the line in the middle of the peach. You don't have to cut the cake for smaller peaches. Just hold the knife in place for several seconds to make the imprint, like my mandarin orange chiffon "oranges". For larger peaches, you may carefully carve out a "valley" after making the imprint to create a more realistic 3D shape of the peach. Use a sharp, small fruit knife that has been dipped in water to carve.


Spray paint the peaches with pink paint. Dissolve pink food colouring (I used a combination of natural coloring and gel as I wanted a more vibrant pink. Natural pink tends to be duller) in some syrup. Dip a toothbrush in the paint, knock off the excess and spray the paint onto the peaches with the pointy side facing you. You should get a nice shade of pink that gradually fades away.


 Cut out leaves using leaf shaped cookie cutter or by freehand with a small knife dipped in water (like what I did). Cut out small rectangular strips and roll them up to form the stem.


Melt some marshmellows with a sprinkling of water to make the glue to stick the leaves and stem onto the peaches. Brush the leaves lightly with a bit of syrup before storing.

You may store the cakes in an airtight container in the fridge for a few days.

I hope this post is helpful for those of you who want to bake longevity peach cakes for your elderly loved ones. Definitely much better for the older folks than fondant! You may replace the lychee flavour with any other colorless/light coloured flavours like lemon, vanilla or light coloured floral teas.

I gave Grandma these cakes to sample and she said they tasted great :). I can imagine making these for her 80th birthday later this year!

Update: please refer to this recipe for a more fragrant lychee cake.

With lots of love,
Phay Shing

Read More »