Thursday, 6 March 2014

Pandan Kaya Chiffon Cake (Cooked Dough Method)

After my not-so-successful first attempt with the cooked dough method, I decided to give it a try again, following a recipe closely to ensure higher chances of success. I realized that it is important to heat the liquid mixture to the right temperature before adding in the flour. Too hot (like my first attempt) and you will get an egg yolk batter which is of a soft dough consistency that is quite hard to incorporate with the meringue. Check out Victoria's comment towards the end of her blog on this.

Here's my version of Pandan Kaya cake made with fresh Pandan leaves and as little food coloring as possible :). Do pardon my experiment with the floral decorations. I will show you how I made the flower designs but you don't have to follow it. Pandan Kaya cake purists would prefer to keep it plain and simple :P.


You begin by making the Pandan juice. I didn't count the exact  number of leaves and amount of water I used because I don't like to stick strictly to recipes unless I have to :P. My elder kid ( I roped in my elder kid to help out and for some bonding time too) and I cut about 15 leaves (+/-5) to small pieces that are about 1cm in size. We blended the leaves with about 80ml of cooled boiled water, and then squeezed out the Pandan juice by putting the blended leaves in paper coffee filters and squeezing as hard as we can with our hands. Here's how much Pandan juice we got!


I love the natural jade green color, which will be used to color the cake naturally. Refrigerate the juice overnight in the fridge to let it settle. There will be a layer of clear water above the dark green water with Pandan leaf bits after letting the juice to settle. Only the dark green layer at the bottom should be used for making the Pandan cake.

I adapted the chiffon cake recipe from here and the fudge layer recipe from here.

Pandan chiffon cake recipe (cooked dough method)
Ingredients:
2 egg yolks
28g coconut milk
16g Pandan juice
20g butter
36g cake flour (sifted)

32g caster sugar
3 egg whites
1/4 tsp cream of tartar

Steps:
1. Preheat the oven to 160 degrees Celsius and line the bottom of a 10 x 10" square tin* with baking sheet.
2. Cook coconut milk, butter and Pandan juice until the butter melts. While the mixture is still warm, add in sifted flour and mix well.
3. Slowly add in beaten egg yolks and mix well. Set aside.
4. Beat egg whites until foamy with an electric mixer. Add in cream of tartar and beat until soft peaks form. Gradually add in sugar until stiff peaks form.
5. Add in one third of the meringue into the cooked dough and fold in well. Fold in the rest of the meringue in two additions until it is well incorporated.
6. Pour the batter into the tin and bang it a few times on the table to release any air bubbles. Bake for 15 minutes. Here's how the cake looks like fresh from the oven. Oh my, this smells really heavenly!


7. Use a knife or spatula to release the cake from the sides of the tin. Cover the cake with a baking sheet and flip it over to cool. Remove the baking sheet that was originally lining the tin and cover the cake with a fresh sheet. I used reusable baking sheet for the first time for this bake. Loving it lots! Love the natural green color too!


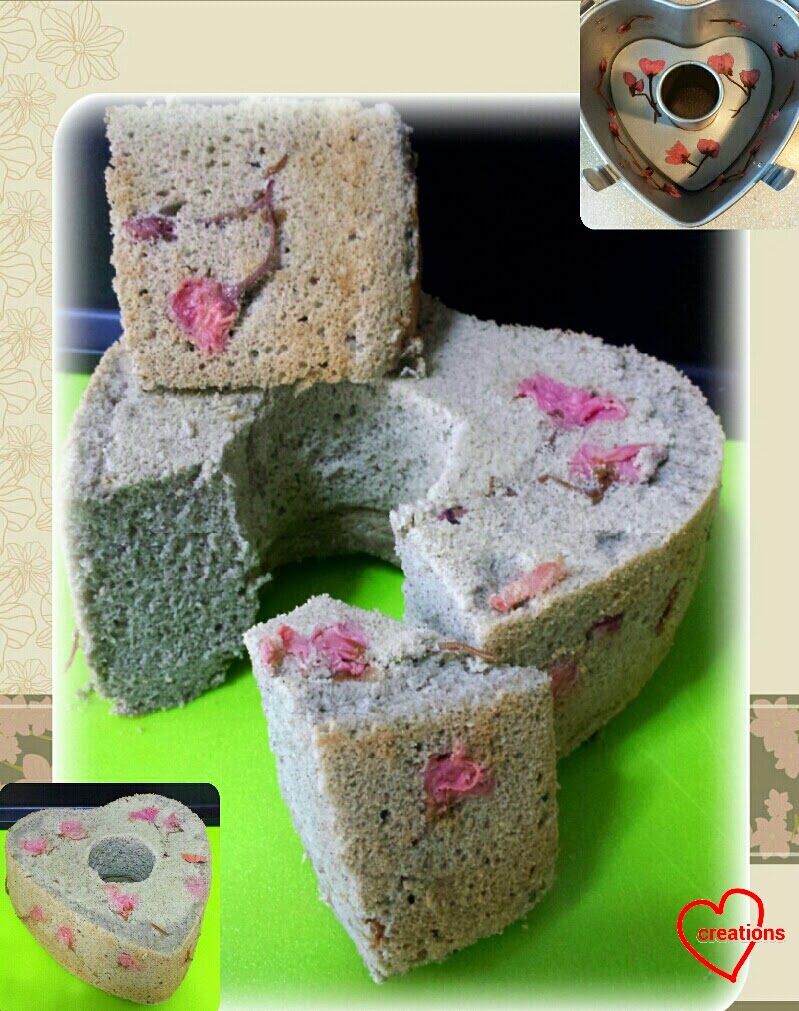
8. Use small cake tins (springform ones will be helpful for releasing the assembled cake later on but not necesssary) to cut out 2 pieces of cake for each shape. One 10 x 10" flat cake can make two 4" round cakes. Testing out my heart shape tin! Set aside the cakes and get ready to make the fudge.


Fudge layer recipe
Ingredients:
(A)
400ml coconut milk
200ml Pandan water (Boil water with a few Pandan leaves that have been cut up to small pieces. For this attempt, I used the leftover Pandan juice from making the cake and top it up with water.)
90g sugar (I used 80g and hubby thinks it's not sweet enough)
1/2 tbs agar powder (I used 1 tsp and fudge turned out a little too soft)

(B)
37g custard powder
200ml water
A few drops of green and yellow liquid food coloring
1/8 tsp salt

1. Mix ingredients (B) together and stir well.
2. Mix ingredients (A) in a pot and use low heat to cook it. Stir until it boils.
3. Stir (B) again as the custard powder may have settled. GRADUALLY pour (B) into (A), keep stirring while you do so and cook until mixture thickens a bit. If you pour (B) at one shot you may get a lumpy fudge.
4. Pour fudge into base of cake tin and cover it with a layer of cake. You may push the cake a little away from the edges and spoon in a bit of fudge such that your cake will have smooth  fudge-covered sides. Repeat layering with more fudge and end off with cake.
5. Refrigerate for 2 hours or until set. Remove cake from springform pan carefully and decorate sides with dessicated coconut (optional).

Fudge flower decoration

If you intend to make designs using fudge, prepare this first before the main portion that is used to cover and layer the cake. Prepare about a quarter of the fudge above and color it with red food coloring instead of green and yellow. Pour into flat-bottomed moulds/ cups/ tins and let it set in the fridge. Use cookie cutters to cut out the flower shapes. A quarter portion is too much for making designs but any less and the portion will be too small to work with.


Line the bottom of the springform pan with some fudge flowers. Take a tablespoonful of green fudge and add in more green and some brown coloring while it is still warm. Use a food brush to paint the leaves and stems at the bottom of the tin. Let it set in the fridge for 5-10 minutes.


Place the tin on some freezer packs and pour the pandan fudge over the floral designs. This is to prevent the warm fudge from melting the designs too much. Keep stirring the fudge in the pot to prevent it from setting too much. Layer with cake and more fudge, following the instructions above. Place the whole assembly in the fridge for 2 hours or until set before attempting to unmould.

I was curious to know if the designs will stay stable after one day. Here's the cake the next day.


As you can see, the color runs a bit due to diffusion. Perhaps that's why Bengawan Solo always decorate their Pandan Kaya cakes with buttercream :P. Otherwise, this idea is pretty awesome if you want to make designs that still look good even when the color runs a bit... like rainbows!

This cake is generally well received with mainly "fudge layer too soft" as the negative comment. Otherwise everyone liked the taste (except for hubby who thinks the fudge is not sweet enough) and the cooked dough pandan chiffon cake is really good! There will be some leftover cake and fudge if you follow my recipe so you may want to do what I did. Just dump the whole lot into a bowl and refrigerate it. Enjoy the cake straight out of the bowl after it has set!

With love,
Phay Shing

*Most people make Pandan Kaya cake by baking a tall cake and then slicing it horizontally into two or three separate pieces. I prefer to bake a big flat one and then use small cake tins to cut out smaller slices for layering.

Read More »

Monday, 3 March 2014

Apple Raspberry Chiffon "Apples"

Ever since I started using small glass bowls to bake chiffon cupcakes, I wanted to bake cupcakes that are apple shaped. It took me quite a few weeks of day dreaming on and off before I came up with this version of apple look-alike cupcakes that are bursting with flavor :).


I took my time to prepare for this bake by making the applesauce from scratch and bottling them up, and soaking, cutting and oven-drying the cinnamon sticks (as apple stems). Here's two bottles worth of applesauce (Yes, I know it looks like Kaya!). One for me and one for Susanne :).

Homemade applesauce ingredients:

4 apples, peeled and cubed (Preferably the tart types like Granny Smith or Rose apples. I used up the super-sweet Gala apples that I have at home and the applesauce turned out sweeter than I like.)
50g caster sugar (more or less according to your taste)
1/2-1 tsp of Cinnamon powder
1/8 tsp Allspice
1 tsp lemon juice (omit if you use really tart apples)

Steps:
1. Use a blender to blend the cubed apples.
2. Cook the apple puree together with the rest of the ingredients over low heat and simmer for about  20 minutes. Cool down to room temperature before using it or storing in the fridge/ freezer.

Soak the cinnamon sticks in hot water for about 15 minutes before attempting to split them longitudinally with a knife. Cut them into thin strips that resemble apple stems. Dry them at about 100 degrees Celsius for half an hour in the oven.

I was curious about the effect of having more wet ingredients and flour in the recipe so I decided to adapt from this recipe:

Ingredients (Makes 6-8 "apples"):
Egg yolk batter
(A)
2 egg yolks
17g caster sugar
30g Canola oil
1/4 tsp cinnamon powder
A pinch of salt
1/2 tsp vanilla essence

(B)
40g applesauce
40g raspberry puree (Press fresh or frozen-thawed raspberries through a sieve and discard the seeds.)

(C) (Sifted together)
68g cake flour
1/2 tsp baking powder

(D)
Red, yellow and brown gel food coloring (Optional)

Meringue
3 egg whites
50g caster sugar
1/4 tsp cream of tartar

Steps:
1. Prepare (A) by whisking together egg yolks and sugar until it turns pale. Add canola oil, cinnamon powder, salt and vanilla essence and whisk until well combined.
2. Divide the above into 2 equal portions and add applesauce into one portion and raspberry puree into the other. Whisk until well combined.
3. Divide the flour mixture (C) into 2 equal portions and gradually add into each batter, whisking until no trace of flour is seen.
4. You may add food coloring to the yellow (applesauce) and red (raspberry) batters for more realistic looking "apples". Add a small drop of yellow coloring into the yellow batter. Add a small drop of yellow and brown into the red batter, followed by some red coloring until a desired shade is reached. Take note that the colors will lighten up when the meringue is added in.
5. Beat the egg whites with an electric mixer until foamy. Add cream of tartar and beat until soft peaks form. Gradually add in sugar and beat until stiff peaks form.
6. Quickly but gently fold the meringue into the egg yolk batters one third at a time. Here's how the batters look like:

7. Pour the batters into small ungreased round-bottomed glass/metal bowls in the following alternating fashion:

8. Top what you see in step 7 with more red batter around the circumference of the bowls and yellow batter in the middle. Fill the bowls until they are slightly more than half full.
9. Create a marble effect that mimics the streaks on the apple surface by using a chopstick. Dip one end of the chopstick into the center of the bowl until it touches the bottom and then draw a line radially outwards following the curvature of the bowl. You can actually see the marbling effect from the outside of the bowl. Rotate the bowl and repeat this until you have completed one round. You may wish to slide the chopstick radially towards the center of the circle instead of outwards sometimes to create a more natural streaky pattern. Clean the chopstick before proceeding with the next bowl.
10. Bake in preheated oven at 160 degrees Celsius for 15 minutes followed by 150 degrees Celsius for another 15 minutes. Immediately invert the bowls if you are able to onto a cooling rack (I used a roasting pan). I had leftover batter and not enough bowls so I poured some into metal jelly molds.

11. Remove the cakes from the bowls after they have cooled completely. Mine actually fell off the bowls while cooling down! I have never worked with such a high proportion of liquids/ oil in the batter before so maybe that was why it happened.
12. Use the blunt end of a chopstick to make an indent in the center of the apple. Insert a cinnamon stick into the indent as the apple stem. You may want to pinch in the bottom of the "apples" if it flares outwards too much. Place the cakes on paper cupcake liners and you are done :).

Here's a peek at the inside of an "apple"...


Rather dense because it is overloaded with stuff but very moist and soft. Not the kind of chiffon texture that I am used to :P. If I ever attempt this again, I think I will stick to the proportion of ingredients that I am used to with maybe a slight increase in proportion of applesauce/ raspberry puree. My elder kid prefers this to regular chiffon texture. My younger one just likes anything sweet :P.

With love,
Phay Shing


Read More »

Sunday, 2 March 2014

Sweet Potato Chiffon "Pumpkins" (Cooked Dough Method)

When I heard rave reviews about the cooked dough method of making chiffon cakes, I was really curious and eager to try. This is one of my unplanned bakes... the type where you just grab anything available at home (I happened to have some frozen sweet potato puree) and start baking on the spur of the moment :P. If I had more preparation time, this post would have been "Pumpkin Chiffon "Pumpkins"" instead of "Sweet Potato Chiffon "Pumpkins"". You may replace the sweet potato puree with pumpkin puree for more authentic "pumpkins". Here's my sweet potato chiffon cupcakes masquerading as mini pumpkins!


You may ask "If this was an unplanned bake, how come you have cinnamon sticks on hand as pumpkin stems??" I have another awesome planned bake that will need cinnamon sticks. Will post that one very soon!

I adapted the recipe from durian chiffon cake made by using the cooked dough method:

Ingredients (Makes 10-12 mini pumpkins, depending on size of molds and eggs used):
(A)
30g Canola oil
30g water
A squeeze of lemon juice
Pinch of salt

(B) (Sift together)
45g cake flour (I used only 40g. On hindsight, 45g may be better)
1/5 tsp baking powder

(C) (Mix together)
2 egg yolks
50g orange sweet potato puree (Steam small cubes of sweet potatoes until soft and mash with a fork. I left some small chunks in the puree.)
Orange gel food coloring (optional)

(D - Meringue)
3 egg whites
50g sugar
1/4 tsp cream of tartar

Steps:
1. Preheat oven to 160 degrees Celsius.
2. Combine (A) and cook over low heat in a small saucepan. When it starts to simmer, take it off the heat and stir in (B)
3. Pour (C) into step 2 and mix until combined. If you would like a deeper orange color, you may add more food coloring. Set aside.
4. Beat egg whites using an electric beater until foamy. Add in cream of tartar and beat until soft peaks form. Gradually add in sugar and beat until stiff peaks form and the bowl can be turned upside down without the batter falling out.
5. Fold the meringue into the egg yolk batter 1/3 at a time. The first addition may need some time to combine it well as the egg yolk batter is of a soft dough consistency. Pour the batter into ungreased metal jelly molds like the ones shown in the picture above until about 2/3-3/4 full.
6. Bake for 15 minutes, then lower the oven temperature to 150 degrees Celsius and bake for another 15 minutes. Remove from oven and invert immediately onto a cooling rack if the tops of the cakes are not above the rim of the molds. If the cakes are too tall, don't invert the molds. The cakes will still be soft but more dense. Cool completely before removing the cakes from the molds by hand.
7. Insert a cinnamon stick at the top of each cake and place the cakes in paper cupcake liners.

Here's a peek at how a pumpkin wannabe looks like inside:


I am still not very good at working with this method as the egg yolk batter is really thick and I wasn't sure if I was combining the yolk batter and meringue correctly. The cake turned out rather dense (maybe because I really used loads of sweet potato) but it is so very very moist and soft! My kids loved the texture of this cake! It is not as springy as chiffon cakes made using the regular method but definitely moist and soft. I need to do more research before jumping in to try some new technique so will definitely give this cooked dough method a try again after I am more prepared :).

With love,
Phay Shing

Read More »

Thursday, 27 February 2014

6 Flavour Rainbow Chiffon Cake


I had very lovely friends coming over to the "West" to visit all the way from "the other planet" of Singapore (lol!). I wanted to design another pretty 6-flavoured chiffon that was as lovely as them! I came up with a cake with all my favourite elements - rainbow, hearts, flowers - with a very sweet, "beachy" feel (or so I dreamed!).

The recipe and method is pretty similar to that of "6 Flavour Rainbow Hearts Chiffon Cake" with a different flavour to each rainbow layer: red (red bean), orange (orange), yellow (lemon), green (matcha), blue (berries - required the most colours), purple (strawberry-beet). The main difference was in the arrangement of the rainbow batter (layering instead of segmentation), and in the patterning designs. I guess I was overly ambitious with the patterning and wanted to make flowers and hearts with 2 colours, hence I made a vanilla layer cake first that was purple and white (below). After cutting out the flowers and hearts from the layer cake, I incorporated them on the top, sides and also in the cake (hidden hearts) (see pic above).


It was the most complicated cake I had attempted thus far, and I almost gave up halfway as it took really long to work the batter into 6 flavours and colours (see pic above), and really time-consuming to layer the colours over the patterns at the sides and in the cake! I was afraid of overworking the batter and didn't feel confident about the cake at all.

Thank God that they said the texture of the cake was very nice, which was really encouraging for me as I felt like I wouldn't want to bake another cake so soon after this! :) In fact, I would have been so encouraged to bake the next day, if not for the fact that my baby arrived that very day! Lol =)

Might be my last bake for a while! :) A very joyful loving bake! 

I entitled the cake "Chiffonique", after the nickname my lovely friends gave my baby the day before she arrived :D!

With love,
Susanne


Read More »

Peanut Butter and Chocolate Macarons

The craze for macarons has been around for some time and for a long time, I was afraid to attempt making them because I have heard of how hard they are to make. I finally mustered some courage to try and after some failures, I came up with something decent for a bride-to-be who is a fan of Reese's peanut butter cups :).

I took the liberty of decorating these peanut butter and chocolate macarons with chocolate flavored royal icing sugar and some heart and flower shaped cupcake toppers. Don't they look sweet :)?

I have tried both Italian and French methods of making macarons. Having no stand mixer as a kitchen tool meant that my dinky handheld mixer was threatening to overheat with the thick Italian meringue. I was left with the French method, which supposedly has higher chances of failure. I went ahead to make macarons with the French method anyway because I didn't want my handheld mixer to die and I prefer to use less sugar (Italian macarons have very high sugar content!).

Making macarons has taught me patience. It is extra challenging to make them in Singapore because the weather here is perennially hot and humid. I have to use a longer drying time and a firmer ganache filling after taking into account the climate here. After a few attempts, I am better at watching the consistency of the batter -- to know when to stop or continue folding, and when the shells are dry enough to be sent into the oven. These two, I think, are the key things newbies have to look out for to ensure a successful attempt at making macarons. Don't be too discouraged if yours don't turn out pretty. They should still be nice to eat!

The French method also has the advantage of letting you work with small batches. So here's the recipe that I used (makes 20 macaron shells):

Ingredients:
Macaron shells
44g almond powder
80g icing sugar
36g room temperature egg white (aged for 3 days*)
10g caster sugar
A pinch of cream of tartar
Orange and yellow gel food coloring, one drop each

 Milk chocolate ganache
40g milk chocolate chips
25g whipping cream

Peanut butter filling
40g white chocolate chips**
25g whipping cream
30g peanut butter

Decorations
Cocoa powder
Royal icing sugar
Water
Heart and flower shaped cupcake toppers

Steps:
1. Bring the aged egg whites to room temperature.
2. Sift almond powder and icing sugar together. Set aside.
3. Using an electric mixer, beat egg whites with cream of tartar until soft peaks form. Gradually add granulated sugar and coloring until stiff peaks form. You should be able to turn the bowl upside down and the meringue should not fall out.
4. Incorporate the dry ingredients in 3-4 additions into the meringue and fold in until you get a smooth moving lava. To test, let some batter fall into the bowl to form a streak and the streak should disappear back into the batter after 30 seconds. The batter should also flow when you tilt the bowl.
5. Spoon the batter into a piping bag fitted with a round tip that is about 5mm in diameter. Pipe round shells of about 3cm in diameter onto a baking sheet. I drew a template on the reverse side of the baking sheet to help.
6. Leave the shells to dry until they don't stick to your finger when you gently use your finger to brush across the surface of the shells. Due to the humid weather here, I had to dry the macarons in an air conditioned room for 2 hours before the shells were really dry to touch. Do not be too quick to send them into the oven! I had a couple of failures because I was too impatient to wait for them to dry completely.
7. Bake at 140-150 degrees Celsius for 15 minutes, or until the shells are dry enough and come off the baking sheet easily. Cool completely before assembling with filling.
8. Prepare the milk chocolate ganache by boiling the whipping cream, while melting the chocolate chips in a double boiler at the same time. Pour the boiling cream into the melted chocolate and stir until combined. Refrigerate for a couple of hours before piping onto the shells.
9. Similarly, prepare the peanut butter filling by first melting the white chocolate chips in a double boiler while boiling the cream. Pour the boiling cream into the melted white chocolate and mix well. Add the peanut butter in and stir well. Refrigerate until you are ready to assemble the shells.
10. Assemble the macarons by spooning some milk chocolate ganache on one shell and peanut butter filling on another shell. Put the 2 shells together. Refrigerate until you are ready to serve. Best eaten after 24-28 hours to let the flavors mature.
11. If you would like to decorate them like I did, prepare some royal icing sugar with cocoa powder mixed in. I used the just-add-water type of royal icing sugar so it was rather convenient for me. My apologies for not taking note of the quantities used as I was experimenting with this technique. I added water to the icing sugar and cocoa powder mixed until the desired piping consistency is reached. I use the icing as "glue" to stick the cupcake toppers onto the macaron shells, and added some floral features.

Much as it is challenging to make macarons (I know some of you experts will find it a breeze to make them :P), there is a certain amount of satisfaction when the bride-to-be said that the macarons were really well made and they tasted good!

With love,
Phay Shing

*You may just want to age it overnight in the refrigerator but I happened to use it after 3 days. Place the egg white in a clean bowl and cover it with a piece of paper kitchen towel.
** I was unable to get hold of peanut butter chips. Those would have been ideal so I just settled with white chocolate chips.
Read More »

Tuesday, 25 February 2014

Lemon Bees Chiffon Cake and Cupcakes

Ever since I started baking chiffon cakes in glass bowls, I dreamed of making cute animals using these bowls. The most common hemispherical shaped ones are ladybugs and bees. Susanne beat me to it to create really cute ladybugs so I am left with the bees. Here's Mama bee with her three baby bees :)


This was a bake that I nearly gave up because Murphy's Law was at work more than once. I originally wanted to make black sesame flavored stripes for the bees but the bake turned out horribly wrong and I threw away that batch. Not wanting to face another failure, I decided to color the lemon batter black to create the stripes. I didn't portion enough yellow batter so Mama bee ended up looking a bit short and I had a mishap unmolding the big chiffon cake. Thank goodness the royal icing wings were big enough to cover up the ugly surface. I am just relieved that the end  product looks somewhat cute :P. I used Susanne's technique of using another cake as separators to create the stripes. So inspired by her awesome rainbow bake that I wanted to try it!

This is the basic recipe for lemon chiffon cake that I used:

Ingredients:
Egg yolk batter
2 egg yolks
15g caster sugar
22g Canola oil
16g lemon juice
16g water
1 tsp lemon zest
37g cake flour
1/2 tsp vanilla essence
(Black and yellow gel food coloring)

Meringue
3 egg whites
35g sugar
1/4 tsp cream of tartar

Steps:
1. Preheat the oven to 160 degrees Celsius and line a 10 x 10" tin with baking sheet.
2. Whisk egg yolk and caster sugar until well combined. Add in oil, followed by lemon juice and zest.
3. Whisk sifted flour into the batter bit by bit until there is no trace of flour.
4. Add black food coloring bit by bit until a desired shade of orange is reached. Take note that the shade will lighten up considerably when the meringue is added in so you may want to make it a darker shade than desired.
5. In a clean metal bowl, beat egg whites and cream of tartar with an electric mixer. When soft peaks are formed, gradually add in sugar and beat until stiff peaks are formed and the bowl can be overturned without the meringue falling out.
6. Add one third of the meringue into the egg yolk batter and mix well. Fold in gently but quickly the rest of meringue in 2 additions until there is no trace of egg whites.
7. Pour the batter into the square tin and bake for 15-16 minutes. Remove from oven and let it cool with a baking sheet covering it.
8. Cut out the stripe patterns for inserting into the chiffon tin and glass bowls. Use a ruler to measure the dimensions required.
9. Prepare the yellow batter in a similar manner as the black batter, except that you have to convert the above recipe to a 4 egg yolks and 5 egg whites portion. I used 3 yolks and 4 whites, and there was not enough yellow batter for the big cake.
10. Carefully pour the yellow batter into the tin and bowls, using a chopstick to release any trapped air bubbles at the boundary of the batter and black cake.
11. Bake for 20 minutes and reduce the temperature to 150 degrees Celsius. Bake the cupcakes for another 8-10 minutes and the big cake for another 25 minutes. Invert the chiffon tin immediately to cool. Remove the cakes by using the hand unmolding technique. Here's my cakes after baking them:


See my unmolding mishap? Bad days do happen :P.
12. Prepare some royal icing sugar and pipe the eyes and wings of the bees on a baking sheet. You may draw the features on the reverse side of the sheet to help you. I used the just-add-water type of royal icing sugar. If you do not have it, you may prepare the royal icing sugar this way. Prepare a small portion of royal icing sugar to color it black. Pipe some of it to form the mouth of the baby bees.
13. Dry the royal icing features THOROUGHLY before attempting to remove them from the baking sheet. I dried them in the oven for over an hour at 80 degrees Celsius, then cooled them for another hour at room temperature. GENTLY peel the baking sheet away from the icing features. Place the features on the bees. You may use a bit of royal icing sugar to glue them on or if you are lazy, some Nutella will do :).
14. If you would like rosy cheeks on the baby bees, prepare some icing sugar colored with pink gel food coloring. Drop a drop or two of water to wet the icing sugar a little and then use a food brush to paint the pink sugar on the bees' cheeks.

Yes, it is a lot of work! I am really glad that my kids loved the cupcake bees and finished them really quickly. It was a whole day's worth of work what with all the mishaps along the way.

A cut-up view of one of the baby bees and a small corner of mummy bee....


This type of cake is perfect for flavor combinations that go well together. Maybe on better days, I might attempt making chocolate and lemon bees...

With love,
Phay Shing


Read More »

Sunday, 23 February 2014

Hello Kitty Baby shower-themed Vanilla/Lemon Chiffon Cake


My daughter and myself (oops..secret revealed!) love hello kitty, so when I saw Sharron's hello kitty cake mould, I couldn't wait to try out a hello kitty cake with 3D patterns. The colour scheme is light blue and pink because I had in mind a hello kitty themed-baby shower for baby "whale" (nickname for baby in my tummy :)). Thanks Sharron for so generously lending me the cake mould!

I combined both the patterning technique, hello kitty moulds and hearts cookie cutters to create a cake with hello kitty and hearts patterns on the top, side and insides of the cake. This cake is by far the most time consuming cake I have done. So do be prepared to allocate at least 3 hours for the preparation of the cake!

Recipe as follows:
Cake batter for patterns, hello kitty silicone cakes and layer cake (for 8 x 8 inch tray)
3 egg yolks
20g sugar
35g vegetable oil
45ml (water + lemon juice and zest)
60g cake flour
Black, red and pink wilton colours

4 egg whites
45g sugar
1/4 tsp cream of tartar

Chiffon cake
3 egg yolks
20g sugar
35g vegetable oil
45ml boiled water
60g cake flour
1 tsp vanilla essence

4 egg whites
45g sugar
1/4 tsp cream of tartar

Method:
Patterns, hello kitty silicone cakes and layer cake (for 8 x 8 inch tray)
1. Preheat oven to 160°C.
2. Beat egg yolks with sugar with whisk till pale yellow before stirring in oil and juice.
3. Add in sieved flour and whisk till no trace of flour found.
4. Scoop out 2 tsp of egg yolk batter into 2 separate bowls each. Add in a tiny dip of red/black colours to each bowl. Add 1/3 tsp of cake flour to each bowl and mix well.
5. Beat the egg whites with cream of tartar till stiff peak, mixing in caster sugar in 2 additions.
6. Scoop over 4 tbsp of meringue into the red and black egg yolk batter. Quickly but gently fold it in till well-combined.
7. Use a wilton 230 tip to pipe in the red hearts and ribbons, and black letters and features in the main cake mould as well as the small hello kitty silicone moulds (see top left pic above).
8. Bake the patterns for 1.5 min at 160°C.
9. Add a tiny dip of pink colouring to the rest of the egg yolk batter. Gently fold in the rest meringue into the egg yolk batter in 3 additions.
10. Pour into the hello kitty small moulds and 8 inch tray. Tap on table top to release bubbles and bake for 14 mins at 160°C.
11. After the layer cake cools, flip over the cake onto a clean baking sheet. Use hearts cookie cutters to cut out the hearts and letters. Pop out the small hello kitty cakes (see picture above).
Chiffon cake
12. Beat egg yolks with sugar with whisk till pale yellow before stirring in oil, water and strawberry paste.
13. Add in sieved flour and whisk till no trace of flour found. Mix in a tiny dip of blue wilton colour.
14. Beat the egg whites with cream of tartar till stiff peak, mixing in caster sugar in 2 additions. Gently fold in the meringue into the egg yolk batter in 3 additions.
15. Gently pour cake batter over the designs. Then arrange the cut-outs on the sides and middle of the tin and gently pipe/pour cake batter over the designs.
16. Bake the cake in preheated 160°C oven for 50 minutes.
17. Invert when cake is removed from oven and unmould when cake is cool.

I love patterning chiffon cakes as they are light and not too sweet. I thought that the combination of vanilla and lemon was pretty refreshing!

With love,
Susanne


Read More »

Saturday, 22 February 2014

Black Sesame Sakura Chiffon Cake


It was love at first sight the moment I set my eyes on dried sakura flowers. When my dear friend Joan went to Japan and generously brought back a small tub of pickled sakura for me, I just couldn't wait to try it! Being rather adventurous, I wanted to go beyond the usual sakura patterns on the base of the tin, and sought to pattern the sakura flowers on the side of the tin as well to create more 3D sakura patterns. I was surprised the dried flowers stuck well to the sides of the tin! I had been wanting to try the famed Okashi black sesame chiffon cake for the longest time and I thought that black sesame and sakura would pair up very well for a Japanese-themed cake.

I will not be blogging about the recipe since it was taken from the book, "Okashi, sweet treats made with love". However, I did make some modifications to the original recipe. Since I was a big fan of 3 egg yolk: 4 egg whites chiffon recipe for its softness, I reduced the number of egg yolks in the original okashi recipe from 5 to 4. I also reduced the amount of sugar in the original recipe by 10g as the black sesame paste I bought was already very sweet.

Care has to be taken to rinse and soak the pickled sakura flowers in hot water for at least 10 mins (repeat at least 2x), as they are originally very salty. It it also very important to pat dry the flowers with kitchen paper towel before arranging them on chiffon tin on the base and at the sides (refer to the photo above).

The pickled sakura flowers were still slightly salty in the cake, but I thought it was an interesting combination with the sweet black sesame chiffon cake. My hubby felt it was an acquired taste lol! But my parents loved it :) The okashi cake indeed has an interesting elastic light texture, perhaps due to the corn flour? 

I will continue to use the pretty sakura flowers in my bakes! Seeing them makes me so happy!

With love,
Susanne

Read More »

Iced Gems

Some like to pop these tiny beauties into their mouths whole, some like to break apart the icing and biscuit, eat the biscuit and then followed by the icing, and some just wanna eat the icing :P. Iced gems! Don't they just bring back fond memories of childhood? As kids we love these and I love the ones that Khong Guan produces. My kids love them too and asked me to make them, and so I did!


I was searching the internet for iced gem recipes and to my surprise, I couldn't find many. I took a quick look at the ingredients and I knew that the biscuits will not end up tasting anything like Khong Guan's as they were all butter based. I ended up settling for one that looked all right and started work.

The recipe is adapted from here for the biscuit dough and here for the icing on the biscuits.


Ingredients:
Dough
200g plain flour
10g corn flour
100g cold butter
90g caster sugar
1 egg
1/2 Tbs golden syrup

Royal icing*
335g royal icing sugar (I used Wilton)
2 Tbs water plus extra as necessary
Gel food coloring

Steps:
1. Place plain flour and corn flour in a large bowl and cut small pieces of cold butter into the flour using a small butter knife. Using only your finger tips and working quickly, rub in the butter and the flour until the whole mixture resembles coarse breadcrumbs.
2. Mix in the sugar using the butter knife until well combined.
3. Mix in the egg and golden syrup using the butter knife until well combined. Do not use your hands as the dough is very sticky. 
4. Place the dough between 2 baking sheets or cling wrap and roll into a sheet that is about 5-7mm thick. Seal the edges of the dough with the baking sheets/ cling wrap before putting it in the fridge for at least 1 hour to let it harden. 
5. Preheat the oven to 180°C.
6. Use a small round cookie cutter (1-2 cm in diameter, or any other shapes that you like) and cut out the dough into the desired shape. Place the dough on a baking tray lined with baking sheet. You may need to use a chopstick to push the dough out from the cutter and if the dough gets too soft and sticky to handle, place it back into the fridge for another 15-20 minutes. Alternatively, if you have freezer packs with flat surfaces, use them as your work surface and place the dough on top of it as you cut out the circles. This will ensure that the dough stays firm for a longer time. Always roll the dough between 2 sheets of baking sheet or cling wrap as you continue to reshape leftover dough and cut out more circles. If you find that the circles of dough have turned very soft, you may want to put the baking tray in the fridge for 10 minutes before putting it in the oven. 
7. Bake at 180°C for 6-8 minutes or until the cookies are golden brown. Cool completely on a cooling rack before adding the icing sugar. Here's a tray of freshly baked cookies! There's another tray's worth of them.


8. Sift the royal icing sugar into a bowl and add 2 Tbs of water. Use a spatula to mix well until it forms a smooth paste. Add water as necessary, 1/4 tsp at a time and mix well until you get a glossy icing that forms stiff peaks. You may use an electric mixer on low speed to make the icing but the icing was too thick for my handheld mixer to handle so I just worked with a spatula and it turned out fine. 
9. Split the icing between the number of colors that you want. Use a toothpick to add a tiny drop of gel food coloring into each bowl of icing. Mix well using a spoon. Add only a tiny bit of coloring at a time to keep the colors a pastel shade.
10. Prepare a piping bag with a closed star nozzle (mine was not a standard sized nozzle but an 8-pointed star with point-point distance of about 8 mm) and spoon the icing into the bag. To pipe the traditional iced gem ruffle, hold the nozzle directly above the biscuit and apply pressure, allowing the icing to spread sideways as you slowly raise the nozzle upwards. To finish the ruffle, remove pressure from the bag and dip the nozzle down a little before pulling sharply upwards. 
11. Leave the icing to set for a few hours or overnight until completely hard and dry. Store the biscuits in an airtight container**.

Icing the tiny biscuits was sure hard work and tiring for my eyes. This is less than halfway done!


There were so many biscuits that I lost count. I must have made more than a hundred of these. I gave away lots of iced gems to a few neighbors (my kids were happy to share) and they all loved it! They said the biscuits were really pretty and yummy too :). These biscuits don't taste like Khong Guan's but they are good enough for me :).

You may still decide to buy iced gems from Khong Guan but there is a certain satisfaction in laboring, and then watching the fruits of your labor when those who received them enjoy with a smile :).

Update: I have finally found the biscuit recipe that is pretty close to what we grew up with! Please refer to the recipe here for the biscuit base.

With love,
Phay Shing

*I was not comfortable with using raw egg whites to make the royal icing so I used store bought royal icing sugar. As this may not be readily available, you may refer to this link for the recipe to make the royal icing using the traditional method or meringue powder if you are not comfortable with using raw egg whites: http://www.joyofbaking.com/printpages/RoyalIcingprint.html 

**My biscuits turned soft, especially the portions in contact with the icing due to moisture absorption from the icing. To rectify this, I placed the biscuits on a baking tray lined with baking sheet and dried them for 30 minutes in the oven preheated to about 110°C. The biscuits became crunchy again and remained so even after a few days :). Temperature and time for drying out the biscuits may vary depending on your oven and humidity when letting the icing set, but generally you should not set the temperature too high to prevent the icing from browning.


Read More »

Friday, 21 February 2014

Black sesame-Red Bean Ladybird Chiffon Cupcakes


Don't you just love these cute creatures? I wanted to make cute chiffon ladybugs that would bring a smile to anyone's face and be so light and yummy to eat! Not being a fan of artificial colouring, I paired up black sesame chiffon with azuki chiffon to pattern these cute bugs. It was also a good chance to try out my new silicone mini round moulds for making small chiffon cakes!

I made a picture tutorial for it for a friend and will share it here :)


Ingredients (makes 16 ladybirds)
3 egg yolks
20g sugar
35g vegetable oil
45ml boiled water
60g cake flour
10 g black sesame paste
15 g azuki bean paste
Tiny tiny dip of wilton red

4 egg whites
45g sugar
1/4 tsp cream of tartar

Method:
1. Preheat oven to 160°C.
2. Beat egg yolks with sugar with whisk till pale yellow/white before stirring in oil and water.
3. Add in 60 g sieved cake flour and whisk till no trace of flour found.
4. Scoop out 8 tsp of egg yolk batter and add 10 g black sesame paste. Mix well.
5. Meringue: Beat 4 egg whites with 1/4 tsp cream of tartar till stiff peaks form, adding the sugar in 2 additions.
6. Scoop over 16 tbsp of meringue. Quickly but gently fold it in till well-combined. Use a wilton 5 tip to pipe in the black lines and dots for the ladybird.
7. Bake the patterns for 1.5 min. *For good transfer of patterns, patterned batter onto tin must be thick.
8. To the rest of the remaining egg yolk batter, add in 15 g azuki bean paste and a tiny dip of red wilton color. Mix well. Fold the rest of the meringue gently in 2 additions.
9. Use a wilton 230 tip to gently pipe the red batter gently over the black patterns over half of the body. Then use a spoon to fill up the black portion of the ladybird with black batter.
10. Bake the cake in preheated 160°C oven for 25 minutes.
11. Pop the ladybirds out when the cake is cool.
12. Stick on the ladybirds’ eyes using kaya.

It was quite a lot of work to make these small ladybugs! But when I set my eyes upon them, I couldn't help but smile! Tastewise, I thought the pairing was lovely!

Hope they bring a smile to you and your loved ones too!

With love,
Susanne


Read More »

Matcha Azuki Sakura Patterned Chiffon Cake with Hidden Hearts

I got all excited after seeing Susanne's Valentine's Day Hearts-in-all-directions Strawberry Chiffon Cake and wanted to make a cake like that too! Thanks to Ssb Baker for showing us how to bake cakes with hidden hearts, we were both inspired to try. I decided to combine two techniques, piping patterns on chiffon tin and using cookie cutter cut-outs of a separate cake, to create a Sakura patterned cake... with hidden hearts of course!

I used the same recipe as my previous Matcha Azuki layered chiffon cake with the same quantity of ingredients. Here's how this cake is done:

1. Bake the red bean cake in a 10 x 10" tin and cut out the hearts and flowers using cookie cutters.
2. Prepare the egg yolk batter for Matcha flavor. 
3. Take 1 tsp of the green tea batter and mix in 1/4 tsp of Matcha powder and 1/4 tsp of cake flour. Add in some brown and green gel food coloring until a desired dark green shade is reached.
4. Prepare the meringue for the Matcha batter. Add 3-4 tbs of meringue into the small portion of colored green tea batter. Put the batter into a piping bag fitted with a Wilton No.3 round tip.
5. Lay out the red bean flowers at the base of the 17 cm chiffon tin. Pipe the leaves and stems onto the base and sides of the tin. You may use edible food marker to draw out the designs before piping. Bake for 1.5 minutes at 160 degrees Celsius.
6. Fold in the meringue for the rest of the green tea batter.
7. Pour in enough green tea batter until it covers the base, taking care to release any air bubbles by gently swirling a chopstick in the batter. Line the sides of the tin with more red bean flowers and the insides with red bean hearts arranged in a ring around the center tube. Make sure you line the hearts upside down! Cover the red bean cakes with the remaining green tea batter. Air pockets may be introduced so do release any air bubbles trapped inside.
8. Bake at 160 degrees Celsius for 20 minutes, followed by 150 degrees Celsius for another 20-25 minutes.

This cake is not only pretty to look at. It also tastes great with red bean cream :).


With love,
Phay Shing


Read More »

Tuesday, 18 February 2014

Matcha Azuki Layered Chiffon with Azuki Cream

Matcha (green tea) and Azuki (red bean) flavors are a pair that go so well together that I decided to make a cake that is bursting with these two flavors. And to give the cake an extra oomph of flavor and texture, I added red bean cream. So here's my first attempt at making a layered chiffon cake with  cream sandwiched in between the layers.


My neighbors who had this loved the combination very much! I had some leftovers of cake and cream so I made some Swiss rolls. I was pleasantly surprised at how soft and bendy the cakes were. No cracks when rolled cold! I was fully expecting the cakes to crack after sitting out in the open for a couple of hours. Please excuse the messy green tea roll as I did not roll the cakes with care, thinking that they were going to crack anyway.


 My family enjoyed the rolls very much too! Moist and full of flavor.... Mmm-mmm! Here's the recipe for the cake:


Matcha chiffon:
Egg yolk batter
2egg yolks
28g cake flour
4g Matcha powder (try to go for good ones)
8g caster sugar
28g water
24g canola oil
1/4 tsp vanilla essence

Meringue
3 egg whites
36g caster sugar
1/8 tsp cream of tartar

Azuki bean chiffon:
Egg yolk batter
2 egg yolks
10g sugar
20g canola oil
30g Azuki bean puree (I pressed the undrained canned beans through a sieve)
5g water
33g cake flour
1/4 tsp vanilla essence
Red food coloring (I used 2-3 drops of liquid coloring)

Meringue
3 egg whites
32g sugar
1/8 tsp cream of tartar

Red bean cream:
200ml whipping cream
2 tbs icing sugar
5 tbs drained canned azuki beans

Steps:
1. Preheat oven to 160 degrees C. Line a 10x10" tin with baking sheet
2. Prepare egg yolk batter by first whisking sugar and egg yolk together, followed by oil, water (and puree for Azuki flavor) and vanilla essence.
3. Add in sifted flour bit by bit (Matcha powder as well for the Matcha flavor). Continue whisking until no trace of flour is seen.
4. Add red coloring until desired shade for Azuki batter.
5. Prepare meringue by beating egg whites with cream of tartar until soft peaks are formed. Gradually add sugar until stiff peaks are formed.
6. Add 1/3 of meringue into egg yolk batter and mix well. Gently but quickly fold in rest of meringue in 2 batches.
7. Pour batter into tin. Bang the tin on table to release air bubbles
8. Bake for 15-16min. Leave to cool completely with a baking sheet over the cake
9. Cut and assemble the cake layers and add the cream.


10. When the cake is baking/ cooling, you can prepare the cream by whipping cold whipping cream with icing sugar until firm peaks form. be careful not to over-beat the cream or it will separate. Gradually add in the Azuki beans and fold them in.
11. You may wish to dust some icing sugar on top of the cake with a stencil to make some pretty patterns on it.

Like Swiss rolls, these cakes have to be refrigerated and best served the next day.

Enjoy!

With love,
Phay Shing


Read More »